|
Creating a website used to be a massive project. Expensive, too. Businesses needed to work with an online marketing agency that would charge them tens of thousands of dollars to build the site. If you wanted a professional-looking site, that was your only option. Things have gotten a lot cheaper and easier. The most popular option— which only costs a few bucks a month to start— is creating a website with WordPress. There’s a number of approaches you can take to creating a website, but more on that later. Let’s dive right in. A Step-by-step Guide to Creating a Website With WordPressI’ve broken down the 9 simple steps to create your website from scratch. They are:
You’ll easily be able to run through these steps over the next 120 minutes. Step 1: Pick a name and find a domain for your websiteTime for a tough truth: A lot of the good domain names have been taken. Here’s how a naming session might go for you:
Websites have also become so embedded in our day-to-day lives that it’s better to change the name of the business to match an available domain than it is to pick a poor quality domain. Through this process, I almost always end up with a completely different name than I originally intended. This is why I consider the “naming my business” and “buying the domain” steps for creating a business to be the same step. I try to only lock myself into a name once I have the domain. We put together an in-depth guide on buying domains here. The good news is that the rest of these steps are a breeze once you have your domain purchased. It’s the first and hardest step to create your website. Step 2: Register your domain nameFirst you need to know the difference between a domain registrar and a web host. A domain registrar is a company that specializes in buying and registering domains. A web host, on the other hand, specializes in running servers that host websites. This is where your website “lives.” Every web host will desperately try to get you to also register a domain through them. After all, it’s more money for them. They’ve spent most of their resources building out a hosting service, then they offer domain registration as a convenience, increase the price a bit, and collect a nice chunk of extra profit from you. My philosophy is to buy things from businesses that specialize in that exact thing. Prices will be better and so will quality. That’s why I also use a domain registrar for buying domains and a web host for hosting. I never mix up the two. The best domain registrar is Domain.com. That’s where I have all of my domain names. We put together a detailed review of domain registrars here. Step 3: Decide what kind of site you are creatingMost guides on creating a website will push you into using WordPress. It’s the most popular and flexible website builder. And that’s usually a good recommendation. But there are a few situations where I recommend different options. Simple Portfolio or “Business Card” Sites Many businesses need a simple website that tells people a few things:
You need to communicate basic info—and that’s all. If this is what you need, Wix is your best option for creating your website. It’s incredibly simple to use and will give you a professional site at a very low price. It’s perfect for small businesses. They’ve created the simplest and easiest website builder out there. Truly, it’s a joy to use, and makes the most sense when you just need a clean, professional-looking site that gives some basic info on your business. It’s perfect for small businesses, freelancers, and artists. Ecommerce Sites If you’re planning on building an ecommerce store for your site, don’t use WordPress. We have an entire post here on when to use WordPress for ecommerce and when not to. The short story: it rarely makes sense to use WordPress for ecommerce. You can if you really want to but it’s not really the most optimal way to do so. The best option, by far, is Wix again. There used to be more competition in the ecommerce tool space, but Wix got too far ahead of even Shopify. If you’re going this route, we have a 9-step guide on how to create an ecommerce website. We also have a guide on how to start a store that drives real sales. Both of those guides will get you pointed in the right direction. Blog Sites If you know you want a blog or are planning on doing lots of content, start on WordPress. The majority of this guide is around building a WordPress website. (We also have a detailed guide on starting blogs here.) Most websites are really just blogs. Some of the biggest, and most well-known websites on the Internet are blogs. WordPress powers over 30% of the entire internet. So it’s the only real option for starting a blog these days. What about Joomla or Drupal? Or Typepad? WordPress left all those other platforms in the dust about a decade ago. They’re not even legitimate options at this point. Pick WordPress — there isn’t a single situation where you’ll regret it. When I originally started with this online thing, Drupal sites were still pretty common. I partnered up with an engineer friend of mine and we did a lot of freelance work migrating sites from Drupal to WordPress. Even back then, WordPress was a clear winner. Now when I come across a site on any of these other tools, it’s kind of exciting. It’s like finding an ancient artifact. “This still exists!? How fascinating!” Don’t use any of these other tools, stick to WordPress. Everything Else If you’re not sure or have another vision for your site outside the categories above, use WordPress. It’s one of the most flexible platform out there. It will do ecommerce, it’ll do simple portfolios, it’ll do massive content sites, it’ll do Fortune 500 marketing sites, it’ll do it all. You might have to customize it more than other platforms in some situations but you can make WordPress do whatever you want it to. And just about anyone in online marketing knows their way around WordPress so you’ll be able to find plenty of people to help you when the time comes. Whether you want to build your site by hand or you have an online marketing agency to do it for you, you should still build on top of WordPress. It’ll shortcut programming work and let you edit basic items on your site without having to edit code. I’ve managed marketing sites of venture-backed tech startups that employed dozens of engineers — we still had our marketing site built on top of WordPress. It’s the standard choice. Step 4: Get a host for your websiteNow it’s time to get into the weeds a bit. The next steps really depends on your actual goals. If you want an ecommerce site, skip the rest of this guide and follow our guide on creating an ecommerce site. For everything else, keep following this guide! So WordPress is the tool that you’ll use to build your website. But you also need a web host. That’s the actual server that will store your site and make it available to anyone who visits. Every website on the Internet is on web host. And the best place to go for most people is Bluehost. We have an entire guide here that goes through all the best web hosts. Hosting plans usually start around $5/month. Step 5: Install WordPressBluehost offers a great one-click installation feature for WordPress. The benefit is it’s incredibly simple to integrate the web host with WordPress. It should be clearly available when you log into BlueHost. Step 6: Point your domain to your hostLet’s do a quick recap.
Now you’re going to connect all that stuff together by pointing your domain to your host. Then when people go to your domain, they’ll end up on your website. There are a few technical settings you need to apply. This involves configuring a few nameserver settings on your domain registrar for your domain. Your host will give you the correct settings; you’re looking for their nameserver settings. If you’re confused, just reach out to a customer service rep from the host and they’ll help you out. Once you have the nameserver info from your host, go into your domain registrar and configure those settings for the domain that you want to point at your site. Once you’re done, it’ll look something like this:
Step 7: Install a WordPress themeWordPress is the heart of your website. It keeps your website alive and running. Treat it well and it will treat your business well. WordPress uses themes to determine how your website looks. This makes it really easy to change how your site looks without having to rebuild your site from scratch. Swap out your old theme for a new one and ta-da! Your design will look completely different. These days, I purchase all my themes from StudioPress. Heads up, WP Engine bought StudioPress and now includes all the StudioPress themes in its hosting plans. WP Engine is more expensive but it’s perfect for serious bloggers. It’s a great way to save money on your theme if you are planning on building a large site to begin with. WP Engine is another one of our recommended hosts if you’re looking for the best. The downside is that WP Engine tends to be more expensive than other hosts. It’s probably overkill if you are just starting out, or creating your first website. Back to themes, are there other options? You betcha. ThemeForest and Pixelgrade has a marketplace of WordPress themes. There are literally tens of thousands of themes to pick from. They’re usually in the $30–60 price range. When looking for theme, I rank them by the most popular or the highest rating. Then I pick one I personally like. After you’ve purchased a theme, go to the WordPress Theme settings and upload your theme. The Theme settings are under Appearance in the WordPress sidebar menu. You’ll have to click through “Add new” and “Upload Theme” in order to see this option to upload:
Go ahead and upload the .zip file you received when you purchased your theme. After it’s uploaded, you’ll also have to click “activate” on the theme in WordPress to make it go live. Step 8: Add content to your websiteNow it’s time to create individual pages for your site. You’ll do this within WordPress. WordPress has two types of content: pages and posts. Think of posts as blog posts that are published under a “blog” section of a site. If you’re not planning on having a blog, then you can skip posts entirely. Pages are the more permanent pages on your website. Like your About or Contact Us pages. When you’re first creating your website, you want to get a batch of pages live so your site feels real. Every website has a few standard pages you should create:
This list will get you started. You can always add more later. Step 9: Continue evolving your websiteYou now have a nice looking, fully functioning site. But I’m not going to lie, there’s a lot of extra configuration you can do to your site: you can add WordPress plugins that upgrade your site, build out a blog, add an email list, grow traffic, the list is endless. You don’t have to do any of this extra stuff — it’s all optional. It depends on your priorities and goals. A website is an ever evolving thing. The way it looks after you first create it, won’t be how it looks a couple months later. At least that is the case if you are actively working and growing your website. When you’re ready, these guides will walk you through the extra stuff that’s worth considering:
Our General Take On Building a WebsiteDon’t get confused by all of the different options for creating a website. For a more in-depth look at how we think about this, check out our preliminary guide on how to create a website. WordPress is KingAgain, I highly recommend to build your website with WordPress— especially if you’re making a blog or a business site. Some of the biggest websites on the Internet are built on WordPress. TechCrunch, The New Yorker, Variety and MTV News, just to name a few. There’s a reason for that: They’re the best CMS out there — bar none. It’s an open source platform that allows you to run your website with very little technical expertise. It’s also the most popular blogging platform, so there are hundreds of thousands of smaller websites that use WordPress. WordPress is used by 33.4% of all the websites, and has a content management system market share of 60.3%. Much of our content is centered around WordPress because we use it for all of our websites outside of Ecommerce. Here’s the guide on how to create your website on WordPress. Wix for EcommerceFor Ecommerce, we like Wix — which is an Ecommerce website builder that allows you to get an online store up and running quickly. The reality is that creating and running an online store can be a huge pain. Wix takes that pain away. That’s probably why they are growing so quickly. Here’s the guide on how to create your website on Wix. The Dozens of Other OptionsIf you’re reading this right now, then you most definitely fall into the category of someone that should be using WordPress or Wix. In rare cases, it might make sense to create a website using Squarespace or a similar website builder. In other (very) rare cases, it might make sense to have a custom-built website. More Guides On Creating and Managing a WebsiteBelow, a master list of all our best resources on creating a website. For general information:How to Plan Out Your New Website How to Buy The RIGHT Domain Name – A Detailed Guide How to Develop Your First Brand Identity on a Budget 10 Trending 2019 Website Color Schemes 9 Places To Get Website Images (Paid and Free) The Best Website Fonts That Go Together in 2019 13 Website Design Best Practices 7 Reasons Why You Do NOT Need to Hire a Website Designer The 22 Key Elements of a High Quality Website How Much Copy Should You Write on Your Homepage? 10 Contact Page Techniques That Make People Contact You How To Create an About Page That Matters How to Make a Wix Website in 6 Easy Steps For useful information on optimization as your site gets up and running:5 Easy Steps to Creating a Sitemap For a Website Should You Switch Your Site to HTTPS? Pros and Cons The Top 10 Principles That Boost Your Website Loading Time More about web hosting:You need a web hosting provider in order to have a website. We recommend Bluehost for most people. For advanced WordPress users, with high traffic websites, it could make sense to move to WP Engine at some point. More about The Best Web Hosting Companies here. Here are some additional guides to help you learn more about web hosting: The Best Web Hosting for WordPress The Hidden Costs of Website Hosting More about analytics and reporting:An analytics tool is important if you want to know what’s happening on your website. It tells you how much traffic you’re getting, where it’s coming from, and what people do on your site. Google Analytics is the standard. That’s what we use for Quick Sprout. Read more about why Google Analytics is the best. Installing Google Analytics is easy. Consuming the reports is a bit more complicated. Here are some guides to help: The 2 Website Analytics Tools Pros Actually Use in 2019 Setup Google Analytics in 3 Steps – The Beginner’s Guide 10 Vital Customizations to Make in Google Analytics A Guide to Google Analytics Add-on for Google Sheets How to Track Your Leads with UTM Parameters More about building and optimizing with WordPress:A WordPress website is basically made from what’s called a WordPress Theme and WordPress Plugins. All of the features of your website will come either from the theme or the plugins you install. To help you get started, we reviewed all of the best WordPress Plugins across the most popular categories. Here’s an in-depth review for each category: Best SEO Plugins for WordPress Best WordPress Security Plugin Best WordPress Calendar Plugin Best Google Analytics Plugins for WordPress Best WordPress Directory Plugin Best Membership Plugins for WordPress Best Social Media WordPress Plugin Useful information for ecommerce websites:If the primary purpose of your website is to sell products, you’ll need an ecommerce website. We recommend keeping it simple and going with Wix. Check out our review of the Best Ecommerce Platforms, to get a comparison to the other options out there. Get the step-by-step on how to start an online store. Our guide on how to create an Ecommerce website. More useful guides on building an Ecommerce website: How to Transfer Your Website to Shopify Best Ecommerce WordPress Themes Best Ecommerce Website Builder How to Create a Trust Seal On Checkout Page Tips on starting a blog:When you really break it down — most websites are blogs, and blogs are websites. They have become one and the same. The most popular blogging platform is WordPress, and that is also the same platform we use for any other website, blog or otherwise. If you’re thinking about starting a blog specifically, and that is why you’re trying to figure out how to create a website…we have over 40 guides on blogging. Here are the blogging guides specific to getting started, and building your blog: Best Blogging Platforms / Blog Sites Best WordPress Themes for Blogs 11 Things I Wish I Knew Before I Started My First Blog The Top 12 Tips for Running a Successful Video Blog 10 Lessons Seth Godin Can Teach You About Blogging 100 Lessons Learned from 10 Years of Blogging Creating Your Own Website: In SummaryCreating your website might seem overwhelming at first. It really comes down to starting with these simple steps:
via Quick Sprout https://www.quicksprout.com/how-to-create-a-wordpress-website/
0 Comments
A limited liability company, or LLC, is one of the most simple business entities to set up and offers flexible tax requirements, making them a popular choice for future business owners in Colorado. However, the process of actually delving into the paperwork and legal requirements can be understandably daunting, especially if you’ve never started an LLC before. This is why I’ve done hours of research to find out exactly what you need to do to start your LLC in Colorado, so you don’t have to. Instead, all you have to do is follow these simple steps. The Easy Parts of Starting an LLC in ColoradoAbove all else, choosing a name for your LLC is one of the easiest parts of the process. It can even be fun. Rather than dealing with complicated language and paperwork, coming up with a name for your business gives you the opportunity to get your creative juices flowing. It will also allow you to envision your ideal future for your business and even start formulating your brand identity. There are some simple legal requirements to be aware of before you get too far in the naming process, though. Colorado requires LLCs to include some kind of indication that it is an LLC in its formal name. Luckily, you have a little bit of choice when it comes to this, so you’ll still have room for customization. The state allows “LLC, L.L.C., ltd., limited liability co., ltd. liability company, ltd. liability co., or limited” to be options. In addition, you must choose a name that cannot be confused with any government agency. For example, it is illegal to choose a name that involves “FBI” in any way. In the same vein, certain words must require additional legal paperwork, such as “doctor” or “lawyer.” You can find the list of all of these words here. Understandably, the government would like to make sure that customers are not going to businesses that are falsely advertising such important qualifications. To begin to come up with your name, look around at some of your favorite stores or businesses for inspiration. Take notice of the brands that are particularly enticing or memorable to you, and then start brainstorming! You’ll have some choices for your future business name in no time. The Difficult Parts of Starting an LLC in ColoradoThe most difficult part of starting an LLC in Colorado is the large volume of paperwork and legal documentation you must get through to finalize the process. There are many steps to this, with many different kinds of paperwork you must fill out. You have to apply for your name, get an EIN, and submit your Articles of Organization. This is all to get started, and doesn’t even address the taxes that you will soon have to learn about once your LLC is established. I know this is overwhelming, and a ton of information to learn. Know that you don’t have to understand it all at once, or learn it all in one sitting. The best way to approach it is to just start with one task at a time. Start with some of the smaller tasks, like applying for your LLC name and registering for an EIN. Then, once those are complete, start approaching some of the more in-depth tasks. Once you take the first step, the rest will seem much less daunting. Step 1: Choose a NameAlthough it may seem obvious, a business isn’t a business without a name! In order to apply for an EIN, get a business bank account, and start advertising, you need to have a name that is compliant with those legal requirements I outlined. Brainstorm NamesIf you’re not sure what you want the name of your business to be, get out a whiteboard or a piece of paper and start putting pen to paper. Although it’s easier said than done, try not to overthink it. One of the best ways to start this process is to write as many words as you can think of that relate to your business. Let’s say that you want to start a coffee shop. Some possible words related to your business could be roaster, bean, cup, java, caffeine, cafe, and more. Now that the words are flowing, come up with a few options for your name. Remember to keep it short, simple, and easy to recall. If you’re still having trouble, look online for some business name generators. There are plenty out there to use for free, which could be great sources of inspiration if you get stuck. Name AvailabilityOnce you come up with a few names that you like, make sure to check to see if they are available. In order to prevent confusion, Colorado requires that every business has a unique name. You can check to make sure yours is still free by going to the Business Database Search on the Colorado Secretary of State website and plugging in the names you are considering. 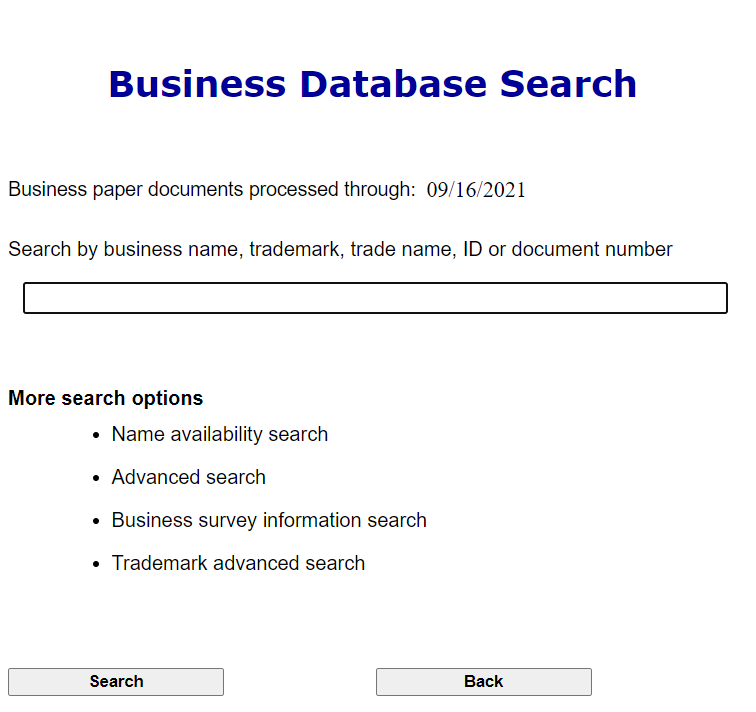
If, on the off chance, that all of your business names have already been taken, consider switching around the order of the words. For example, if you wanted to own a coffee shop called Kate’s Coffee Roasters, consider shifting it to Coffee Roasting by Kate. In the same vein, check to see if there is a domain name available for your business. While this isn’t legally required, I would highly recommend it. In this day and age, having a website is more important than ever. It’s one of the best ways to connect with your audience, build your credibility, and even allow customers to purchase products. To check to see if the name you want is available, the easiest way is to look it up on GoDaddy’s domain name search. It could also be worthwhile to see if your business name is available on various social media platforms, like Instagram, Facebook, Twitter, and Tiktok. Brand continuity is important, so it would be best to have the same name on each of these. If you’re not sure you want to commit to a name just yet, you also have the option of submitting a Statement of Revision to reserve it for up to 120 days. However, this does require a filing fee of $25. Apply for an EINAlthough this won’t be a part of your business’s actual name, an EIN is still vital to your business’s identity. Think of your LLC as a baby. First, you have to give it a name. Next, you need to make sure it has a social security number and a birth certificate. That’s what an EIN does. Your EIN is basically proof to the government that your business exists. It is also required to open a business bank account, apply for a business license, file your tax returns, and even apply for traditional loans. It should be one of the very first things you do as you create your LLC. 
Click here to apply for one in just a few minutes. Step 2: Choose a Registered AgentAll LLCs in Colorado are required to have a registered agent, so you’ll want to start the process of finding one as soon as possible. Understand the requirements of a registered agentThe main duty of a registered agent is to accept any legal mail on behalf of your business. Essentially, your registered agent will be the main point of contact between your business and the Colorado Secretary of State office. It is required that your registered agent is available during normal business hours in the event that Service of Process (SOP) arrives. SOP includes the delivery of all legal documents, such as subpoenas, complaints, and summons. If your registered agent is not available, there could be legal complications. Consider your optionsDue to the legal requirements, there are a few options to consider when it comes to selecting your registered agent. First, you can choose to be your own registered agent. While this is one of the easier options to choose at the beginning, be aware that there are some risks involved with it. For example, if you ever get an SOP and you are not present, such as being on vacation, this would allow a court case to start. It would be the same if a friend, family member, or employee was your registered agent. If you don’t want to worry about this, you can hire a Colorado-based registered agent company to do it for you. This way, someone will always be available through the company to collect any SOPs. However, the one drawback to this option is the cost. Hiring a registered agent company can cost anywhere between $50 and $500 per year. Step 3: File your Articles of OrganizationIt is also required by law to file a document called the Articles of Organization with the Colorado Secretary of State. The exact guidelines can be found online, but we will review a few of the main sections here. Publish your addressesOne of the main pieces that you will need to include are addresses – and you’ll need to specifically clarify what addresses should be used in various scenarios. First, you’ll need to decide what your principal office address will be. This will be the main address for your business. Keep in mind that this information will be published online, so if you choose your home address it will be public.
Obtain Registered Agent ConsentYour Registered Agent must provide you with a few pieces of information for your Articles of Organization. Like I mentioned before, they will need to provide a business address as well as a mailing address. The business address must be located in Colorado. Finally, they must explicitly consent to accept this responsibility for your business within the Articles of Organization. Determine managementPart of this document also includes a description of your LLC’s management system. The Colorado Secretary of State outline for the Articles of Organization gives applicants two options to choose from. First, you can select that your LLC will be run by people who are specifically chosen to be managers. Essentially, this means that not every member of your LLC will be participating in daily management duties, only a select few. They will be the ones who make daily decisions for the business. The other option would be to choose a member-managed LLC. In this type, every member of the business would have managerial duties. All members would participate in the decision-making process. In addition, it says that “Where there is a dispute, the vote of a majority generally rules, while certain extraordinary actions require unanimous consent.” Think hard about how you want the structure of what your business will be. Step 4: Develop your Operating AgreementColorado does not currently require an operating agreement, but there are many benefits to creating one. Essentially, this document will legally outline a business’s rules, regulations, and processes – both financial and otherwise. Formulate your AgreementBefore you start the writing process, you’ll need to think about what you need to include in your agreement. Most operating agreements include the following information.
I would recommend copying these questions into a blank document and filling them all out before beginning the process of creating your first draft and subsequently filing them with the Colorado Secretary of State. Write the Operating AgreementThere are many different templates to use when it comes to writing the operating agreement. However, there is no required formatting, as long as it is legible. In addition, don’t forget to have all of the members of your LLC read and sign the document. Everyone should know what the standards and processes of your business are from the beginning. Step 5: Educate yourself on annual LLC requirementsWhile all the legal requirements to register your business have been covered already, it is still important to think about what is coming for your LLC in the future. Annual ReportLLCs in Colorado must file a report every year. This report will contain any updates involving your business address, mailing address, registered agent’s address, and any filing individuals’ addresses. Essentially, this is required just to ensure that any parties who need to contact you can find your information with ease. The annual report can be filed anytime within a three-month window every year. For example, if you establish your business on January 15, you will have to file your taxes between January 1st and April 1st of the following year. It also costs $10, and you can submit it here. Yearly TaxesIt is essential to keep on your taxes in order to maintain your legality and credibility. There are three main types of taxes you may need to file. The first is the business income tax. If you are operating your business solely in Colorado, then 100% of your income will be taxed. If you are doing business in more than one state, then your taxes must be divided appropriately. 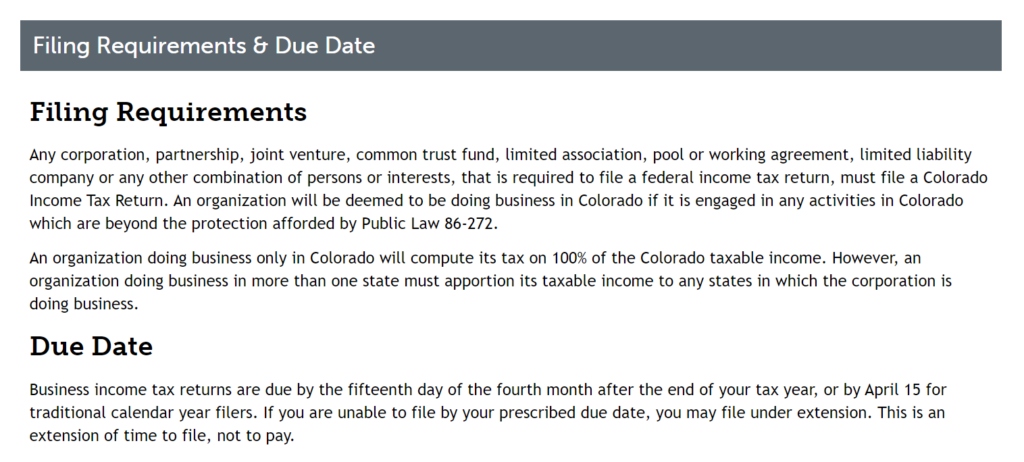
Second, if your LLC has employees, you will have to pay a different kind of taxes. These are called withholding taxes. Essentially, you will take a portion out of your employees’ paychecks and send it straight to the government. Finally, the last is sales taxes. More than likely, you will have customers from Colorado purchasing your products. This means that you will have to collect a sales tax, and then send that money to Colorado either every month, quarter, or year. There are a few other kinds of taxes that are less common, such as excise and fuel taxes and severance taxes. You can learn more about them on the Colorado tax website. via Quick Sprout https://www.quicksprout.com/how-to-start-an-llc-in-colorado/ Want to jump straight to the answer? The best web hosting provider for most people is definitely Hostinger. The hosting provider you choose is paramount to the success of your website. Using first-hand experience as a starting point, I waded through all the dependable hosting options and narrowed it down to the best web hosting providers. Featured Web Hosting Partner
Read in-depth reviews of these below — plus, tips for saving money, the best types of hosting for different situations, and my method for picking the right web host.
The Top 10 Best Web Hosting Providers
#1. Hostinger – Most Affordable Hosting Plans Overall
Hostinger is the best choice if you’re looking to save money. In fact, their lowest plan is $1.39/month. That’s rock bottom.
All of these rates are promotion, so they’ll go up at renewal. But you’re able to lock in these ridiculously low prices on a longer subscription. They offer four years of hosting for $1.39/month if you pay for the four years upfront. That’s an amazing deal. Even after the promotional pricing ends, the pricing is still super low. The single-site plan only costs $2.99/month, one of the lowest rates in the industry. In fact, it’s about the same as Bluehost’s promotional pricing. The best part? Hostinger doesn’t feel like cheap hosting. From the marketing to the UI for managing your site, it’s a premium host with a deep roster of features on every plan. Hostinger also offers a separate plan just for email hosting. That starts at just $0.99/month. The uptime, site speed, and support are all pretty good too. They have a 99.9% uptime guarantee along with 24/7 support whenever you need help. #2. Bluehost – Best Web Host for Beginners
Bluehost is one of the most popular and best choices for web hosting. That’s because they offer great shared web hosting solutions at incredibly affordable prices. They’re also tailor-made for folks who are new to website building. Shared hosting starts $8.99 per month, but there are major discounts if you are a new customer. You can sign up for three years and lock in the price of $2.75 per month. That’s a good deal, especially with everything you get. If you get stuck or have a problem, they have 24/7 support by phone or live chat. They list their support number and live chat options right on their site, so you can reach out for help within two clicks. Bluehost also offers fantastic analytics and SEO tools to help you optimize your site’s performance—while attracting more visitors.
Their SEO tool that scores and tracks how well your website is ranking for specific keywords. This gives you a good idea of how you should optimize your site for the best search rankings.
They also offer hosting that will support whatever direction your business grows. Let’s say you start with a standard shared hosting plan and want to install WordPress. They have an easy 1-click install to make that happen. If your site keeps growing and you want to upgrade to managed WordPress hosting to speed up your site and improve security, they have that too. Or, if you want to get more control by upgrading to VPS or dedicated hosting, they have plans for both. Bluehost covers everything you could possibly need from a host. That’s what makes them the best for beginner website creators. If you start with them, you’ll never need to switch to another service. #3. DreamHost – Most Affordable Month-to-Month Hosting Plan
DreamHost offers stellar month-to-month pricing along with very solid hosting performance. In fact, their month-to-month plans start at $4.95/month. This plan includes 1 website with unlimited traffic, along with a free SSL Certificate—a great deal.
They also offer one-year and three-year contracts start at $2.59/month that allows you to save even more money. Even though it’s not the lowest on this list (check out Hostinger below for the lowest contract hosting plans), it’s still a good deal. Overall, their month-to-month pricing makes them a perfect choice for those who aren’t sure about a longer term commitment for any reason. Along with great prices, DreamHost also stands out for the way they manage their web hosts. They don’t use the standard cPanel that most hosts use. Instead, DreamHost offers a completely custom control panel to manage your website. This is great for developers who want more control over their websites. There is a catch: It makes things much more difficult to migrate off DreamHost. However, migrating to DreamHost is easier than ever though. Their free migration plugin lets you migrate in a few steps. You’ll also be able to scale your hosting as your site grows. If you run a nonprofit, I highly recommend DreamHost. They offer one free Unlimited shared hosting plan for 501(c)(3) organizations. That’s a deal you cannot beat. DreamHost is another one of WordPress’s three recommended hosts, and includes some managed WordPress hosting in its basic shared plans. It also offers a managed plan with more bells and whistles called DreamPress. It does have an industry-leading free trial period — a full 97-day money-back guarantee. Customer service is a little less traditional: email support is available 24/7, but live chat is only on during business hours. If you want technical support over the phone, you have to pay an additional $9.95. However, if you spring for either the DreamPress Plus or Pro managed WordPress plans, phone support is included along with other premium features. Sign up with DreamHost today for the lowest price in hosting without a long-term commitment. #4. Hostgator – Best for Lean/Minimal Needs
HostGator is best for any business that’s looking for simple websites. If you don’t need a boatload of extra features from your web hosting provider, go with HostGator. I’m talking about websites or portfolios where you just need a visitor’s contact info. Or maybe you just need an about page. Or a landing page to collect leads. HostGator offers an extensive list of how-to guides for technical support. If you don’t find the answers you need, you can turn to phone, live chat, and email support. Unlike some hosts, HostGator does include support in all its plans. If you want a hosting plan that’s cheap and includes support, this is the host for you. If you want to get your hands dirty, there is a bit of a learning curve to take advantage of their advanced options. HostGator does offer Windows hosting in addition to Linux, as well as a variety of options to upgrade, including cloud hosting, VPS hosting, managed WordPress, and a dedicated server. Shared hosting plans start at $2.64/month with a three year contract.
If you’re interested in trying HostGator, I recommend taking full advantage of the 45-day money-back guarantee and testing out their support thoroughly before committing. Overall, this is a great web host for simple deployment and uses like a company website that doesn’t necessarily see a ton of traffic each month. However, with VPS options, it’ll allow you to scale if you need. #5. GreenGeeks – Best Eco-Friendly Hosting
GreenGeeks is the eco-friendly alternative to other web hosting providers. What’s that mean? It means they’ve used renewable energy to power their web hosting services. Aside from being good to the planet, their web hosting services are top notch. They offer fast speeds, solid uptime, and great solutions for:
Bottom line: They’re a fantastic option for eco-conscious businesses and websites. Here’s a look at their prices for shared hosting.
Like other hosts, they provide an automatic 1-Click WordPress Installer and auto-updates to keep your WordPress site up to date. They also provide daily backups and advanced security features in order to help you keep your data safe and secure. GreenGeeks also stays up to date with the latest technology like PHP7, SSD, CDN, and more. This helps make sure your website always stays fast and secure. They also offer 24/7 support available by phone, chat, or via their ticket system. They are typically very quick to respond and can assist with a wide range of issues. I’m a big fan of GreenGeeks for their great service and dedication to helping the planet with their environmentally-friendly web hosting plans. If you’re looking for a “green” hosting company, GreenGeeks is just what you need. #6. SiteGround – Best for Making Your WordPress Site Speedy & Secure
Fast loading times are paramount if you want your website to gain traction. Nine out of ten potential page visitors will bail if a site takes five seconds or longer to load. SiteGround is built to deliver top-class speed to its customers, as well as rock-solid security. And particularly for WordPress sites. It starts with the technology their hosting is built upon. SiteGround utilizes Google Cloud to maintain swift and stable connections, and their SSD persistent data storage ensures low latency. Not only that, but SiteGround’s innovative developers rolled out their own, better PHP solution in late 2020—Ultrafast PHP. Through it, SiteGround delivers site speeds that are 30% faster than standard PHP while also reducing time to first byte by half and memory usage by 15%. I’ll save you the trouble of doing the math yourself—SiteGround will make your site so fast that you’ll be counting page loading times in fractions of a second rather than whole ones.
Ultrafast PHP also exemplifies SiteGround’s commitment to proactive security. They update firewall rules on this proprietary PHP weekly. SiteGround isolates accounts on their servers, so even shared hosting customers never have to worry about one compromised account negatively impacting others. Beyond that, they are ever-vigilant in keeping their customers’ sites secure and stable. SiteGround runs server health checks every 0.5 seconds and its AI-driven anti-bot system blocks between 500,000 and 2 million brute force attack attempts every hour. This combination of speed and security can work for most sites. But, as one of WordPress’ recommended web hosts, SiteGround is particularly apt at delivering this performance for WordPress sites. They add an extra level of security there, by constantly scanning for emergent platform vulnerabilities and offering auto updates. Plus, all SiteGround plans—not just their WordPress hosting options—include one-click WordPress installation, the WP Starter site builder, and auto updates for both the WordPress platform and its plugins. Altogether, that’s a lot of value included:
Keep in mind that each plan will renew at a decently higher rate after one year. SiteGround also gives you options at checkout to pay for a 24-month or 36-month term instead. However, SiteGround gives nice discounts on renewals longer than one year. Two-year renewals get a 20% discount on the base renewal rate and three-year renewals get 30% off. So, in terms of long-term value, you’re still getting the best deal by capitalizing on their great intro rate for one year up front. Altogether, SiteGround offers the best technology and services to host your WordPress site and keep it fast and safe for all visitors. #7. A2 Hosting – Fast & Reliable Shared Hosting
A2 Hosting stands out for their great speeds and low prices. At every hosting tier (shared, VPS, dedicated), A2 Hosting beats other hosts on speed. If you’re coming from another shared web host, you’re likely going to see an improvement in loading speed once you migrate to A2. With their Turbo Boost and Turbo Max plans, you’ll get access to their Turbo Servers. They boast that it’s 20x faster than their other servers and includes:
A2 Hosting also has a 99.9% uptime commitment on all plans so you know you’ll have a reliable host that won’t be down often. They offer free site migration with each plan too. If you’ve set your site up on a bad host and want to migrate, this is a fantastic deal. It’ll save your dozens of hours trying to get your site rebuilt. The A2 Hosting team takes care of it for you. Like many of the other web hosts, there are 1-click installs for all the popular CMS tools like WordPress, Magento, and Drupal. Note: Their startup plan includes only one website.
If you plan on hosting multiple websites, you’ll need to get the Drive plan which is an extra $2/month after the promotional period ends. One trick to save money with A2 Hosting: the promotional prices end on renewal. To lock in the 63% discount for as long as possible, go for the tri-annual billing which will bill for three years at once. You’ll get 2 years of hosting for free. #8. InMotion Hosting – Best VPS Hosting
InMotion offers truly excellent technology, a wide assortment of plans, and a legion of longtime customers. InMotion also gives you a massive self-help knowledge base. So if there’s something wrong, there’s probably a guide out there to help you. The customer support is also among the best. Don’t believe it? Try for yourself. InMotion’s 90-day free trial period for shared hosting is one of the longest around and gives you plenty of time to test out InMotion’s support team. InMotion’s plans are really straightforward and almost identical. As you upgrade, you’ll get faster servers and extra databases, websites, and subdomains. It’s a straightforward approach I like, especially for small businesses and websites that aren’t overly complex. No pushy upsells or confusing tiers to worry about. Even the entry-level plans have excellent customer support. It’s 24/7 via 5 communication channels: phone, chat, email, tutorials, and Q&A, which were actively answered. I also appreciate that none of this support is hidden or hard to find. The phone number is broadcast at the top of the page and the chat support login is easy to find in your admin panel. There’s nothing more annoying than 24/7 support that requires you first unearth the contact methods on your own. It’s a waste of time and tells me exactly what I need to know about the host. I also appreciate that the support is available at your level — whether you’re just starting and need someone to walk you through the ultimate basics with a friendly and supportive demeanor, or you want someone who can talk specs and technical nuances like a pro, the InMotion support has you covered. InMotion also has some of the best VPS hosting options. They even have two types of VPS hosting so you can get the exact amount of support or flexibility that you want:
InMotion regularly runs promo pricing, with deals that start as low as $5/month. Normal pricing for shared hosting bumps up to $8–$9/month after the initial contract is up. In addition to shared hosting, InMotion offers upgrades to managed WordPress hosting, VPS hosting, and dedicated servers. #9. WP Engine – Best Managed WordPress Hosting
WP Engine is one of the best (if not the best) WordPress hosts out there. Full stop. They provide a truly excellent product, that’s highly optimized for WordPress websites. If you want all the storage and speed you can get for your WP blog or online store, this is the host for you. It does come at a price though. A fully managed WordPress host is noticeably more expensive than shared hosting providers. WP Engine’s lowest-priced plan is $30/month, and that’s only for one 10GB site with max 25,000 visitors/month.
If you sign up for an annual subscription, you’ll save a good bit of money because they give you three months for free. Yes, the price tag is higher than other hosts, but when you factor in what WP Engine does, it’s an incredibly appealing option for WordPress site owners. As a managed WordPress host, WP Engine only provides service to WordPress users, which means its entire infrastructure can be optimized for WordPress. Your site will be wicked fast, there’s virtually no downtime, and lots of maintenance tasks get taken care of automatically. Bottom line: If you want a blazing fast site where everything is taken care of automatically, you’ll want WP Engine. Customer support is also laser-focused on WordPress, which makes for highly competent knowledgeable support staff available through tracked tickets and on live chat 24/7. You’ll be paying more in order to get a lot more. WP Engine is the ultimate choice for any business running on WordPress. If you don’t want to waste time managing the hosting component of your website, then these are the guys to turn to. #10. Nexcess – Best for scaling and growth
Nexcess is a web hosting solution from Liquid Web — a provider I’ve featured on my lists for best dedicated web hosting, best VPS hosting, and best WordPress hosting. So it’s no real shock that Nexcess makes my list for best web hosts. Where they really shine is managed ecommerce hosting. In fact, they offer ecommerce hosting for:
So if you’re looking to make an online store, they should be a top consideration for you. Their Nexcess Cloud Accelerator—a feature that adds a layer on the cloud stack that increases the speed of your websites loading time. That’s a huge boon because speed is everything when it comes to keeping your customers on your website and browsing. They also offer a massive suite of plans for each of their web hosts. Here are the ones from just WordPress for example:
This makes Nexcess perfect for any growing business looking to scale. No matter where you are with your business, there’s likely a plan for you with Nexcess. On top of that, they have a dedicated support team available 24/7 to help you address any technical issues as they occur. Very important when it comes to web hosting. If you’re running an ecommerce website or if you have a startup that you know will grow quickly, Nexcess should definitely be in consideration. Prices vary depending on which CMS platform you want to use. But their WordPress plans start at $15.84/month. How To Find The Best Host For YouBy following these rules, you’ll be happy with the host that you get and won’t have to switch any time soon. Featured Web Hosting Partner
So how do I evaluate web hosts? What actually matters? Let’s go through all the key items. Site UptimeUptime is the most crucial component of a good web host. If your site isn’t up, you won’t make money or gain an audience. First and foremost, you want a web host with great uptime. This means you’re site is always available and never goes down. To try to avoid the “just trust us” promise of near-perfect uptime, most hosts provide some sort of guarantee of at least 99.9 percent uptime. However, that guarantee isn’t much of a guarantee. It just means your bill can be discounted in the event of any unplanned downtime. There’s a lot of fine print on these guarantees, too, including not accepting self-reported or third-party uptime data, and not providing refunds for downtime that was out of the host’s control (for example, a hurricane). Site SpeedSite speed impacts everything related to your site. Want search rankings? Get a fast site. Want conversions on your site? Make it fast. Want happy users? Speed it up. Every part of your business is impacted by the speed of your site. When looking at different web hosts, make sure you’re choosing a host that can serve every page lickity split. There is some nuance with site speed. In the early days, you need a host that’s fast “enough.” It doesn’t have to be blistering fast, but it needs to be fast. Think of Amazon. Back in the day when Amazon just sold books, their site needed to be fast but it didn’t need to be instantaneous. Now that many people use it for all their shopping, Amazon’s site can’t be fast enough. The bigger you get, the faster you’ll want to be. If you’re planning on building a high-traffic site, you’ll want a host that can maintain crazy-fast speeds on large sites. Customer SupportWhen running your own site, web host customer support is the single most important thing a web host can offer. Digging through use reviews doesn’t always give you a conclusive answer on the quality of support at a particular web host. Watch out for glowing reviews on top publications, they don’t always reflect reality. There is one true test for assessing the customer support quality at any host. The free trial customer support test. Pretty much every web host has some sort of money-back guarantee on their shared hosting plans, which means you can set up your website and see what you think of the service with relatively low stakes — just your time and any add-on fees you opt into, like paying for domain registration. I recommend going to town with customer support during that trial period. Get on live chat, open tickets, hop on the phone as much as possible to see if you like what you’re being served up. Most web hosts offer some sort of free trial period. I recommend using this time to really dig into your host’s customer support — its knowledge center and especially support staff across all channels. That’ll tell you the real story. Traffic VolumeThe amount of traffic that you get has a huge impact on the hosting that you need. For a site that gets 300 visitors every month, pretty much any standard hosting package will be good enough. As long as your web host has strong customer support, you’re good to go. As you get bigger, all sorts of small details start to matter a lot more. Is the PHP on your server being updated regularly? Do you have a CDN for your content? Is your site being backed up daily and can you restore it within 15 minutes if something goes wrong? Do you have an SSL certificate? Can your server handle a giant traffic spike during a marketing promotion? Whenever I have a larger site, I look for premium hosting that takes care of all this for me. And if I’m planning on building a large site, I look for a host that can easily scale to millions of visitors per month. I’m happy to pay a premium price in order to guarantee easy upgrades in the future. Don’t skimp if you’re going big. And if you plan to stay under 50,000 visitors/month, get a standard shared hosting package. There’s no reason to worry about the advanced stuff. PriceWhile you don’t want to overpay on hosting, you definitely don’t want to underpay either. Avoid choosing a host exclusively on price. Most basic web hosting plans are in the $10-$20/month range. Yes, there are cheaper options. Some of them are promotional offers that go away at renewals. Others are hosting plans with terrible support and uptime. My rule is if the price sounds too good to be true, it probably is. I also don’t worry about chasing promotional offers to save a few dollars. For every site I’ve ever managed, I used the same host without ever switching. Once you have a host you’re happy with, changing to save a few bucks isn’t going to be worth it. Promotional offers come and go pretty quickly. Migration FeaturesThe ability to easily and quickly migrate an existing site will save you weeks of time. Even a basic WordPress site can be a real hassle to migrate. First you have to set up a new WordPress install on your new host. Then you need to export the database of content from your old site and import it into your new one. Finally you have to re-configure everything in WordPress like the theme, plugins, and settings. That’s a real pain and that’s why I put together an entire guide on WordPress migration. It is possible to skip all this. Some hosts will offer a 1-click migration for popular site builders like WordPress. If you’re switching hosts and handling the migration yourself, look for an easy migration feature. This is a great way to make the final decision once you’ve narrowed it down to a few final options. Managed HostingHere’s how a normal host works:
Alternatively, there are managed web hosts. These hosts customize the hosting environment and manage a lot more of it for you. WP Engine is the best example, they’re a managed host for WordPress. Instead of getting a cPanel login that lets me do anything I want, WP Engine gives me a login to their custom interface that’s built to manage WordPress sites specifically. When a web host is optimized exclusively for WordPress, three key things happen. First: It gets faster than pretty much any shared hosting provider can dream of. Everything can be tailored to making WordPress work its best, whether that’s optimizing website caching or tinkering with the command line tools. The host only needs to know how to support WordPress, as opposed to, say, Joomla and a Node server and some sort of custom-made site and on and on. Second: Sites get more secure and stable. A managed WordPress host can build a system that predicts, accommodates, and patches all of WordPress’s vulnerabilities. That means fewer malicious attacks and less downtime. Finally, and perhaps most importantly for small businesses: Admin and site maintenance get a lot easier. And that service is vital because managed WordPress hosting is significantly more expensive than shared web hosting services. While I give up some flexibility from not having a basic web server like other hosts, a managed host takes care of a lot of ongoing tasks that I’d normally have to handle myself. If you have a small business site, a normal host is fine. If you’re building a larger site, a managed host will save you a ton of time in the long run and is worth the extra cost. ConclusionOut of hundreds of web hosting companies I have narrowed it down to my top 10 picks for the best web hosts. If you’re inexperienced or know you’ll need a bit more guidance, look no further than Bluehost. SiteGround is a top choice for WordPress sites that need reliable speed and security. Looking to maximize your budget? DreamHost offers the best rates for month-to-month hosting, while Hostinger provides the lowest prices on hosting plans around without skimping on resources or features. If you know you don’t need any extra bells and whistles from your hosting provider, HostGator is the best option for your simple website. For websites where you need to count on fast loading speed, A2 Hosting and Inmotion are great options, particularly for shared hosting and VPS hosting, respectively. Got serious growth on your mind? Nexcess is the hosting provider best suited to scale alongside your site. Bluehost is one of WordPress’ recommend web hosts, but you can also get managed WordPress hosting from the specialists at WP Engine, who also come highly recommended by WordPress. And for any companies or operations that value ethical, eco-friendly hosting, GreenGeeks is the provider whose values match your own. Featured Web Hosting Partner
via Quick Sprout https://www.quicksprout.com/best-web-hosting/ Want to jump straight to the answer? The best free web host is Wix. So you need web hosting, and you’re on a budget. Free web hosting might seem like a good idea…but, there’s a catch: Even the best free web hosting only makes sense for a very narrow scope of websites. If you are going to run a business or build an online presence you want to grow, I recommend paying for hosting. Some of the best web hosting services start for as little as $4/month. For the price, you’ll get increased functionality, more reliability, and better customer support. It’s an investment I think is worth it for just about every site. I also have a guide on the best cheap hosting plans, which is much better than many of the free options.
Compare The Best 6 Free Web Hosts
Educators and nonprofits often qualify for free (or deeply discounted) hosting by some truly excellent providers. Jump here to read more. Let’s review the top six free web hosts. The 6 Best Free Web Hosts#1 – Wix — Best Free Hosting With Easy Website Builder
Wix is one of the best website builders out there. With their builder, they also offer free web hosting. It’s one of our favorites. In fact, we recommend them to any beginner starting out with a blog or ecommerce store. Their highly intuitive UI makes it easy for anyone to create an attractive website to meet their needs. They also come with 24/7 customer support. That’s downright essential when it comes to hosting a website. However, their offerings are limited when it comes to their free plan. Expect half the storage and bandwidth of some of the other offerings on this list. You also won’t get a custom domain and your site will have Wix ads throughout it. Overall, though, it’s a top choice if you’re looking for free hosting. More Wix specsOnline payments not included, Google Analytics not included. Get started with Wix right now. #2 – Awardspace — Best Free Web Hosting With No Ads
Awardspace is well-known for their fantastic free web hosting. For more than a decade, they’ve provided a great hosting service. They stand out for offering a full gig of storage (more than most others). We personally spoke to a rep at Awardspace and they said they also offer up-to-date versions of PHP and MySQL. Awardspace also offers the Zacky drag-and-drop website builder, plus an easy-to-use WordPress and Joomla installer. Note: If your site receives no traffic for 12 months, it will automatically be set to inactive. After two more weeks of notices, it will be deleted. More Awardspace specsPHP 7.2, MySQL 5.7, 30MB database storage, 1 email account, no SSL #3 – Atspace — Best For Unlimited Bandwidth and 24/7 Customer Support
Atspace has nearly identical stats to Awardspace. The difference? Atspace offers unlimited bandwidth (as opposed to Awardspace’s 5GB) and a claim of 24/7/365 support. Digging deeper, though, Atspace lists that support as “limited 24/7/365 support” so take that with a big fat grain of salt. Atspace also uses the Zacky website builder and app installer for apps like WordPress and Joomla. More Atspace specsPHP 7.2, MySQL 5.7, 30MB database storage, 1 email account, no SSL #4 – Freehostia — Best For Fast Site Speed
Freehostia offers free cloud hosting on its Chocolate plan. That means it should be faster than most of the other options on the list. But the Chocolate plan is also very small: only 250MB of disk space and 10MB of database storage. Don’t expect to be hosting a ton of media on your website anytime soon. That said, it does include a free self-signed SSL certificate, a site builder with free templates, and the promise of a response to help tickets in under one hour — pretty much unheard of. If you have a small enough site, the customer service promise alone makes Freehostia a compelling pick. More Freehostia specsPHP 4 / 5 / 7, MySQL 5, 10MB database storage, 3 email accounts, self-signed SSL #5 – Agilityhoster — Best Free Web Hosting Plus Free Email
Agilityhoster’s free tier is similar to what’s offered from Awardspace and Atspace: only 1000MB of storage and one 20MB MySQL database. It also lacks any sort of website builder, which is nice to have but not necessarily a deal breaker. It does have a simple WordPress and Joomla installer to get you up and running quickly though. Good option if you need to get something up ASAP on the cheap. A sales rep confirmed that it runs up-to-date PHP and MySQL. More Agilityhoster specsPHP 7.2, MySQL 5.7, 20MB database storage, 1 email account, no SSL #6 – Byethost — Best For Hosting Unlimited Sites
Byethost is by far the most generous free web host with unlimited sites, storage, and bandwidth; and five email accounts. It also provides an automatic SSL on all domains, and includes a free site builder with templates. But there’s a catch: Byethost is one of the least professional-looking hosts I’ve seen. They also have a poorly written website and enough vagueness that I wonder how unlimited its unlimited offerings actually are. Unless you think you need a lot of database space, I recommend going with a different free host. More Byethost specsPHP 5.4, 5.5, 5.6, 7.0; unlimited database storage; 5 email accounts; self-signed SSL Free Hosting for Ecommerce SitesLet’s make one thing clear: If you’re serious about starting a business online, you need to run your ecommerce with Shopify. It’s the only contender in this space, and the subscription cost is well worth it. Most free sites don’t support ecommerce, and when they do, the experience is pretty limited. Strikingly
I was actually pretty surprised to find Strikingly, a website builder that also offers built-in ecommerce on its free plan. The catch here is pretty big: You’ll be limited to selling one single product, and you’ll be limited to using a Strikingly.com subdomain. So, it’s ecommerce but it’s definitely no place to build an ecommerce business. If that’s what you’re doing, you should head over to our guides How to Create an Ecommerce Website in 9 Easy Steps and How to Start an Online Store That Drives Sales in 2019. You won’t regret it.
Though selling only one product on a subdomain is super limiting, it’s very rare to find a free option that’ll let you sell anything at all. That’s why I included it at all. But, you already know how I feel about subdomains. (They are instant trust breakers for people who aren’t already convinced to buy from you.) Free online stores are a little easier to come by. The difference? Online stores are just the stores, without the bells and whistles of a full-fledged website. That means no blog, no additional content — just products. Square
Square is typically known for their point-of-sell credit card swipers found at every farmers market and craft fair. But they also offer a great ecommerce website builder that gives you hosting for free. As you can imagine it works very well with Square’s POS system. So you can keep your system all centralized and working together.
Ecwid
Ecwid is a really interesting option. While it offers a free online store like Square (Ecwid calls it a “Starter Site”), Ecwid also offers a free online store widget with code you can insert into pretty much any platform your site is on from Wix to WordPress to Tumblr just like you’d insert a YouTube video. That widget also means you sell simultaneously on multiple sites.
The 2 Free Website Builders with Free Hosting
Hands-down the easiest way for most people to get a website up and running is using a website builder, where you can drag-and-drop content blocks and tinker around with customizable templates. Most website builders are only free if you use a subdomain (for example, our URL on a Wix subdomain would look like: quicksprout.wix.com), which is a dealbreaker for anyone who wants to run a professional-looking site. I don’t like it one bit.
I have great news, though. There are two builders that host websites for free and connect to a custom domain. They are super simple and have limited functionality — but since super simple, limited websites are the only ones I recommend hosting for free, that’s not really a problem. The two that meet these criteria are Ucraft and Google Sites. If all you need is a super simple page — AKA the only kind of site that should run on a free host anyway — I recommend you try a free website builder that hosts custom domains, like Ucraft or Google Sites. Design limitations are probably the biggest downside to using a free website builder. If the templates available on Ucraft and Google Sites aren’t what you’ve envisioned for your site, the next easiest free option is to find a free template you like and pair it with a free web host. I may be beating a dead horse, but the best web hosting services aren’t that expensive. We’re talking around $4/month for the initial contract. I think the price more than pays for itself in customer service, security, and speed. Ucraft Review
Ucraft has a free plan for a single-page website that’s built with what it calls “elements.” An element is any individual piece of content: a title, a text block, a video, an image, an image gallery, a button. Ucraft’s free tier supports up to 50 basic elements, so that single-page website can hold a decent amount of content — just nothing too snazzy.
Google Sites Review
Google Sites is your other option for a super simple free site. And when I say “super simple,” I mean it. There are only six versions of the same template to choose from, and a limited number of layouts to work in. It’s super basic. In fact, lots of Google Sites are used for basic things like internal wikis.
Google Sites offers one basic template in six simple themes. That said, Google Sites hosts as many pages as you want at no cost. It connects to your custom domain. It integrates with every other Google service, like Docs, Forms, and Slides. And it’s absurdly simple to use, especially if you’re used to working in Google products. If you already have a Google account, or are paying for GSuite for email hosting (which I wholeheartedly recommend), it’s a no-brainer. Free Web Hosting Alternatives for Subdomain SitesIf you’re okay with a subdomain (as opposed to a custom domain) your options for free hosting increase. That’s because lots of great website builders offer freemium versions of their platforms when you use a subdomain — for example, our URL would be quicksprout.wordpress.com or quicksprout.wix.com. Obviously, a subdomain lacks the professionalism of a custom domain, and free versions of any website builder product or platform tend to be pretty stripped down. But if you’re interested in launching content quickly, subdomains offer a really low barrier of entry. Most can launch in just a few minutes. Even better, if you envision a more robust web presence in the future, starting for free on the platform you ultimately want to use means you’ll have everything already built. You’ll just need to upgrade. At the free level, these 3 are pretty comparable. They’ve all got an assortment of free templates or themes, an easy-to-use editor, limited storage, and ads for their service floating near the footer or in a bottom corner of the site. If you may eventually upgrade to a paid plan, check out our review of website builders. I go into a lot more detail than I do here. Weebly
The free version of Weebly includes ads and a Weebly subdomain. You’ll be limited to 500MB of storage, but will have the full drag-and-drop builder plus templates. You can always start with the free version and upgrade later, though Weebly’s ads are pretty obvious. Wix
Wix’s free plan is a lot like Weebly’s — you’ll get 500MB of storage and a drag-and-drop builder with templates. But you’ll subsidize your free plan with ads and one of the most eggregious subdomains out there, username.wixsite.com/siteaddress. You have the option to start for free and upgrade at a later time. WordPress.com
I love WordPress, but typically recommend people go with WordPress.org, the self-hosted version. The fully hosted version does have a free subdomain plan with free themes, but you’ll be using a subdomain and displaying WordPress ads. To get rid of those elements, it’ll be $4 a month, or about the price of some of the best web hosts. I think it’s better to go the self-hosted route at that point. Best Free Web Hosting for Nonprofits and EducatorsThere are excellent — and extremely robust — free hosting options available for nonprofits and educators. These typically aren’t stripped-down versions, but full-blown shared hosting plans that are available for free, including custom domains, full technical functionality, and attentive customer support. For nonprofits, I recommend DreamHost.DreamHost offers one free Unlimited shared hosting plan (which includes email hosting) for 501(c)(3) organizations, plus a 35% discount on its suped-up DreamPress managed WordPress hosting. Both are killer deals. DreamHost is a really big name in web hosting. It’s one of our top picks for best web hosts for small businesses and is one of three recommended hosts by WordPress itself. Most of the other free web hosts for nonprofits don’t have nearly as strong of reputations, nor offer as robust free plans. This plan has unlimited bandwidth, unlimited storage, and you can host an unlimited number of sites. Read more about the company in my Dreamhost web hosting review. Best Free Web Hosting for EducatorsSome of our favorite web hosts provide free or deeply discounted services for teachers and university administrators. SiteGround Hosting for Educators
SiteGround, one of our picks for best web host, has some of the most robust shared hosting technology available — and arguably the best reputation in an industry of hundreds. SiteGround offers all the features and functionality of its StartUp Plan (including 24/7 support on chat, phone and ticket) to teachers for free with a SiteGround subdomain. SiteGround also discounts its hosting for students. Learn more about SiteGround plans and features in my SiteGround hosting review. InMotion Hosting for Educators
InMotion Hosting, our pick for best web host for beginners and another standout in the world of shared hosting, gives its mid-tier Power plan to educators for free. Check out my InMotion hosting review for more info on the hosting company. Weebly for Educators
Weebly has a eductor-focused arm of its website builder business. It works just like Weebly for any small business or personal website, but is geared for educators. The edu-version of Weebly gives the option of publishing content to a custom domain, not a Weebly subdomain. It also skips all Weebly advertising. If you like the sound of Weebly and a website builder, check out WordPress’s version, Edublogs. Similarly, it offers an ad-free environment with class and student management functionality, edu-focused plugins, and an Edublog subdomain. The Cons of Free HostingI’m not going to dance around the fact that there are plenty of downsides to free web hosting. To make my recommendations for the best free host, which is definitely a title that’s relative to the niche, I took the following six criteria into consideration. AdsSome free web hosts stay afloat by selling ad space. We wanted to avoid those providers — no one wants random ads appearing in the middle of their content — and opted for hosts that support their free tier from sales of their paid hosting plans. Email hostingMy recommendations offer at least one custom email address and free email hosting since that is one of the glaring things lacking from a free website builder. (Ucraft doesn’t offer email hosting at all and Google Sites only offers a custom email address if you pay $5/month for GSuite.) An email that’s attached to your website and domain name is great to have for one-off correspondences (plus looks pro on a business card), and a free web host provider’s email hosting is perfect for that. Beware that your legit emails may be flagged as spam. Why? Free hosting is a hotbed for less-than-savory online activity, and your site might get lumped into a server of bad actors. In other words: spam filter activated. If you’re going to use your email a lot or for anything important — say for sending out a newsletter or for marketing promotions — we recommend upgrading to email hosting through a service like GSuite or even a domain registrar like Namecheap, which sells email hosting starting at $10/year. Storage and bandwidthFree web hosting has infamously low limits for both disk space and bandwidth. If you go over your limit, your site may get suspended or you may be automatically upgraded to a paid service. Even when providers like Byethost offer unlimited bandwidth and storage, it’s not infinite. Just like with a paid service, unlimited storage and bandwidth only last until you start negatively impacting the other sites on your server. All hosts are vague about how much traffic or storage is too much traffic or storage. Have a negative impact, and your site may still be suspended or auto-upgraded. PHP and MySQLPHP is one of the most popular programming languages. It’s what apps like WordPress, Joomla, and Drupal run on, and therefore what a lot of websites use. MySQL are databases those apps store information on. Your web host needs to support up-to-date versions of both. The problem: Most hosts don’t disclose the exact version of the PHP or MySQL they run. And even if these apps do work, there is a high likelihood that with any free host they are going to load slowly — a PHP application requires a lot more lift from what is probably a burdened server. If you’re worried at all about page load time (and you should be — Google takes it into account), we recommend limiting anything you build on a free host to a simple static HTML/CSS site. Another thing to keep in mind is database limitations. Every piece of software you want to use on your site requires a database to store its information. If you are running WordPress, it needs a database. If you’re running another app, it’s going to need its own database. Most free hosts impose a limit on the number of databases your site can access, and the amount of storage available in that database. SSL certificateSecure Sockets Layer encryption is what confirms a website is secure enough to receive sensitive data like credit card data and passwords. SSL certificates are the only way a site can do any sort of ecommerce at all, but Google also considers it a factor for where any site, ecomm or not, shows up in search rankings. Most free web hosts don’t offer a free SSL certificate; the ones that do tend to offer a “self-signed” SSL. Self-signed SSLs are issued by servers, not by a certificate authority (Comodo, Digicert, Let’s Encrypt, etc). They offer the same level of encryption, but it’s not the standard version, so web browsers will still flag your site and issue a security warning to visitors.
Customer supportWith any free host customer support is going to be limited, slow to respond, and not all that helpful. That’s just the way it is.
Recap: The Best Free Web Hosting (If It Makes Sense for You)If you’re after free web hosting, you might really want the simplicity and ease of a free website builder. I’m impressed with both Ucraft and Google Sites which provide easy to use drag-and-drop templates and support custom domains. Yes, you’ll be limited in design and there will be some sort of “Powered by” ad in the footer on both. If those are deal-breakers, you probably do want web hosting. Any free host will have similar drawbacks: limited storage and bandwidth, potential for spam-flagging email, and limited customer support. Go with Awardspace for more storage (1GB), Atspace for 24/7/365 help, or Freehostia if your site is really small (under 250MB). If you’re an educator or nonprofit, you have a lot more — and better — options. SiteGround and InMotion Hosting, two of our very favorite web hosts, have excellent free plans for educators. So does website builder Weebly. And Dreamhost, another of our favorite web hosts, doesn’t charge nonprofits for one free Unlimited shared hosting plan. via Quick Sprout https://www.quicksprout.com/best-free-web-hosting/ Online shopping is standard and common for most product categories. Getting into the ecommerce industry now is your chance to win a share of the growing profits. The sooner you get started, the sooner you can establish your brand and get the word out. A successful online business starts and ends with a great website. If you haven’t made one before, don’t let that stop you. It’s easier and more intuitive than ever. Your first sale isn’t going to happen by itself. Read on to learn how to create an ecommerce website right now. The Easy Parts of Creating an Ecommerce Website2021 is the best time to enter the ecommerce landscape. Due to the ongoing pandemic, people have made online shopping their newest hobby and relish the convenience of shopping from home. This means you already have an extensive customer base waiting to buy your stuff. You can even sell internationally by partnering with courier companies. No geographical barriers whatsoever! All you need to focus on is making an easily navigable and optimized ecommerce website, sell high-quality products, and offer excellent customer service, and you’ll be laughing your way to the bank! Making an ecommerce website is easier than ever, too, thanks to tons of excellent website builders like WordPress, Wix, and Squarespace, which take over all the hard parts for you. You can get started as soon as you create an account and purchase a plan. What’s more, the services are affordable and super fast. You can have a site running within 2-3 hours max at just $2.95 per month (provided you choose WordPress + Bluehost hosting). 
Another benefit of running an online business is the flexibility to scale and grow. For instance, if you’re running paid ads, you can easily adjust this based on your target audience’s behavior. The availability of hundreds of unique themes and plugins can help you build the website of your dreams. You have full control over how your website looks, how it works, and what goes on it. You’re the boss! The Hard Parts of Creating an Ecommerce WebsiteEverything depends on how good your website is. If your website isn’t optimized for mobile phones, takes too long to load, or has lower quality product images, you’ll lose business—lots of it. Users should also be able to navigate to product pages in just one or two clicks. Then there’s the issue of the lack of trust among visitors. You have to show your visitors third-party proof that your website is secure by either getting an SSL certificate or adding security authentication and trust marks. Customers won’t want to give you their credit card information if they aren’t confident they are on a secure website. Payment processing and shipping are other common ecommerce challenges. Customers tend to favor specific payment methods. If your website doesn’t offer that particular payment method, they might end up abandoning your site. For instance, if you only support payments via PayPal or Stripe and your customer wants to pay via credit card, they may not buy your product or service. Shipping is an area where ecommerce sellers have the least control. You have to work through third parties, which creates a lot of room for error. Although rare, your product may arrive damaged, which won’t reflect well on your brand. Step 1: Sign Up With an Ecommerce BuilderBefore you can have an ecommerce website, you’ll need an ecommerce account. This is a crucial step, where you make tons of important decisions. You have to choose a reliable website builder, decide on a domain name, and create your account. A common mistake that many ecommerce sellers make is rushing through these seemingly insignificant decisions. Don’t be one of them. Take your time, weigh the pros and cons, and then make the final payment. I highly recommend using Bluehost’s WooCommerce hosting service under its WordPress-specific plans. It’s fully customizable, secure, gives you a free SSL certificate and domain name, AND gives you access to excellent WooCommerce tools to help you build, promote, and start selling from a secure online store! Let’s jump in. Head Over to Bluehost’s WebsiteFirst, you need an account with Bluehost—or rather a Bluehost-WordPress-WooCommerce account. Head over to Bluehost’s WooCommerce Hosting product page, and click on Start Your Store. 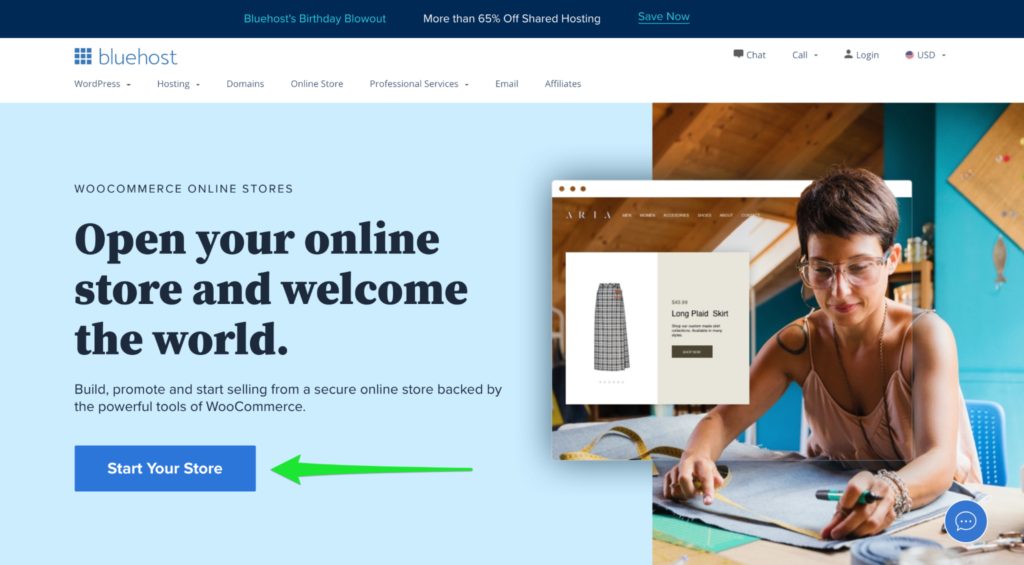
Now, you’ll see the available pricing plans—each offering the perfect mix of ecommerce tools, plugins, security, and expert guidance. Just above the pricing plans, you’ll find various monthly durations. If you want the best bang for your buck, opt for the 36-month plan, which is considerably cheaper in the long run. Since we‘re concerned with starting an ecommerce store, choose the Standard plan on a 36-month contract by click on 36 Months and then clicking Select underneath the Standard plan heading. 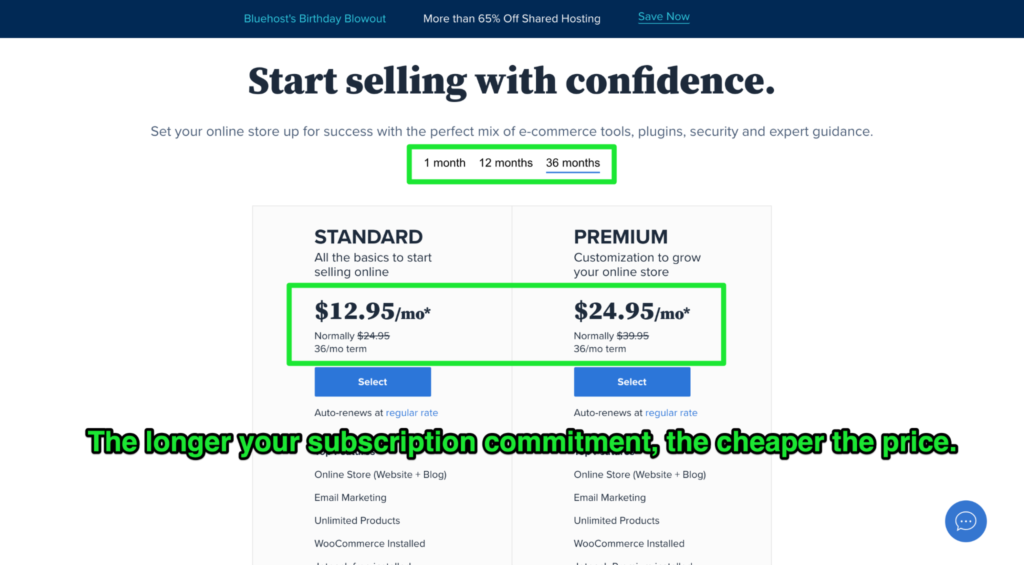
Enter Your Domain NameNext, you have to set up your domain. You’ll see two options: Create a new domain and Use a domain you own. Under the Create a new domain section, you’d enter the name of the prospective domain you want and select the extension, i.e., .com, .in, .site, .online, .website, and so on. 
If you have previously purchased a domain and want to use it, you’ll put it under Use a domain you own and click Next. Not feeling inspired? Don’t worry; you can always skip this step and create a domain later, which is exactly what we’ll do here. Click on I’ll create my domain later. 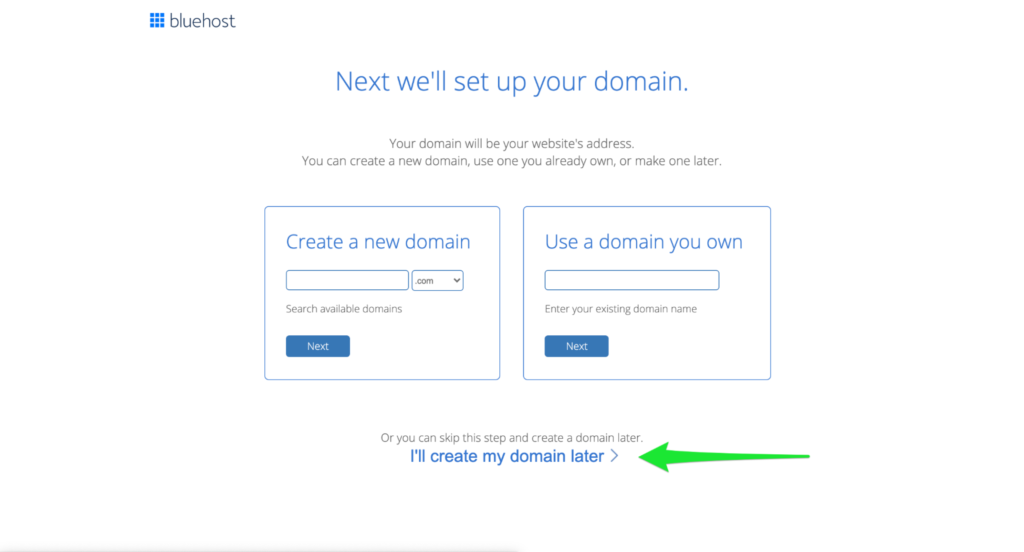
Create Your Bluehost AccountNext, you’ll have to fill in your personal and payment information to create a Bluehost account. 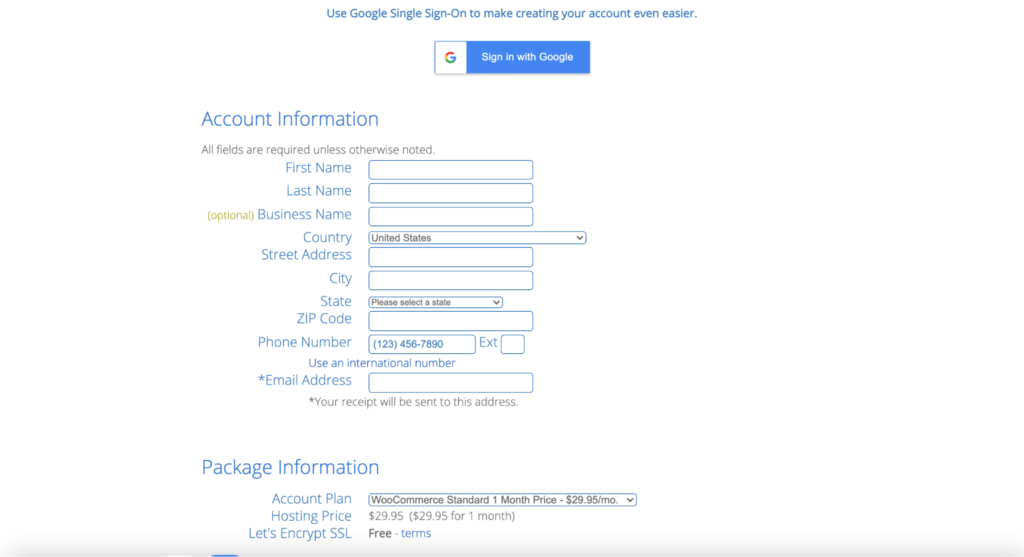
Enter your account information and payment information in all the relevant fields. You can also purchase extras to enhance your security and your site’s functionalities. 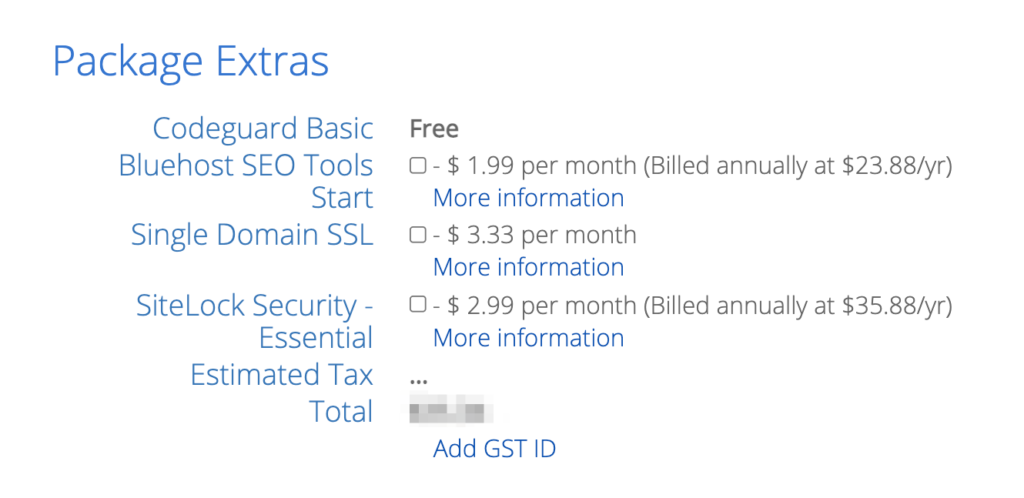
Once you’ve filled in all relevant fields, including your personal and payment information, hit Submit. 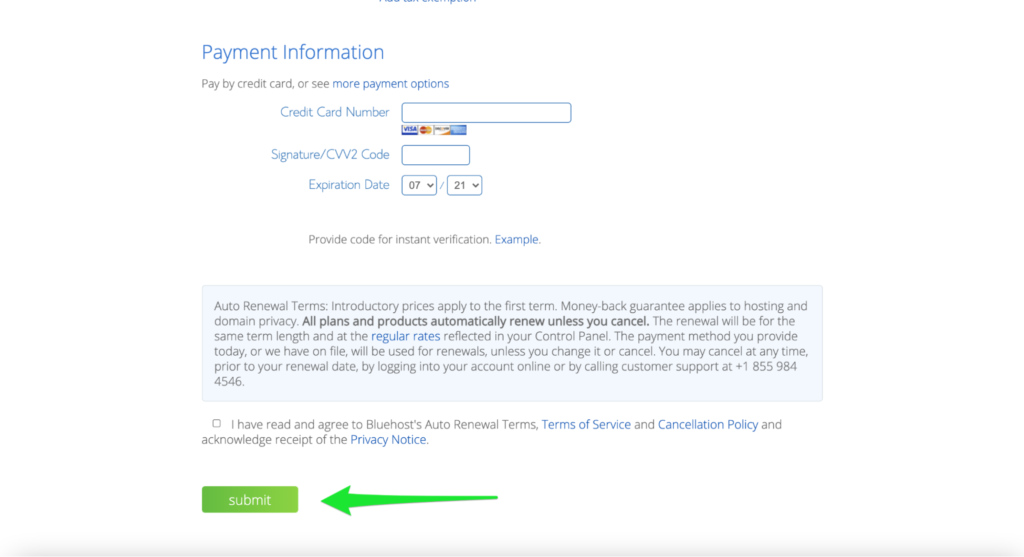
After your payment has been successfully processed, click on Create your account to start with the fun part. 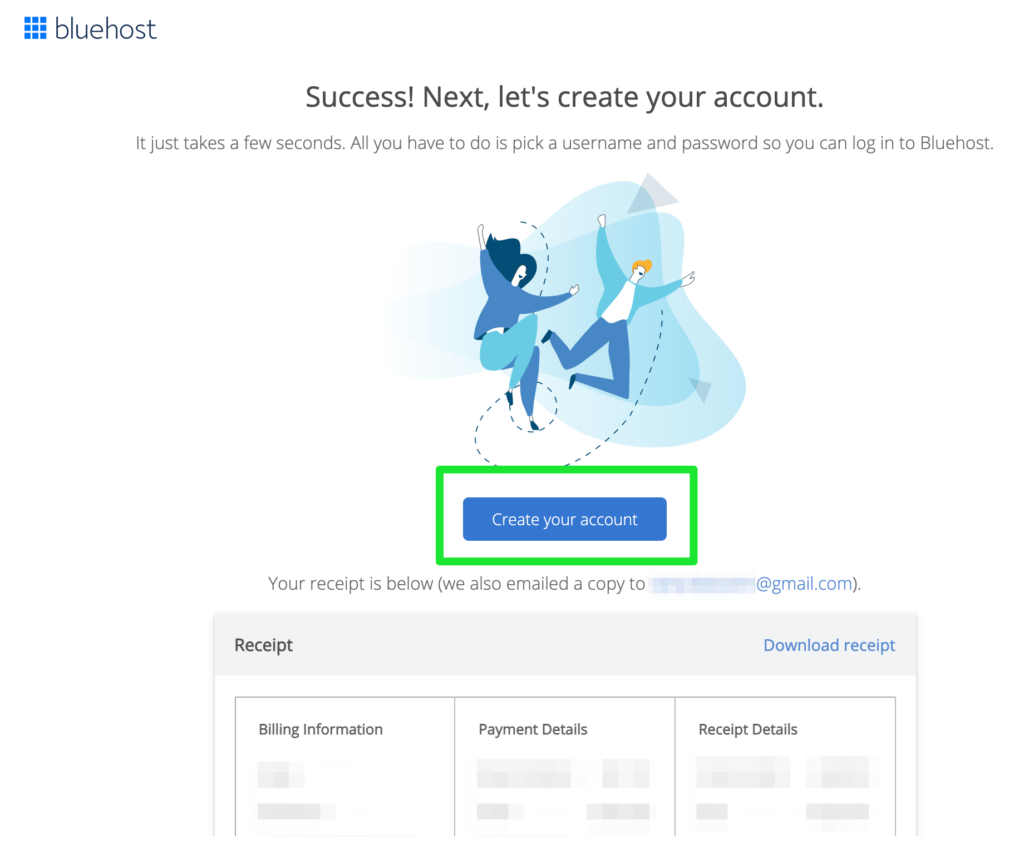
Create Your Account PasswordFinally, the last step here is to create the password for your Bluehost account. Once you’ve entered your domain name and password, click Create Account. 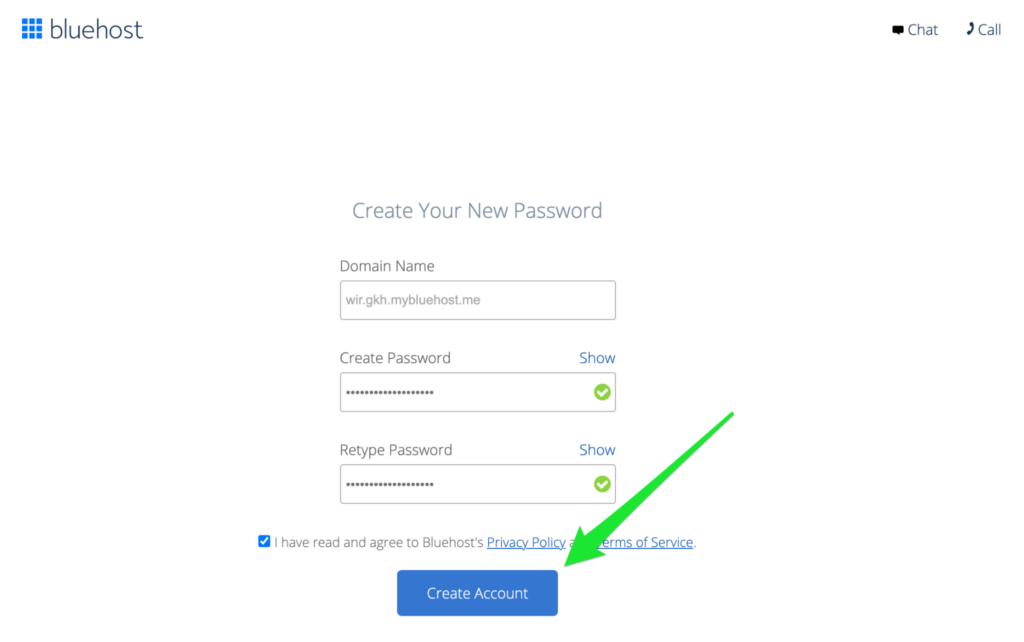
Note: Don’t forget to check I have read and agree to Bluehost’s Privacy Policy and Terms of Service—after going through it, of course. Congratulations! You now have a Bluehost account. 
Step 2: Create Your WordPress WebsiteWordPress is the go-to option when it comes to websites, and this guide is no exception. After creating an account with Bluehost, you’ll already have one-click access to WordPress, thanks to the hosting option you chose. So you can start with the next steps right away. Log Into Your Bluehost AccountYou have to log in to your Bluehost account again to start working on your ecommerce website. You’ll be redirected to the log-in page, where you have to enter your email or domain name and password. Select Log In after filling in your credentials. Give the Go-Ahead to Create Your Ecommerce WebsiteAptly described as “the beginning of your adventure,” click on the Create your website button. 
Alternatively, you can also migrate an existing website. If that sounds like you, click on Start Migration instead. 
Determine Your ExpertiseHow would you describe your website-building experience? Are you a beginner or an expert? Based on your answer, you can choose between the No help needed and A little help options. For this article, I’m going to select A little help. 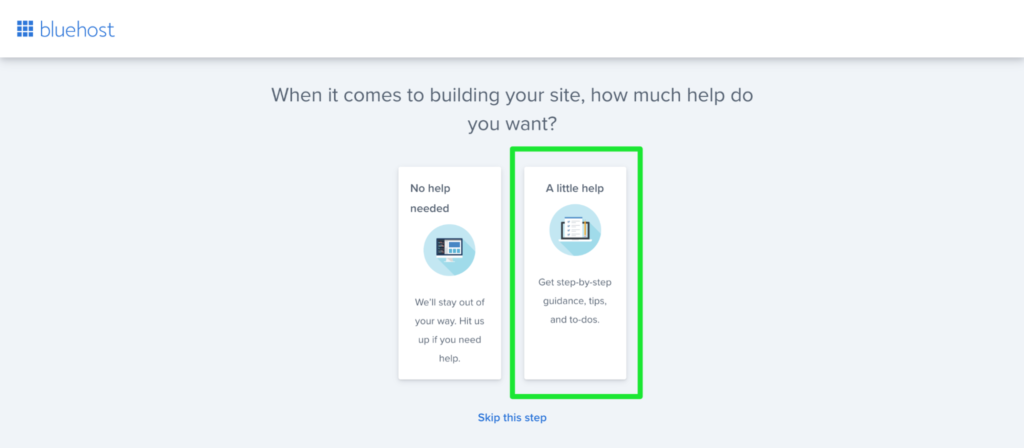
Next, you have to select the kind of website you want to build, which is in this case, will be Online Store. 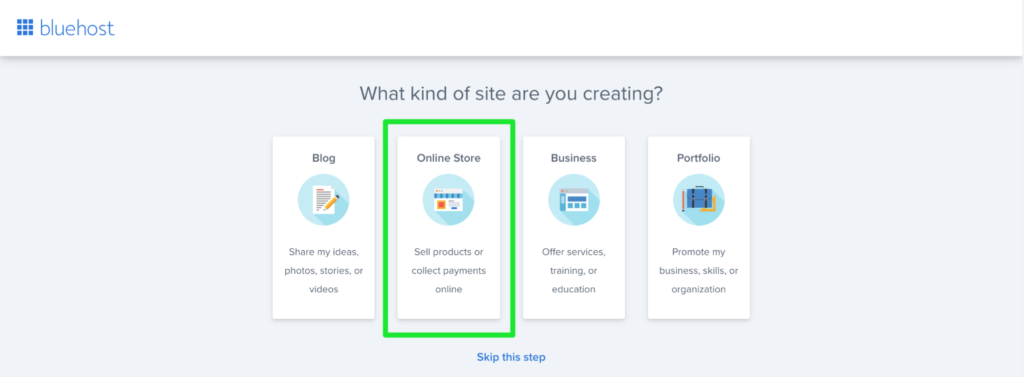
Bluehost will ask you a few more questions to give you personalized recommendation plugin and extension recommendations. Note: You can always skip ahead, but I highly recommend taking the extra five minutes and going through them now. Let Bluehost do the hard work to show you customized options that will suit your ecommerce website best. Pick Your Website ThemeBluehost offers tons of amazing free and premium themes to give your website that extra edge over your competitors. Select whether you want to see free or paid templates, and then filter the theme selections to view ecommerce-specific options. To do this, click on the eCommerce tab on the top menu bar. 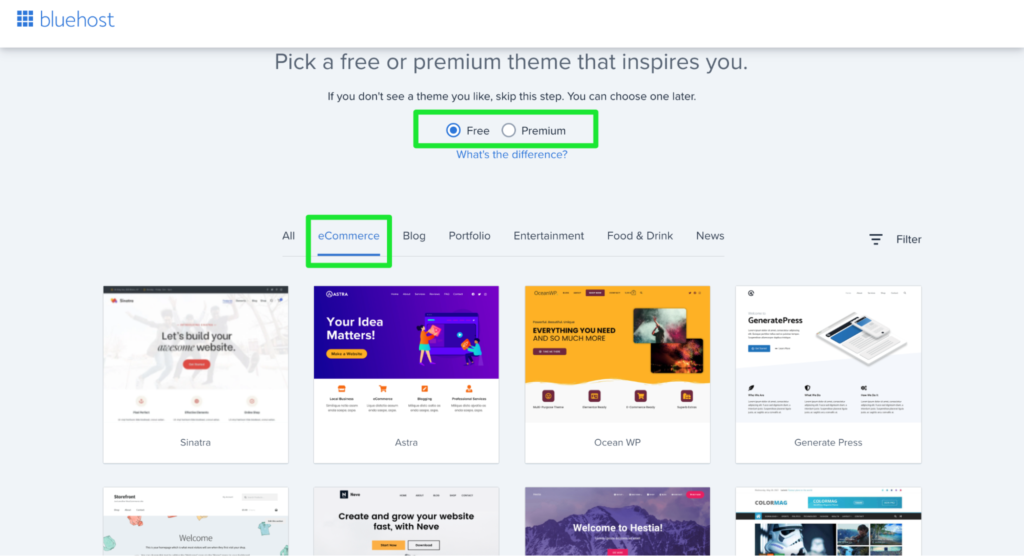
Trust me, you’re completely spoiled for choice here! See something you like? Hover your cursor over the theme and click Use This Theme when it pops up on your screen. I chose the free Astra theme. As soon as you select a theme, Bluehost will start installing WordPress automatically. 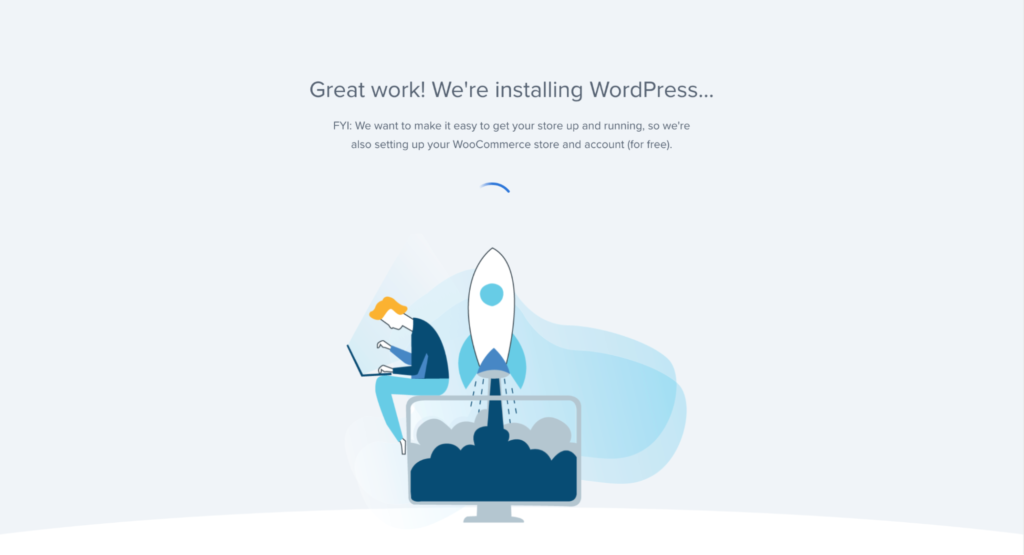
Go to WordPressOn your Bluehost dashboard, click on the Log in to WordPress button in the top right-hand corner of your screen. 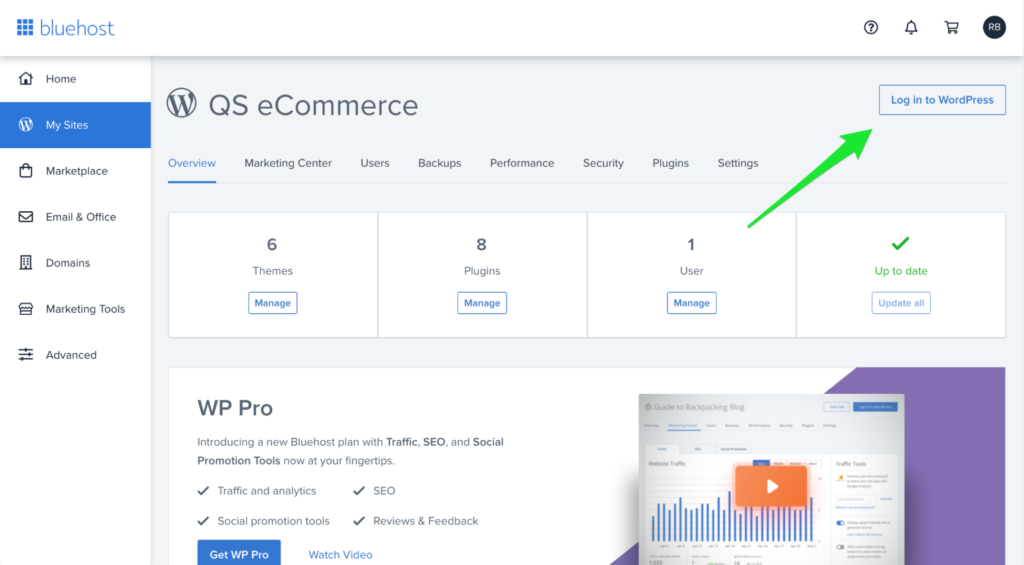
Since you have signed up for the WordPress-specific hosting plan, you’ll be automatically directed to your WordPress site—no extra steps involved. Step 3: Connect Your WordPress Site With WooCommerceWooCommerce is one of the most popular plugins for transforming a basic WordPress website into a full-fledged ecommerce store—and not without reason. It’s free, user-friendly, and is an open-source platform. From product pages to implementing payment gateways to automated tax calculations, WooCommerce is a true lifesaver for ecommerce sellers. Here, we’ll show you how to extend your currently regular WordPress website’s ecommerce capabilities. Open WooCommerceUsually, you would have to install and activate the WooCommerce plugin for your website. But thanks to Bluehost’s WooCommerce plans, this is already taken care of. You can start customizing your website and fill in the required details right off the bat. Add Your Basic InformationHere, you’ll find yourself entering all kinds of information related to your store, industry, product type, and business. 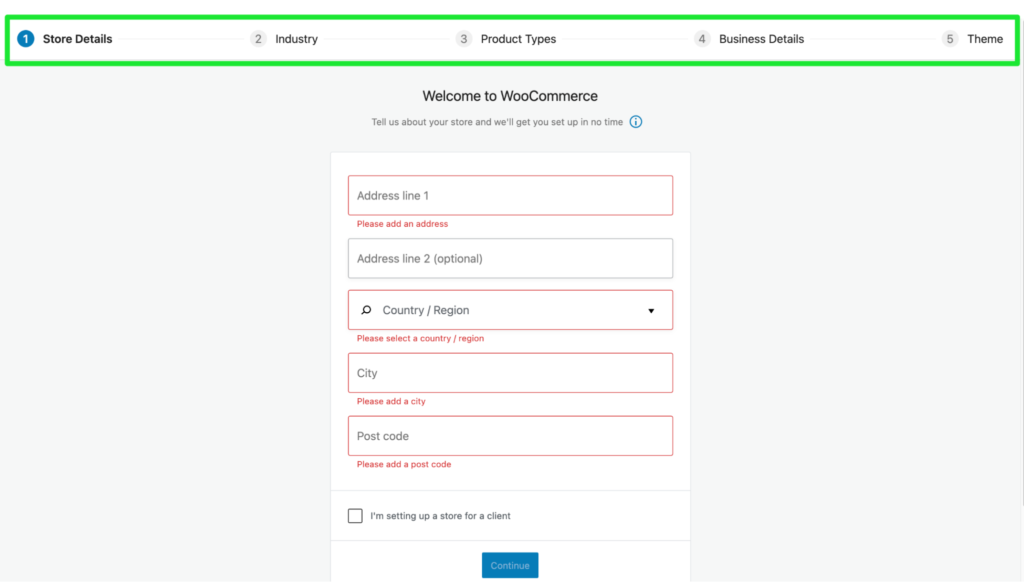
From your address to the industry to the kind of product you want to list on your side, you’ll have to answer them all. Choose Your Ecommerce Website ThemeAt this point, you can either continue using the active theme you chose in Step 2, or you can change your mind and proceed with another one. I want to continue with Astra, so I’ll click on Continue with my active theme. 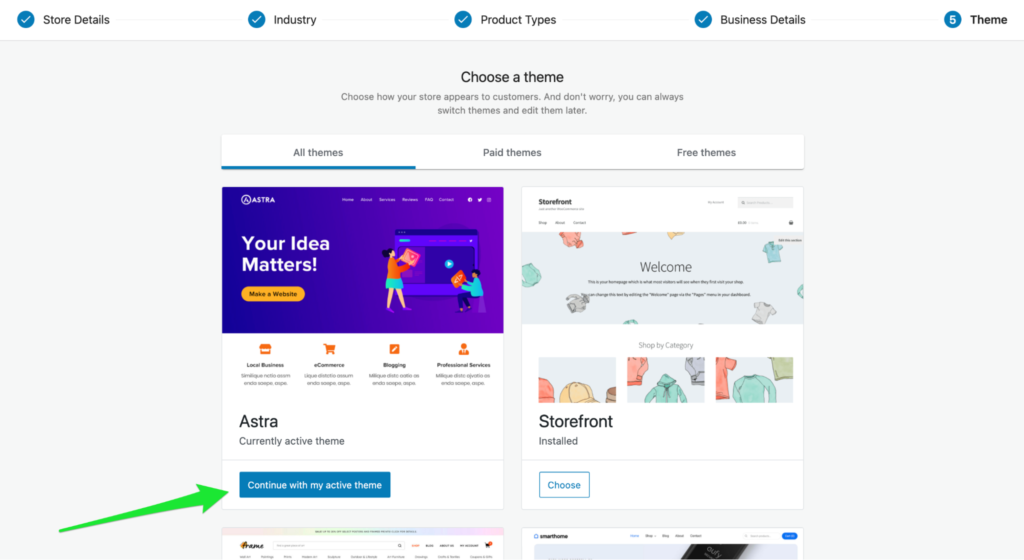
And that’s it! You’ll now see a popup welcoming you to your WooCommerce store’s online HQ. 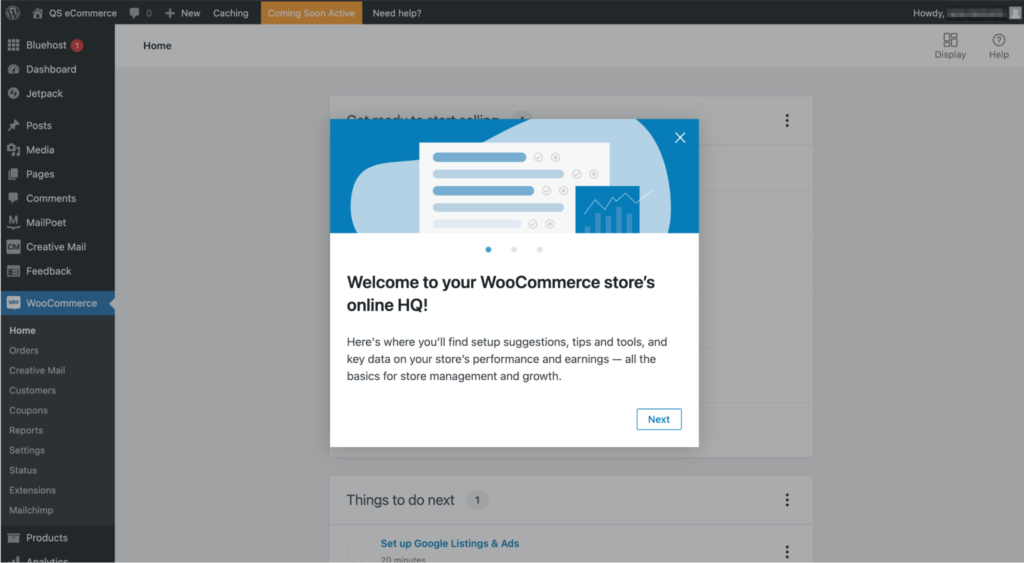
Step 4: Fine-Tune Your Ecommerce Website‘s SettingsThis step focuses on setting up the must-have elements of an ecommerce website, including payment gateways, shipping options, and automatic tax calculations. Now, this may sound intimidating, but it really isn’t. You only need the right guidance, which is exactly what this guide provides. Set Up Payment OptionsClick on Set up payments under the Get ready to start selling section of your WooCommerce dashboard. 
Select the payment options you want to accept through your store: Stripe, Razorpay, PayU, or direct bank transfer. The setup process is very straightforward, and you’ll have to connect your respective accounts with your website after clicking Set up. Remember, Stripe will allow you to take credit card payments. 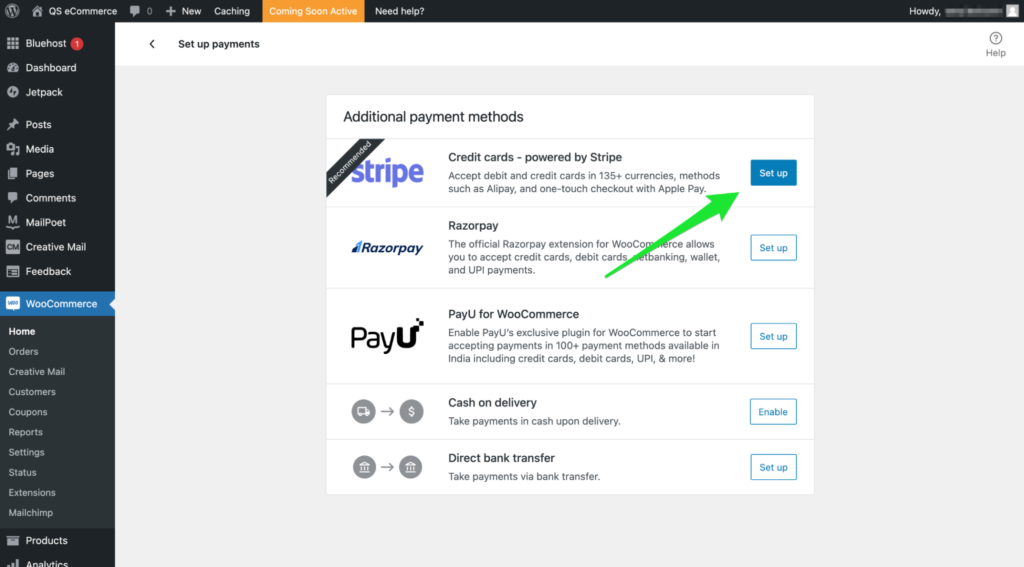
You can also enable cash on delivery, but make sure you have the logistics in place. PayPal is another option. Configure Your Tax RatesClicking on Set up tax from the WooCommerce dashboard lets you configure your tax rates payable by your customers. Click Configure. 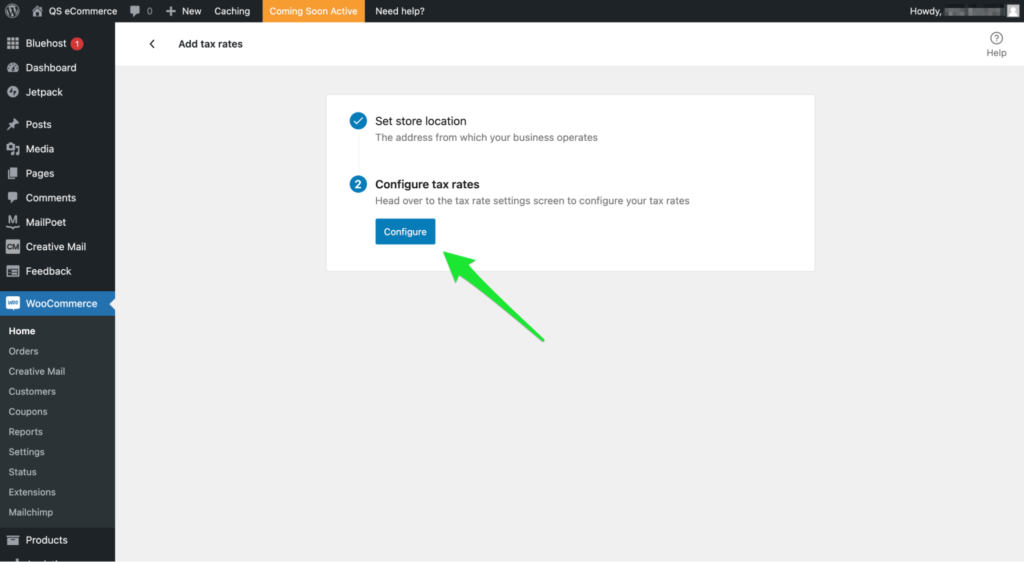
You’ll then be directed to the Tax tab, where you can configure your standard tax rates, among other tax options. 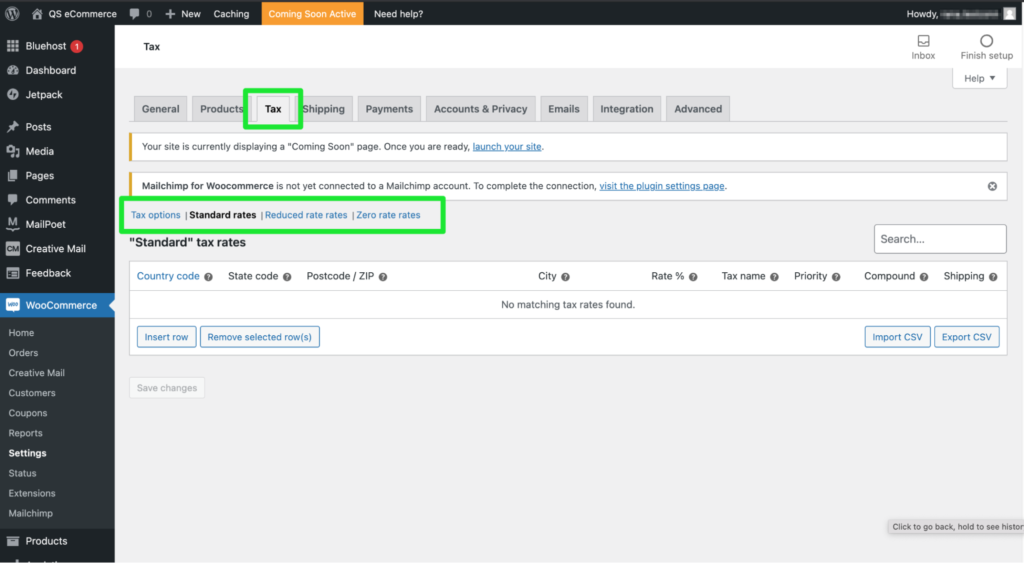
Set Up Shipping OptionsTo add shipping options, select Set up shipping from the list of displayed options on your WooCommerce dashboard. 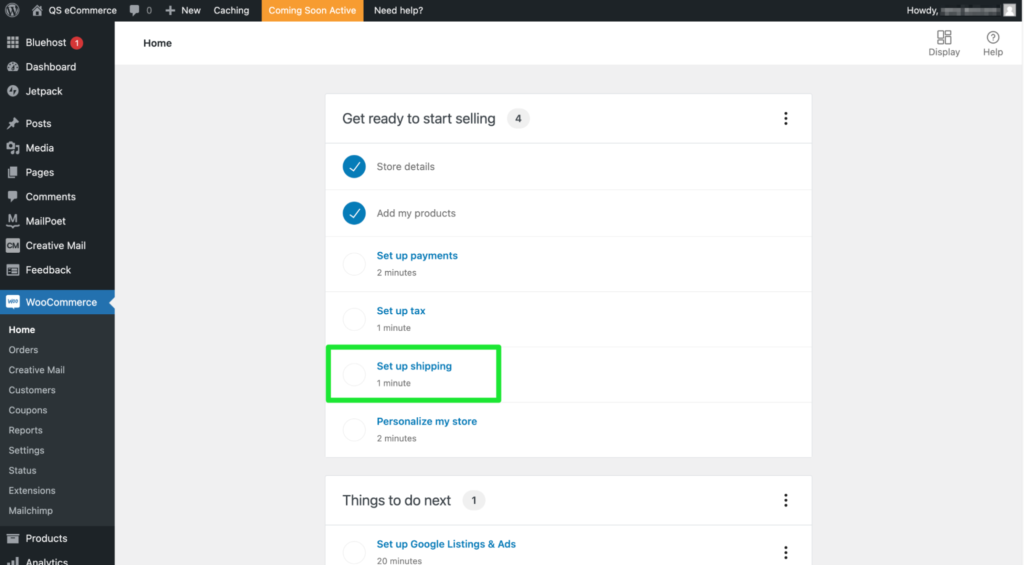
While WooCommerce will automatically recognize the area you are in, you can choose your shipping rates. What’s more, you can either set a fixed price for every zone or set it as free. Once done, click Complete task. 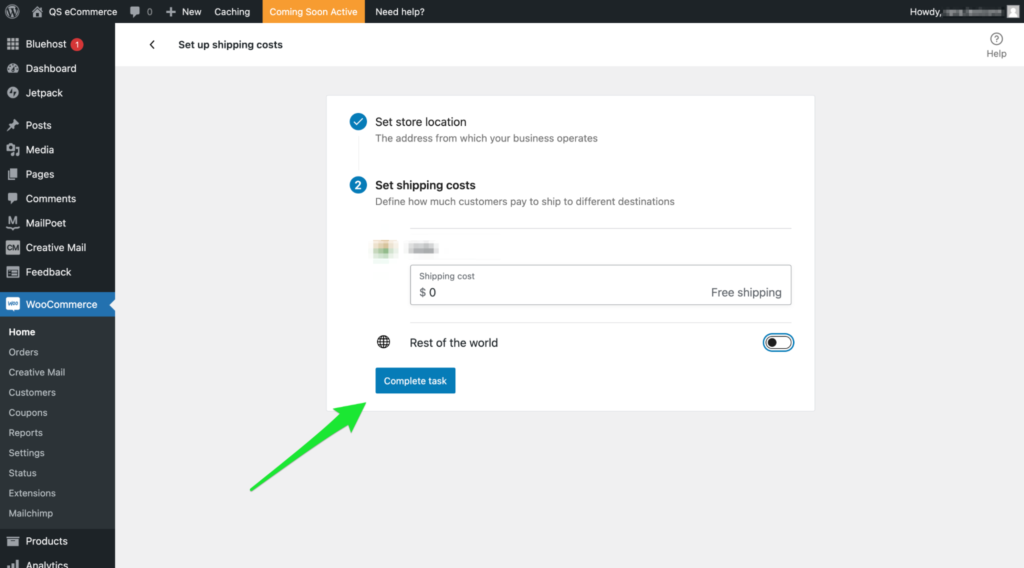
Personalize Your Ecommerce WebsiteStand apart from your competition by creating a custom homepage, uploading your company logo, and adding a store notice. Do this by clicking on Personalize my store on the WooCommerce dashboard. WooCommerce allows you to customize everything that goes on to your website. So you never have to worry about restricting your creative side. Click Complete task once you’re satisfied with how everything looks. 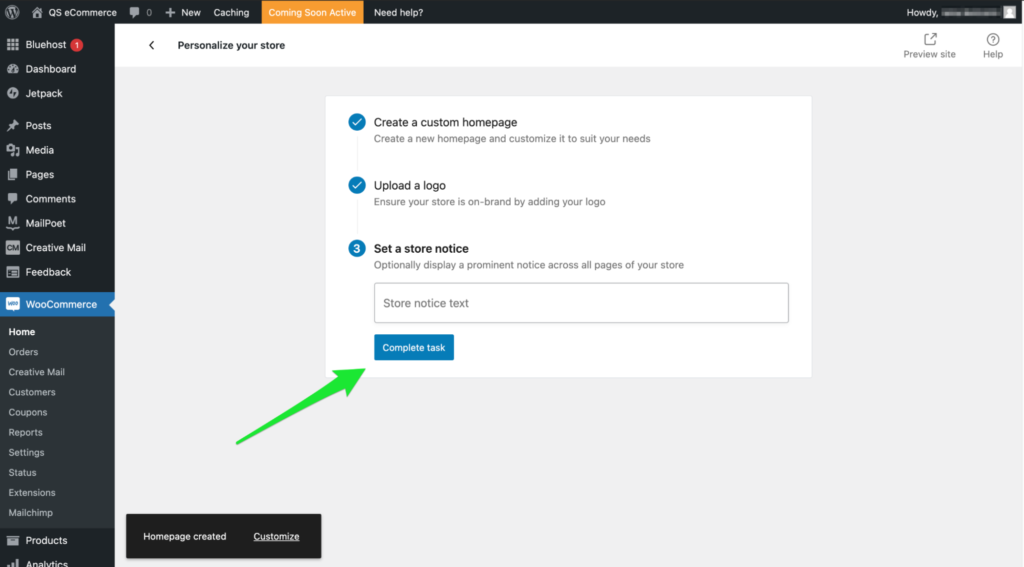
Step 5: Add the Products You Want to SellIt makes no sense to have an ecommerce website if you have nothing to sell. Precisely why the next step is to add the products you want to sell. Return to Your Bluehost PortalOn your Bluehost portal, you’ll see a variety of options displayed on your screen. It’ll look something like this: 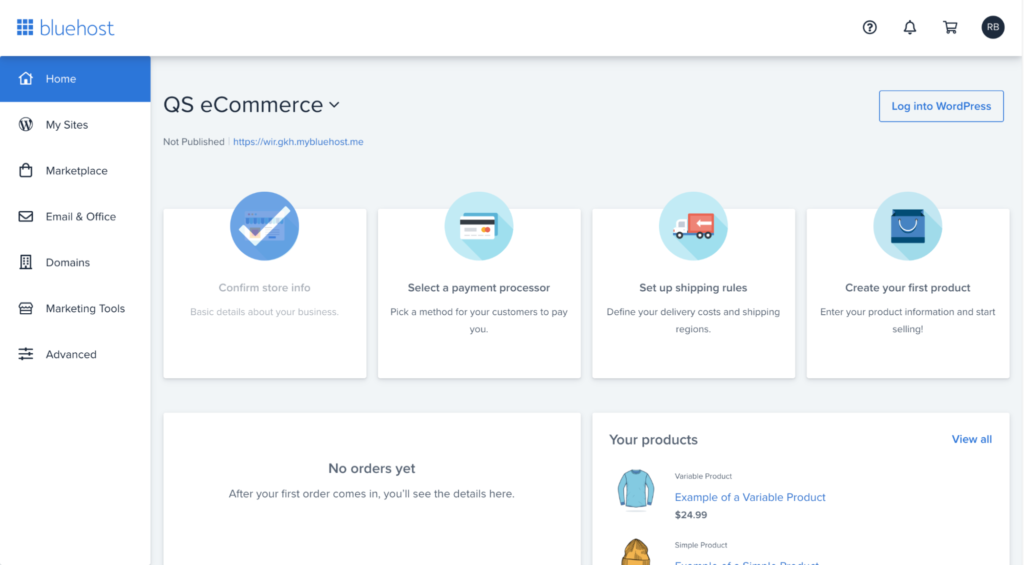
Go to Confirm store info. While most fields will be auto-filled by Bluehost, under Products, select I plan to sell both physical and digital products. Add Products to SellClick on Create your first product. Next, you’ll see two options to add products to your WooCommerce store: manual and import. While importing a product is undoubtedly faster than entering product info manually, not everyone has them. Keeping this in mind, I’ll explain the manual method. Click on Add a product under Enter product info manually. This will direct you to your WordPress website. 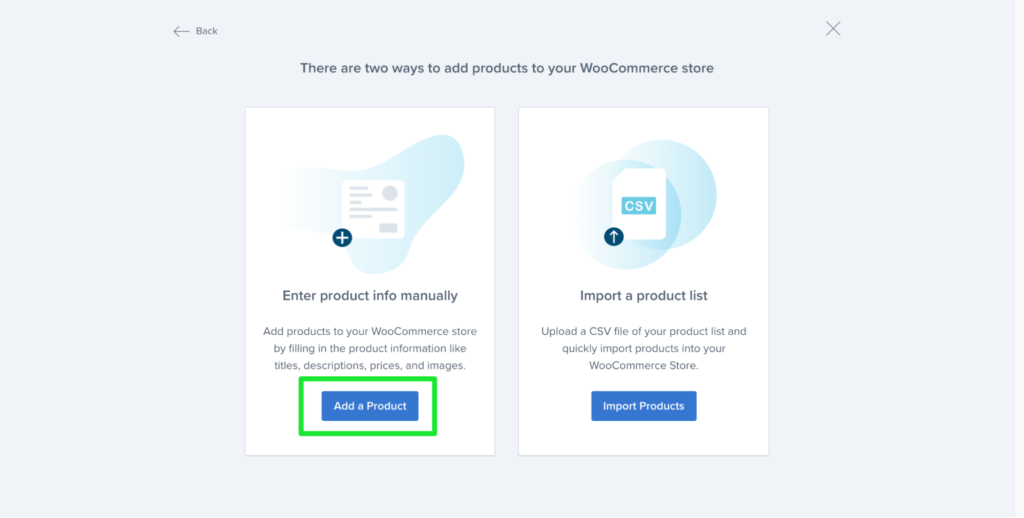
To help you get a better hang of things, WooCommerce has already set up two examples, so you can always take a look at how they’ve set it up in case you get stuck. Select Products from the WordPress menu sidebar on the left, followed by Add New. 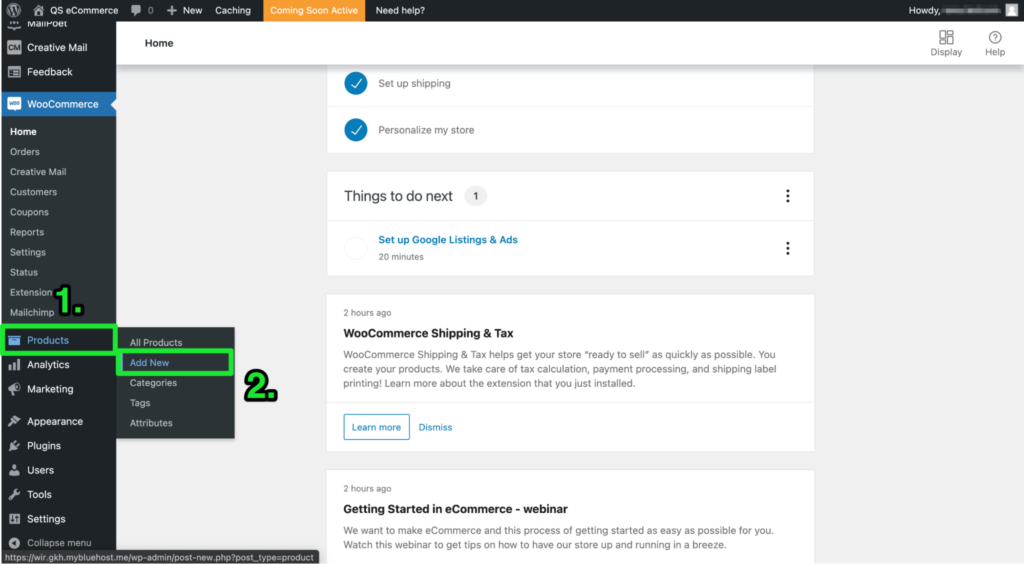
At this stage, you have a blank canvas. You will fill in the product’s name, price, and description and set the product category. You can also add product images, as well as any additional gallery images. In addition to the above, you’ll also find other tabs--General (the one you’re currently in), Inventory (track your inventory and add SKUs), Shipping (product dimensions and shipping costs), Linked Product (upselling complementary products), and Attributes (size, color, etc.) For more information on how the product categories and other attributes work, check out this detailed guide from WooCommerce. Click on Publish when done. 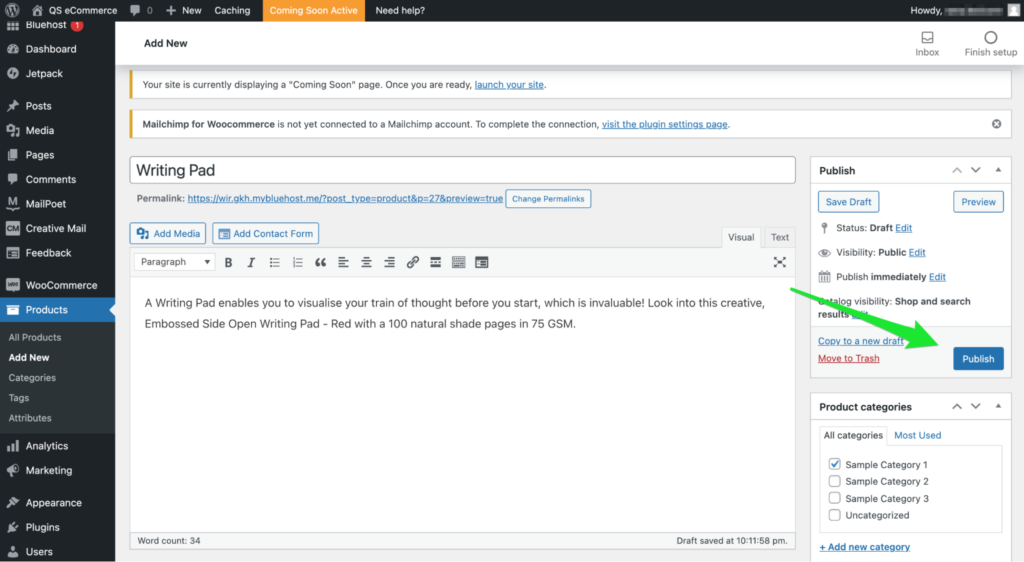
If you click on All Products from the Products side menu bar, you’ll find your product list along with the previous examples. 
Here’s a quick checklist to ensure you’re adding the products correctly before hitting Publish.
Step 6: Add Plugins and Extra Content to Boost ConversionsYou’ve done everything at this point to create a new ecommerce website. Next, we discuss tactics that can help you bring more traffic to your website and, in turn, earn more revenue. Install PluginsYou may have already noticed the Jetpack tab on the WordPress menu bar. 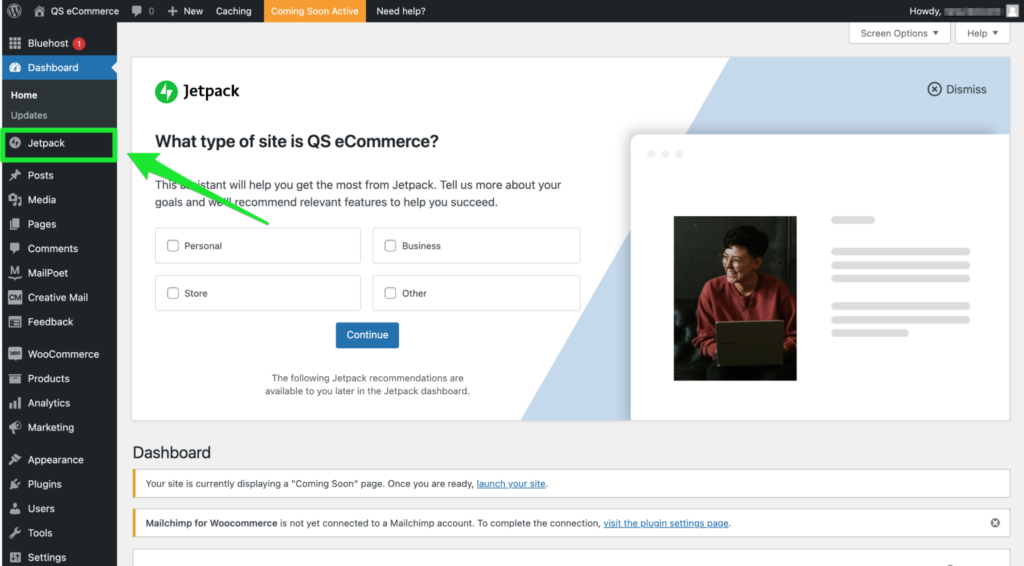
You can activate this plugin, along with several other plugins like Yoast SEO, Securi, and Site Reviews—all of which will work excellently to activate payment setups and automate taxes, implement SEO best practices, enhance security, and add social proof, respectively. Here’s how you can install and activate plugins:
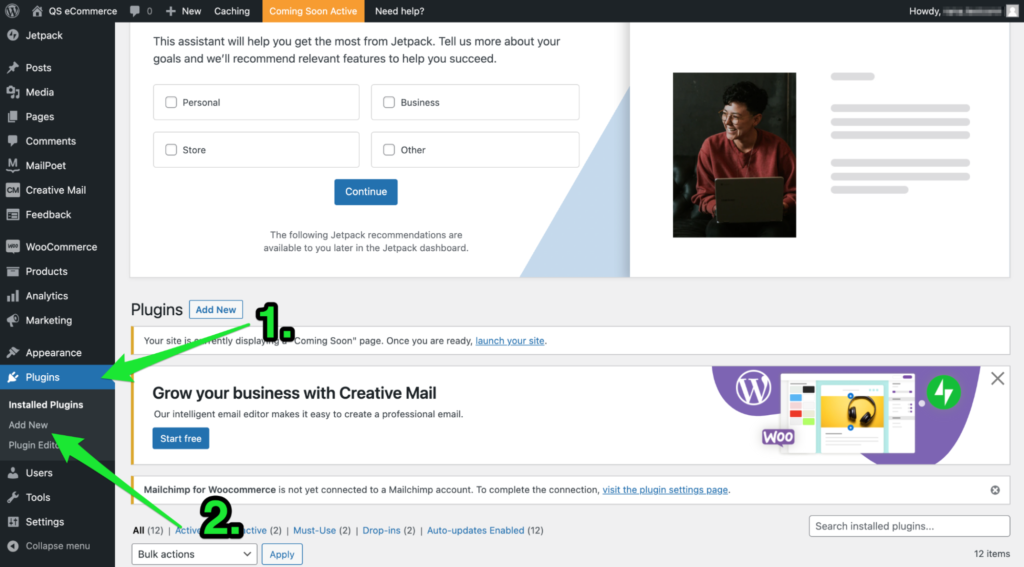

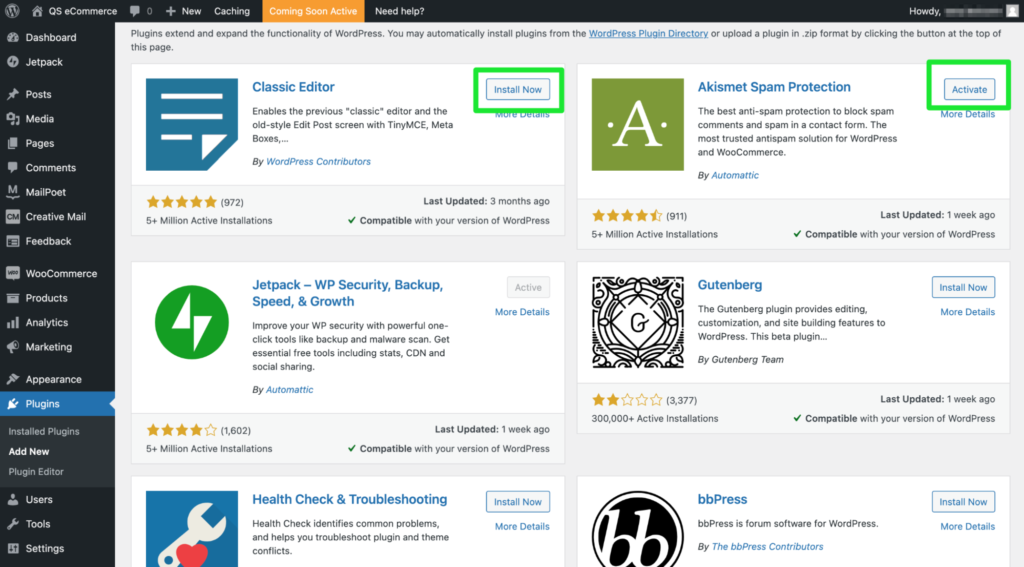
WooCommerce’s setup wizard will then take over from here, guiding you through the rest of the setup process. Add Necessary ContentWith the plugins sorted, your next focus should be on adding relevant copy and content to your ecommerce website. This includes the following:
Step 7: Make Your Ecommerce Website PublicAre you happy with the way your website looks, works, and feels? Then it’s time to make it public and start selling! Launch Your WebsiteGo to Settings from the WordPress sidebar, and click on Privacy. 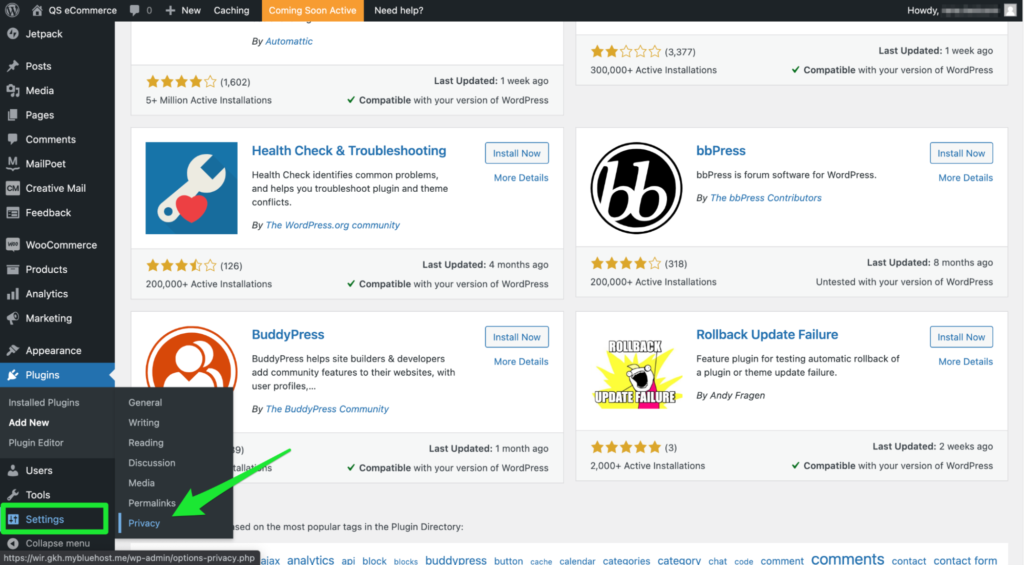
The first thing is to sort out your privacy settings. A privacy policy is a crucial aspect of every website—ecommerce or not. In fact, WordPress won’t let you go public unless you choose a privacy policy page. Luckily, there’s already a template in place, but you can also edit it or write up your own. Lastly, make sure all your website’s must-haves—homepage, contact page, about page, and any other content—are all set and look the way you want. Finally, click Launch Your Site. 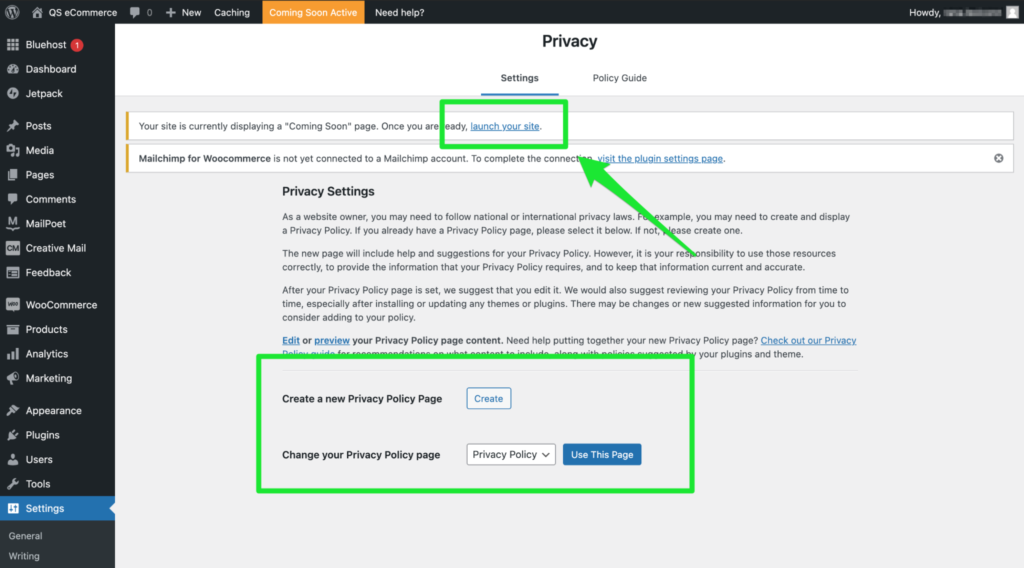
Congratulations! You have your ecommerce website up and running! via Quick Sprout https://www.quicksprout.com/create-ecommerce-website/ Everyone wants more exposure for their brand and website. The benefits of increasing brand awareness and driving more website traffic speak for themselves. Sometimes, this process can be slow, painful, and somewhat ineffective. But in my experience, that only happens when people don’t know where to look for authority links. Once you’re able to get links on the right platforms, your exposure and site traffic will increase exponentially. In order to be successful with this strategy, it’s ideal if you find ways to get featured on major digital media publications like The New York Times, Wall Street Journal, Time Magazine, Mashable, the Chicago Tribune, Fox News, and more. But just individually reaching out to sites like that is not an effective use of your time and resources. So how can you get brand mentions on these platforms? Enter HARO.
What is HARO? The acronym stands for Help a Reporter Out. It’s comparable to a dating website that connects journalists with people like you who want to be featured on major media sites. HARO has an extensive network of more than 55,000 bloggers and journalists connecting with over 800,000 sources. For those of you who are ready to take your link building strategy to the next level, I’ll explain everything you need to know about leveraging HARO for brand exposure. How HARO worksFor those of you who aren’t familiar with HARO, the platform is very straightforward. Journalists need sources for their news stories. So they join HARO to put in requests about certain topics. The requests include a brief summary of the story, source qualifications, and a pitch deadline. When you join HARO as a source, you’ll receive three emails each day, Monday – Friday.
It’s up to the sources to monitor these emails for topic requests that align with their own qualifications. If a source sees something that they qualify for and are interested in helping out with, they can reply to the email with a pitch. Once a pitch is accepted, the source will be connected with the journalist writing the story to provide insight for the article. As a result, sources get mentioned along with links to their website. Create an accountYou can’t use HARO from a guest profile or anything like that. In order to take advantage of this brand exposure and link building strategy, you’ll need to start by creating an account. So head over to their website and sign up as a source.
For the purposes of link building, it’s important that you sign up as a source as opposed to a journalist. Even if your website does some type of reporting, you’ll still need to have a source profile to get the links you’re looking for. Signing up is very easy. All you need to provide is:
The whole process takes a minute at most. So don’t be turned off by the fact that HARO forces you to create an account in order to participate. Review the rules for sourcesThe list of HARO rules isn’t an outrageously long agreement terms form that you just blindly scroll through and click “I agree” without actually reading it. It’s actually pretty quick to go through all of the rules, and it’s definitely in your best interest to do so. Why? HARO has a pretty strict policy for violating their terms. The first time you violate HARO rules you’ll be sent a warning. But your second violation results in being permanently banned from the platform. That’s it. No questions. No exceptions. No explanations. The whole reason HARO works is because it’s based on trust between reporters and sources. Otherwise, journalists just wouldn’t use the platform. I’ll take a moment to briefly summarize the rules, just to give you an idea of what to expect. You’re only allowed to reply directly to the anonymous email requests from HARO. Don’t try to figure out who the journalist or publication is and contact them directly outside of the platform. Do not spam journalists with pitches that aren’t related to their request. For example, let’s say you’re an animal expert. If you see a request related to fitness and personal training, don’t reply to the email discussing your animal knowledge. That would be considered a violation. You are allowed to forward requests to others via email or social media. In fact, HARO actually encourages this, since it grows their network and helps out reporters (pun intended). So even if you don’t meet the qualifications of a request, feel free to send it to someone who does. They’ll just need to create a HARO account if they don’t have one already, and then they can submit a pitch. Harvesting reporter information is strictly prohibited under the HARO guidelines. All replies must be complete, direct, and relevant. Always include your bio and contact info when you reply to a request. Don’t get off track by working a separate pitch into the reply. “Hey, I can definitely help you out with this story. But I’m also an expert in these subjects if you need it in the future…” Messages like that are not allowed. You’re also not able to send any attachments with your email. Instead, use services like Dropbox links if you have supplemental info for your pitch. This should go without saying, but you always need to be polite, respectful, and professional when dealing with anyone who is part of the HARO network. If you follow all of these rules and guidelines, it increases your chances of having success and connecting with journalists via HARO. Choose your planOnce you’ve created an account and reviewed the rules, it’s time to pick your subscription. HARO offers several different plans to choose from based on your needs.
Here’s a brief overview of what you can get with each subscription. But for the most part, the majority of you would benefit from the standard plan. With that said, it’s definitely in your best interest to review all of the options to make sure. BasicWithout paying anything, you’ll still get three emails each day from HARO. The basic plan also comes with email support if you have any problems, questions, or need to contact someone. With the free plan, everything is very straightforward. You don’t get any extra benefits or add-ons. The free option is suitable for those of you who are willing to sort through lots of emails. You’ll probably get tons of emails that aren’t really relevant to your brand. But there are still plenty of opportunities for you out there. You’ll just have to do some extra leg work and sorting to find them. StandardFor $19 per month, the standard plan comes with everything included in the basic plan. Additionally, you’ll also get keyword alerts. Choose one keyword that’s related to your brand that will help filter the opportunities sent to you. With the standard plan, you’ll also get to create a profile that you can insert into your pitches automatically. This will save you a tremendous amount of time compared to doing this manually for each individual pitch. You can also sign up for text alerts in addition to email messages. The standard plan allows you to search for active requests online, instead of just waiting and sorting through emails that come in. As I said before, this is probably the best option for most of you. AdvancedThe advanced HARO plan costs $49 per month. It comes with everything included in the standard plan, but you’ll get extra keyword alerts. If you subscribe to this option, you’ll get to choose three keywords compared to just one. Furthermore, you can also create three separate profiles. This is ideal for those of you who are well-rounded or have multiple people at your company that qualify as experts in different subjects. For example, I might create a profile about digital marketing, another related to SEO, and a third about content creation. That way each profile could fit more specifically with certain requests from journalists. The advanced plan also gives you a head start over other subscriptions. You’ll be contacted first whenever there is a new request. That extra lead time gives you a chance to craft and submit the perfect pitch before other sources in the network, which is a huge advantage. PremiumFor $149 per month, the HARO premium plan is the cream of the crop. In addition to having everything included in the advanced plan, you’ll be able to set up an unlimited amount of keywords and unlimited profiles. Phone support is available as well, as opposed to just email support. If you want the best of the best, this is the plan for you. While the premium plan is obviously great, I don’t know if it’s necessary for most of you to pay nearly $1,800 annually for this. You could get a better value from a less expensive plan, but I’ll leave that decision in your hands. Create a bioOne of the biggest advantages of paying for a subscription over the free account is the ability to have a bio section. Whenever a journalist submits a request for sources, they get bombarded with pitches. It’s difficult for them to sort through all of these. Having a bio helps you stand out from the crowd and makes it less likely that your pitch will get lost in the shuffle. Here’s a great example of a bio from David McSweeney at Ahrefs.
If a journalist sees this bio, they’ll definitely be more inclined to use David as a source. As you can see, the team at Ahrefs has plan higher than the standard option. That’s because they can add another bio. If you have multiple positions or team members who can contribute, you may want to consider upgrading your plan. For example, your CFO and HR manager will have different qualifications and areas of expertise. So you can use one bio over another based on the request from a reporter. Unless you’re a big name in your industry, most journalists probably haven’t heard of you. It’s not in your best interest if they have to ask who is this person? Instead, let your bio tell the story for you. Search and pitchAs I said earlier, if you pay for a subscription you don’t just have to sit back and wait for emails to come in throughout the day. You can actively search through reporter requests.
By default, you’ll see the master HARO list. But you don’t want that. Chances are that 90% of these requests won’t be relevant to you and your brand. So click the downward pointing arrow on the right side of the screen, as I highlighted above. Select the industry search option and uncheck the master HARO list. Then, check a category that’s more relevant to your niche. You can also search for requests with keywords. This will give you much more relevant search results. After you find a request that fits your qualifications, it’s just a matter of pitching yourself. Be quick, but informative. Remember, reporters are going to be sorting through dozens of these replies. To stand out from the crowd, you need to get your point across in a way that’s clear and concise. They aren’t going to sit there and read long-form bulk paragraphs of rambling. Master the art of storytelling. Show them that you actually read their request and you’re not just sending generic mass replies to every request. Provide them with a useful quote or two if that helps your case. It’s also important to make sure that your pitch is grammatically sound. Proofread everything before submitting it. Make sure there are no spelling or punctuation errors. These are journalists you’re dealing with. Mistakes can make you appear unprofessional. Don’t use slang or go overboard with industry-specific terms in an attempt to impress the reporter. They may not know what you’re talking about and end up choosing someone else as their source. ConclusionHARO is a great way to build high-quality backlinks. Using a network like this is much easier and more effective than pitching yourself directly to individual news sites and publications. Instead, just wait for a reporter to submit a relevant request to your niche. Then follow up with your pitch through this platform. This is your best chance to get featured on major authority sites that will grow your brand exposure and drive more traffic to your website with links. via Quick Sprout https://www.quicksprout.com/how-to-get-exposure-and-links-using-haro/ Social media marketing is no longer optional for small businesses in 2018. I see this problem all too often when I’m consulting small business owners. They have this mentality that social media won’t benefit their companies. “Our customers know who we are, and they know where to find us.” Does this sound familiar to you? Don’t get me wrong: it’s great that you have established a steady customer base. But using social media to market your small business will help you get more money from your existing customers in addition to acquiring new ones.
Do you want more social media traffic?
To get help with improving your traffic, leads, and revenue, fill out your info.
While you may not think your lack of a social media presence is having an impact on you today, it will eventually catch up with you down the road. So don’t wait until it’s too late to get started. You’ve got to keep up with the latest social media trends and apply them to your small business. If you’re a small business owner not quite convinced you need to use social media to improve your business, you’ll benefit tremendously from reading this guide. If you are currently using social media to market your small business but not seeing the results you hoped for, I’ll steer you toward the path to success. Follow the marketing tips and strategies I’ve outlined in this guide, and you’ll set yourself up for sustainable growth today and in the future. Create profiles on multiple platforms“We’re on Facebook.” I hear this all the time when I’m talking with small business owners about their social media strategies. If you have a Facebook page for your business, that’s great. You’re headed in the right direction. But Facebook alone won’t be enough to maximize your reach. You need to establish a presence on as many social platforms as possible. Here’s a look at the social media channels that small businesses use the most:
As you can see, Facebook leads the way for small businesses. Less than half of small businesses use Instagram, YouTube, and Twitter to market their brands. Furthermore, less than one-third of owners are taking advantage of LinkedIn and Snapchat. Before you rush to create a profile on all the channels listed above, it’s important you understand your target market. For example, LinkedIn is more beneficial to B2B companies. That’s because 80% of leads generated by B2B brands come from LinkedIn. Let’s say your small business is targeting Generation Z as your primary audience. Well, 71% of Gen Z uses Snapchat at least six times each day. More than half of this generation uses Snapchat over 11 times daily. But if your small business is trying to generate leads from Baby Boomers, it wouldn’t make sense to prioritize Snapchat. For the most part, starting with a Facebook profile is a safe bet. With nearly 1.5 billion daily active users, you can assume your target audience has a presence there. Believe it or not, after all these years, Facebook is still the fastest growing social network. So it’s not going anywhere in the near future. After you create a Facebook page, you need to determine which other channels are suitable for your brand and marketing strategy. I’d recommend creating a YouTube channel. The video content you upload to YouTube will be easy to repurpose for your other marketing channels. These videos will give you an excuse to post content on other platforms when you’re running low on ideas, but we’ll talk about that in greater detail shortly. Define your marketing goalsYou can’t just blindly start posting content on social media without some sort of rhyme or reason. Before you do anything else, you need to identify your marketing goals. These are some of the top goals that small businesses are trying to accomplish with their social media strategies:
While lead generation, brand awareness, and customer engagement are all good reasons to use social media, it doesn’t mean these should be yours. You may be using social media to provide better customer service or directly drive sales. Whatever your reasons, make sure they are clearly defined. Think of it as you would of any other marketing strategy for your company. You wouldn’t run an ad on the radio or a print advertisement without establishing a goal first, so you need to treat your social media strategy the same way. Once you decide the purpose of your social media campaigns, it will be much easier for you to come up with content to post. As we’ll discuss soon, it can be tough to think of ideas for new posts. But if you can establish what you want to accomplish with your content, you’ll know what to post to achieve those goals. Post content on a daily basisNow that you have a social media profile on multiple platforms, you’ve got to make sure those accounts are active. If someone stumbles upon one of your pages and the most recent post was from three weeks ago, they aren’t going to follow you. What’s the point of following a brand that doesn’t post content? Furthermore, think about all the people already following your business page. These people won’t just navigate to that page on their own to see what you’re up to. You need to post new content that will appear on their homepages and timelines. Let’s take a look at how frequently small businesses are posting on social media:
As you can see from this graph, just over half of small businesses post on a daily basis. This is your opportunity to stand out from your competitors. If your competition is only posting once a week or just a handful of times per month, it will be easier for you to make a lasting impression on your followers by posting daily. Each time you post new content, you remind your followers that your brand exists. When they need or want whatever you’re offering, they’ll think of your company as opposed to another small business in the area. One of the reasons why small businesses aren’t posting content daily is because they simply don’t know what to post. If you fall into this category, refer back to your marketing goals. For example, if your goal is to promote new products for sale on your ecommerce site, then post a promotional offer for those products. Repurpose previously published content. I briefly mentioned this earlier when we discussed why you should create a YouTube channel. Let’s say you have an instructional guide or tutorial on how to use a product that you published to your YouTube page. You can post that same video or snippets of that video to your other distribution channels. Share new content from your website. Post links to your most recently published posts. In addition to posting content daily, it’s also important for you to respond to your customers. I’m referring to direct messages as well as comments. 48% of consumers say that when a company is responsive on social media, it will prompt them to make a purchase. Give consumers a reason to follow youIn order to have a successful social media marketing strategy for your small business, you need to have lots of followers. Otherwise, nobody is going to see your content. Once you’re able to grow your social following, it will be easier for you to convert your followers into customers. That’s because consumers are more likely to buy from brands they follow on social media.
Here are some of the top reasons why people would be interested in following your small business on social media:
So make sure your content is worth following. As you’ve seen, getting more followers will ultimately increase your chances of driving more sales. Run a contest. Promote flash sales and discounts. Just don’t post too many promotions, or it will cause people to unfollow you. In fact, 46% of consumers say they’ll unfollow brands that post too much promotional content. There is a difference between posting daily and spamming your followers. People don’t just want to see posts from your brand. If you’re posting several times per day, these posts will flood the timelines and homepages of your followers. Nobody wants to see that. If you want to post content multiple times per day, consider sharing ephemeral content, which we’ll discuss in greater detail shortly. Form relationships with social influencersWhat if I told you there was a way for you to increase your social media presence without posting any content to your page? Well, as I’m sure you were able to guess, this is definitely a possibility. When people think of social influencers, they think of celebrities and athletes. But partnering with a celebrity probably won’t fit within the marketing budget of a small business. However, influencer marketing is the fastest growing method for customer acquisition in the digital world.
Furthermore, 67% of brands are planning to increase their influencer marketing budget within the next year. So how can a small business afford to implement a strategy like this? You can find social influencers who are much more cost-efficient than a celebrity. Try partnering with micro influencers to increase your product credibility. This type of influencer may not have millions of followers, but you can get them to post content about your brand for a few hundred dollars. You may even be able to get away with offering just offering them free products in exchange for a post about your brand. This strategy is effective because micro influencers have stronger engagement metrics with their followers. That’s because they are just regular people. An average citizen can’t relate to the lives of Kanye West and the Kardashians. But they can definitely relate to someone who has a regular job. Consider searching for social influencers who live within the area or region of your small business. It’s more likely that their followers will be interested in supporting your brand. Implement automation toolsI know what you’re thinking. Everything that we discussed so far sounds extremely time-consuming. As a small business owner, you need to wear multiple hats throughout the day. Depending on the size of your business, you might be handling the majority of the company’s responsibilities. Becoming a social media content manager wasn’t something you planned for, and it might feel as if there aren’t enough hours in the day for you to handle this. Plus, hiring someone to take on these tasks can be expensive. That may not be something that your business can afford right now. Fortunately, automation resources will solve this problem for you. Check out my favorite time saving social media marketing tools. Using an automation platform—some good examples are Buffer, Hootsuite, and Missinglettr—will allow you to schedule your posts in advance. You can take time once at the beginning of your week to set the dates and times for your posts in the future. Another benefit of using an automation tool is the ability to respond to messages in a timely fashion. Rather than having to check each social platform individually for these messages, you can find software that sends all messages to one inbox. Then you can reply directly from the software. I highly recommend these tools for small business owners who feel they don’t have enough time to effectively manage their social media profiles. Don’t let that impair your marketing strategy. Encourage user-generated contentThis connects to my discussion about the type of content you should be posting. You can’t go wrong by sharing content that encourages UGC.
As you can see from these numbers, user-generated content has a direct correlation with the consumer buying decision. UGC will also help you build brand awareness. Here’s why. Let’s say you run a contest on Instagram where participants have to post pictures featuring them using one of your products. Your small business just got exposed to a wider audience. Anyone who follows people who enter the contest will see your brand being promoted, even if those people don’t follow you. A whopping 92% of consumers say they trust a referral if it comes from someone they know. UGC is a great way for you to get more followers and ultimately turn those new followers into buyers. Take advantage of ephemeral contentEphemeral content is different from a regular post. This type of content is only displayed for a short period of time, such as 24 hours. The most common places where you’ll find ephemeral content for social media is on Instagram and Snapchat. Both of these platforms have a “story” feature. I highly recommend using an Instagram story to promote your business. I briefly mentioned this earlier when discussing how frequently you should post content. If you want to post several times per day, do it on your story. This won’t spam the timelines of your followers. If you haven’t used ephemeral content just yet, give it a try in your next promotion to see how it goes. Broadcast live video streamsSmall businesses can also benefit from broadcasting live video content on social media platforms. Facebook, YouTube, and Instagram all have options to do this. Just take a look at some of these statistics about Facebook Live:
Basically, your live stream will boost your engagement metrics. It will also give you a more authentic interaction with your audience. You can use your live broadcast in many different ways. But one of my favorites for small businesses is a behind the scenes look. Show your followers what happens behind closed doors at your business. Give them a tour of your production facility, office, and introduce them to your staff. This will make them feel as if they are seeing something that’s exclusive and ultimately bring them closer to your brand. Live video is also a great distribution method for product demonstrations, events, or Q&A sessions. Your live audience will be able to comment on your stream in real time. Make sure you acknowledge those comments and respond to your followers. ConclusionYour small business needs to use social media to stay relevant in today’s day and age. Just having a Facebook profile alone is no longer acceptable if you want to maximize your social media marketing proficiency. Create profiles on multiple platforms as long as your target audience is active on those channels. You need to post content on a regular basis. Just make sure your posts are all related to your clearly established marketing goals. Your profiles need to be appealing to consumers. Run campaigns designed to get more followers. To further extend your reach, find social influencers to promote your business. Encourage user-generated content. Add ephemeral content and live broadcasts to your social media marketing strategy. If you don’t have time to manage all your social media pages, consider using automation tools to make your life easier. Follow the advice I’ve outlined in this guide, and it will bring the social media marketing strategy of your small business to the next level.
Do you want more traffic?
To get help with improving your traffic, leads, and revenue, fill out your info.
via Quick Sprout https://www.quicksprout.com/social-media-for-small-business/ Anyone can have a great idea. But turning an idea into a viable business is a different ballgame. You may think you’re ready to launch a startup company. That’s great news, and you should be excited about it. Take it from me: as someone who has founded several startup companies, I know what it takes to be successful in this space. Before you start seeking legal advice, renting office space, or forming an LLC, you need to put your thoughts on paper. This will help you stay organized and focused. You’ll also be able to share this plan with others to help you get valuable feedback. I don’t recommend starting a company without consulting people first. A typical business plan consists of the following elements:
I recommend using the LivePlan business plan software to help guide you through structuring your business plan in the proper way. You can get 25% off of LivePlan here. Thoroughly writing out your plan accomplishes several things. Save your business plan progress in one place across all the document apps you use. First, it gives you a much better understanding of your business. You may think you know what you’re talking about, but putting it on paper will truly make you an expert. Writing a formal plan increases your chances of success by 16%. Having a business plan also gives you a better chance of raising capital for your startup company. No banks or investors will give you a dollar if you don’t have a solid business plan. Plus, companies with business plans also see higher growth rates than those without a plan.
If you have an idea for a startup company but not sure how to get started with a business plan, I’ll help you out. I’ll show you how to write different elements of your business plan and provide some helpful tips along the way. Here’s what you need to know to get started. Make sure your company has a clear objectiveWhen writing a company description, make sure it’s not ambiguous.
isn’t going to cut it. Instead, identify who you are and when you plan on going into business. State what kinds of products or services you’ll be offering and in what industry. Where will this business operate? Be clear whether you’ll have a physical store, operate online, or both. Is your company local, regional, national, or international? Your company description can also incorporate your mission statement. This is an opportunity for you to gain a better understanding of your startup. The company summary forces you to set clear objectives. The type of company you have and how you will operate should be obvious to anyone who reads it. Include the reasons for going into business. For example, let’s say you’re opening a restaurant. A reason for opening could be that you identified that no other restaurants in the area serve the cuisine you specialize in. You can briefly discuss the vision and future of your startup company, but you don’t need to go into too much detail. You’ll cover that in greater depth as you write the rest of your business plan. Keep in mind, this description is a summary, so there’s no reason for you to write a ton. This section should be pretty concise and no more than three or four paragraphs. Identify your target marketYour business isn’t for everyone. Although you may think everyone will love your idea, that’s not a viable business strategy. One of the first steps to launching a successful business is clearly identifying the target market of your startup. But to find out whom you’ll target, you need to conduct market research.
This is arguably the most important part of launching a startup company. If there’s no market for your business, the company will fail. It’s as simple as that. All too often I see entrepreneurs rush into a decision because they fall in love with an idea. Due to this tunnel vision, they don’t take the necessary steps to conduct the proper research. Sadly, those businesses don’t last. But if you take the time to write a business plan, you may discover there’s not a viable market for your startup before it’s too late. It’s much better to learn this information in these preliminary stages than after you’ve dumped a ton of money into your venture. To figure out your target market, start with broad assumptions and slowly narrow it down. Typically, the best way to segment your audience is using these four categories:
Start with things like:
As I said earlier, start broadly. For example, you may start by saying your target market lives in North America, and then narrow it down to the United States. But as you continue going through your market research, you can get even more specific. You can target customers living in New England, for example. By the time you’re finished, the target market could look something like this:
This profile encompasses all four demographic segments I mentioned earlier. Plus, it’s very specific. Your business plan should talk about the research you conducted to identify this market. Talk about the data you collected from surveys and interviews. You’ll use this target market in other sections of the business plan as well when you discuss future projections and your marketing strategy. We’ll cover both of those topics shortly. Analyze your competitionIn addition to researching your target market, you need to conduct a competitive analysis as well. You’ll use this information to create your brand differentiation strategy.
When you’re writing a business plan, your startup doesn’t exist yet. Nobody knows about you. Don’t expect to be successful if you’re planning to launch a competitor’s carbon copy. Customers won’t have a reason to switch to your brand if it’s the same as the company they already know and trust. How will you separate yourself from the crowd? Your differentiation strategy could involve your price and quality. If your prices are significantly lower, that can be your niche in the industry. If you have superior quality, there is a market for that as well. Competitive analysis should be conducted simultaneously with identifying your target audience. Both of these fall under the market research category of your business plan. Once you figure out who your competitors are, it will be easier to determine how your company will be different from them. But this information will be based on your target market. For example, let’s say you’re in the clothing industry. Your competitors will depend on your target market. If you’re planning to sell jeans for $50, you won’t be competing with designer brands selling jeans for $750. Or you can base your price differentiation on what you learned about your target market. From there, you’ll be able to identify your competitors. As you can see, the two go hand in hand. Budget accordinglyYou need to have all your numbers in order when you’re writing a business plan, especially if you’re planning on securing investment funding. Figure out exactly how much money you need to start the business and stay operational; otherwise, you’ll run out of money.
Running out of cash is one of the most common reasons why startup companies fail. Taking the time to sort your budget out before you launch will minimize that risk. Consider everything. Start with the basics like:
Here’s an example of what this will look like in your business plan:
These numbers need to be accurate. When in doubt, estimate higher. Things don’t always go according to plan. In the example above, although the total startup expenses are less than $28k, it may not be a bad idea to raise $40k or even $50k. That way, you’d have some extra cash in the bank in case something comes up. You don’t want poor budgeting to be the reason for your startup’s failure. Identify your goals and financial projectionsLet’s continue talking about your financials. Obviously, you won’t have any income statements, balance sheets, cash flow reports, or other accounting documents if you’re not fully operational. However, you can still make projections. You can base these projections on the total population of the target market in your area and what percentage of that market you think you can penetrate. If you have an expansion strategy in mind, this would also be outlined in your financial projections. These projections should cover the first three to five years of your startup. Make sure they are reasonable. Don’t just say you’ll make $10 million in your first year. In fact, your company may not be even profitable for the first couple of years. That’s OK. As long as you’re being honest with yourself and potential investors, your financial plan will cover your break-even analysis.
While it’s reasonable to expect your sales revenue to increase each year, you still need to take all factors into consideration. For example, if you’re planning to expand to a new location in year four, your financial projections need to be adjusted accordingly. You may not be profitable until your third year of operation, but if you’re opening a new facility in year four, that year may have a net loss as well. Again, this is completely fine as long as you’re planning and budgeting accordingly. Another example of a goal could be launching an ecommerce store in addition to your brick-and-mortar locations. Just don’t try to bite off more than you can chew. Keep everything within reason. Clearly define the power structureYour business plan should also cover the organizational structure of your startup. If it’s a small company with just you and maybe one or two business partners, this should be easy. But depending on how you’re planning to scale the company, it’s best to get this sorted out sooner rather than later. Here’s an example of what your organizational chart may look like:
It’s really important to have this hierarchy in place before you get started. That way, there’s no debate over who reports to which position. It’s clear who is in charge of specific people and departments. Don’t get too complex with this. If you put too many layers of managers, directors, and supervisors between the top of the chart and the bottom of the chart, things can get confusing. You don’t want any instructions or assignments to get lost in translation between levels. You also don’t want anyone to be confused about who is in charge. This is an opportunity for you to outline how your company will operate in terms of board members and investors. Who has the final say in decisions? While I understand you may need to give up some equity in your startup to get off the ground, I recommend keeping the power in your hands. Discuss your marketing planYour marketing plan relies on everything else I’ve talked about so far. How will you acquire customers based on the market research of your target audience and competitive analysis? This strategy needs to be aligned with your budget and financial projections as well. I could sit here and talk about different marketing strategies all day. But there’s no right or wrong way to approach this for your startup company. My recommendation would be to stay as cost-effective as possible. Be versatile and well-balanced too. Acquiring customers is expensive. You don’t want to dump your entire marketing budget into one strategy. If it doesn’t work, you’ve got nothing to fall back on. Take these categories into consideration when you’re coming up with a marketing plan:
Before you try anything too crazy, get the basics sorted out first:
Don’t ease into this one step at a time. Come out fast. Even before your company officially launches, you can start building your website and social media profiles. The last thing you want is for consumers to find out about your brand but then be unable to find your website or contact information. Or worse, get directed to a website that’s broken or unfinished. Keep it short and professionalI’ve talked about many different components of your business plan. It may sound overwhelming, but don’t be alarmed. This shouldn’t be a 100-page dissertation. You definitely want it to be detailed and thorough, but don’t go overboard. There’s no exact number of pages it should be, but have at least one page per section. It should also be written cleanly and professionally. Don’t use slang terminology. Proofread it for grammatical and spelling errors. Remember, you may need to use this to raise capital. People may be hesitant to give you money if you overlook the small stuff like proper grammar. ConclusionLaunching a startup company is exciting. It’s easy to get so caught up in the moment that you rush into things. If you want to set yourself up for success, you need to take a step back and plan things out. Going through the process of writing a formal business plan will increase your chances of securing an investment and also improve your potential growth rate. The market research you’ll need to conduct in order to write this plan will also help you determine whether this is a viable business venture to proceed with. If you’ve never written a business plan, use this post as a guide for what you should include. Follow my tips for best practices. Writing a business plan may seem like a tedious task right now, but I promise it will keep you organized and save you lots of headaches down the road. Get started by using LivePlan business plan software to create your perfect business plan today. Get 25% off of LivePlan here. Good luck! via Quick Sprout https://www.quicksprout.com/how-to-write-a-business-plan-for-your-startup/ As a business owner, you have to keep coming come up with creative ways to attract new customers. But as you know, this type of marketing can be expensive. It’s much more cost-effective to market to your existing customers than to find new ones. Acquiring a new customer is six to seven times more expensive than retaining a current customer. Sure, you may be very profitable right now without putting too much emphasis on acquisition. However, that business model isn’t sustainable forever. You can’t grow at an exponential rate without expanding your customer base. Sooner or later, you’ll need to run marketing campaigns to attract new customers. That’s why you need to implement customer acquisition strategies that won’t break the bank. A customer referral program is one of my favorite ways to do this. Your campaigns will leverage your existing customers to bring in new business. Take a look at the most significant driving factors of retail revenue:
As you can see, retention and acquisition ranked first and second on the list. Combining both of these into one marketing campaign will be very beneficial for your business. If you can properly implement a customer referral program, you’ll get new customers without having to do much work. All you have to do is set up the program. The rest will take care of itself. Don’t get me wrong. It’s not as easy as it sounds. The key here is coming up with the right referral program that gets your current customers excited enough to participate. Whether you’re creating your first customer referral program or trying to improve your existing one, this guide will help you. I’ll tell you everything you need to know about referral programs that drive sales. Prioritize the customer experienceBefore you start worrying about the logistics of your referral program, you need to make sure your existing customers are properly taken care of. After all, this strategy won’t work if your customers are unhappy. Research shows that 89% of businesses named customer experience as a key factor for customer retention and loyalty. In fact, customers care more about the customer service than the quality of whatever they are purchasing. Research indicates 86% of consumers are willing to pay more money for an enhanced customer experience. This type of service starts at the top of the organization and works its way down. As the owner, you need to set the tone and make sure all your employees know how important customer service is to your success. Unhappy customers are bad for business. Only 1 out of 26 dissatisfied customers will complain. What about the other 25? They’ll leave without saying a word. According to research, 68% of customers say they left a company because they believe the brand didn’t care about them. Don’t let this happen to you. Let your customers know how much you care. Happy customers are much more valuable. In fact, more than 80% of customers say they are willing to make referrals.
Unfortunately, only a smaller percentage actually do. That’s why your referral program will need to provide some extra incentives, but we’ll talk about that in greater detail shortly. Offer referral incentivesIf customers are happy, you’ll get some organic referrals even without implementing a program. But for the most part, you can’t rely on such referrals alone when it comes to driving sales and getting new customers. It’s not scalable. Give your customers a reason to refer their friends and family. Discounts and other monetary benefits will be the most actionable. Put yourself in your customers’ shoes for a minute. Think about some of your favorite brands. Are you going to spend a ton of time trying to bring them new customers? If it comes up in a conversation, you might make a recommendation. But I assume you’re probably not actively going out of your way to do this. However, I’m willing to bet that if the company offered you a credit, discount, or reward for these efforts, it would probably change your approach. On the flip side, let’s say someone refers you to a new company. Sure, you may be likely to try them out. But an incentive would definitely boost your motivation to do that. The best customer referral programs offer incentives to both current as well as new customers. Here’s an example of this strategy implemented by MeUndies:
It’s a simple concept. When one of their customers refers a friend, the new customer will get 20% off their purchase. Once that purchase is made, the original customer gets a $20 gift card. That adds up fast. The customers know they’ll get a $100 credit if they can convince just five people to make a purchase. This gives them a reason to spread the word. Make sure your incentives are worth it to both parties. The amount needs to be relative to your prices. With the MeUndies example, most of their products fall within that $20 range, so it’s a great amount. But if the reward was only $5, it may not be worth their customers’ time. However, that doesn’t mean $5 won’t work for another business. Check out this referral incentive offered by Bird:
If you haven’t heard of Bird, they are a new brand with an innovative spin on ride sharing. They have electric scooters placed all over different cities. Customers use their mobile app to unlock the scooters. At a rate of just $1 to unlock a scooter and an additional $0.15 per minute, the $5 reward translates to nearly 30 minutes of free riding time. While $5 may not be a big incentive for other referral programs, it is for this one. That’s what you need to come up with. Take a look at your products or services, and decide what would be a good offer. You don’t want to offer something too high that’s going to lose you money, but it also can’t be so low that it doesn’t motivate customers. Find that sweet spot in between, and set your incentives at that amount. Focus on a fast ROIJust like with any other marketing campaign, you want to make sure your referral program makes sense from a financial standpoint. If you’re spending money without getting a return on your investment, you obviously won’t be profitable. But the great thing about referral programs is that unlike traditional acquisition campaigns, they cost much less. This connects to my previous point about finding an incentive that will encourage sales without depriving you of your profits. When you’re unsure how to do things, it’s always a good idea to follow the lead of those who succeeded before you. Take a look at Uber.
That’s one of their initial referral promotions. It was a standard “give $20, get $20 concept.” Let’s do some simple math here. If the current customer and new customer each get $20, the cost per acquisition is $40 based on this campaign. I know what you’re thinking: $40 per acquisition sounds high. You might not think your business can afford something like this. But if you do your research ahead of time, you’ll be able to get a quick ROI if you know your margins. In a short period of time, Uber turned into an international giant. Customer referrals were the driving force behind their expansion strategy. I came across a recent study that analyzed how they were able to accomplish this:
Keep these numbers in mind. If Uber kept 25% of what the average customer spent in a month, that would mean they would break even in less than two months if their acquisition costs were $40. Once that $40 is repaid, everything else is profits. The $20 for $20 offer is no longer available in every city or region. Once they were able to control a large portion of the market share and prove their concept, they lowered the incentive. However, the new customers were already hooked. You can apply the same approach to your referral program. Start off with high incentives to spread the word fast, but make sure you get a return on your investment. After that, you can always make adjustments that translate to higher profits for your business. Set yourself up for growthThink about how you were able to get your existing customers to refer their friends. You leveraged their customer loyalty and offered an incentive. Now, you have to apply that concept to these new customers. Don’t waste any time. This is your chance to secure them for the long haul as well. Sure, they made a purchase because of a recommendation. We know 92% of consumers trust a recommendation if it comes from someone they know. Your new customers already have a positive impression of your brand. Now you have to convince them to stay. Once they make that first purchase because of the incentive you offered, what’s next? Use your email marketing strategy to create an actionable drip campaign, and encourage these customers to buy again in the future. Make sure they understand they can benefit from the referral program. This should be much easier for you because referred customers are more willing and likely to refer more new customers.
Furthermore, the profit margins from referred customers are roughly 25% higher than from non-referred customers. Your customer referral program can set you up for exponential growth. Think about how successful you would be if each new customer referred just one new customer. And then imagine all of those new customers also referred a friend. Can you see how quickly this could turn into a sales-driving formula for your company? Keep an eye on quality controlThis whole concept started with prioritizing the customer experience. Don’t ruin that. For example, let’s say a customer refers a friend, but due to some glitch in your system, they don’t receive their incentive. That’s a big problem for you. Now they went from a happy customer, who wants to refer their friends, to a dissatisfied customer, who thinks you’re trying to take advantage of them. Instead of getting an additional customer, you may have lost one. It’s important you thoroughly check all the technology associated with your referrals. How will you send the incentives? Text. Email. Social media. Promo code. Make sure each distribution method works. Here’s something else to consider. You have to keep an eye out for customers who may be trying to rip you off. Just like with anything else, there will always be people looking to take advantage of the system. You spent the time and crunched the numbers to come up with the perfect incentives for your customer referral program. In order for you to profit, those margins can’t be tampered with. Customers might create multiple accounts and refer themselves to get the incentive on both accounts. If this happens, you’ll end up losing money without getting a new customer. Make sure you have some safety nets in place to catch and/or prevent this type of occurrence. ConclusionYour business needs new customers. With high average acquisition costs, you need to focus on cost-effective marketing campaigns. Leveraging your current customers is the best way to do this. First, you need to focus on providing excellent customer service. Next, you’ll have to come up with an incentive that encourages the current customer and prospective customer to make a purchase. Set yourself up for exponential growth and a quick return on your investment. Keep an eye on the quality. You need to make sure your program works from a technical perspective and that nobody takes advantage of any loopholes. If you implement this strategy, you’ll see an increase in sales from both current as well as new customers. via Quick Sprout https://www.quicksprout.com/how-to-implement-a-customer-referral-program-that-drives-sales/ A few years back when I first started NeilPatel.com, I spent $66,372.09 on paid advertising through LinkedIn, Google AdWords, Retargeter, Perfect Audience, and StumbleUpon ads. You might say that’s a lot of money. It was. But I learned some valuable lessons. I learned which platforms and networks work best for targeting which audiences with which ads. Some of my takeaways? LinkedIn, for example, provided an excellent return on B2B ads, while Google still reigned supreme for B2C. StumbleUpon’s conversion rate for paid products was woefully low. The top three paid ad spots on Google’s SERPs, for example, get 41% of the clicks. Even the best SEO techniques will only expose you to 59% of the viewing audience, and Google’s knowledge graph and infoboxes are quickly cutting into that as well. Marketing professionals across the board agree that pay-per-click advertising works. The hard part is getting set up with a solid PPC plan to serve as your foundation. We need to know how much to spend, when to spend it, where to spend it, and how to spend it correctly. Those are tough calls to make, especially if you’re a paid advertising newbie. The paid platforms can be complicated and confusing. What do you do with all these options, data, and metrics?
To answer these questions and be successful, instead of playing a guessing game, we need information and cold hard data. How PPC worksFirst, a quick lesson in PPC, which you probably already know. I’m including it for the newbs (and a refresher for the pros—it never hurts!). Google and other search engines allow you to purchase ad views on their platforms on a pay-per-click pricing model. The actual price is determined by the number of searches and ads running for a particular keyword or phrase. A popular search term, such as “insurance,” can cost $59 per click to advertise, meaning you’ll have to pay Google $59 for every lead it gets to your website by displaying your ad at the top of the search results for the terms you bid on. This isn’t your typical example, however, as “insurance” is actually the most expensive PPC keyword by a large margin. These costs can be mitigated (and conversions improved) by targeting specific demographics, affinity groups, geographic locations, and mobile devices, which are generating more and more search traffic.
Of course, search engines aren’t the only platforms for paid ads. Social networks and video ads are rising in popularity, as explained in this Search Engine Land article by Pauline Jakober. Video ads in search results aren’t a reality yet, but with Alphabet owning both Google, the world’s largest search engine, and YouTube, the world’s largest video platform, it’s only a matter of time. Determining CAC and LTVCPC isn’t the same as your customer acquisition cost (CAC). What ultimately determines your CAC is your website’s conversion rate. If each web visitor costs $59 to obtain and you’re only converting 50% of your visitors, the customer acquisition cost for your PPC campaign is actually double your CPC, or $118 in the example of insurance. This doesn’t take into account the rest of the marketing budget either, which also includes radio, print, television, social media, billboard, event marketing, and other customer outreach initiatives. The CAC is calculated by dividing all marketing expenses by the number of customers acquired in the same period. For example, if a company spent $10,000 on marketing in a year and acquired 10,000 customers as a result, its CAC is $1.00. Balancing the CAC with the customer’s lifetime value (LTV) is how you create a successful business model.
So long as the LTV is larger than the CAC, your marketing efforts are working, and you have a sustainable business model. When the CAC rises above the LTV, you’re in trouble. Because understanding this concept is critical, here’s a graphic to help make the lesson sink in:
To calculate the LTV of a customer, you need to know how much each customer spends in an average purchase, how many purchases the average customer makes in a certain time period (day/week/month/year), and how long the average customer sticks around. Profit margins, discounts, customer retention rate, and gross margins are all factored in to the final formula, which you can find here. In the case of an insurance company, if an average policy costs $1,000 ($100 is profit), and the average customer is retained for 3 years, you’re making $300 for every $118 spent on your PPC campaign, which is close to the actual average. Businesses make an average of $3 for every $1.60 they spend on AdWords. I’m sure you want to double your money. We all do. But if everyone is advertising for the keyword “insurance,” they’re missing quite a bit of traffic. You need to check associated keywords. Extending keyword searchesThere are millions of searches for insurance every month, but you have no idea whether those people are looking for medical, life, business, home, phone, or auto insurance.
It’s still worthwhile to advertise on a single keyword, but with such a high CPC, you shouldn’t pour all your budget into that one highly competitive keyword.
“Car Insurance,” “insurance quotes,” “auto insurance,” “compare car insurance,” and “car insurance quotes” all have different prices for different search volumes. Spreading your budget across all these keyword phrases increases the chances that your ad is seen by people searching the web in different ways. At this point, your overall CPC will be determined by the cost and frequency of each individual search term. You can afford to buy some traffic for “insurance” and “auto insurance” so long as it’s balanced out with “compare car insurance,” “insurance quotes,” and “car insurance quotes.” You now have a potential pool of customers that’s three times the size of your original pool, which maximizes the reach of your ads. Continue this research into five- and seven-word long-tail searches for the best results. For example, phrases such as “Best car insurance company in Arizona” or “Cheapest car insurance for 2005 Ford Mustang” are great ways to target specific regions or car owners. The longer a search term, the more specific information a customer is typically looking for. While searches may be lower, bids will also be lower, allowing you to obtain some customers for $5 and others for $50 while still maintaining a low CAC. Portioning budgets for each keyword is critical as this is one of two places where smart marketers maximize their ROI. The other is targeting specific customers using Remarketing lists for search ads. Targeting the right customersA few years ago, Google moved beyond focusing on just keyword searches to looking at contextual information about customers. The most valuable result from this change was RLSA—remarketing lists for search ads. RLSA lets you target customers who have visited your website previously.
Bounce rates are high on websites, but just because a customer leaves doesn’t mean they’re not interested. Shoppers may visit a site 9 times before purchasing, so the more they visit, the further down the conversion funnel they may be. Take a look at this sales funnel:
For every 5,000 visitors, only 100 inquiries are received, so why waste ad money on those 100 when you should be focusing on converting the other 4,900? Using RLSA, you can optimize bids to increase your ROI. Tirendo Tires, for example, increased sales by 22% and conversions by 163% simply by raising their bids on previous homepage visitors. World Travel Holdings increased ROI by 30% by using RLSA to target previous site visitors for broad search terms (like “insurance” in the example above). By adding the remarketing tag to your website, you allow Google to further segment your visitors and hyperfocus your PPC ad campaigns. Of course, the downside to these PPC ad platforms is you can’t determine who is already a paying customer. I constantly receive ads for products and services I’ve already purchased, which I know is wasting the advertiser’s money. You also have to be wary of disgruntled customers and employees who may purposefully click your ads without making a purchase. (Seriously, people do this in order to drive up the cost of your ad spend.) Segmenting and targeting ads in any way is an essential step toward optimizing them and getting the most bang for your marketing buck. ConclusionPPC is still one of the most popular methods of advertising, with over $500 billion spent annually on it. It can be exciting to envision massive ROI and all the extra sales you’ll be able to make by simply toggling some ads and letting them run. Before spending any money on a campaign, however, it’s important to understand what keywords and searches have the best conversions for your site. Targeting these searches with ads moves you to the top of the search results, giving you optimal visibility. Beyond just search terms, it’s also important to target customers at specific points in the sales funnel. The actual cost of your PPC campaign isn’t as important as the ratio of CAC to LTV. It’s okay to spend a little more if you are marketing a more expensive product or a company with higher retention rates. So long as your overall marketing budget doesn’t outweigh the lifetime ROI from customers, you’ve built a sustainable business model. How much are you spending on paid search? Are you getting a solid ROI? via Quick Sprout https://www.quicksprout.com/how-much-are-google-ads/ |

Sean BrianWhile radishes deter certain insects naturally, they require similar growing conditions as carrots. Although the crops both have roots, radishes grow and germinate quicker, allowing carrots to continue growing in the soil space available when the radishes are harvested, Archives
April 2023
Categories |


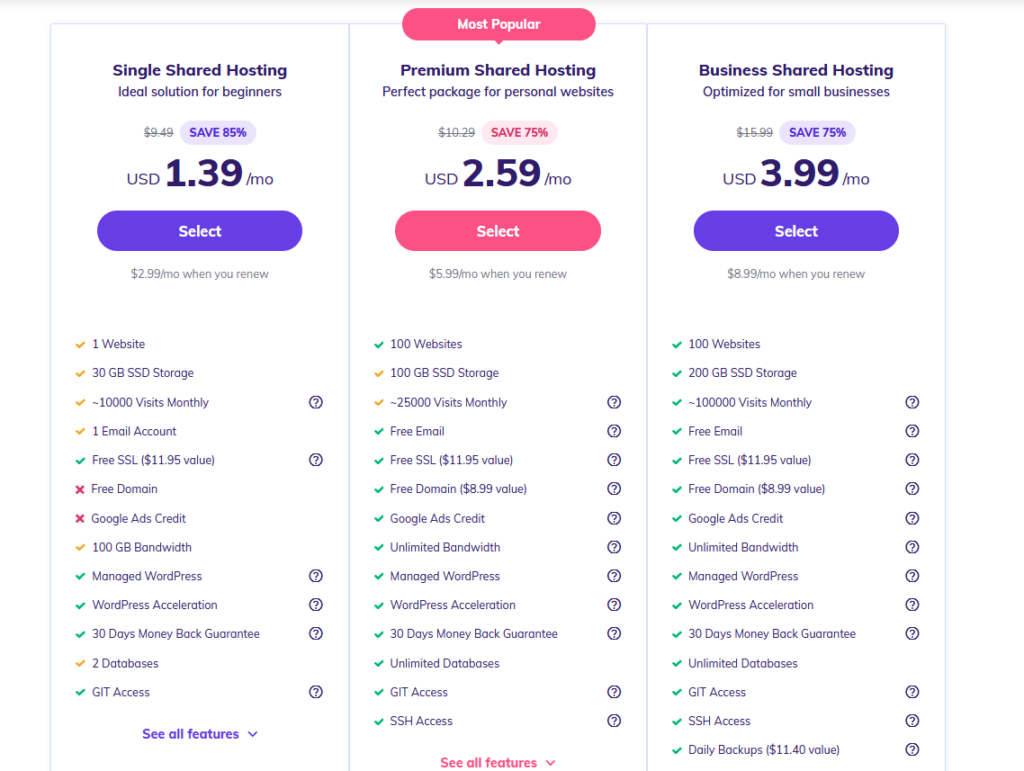

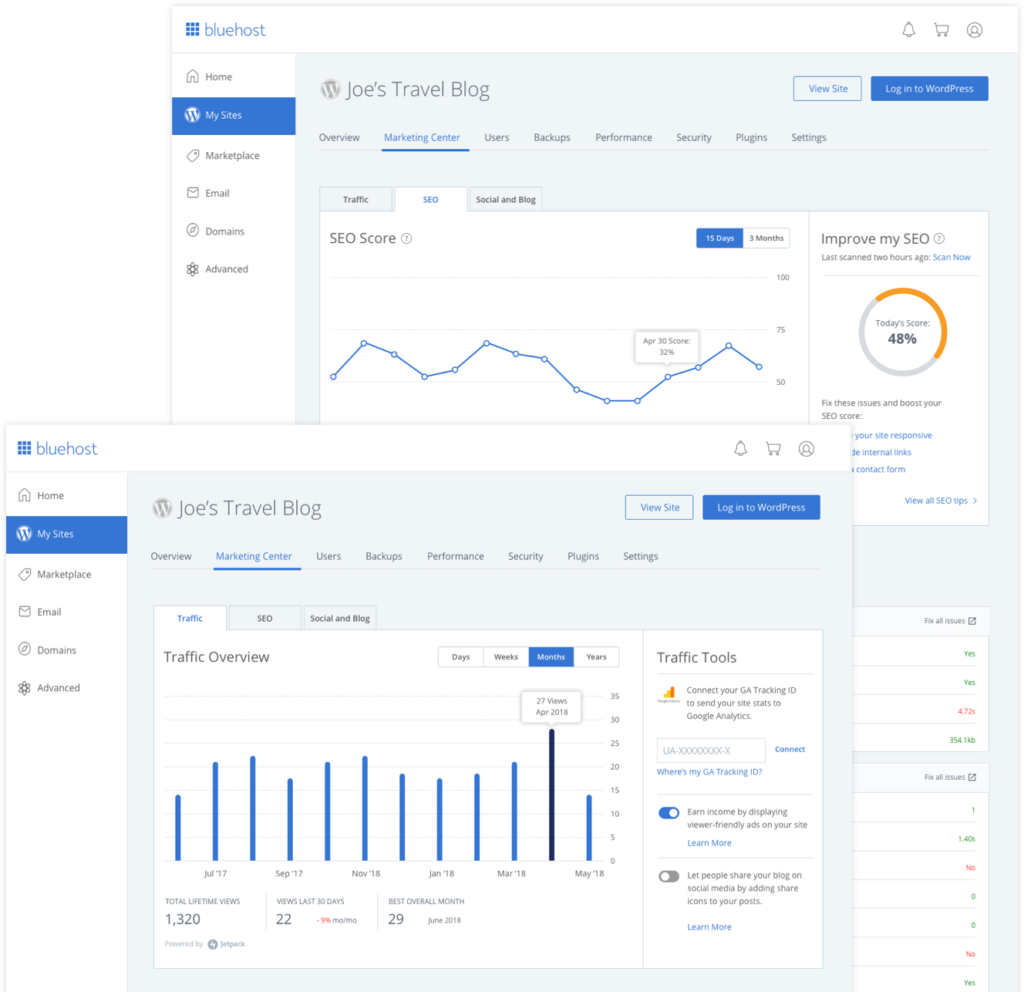
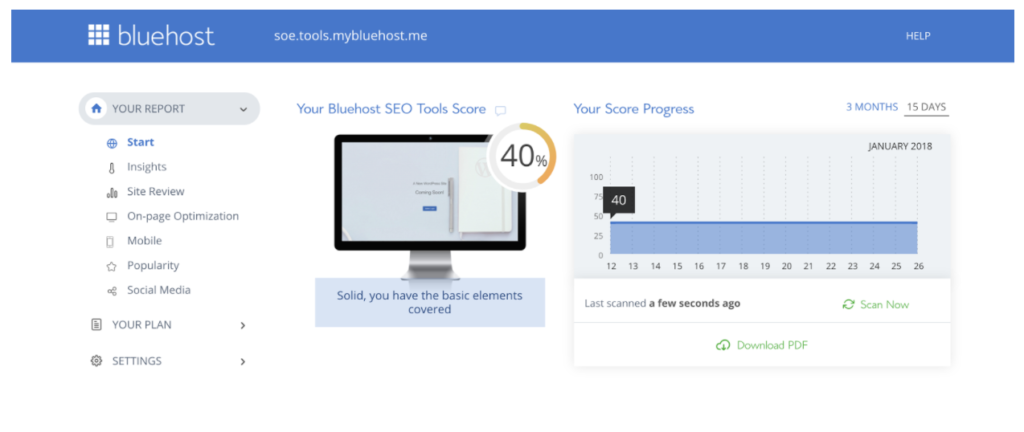

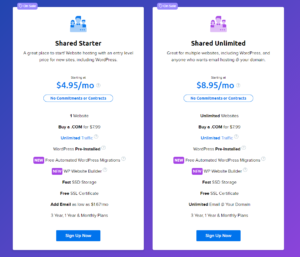


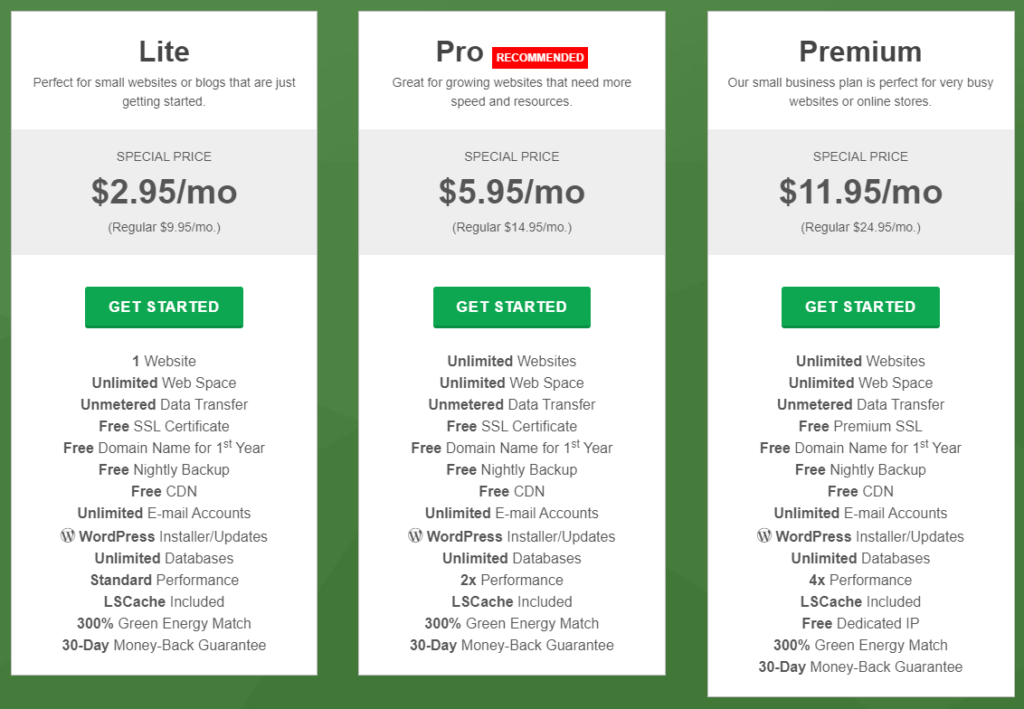

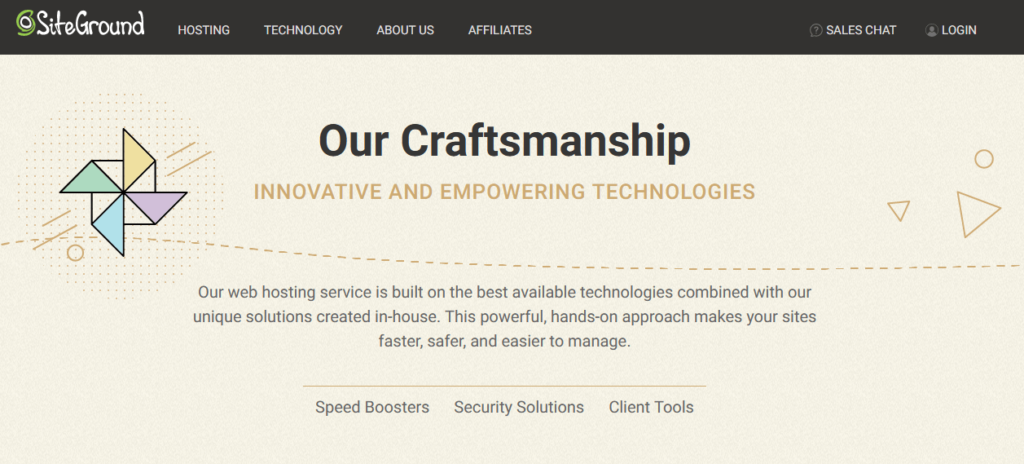
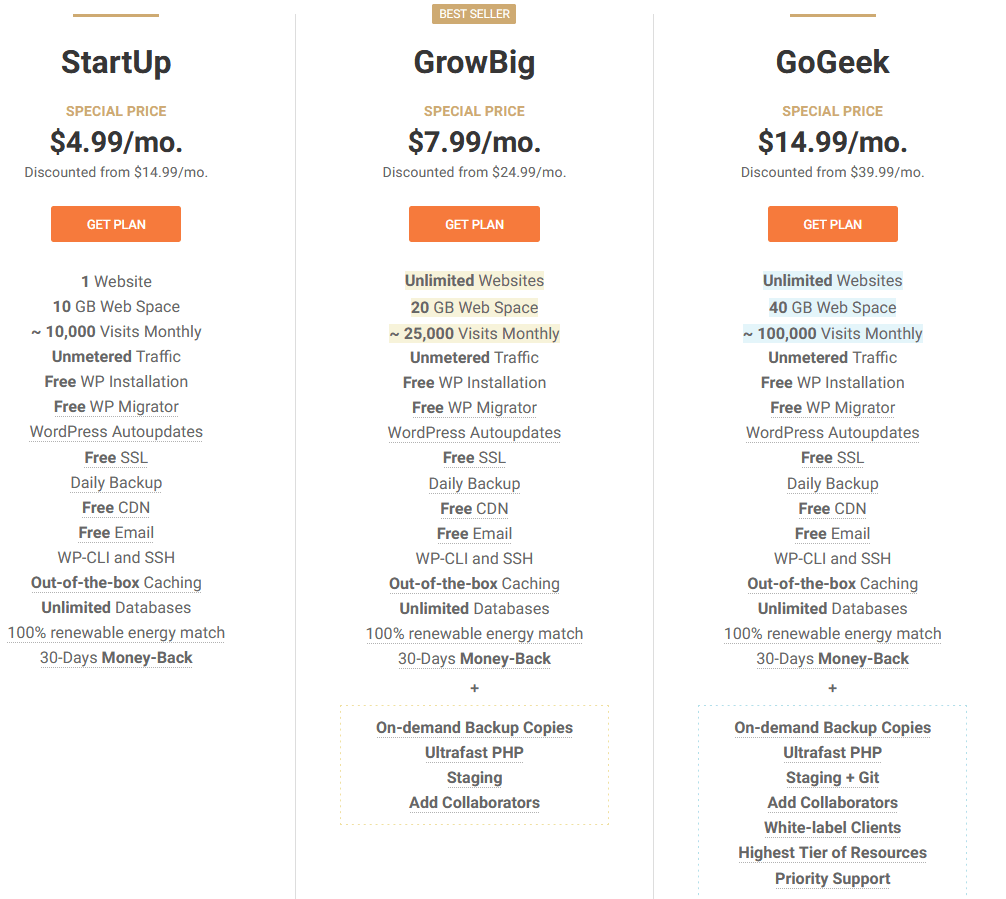
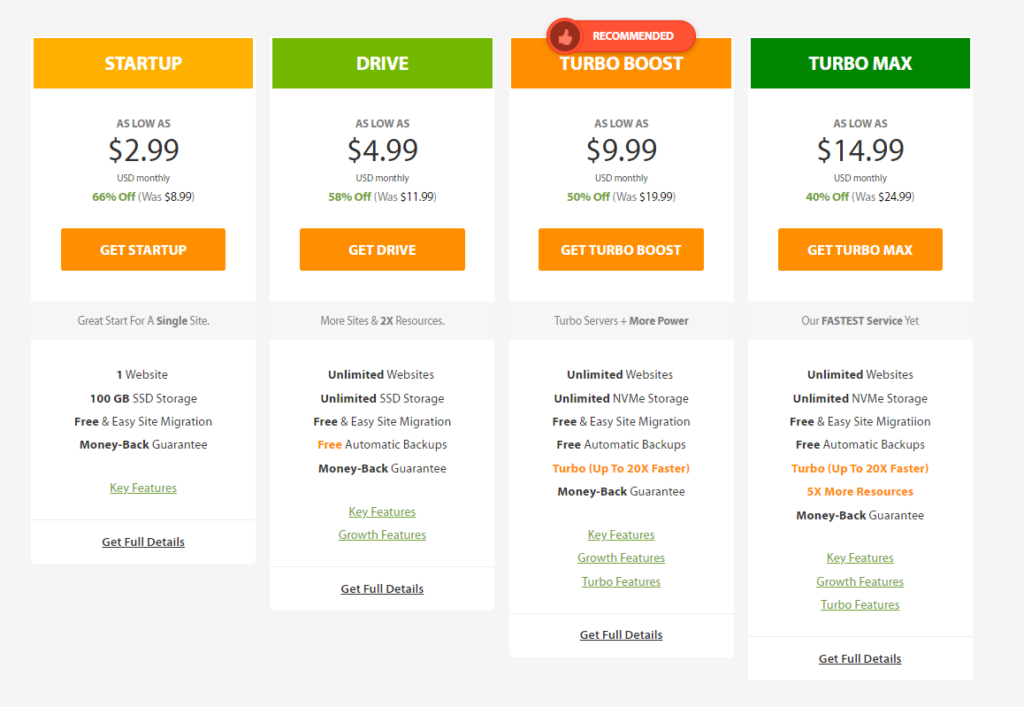


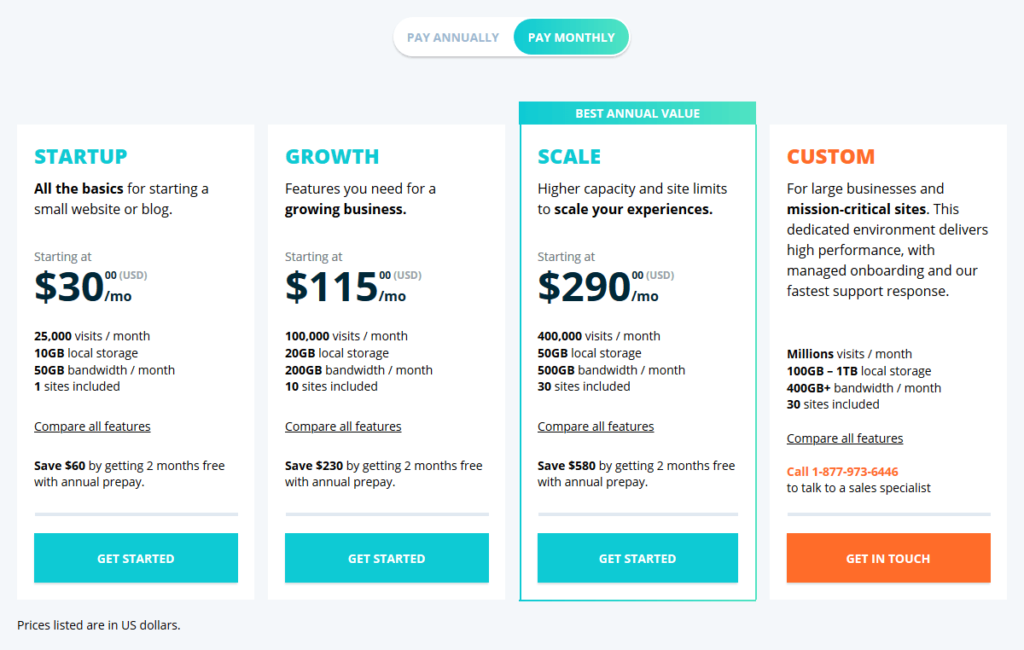

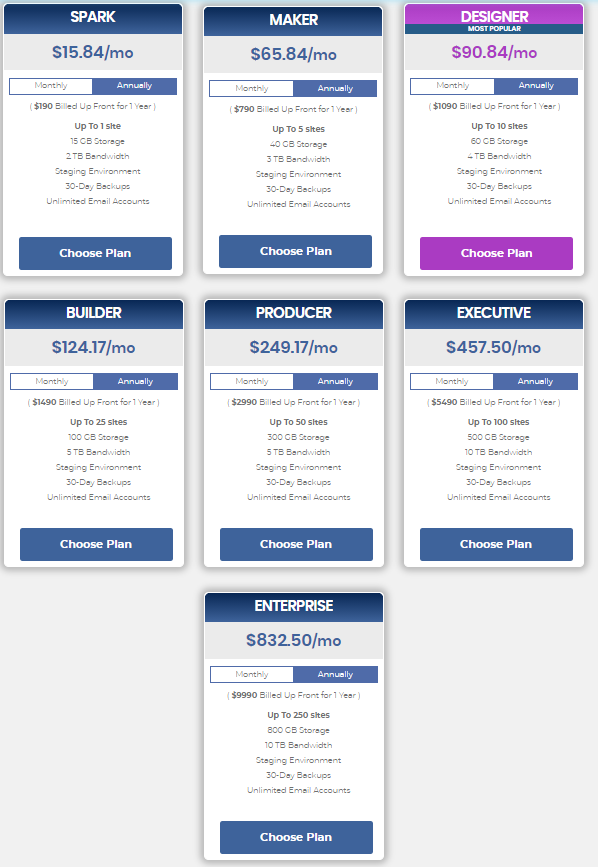
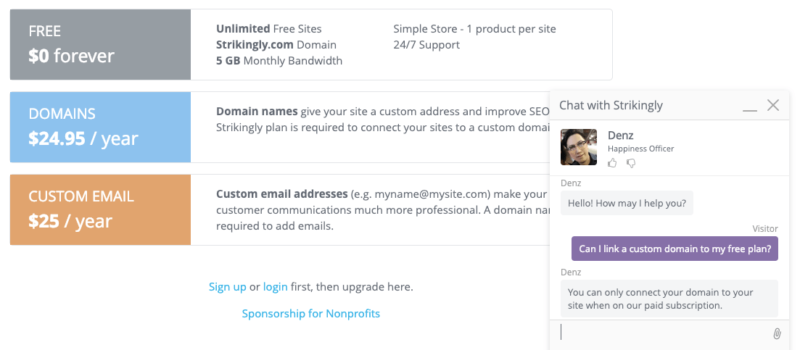
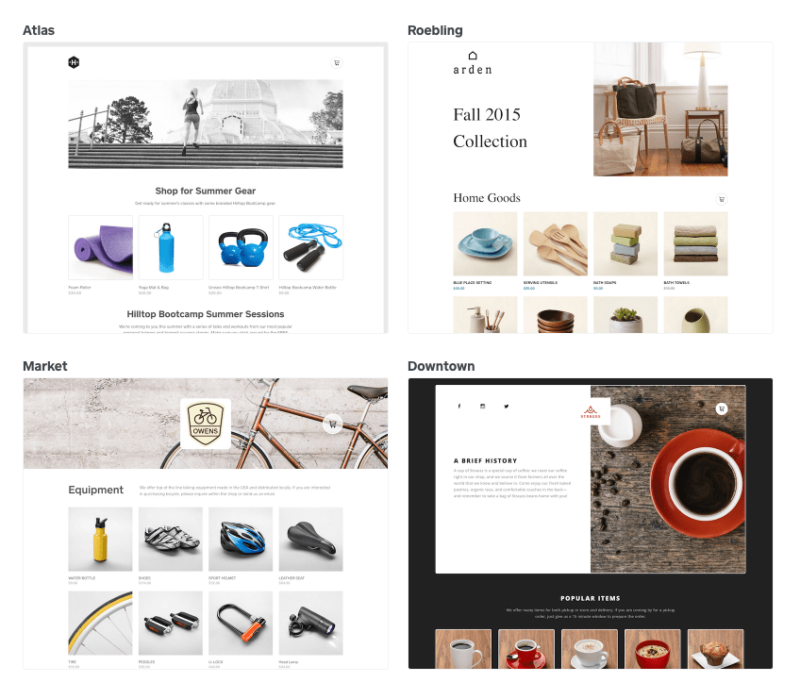
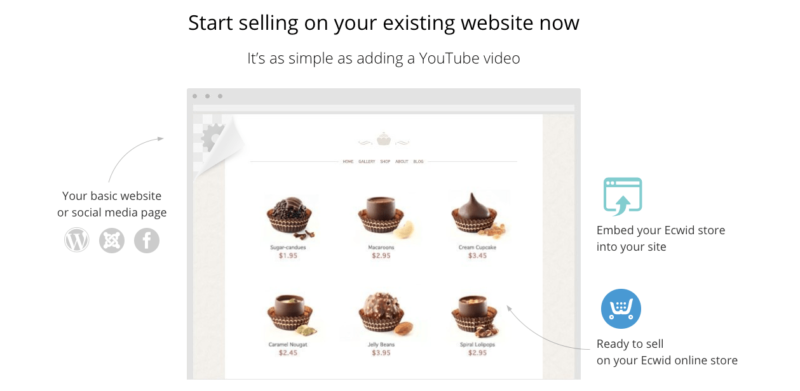


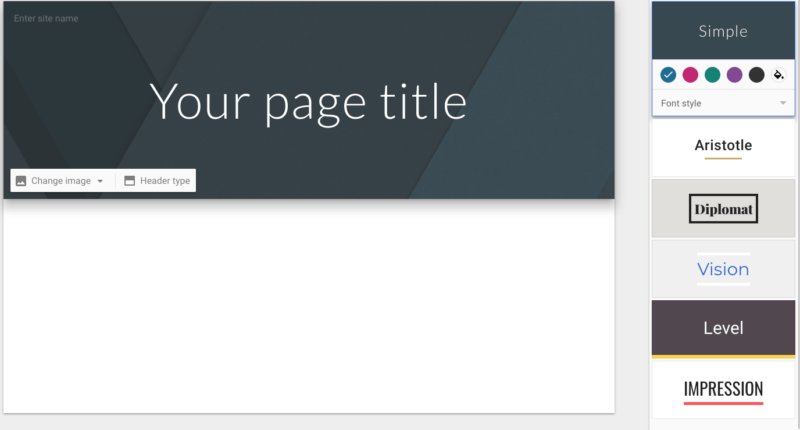


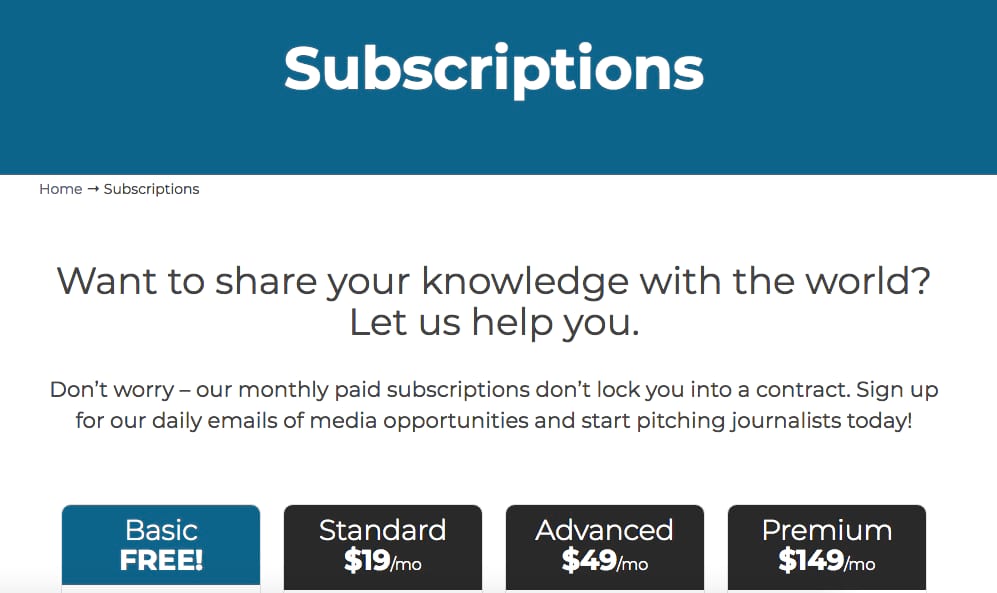
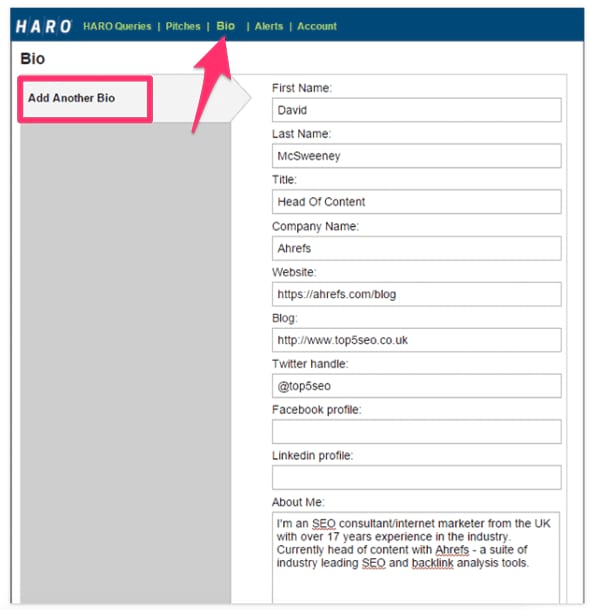
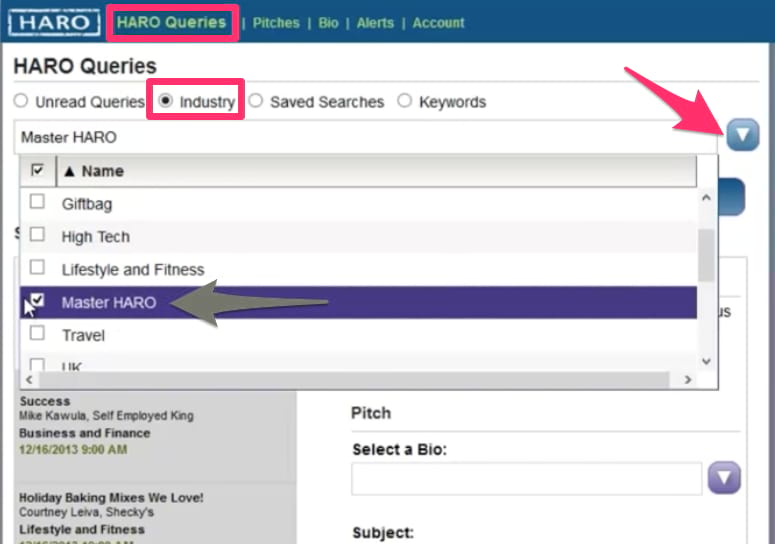
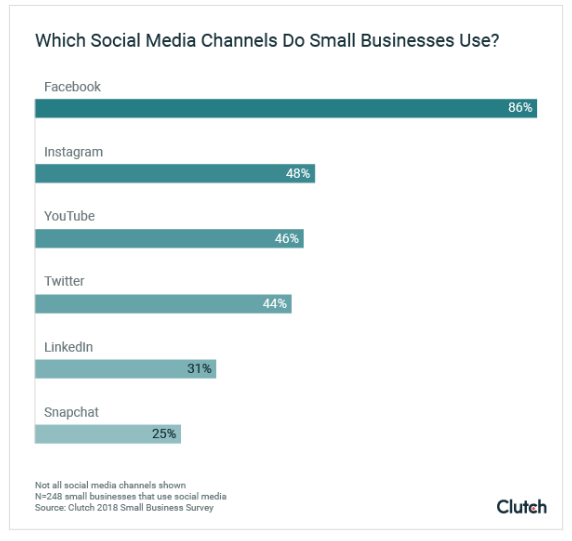
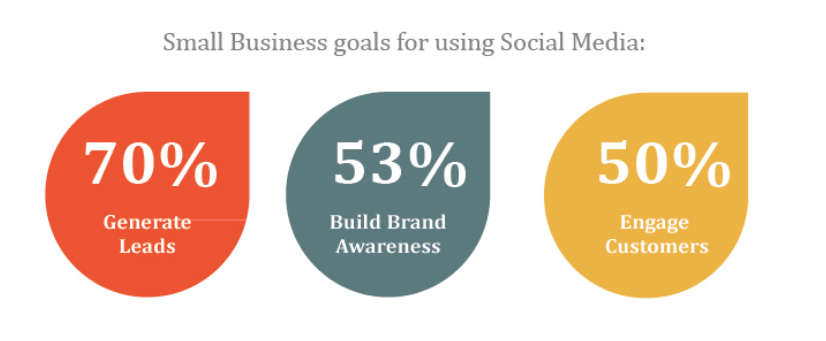
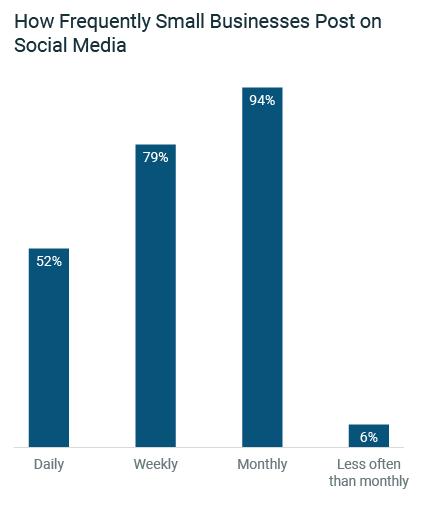
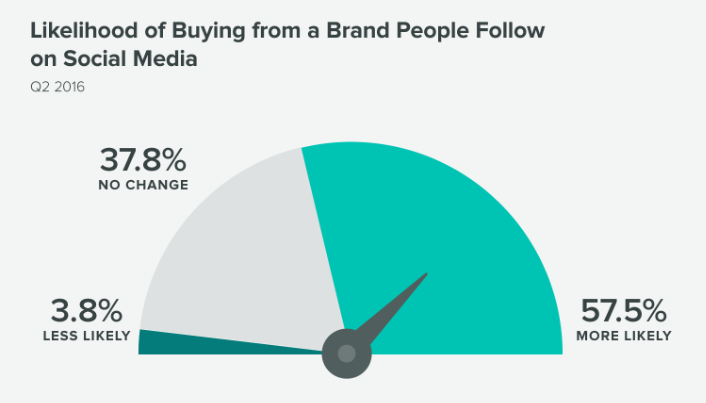
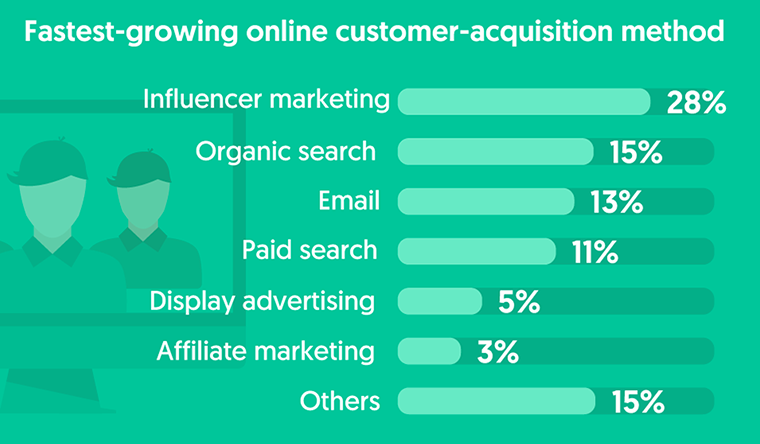
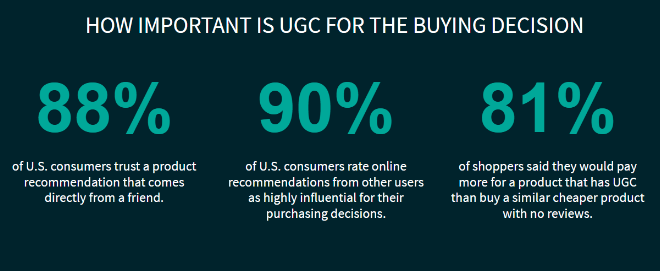

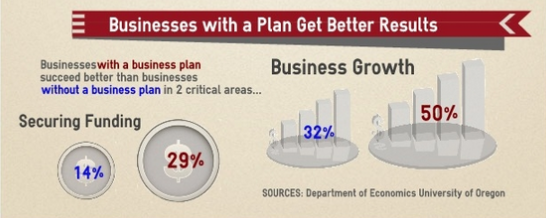
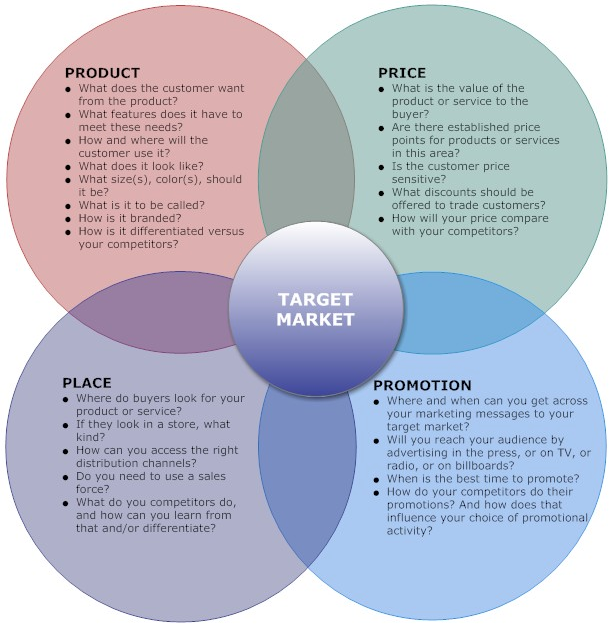
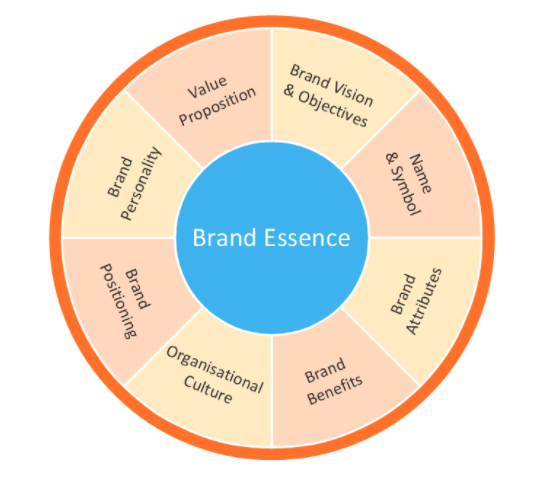
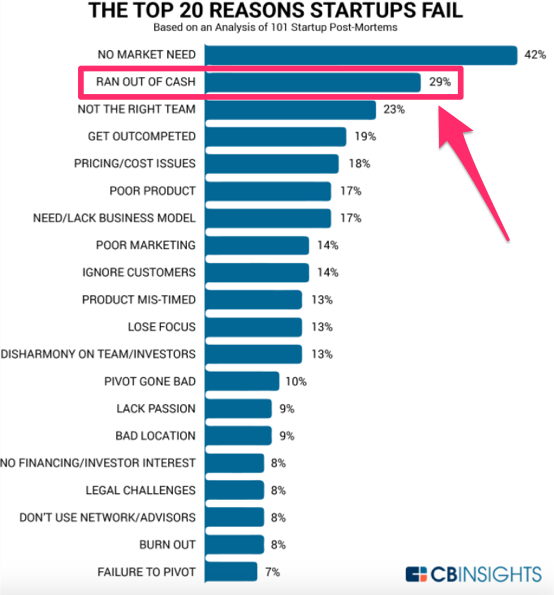


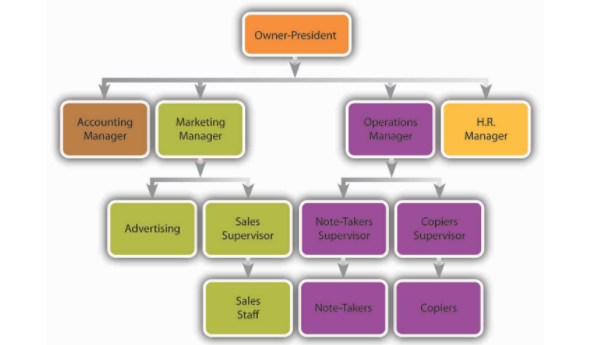
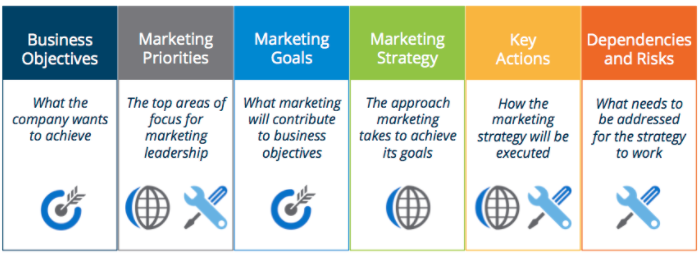
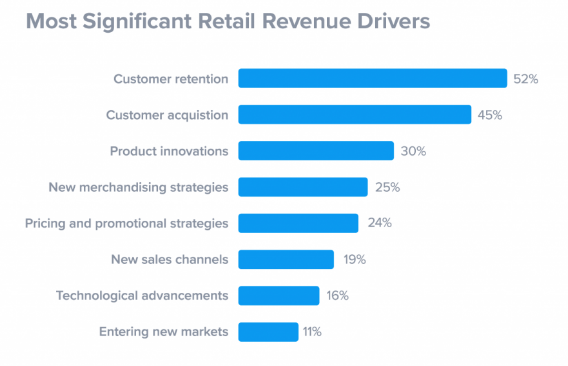
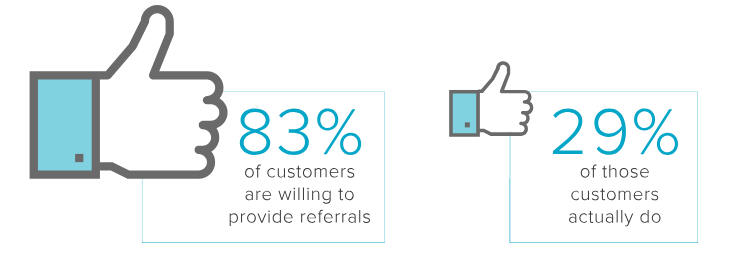


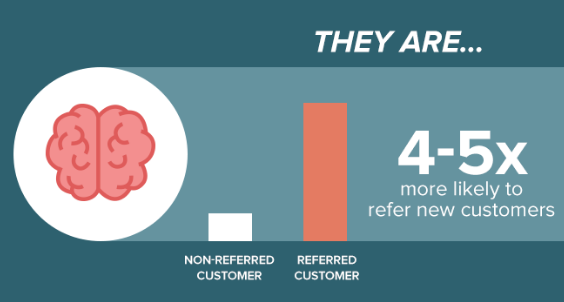
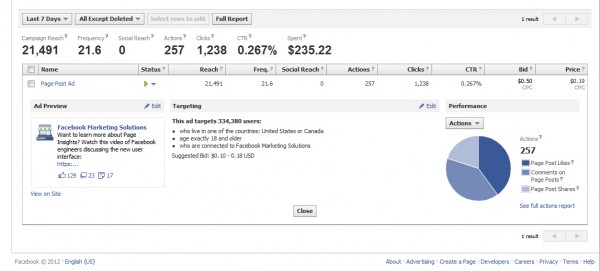

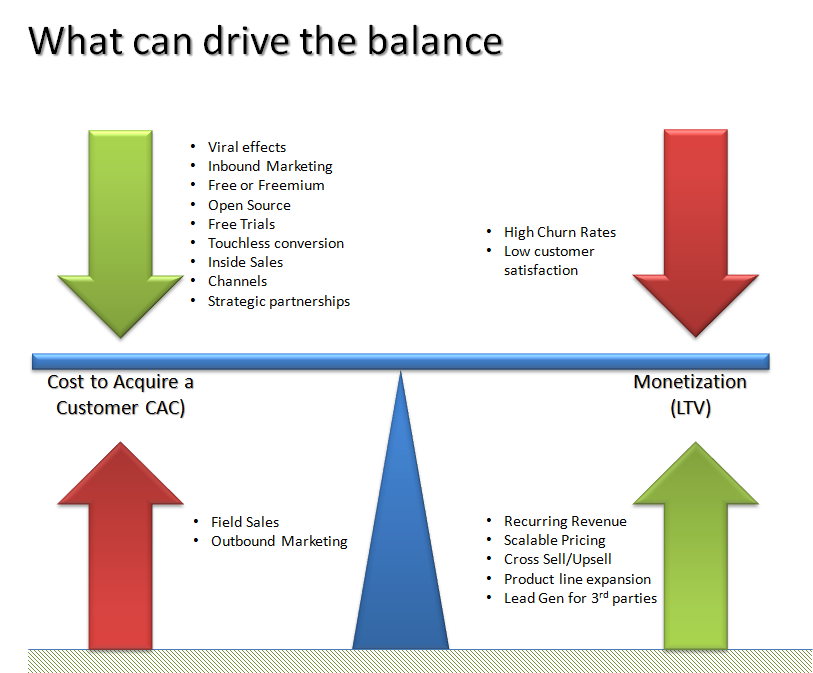
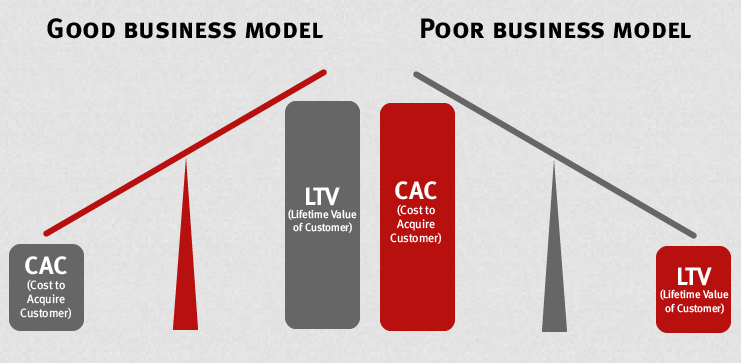

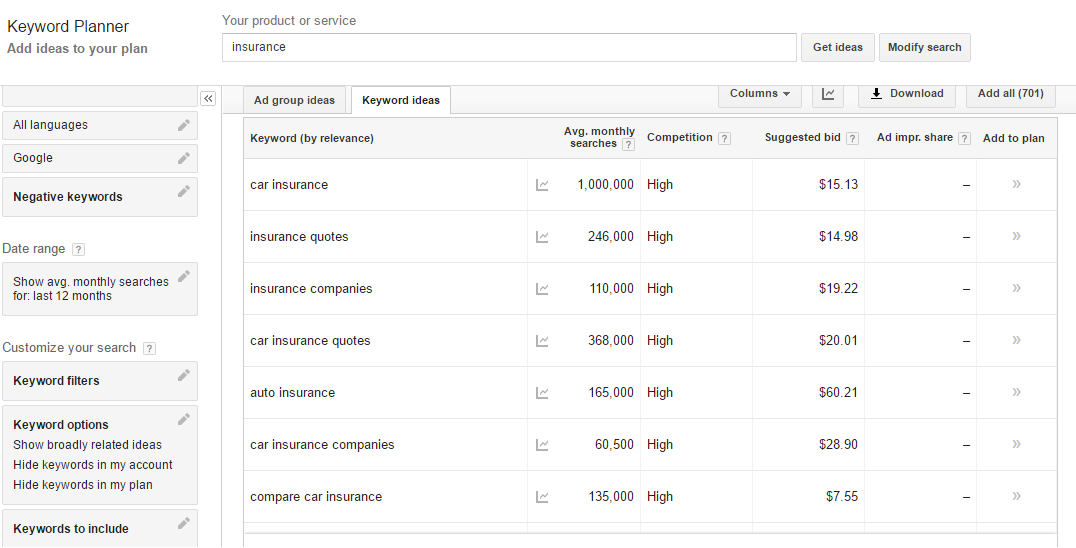
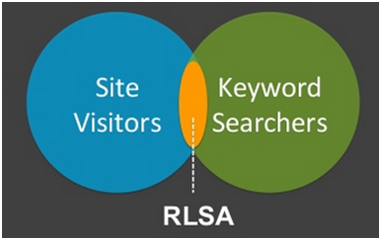
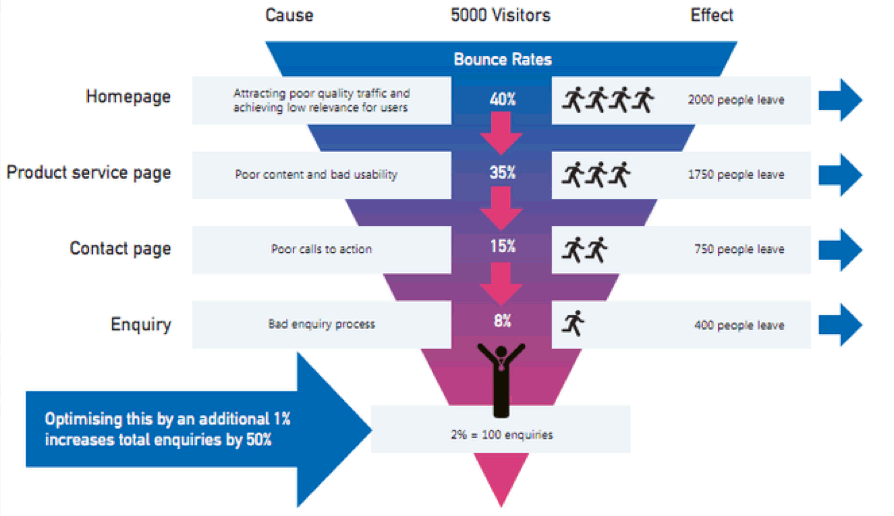
 RSS Feed
