|
Organizational charts—better known as org charts—are a visual representation of a company’s internal structure. Sometimes it’s challenging for people within an organization to understand who they should be reporting to or who they should be communicating with about critical updates or deliverables. Org charts solve these types of problems by showcasing the complete hierarchy of different teams, departments, and the business as a whole. In addition to the role and hierarchical position of each employee, it’s common for org charts to contain things like phone numbers, email addresses, office locations, and even employee photos. So when someone in the organization looks up a colleague on the org chart, contacting that person is a breeze. The Easy Parts of Creating an Org ChartThe easiest part of creating an org chart is getting started. Instead of starting with a blank canvas, Word document, or spreadsheet, modern software makes it easy for anyone to create these from scratch. In fact, lots of the best HR software options on the market have built-in tools for org charts. Since these solutions already contain your employee data, there’s no need to manually input information. Once they are created, it’s easy to share and distribute org charts with the appropriate parties within the business. Some digital org charts are interactive, meaning more details about the employee won’t be displayed on the chart itself until you click the name or position. This helps de-clutter the page, so it’s easier to read and digest. The Difficult Parts of Creating an Org ChartThe biggest challenge with org charts is that they can quickly become outdated. This is especially true for large companies with a high employee turnover rate. It’s easier to update a digital chart compared to one that’s been printed and handed out in person. But if someone isn’t actively monitoring and updating the chart to reflect new hires, promotions, and terminations, the chart quickly loses its effectiveness. Also, org charts only show formal relationships and lines of authority. But those don’t necessarily reflect informal relationships or management style, which means there may well be unofficial hierarchies and connections within the org that the chart won’t identify. Finally, sometimes the org charts for a large organization can be a bit overwhelming. This is especially true if the authority that comes with certain job titles hasn’t been previously established. The person creating the org chart could potentially create problems by placing a role on the wrong hierarchical line of the chart. Step 1 – Determine What Type of Org Chart to CreateThere are several different kinds of org charts to consider. Each has its pros and cons. We’ll take a closer look at some of the most common options below so you can decide which one works best for your organization. Hierarchical Structure Org ChartThis type of org chart starts at the top and works its way down. They typically begin with the CEO at the top and the rest of the C-suite directly below. Positions in the org chart are connected by either a horizontal or vertical line. A vertical line between two roles indicates that the person on top directly supervises the person below. If there’s a horizontal line between two roles, those people are equal but may work within different departments. For example, the CEO could have a vertical line to the CFO and CTO. But there would be a horizontal line between the CFO and CTO, as these positions have equal authority. Most businesses use a hierarchical org chart because it’s the easiest to follow and understand. It works for organizations of all shapes and sizes. Functional Business Org ChartA functional business org chart is similar to a hierarchical org chart in the sense that the formatting and concepts are the same. But functional charts put a stronger emphasis on different departments, which is useful for larger businesses. These charts start by displaying the head of each department followed by who reports to who. The structure may vary slightly for each department as well. For example, a marketing department might have several lines of authority between the department head and employees at the bottom of the chart. But an IT project team might just have a single project manager at the top with all developers, designers, QA reps displayed with equal footing below. Matrix Org ChartMatrix org charts work well for employees who have multiple supervisors. These charts are set up in a way for cross-functional relationships between teams and departments. Similar to hierarchical and functional org charts, relationships between different roles will be represented by solid vertical or horizontal lines. But matrix org charts commonly include dotted lines, used to display a less direct but still important connection between two roles. Companies that want to promote employee innovation and creativity tend to use matrix org charts. That’s because the hierarchy is less prominent, and the departments don’t feel so segregated. The biggest advantage of a matrix org chart is that it encourages communication between different departments that can ultimately build relationships and expose employees to different projects or initiatives. Division Org ChartsA division org chart organizes the structure of a business around specific business activities. This could include a market, region, or product group. Multinational enterprises and big companies tend to use these types of org charts if they have different product or service lines. In this situation, each division operates separately, and the org chart reflects that connection. For example, one division could be for frozen foods in North America. Another division could be beverages in Europe. Within each division, there will be different roles and departments related to sales, production, accounting, R&D, advertising, customer service, etc. Project Org ChartsAs the name implies, project org charts coordinate the roles of a specific activity. In many cases, the project will include individuals from different departments or areas of an organization that may not normally work together. Rather than creating confusing lines or arrows on an already clean org chart, it makes sense to create a completely new chart for the specific project. This helps everyone understand the roles and relationships between different team members. So there’s no confusion on who is in charge and who has the authority to give orders related to the project. In many cases, project org charts are temporary and only valid for the duration of a predefined project. Step 2 – Get Org Chart SoftwareNext, find software that supports the type of org chat you’ve decided to create in the first step. Rather than using a standalone solution for org charts, I strongly recommend using HR software with built-in tools for this process. HR software already has all of your employee information, and it limits the need to bounce back and forth between multiple platforms. It’s more efficient than using spreadsheets, and it will be easier to update the chart as roles and employees change over time. Freshteam is our top recommendation here. It’s an all-in-one solution for HR, recruiting, employee information, and more.
The software is trusted by over 5,000+ businesses across a wide range of industries. Freshteam simplifies the way you update org charts. The software comes with an intelligent employee database. So whenever you add a new employee or update someone’s role, Freshteam automatically adds them to the org chart in the right position. If you’re on the fence about using a new tool, Freshteam makes it really easy to get started. There’s a free forever plan, called Sprout, that supports organizations with up to 50 employees. Even this entry-level free plan comes with the ability to create an organizational chart. Paid plans start at $50 per month, and you can try them for free with a 21-day trial. It takes less than a minute to sign up, and you can immediately start creating your org chart. While the interface and exact buttons will look slightly different if you’re using another tool, we’ll continue using Freshteam for the remainder of this tutorial. The core steps remain the same, regardless of the solution you’re using. Step 3 – Customize Your Org ChartFreshteam will automatically populate your org chart with your own information when you sign up. So if you’re the HR manager, you’ll be placed accordingly in the chart. If you’re the CEO, you’ll be placed at the top. Then it’s just a matter of adding new employees, roles, and other information that will improve the chart. Here’s how you do it: Select Org Chart From The Employees MenuNavigate to the left side of your Freshteam dashboard. The fourth icon from the top is your Employees menu. Hover the mouse over this icon and select Org Chart from the dropdown list. Edit the Default Org ChartAn org chart doesn’t exist with a single person. So in addition to your name and role, Freshteam adds a few sample positions to the org chart as well to get you started. Remove those positions, or simply edit the names so they match. Here’s a sample org chart that includes the CEO, Director of Sales, and two sales reps:
By default, the person’s contact information and additional details aren’t displayed unless you click on them. The number below the contact card represents how many subordinates report directly to that position. In the example above with Stuart Errol, he has two sales reps that report to him. The sales reps positioned directly below Stuart don’t have any numbers below their contact card—meaning they aren’t in charge of any other employees. To make changes to someone’s information, start by clicking their name on the chart. From here, you’ll automatically be directed to the employee’s profile. Click Edit Profile at the top right corner of the screen to edit this information.
Changes made here will automatically be reflected in the company org chart. Step 4 – Add All Employees to the Org ChartThis will potentially be the most time-consuming step of the process. It depends on what information you already have on hand. If you currently have a file containing employee names, positions, and contact info, then you can upload that employee data to your Freshteam employee directory. Alternatively, you’ll need to add each new employee manually. I’ll show you how to do each below: Add Using an Import of Existing Employee DataNavigate to the Employee menu on the left side of your Freshteam dashboard (just like we did at the beginning of step #3). Then select Employee Directory from the list of options. Next, click Import at the top right of the screen.
From here, you can take employee data from a CSV file, G Suite directory, or Office 365 directory and bring it into Freshteam. The software will use that info to create the org chart automatically. Your existing data probably won’t include everything offered in Freshteam. So you may need to verify the data’s accuracy after the import. You can always make changes and add information from here as well. Add New Employees ManuallyIf you don’t already have an employee database to import into Freshteam, that’s fine. But depending on the size of your organization, this process might take a while. For startups and small businesses, you might find this process easy enough that it’s not worth importing data anyway. Then you can ensure everything is accurate initially and limit the number of edits you need to do later on. Head back to your org chart and click Add New at the top right corner. Then select Employee from the dropdown menu.
From here, you can add information like:
In terms of the org chart features, you’ll want to focus on the Reporting Information section on the page.
Once you add a reporting manager, the employee will be positioned directly below that person on the org chart. If you refer back to the sample org chart we’ve been using thus far, you’ll remember that the two sales reps both report to Stuart Errol, the Director of Sales. So if you click on the profile of either sales rep, you’ll see Stuart listed as the reporting manager.
You’ll also have the ability to add additional managers and HR partners associated with each employee. This only applies to larger organizations, as smaller companies would usually leave these sections blank. Step 5 – Plan For The FutureAs previously mentioned, org charts are useless if they’re inaccurate. So it’s important for you to understand how they’ll change over time. Freshteam already simplifies this process by automatically updating the chart every time you add, remove, or edit an employee. But you can customize the chart even further from the Settings menu.
This part of the screen lets you manage locations, departments, sub-departments, teams, and more. You can even change employee roles and permissions within Freshteam to control who has access to different parts of the software, including the org chart. Just understand that creating an org chart isn’t a one-and-done task. There will always be moving parts that change as your organization scales and evolves over time. That’s why it’s so important to use reliable HR software that can grow with these changes. via Quick Sprout https://www.quicksprout.com/how-to-create-an-org-chart/
0 Comments
Are you looking to hire some employees for your company? This can be an exciting time, but that excitement doesn’t come without some challenges attached to it. Employees can make or break your company. And sometimes, finding the right employees for your company is not as easy as simply posting a job and conducting interviews. You can take some essential steps in the hiring process to avoid hiring bad eggs that bring your company down. They ensure that you have employees who will do their job well and that you follow all the legal aspects of hiring new employees to avoid fees, fines, and more. To help you navigate the process of hiring employees, we have created this how-to guide to get you hiring employees successfully and with as little stress as possible. The Easy Parts of Hiring EmployeesDon’t let all the thoughts of hiring employees scare you–it’s not all difficult! To get things off on the right foot, let’s chat about some aspects of hiring employees that you can check off your to-do list without too much work. Choose the right job title.When posting jobs for your company on the website, LinkedIn, Indeed, Monster, or any other job board, it is crucial you choose a job title that accurately reflects the job and is also highly clickable. The clickability of the job title helps to put your position high in search results and helps to attract candidates that are qualified and strong. You want to steer clear of fun buzzwords such as “wizard,” “rockstar,” or “ninja” since those aren’t things that potential candidates typically type into the search bar. They also don’t show what the job is. Stick to a job title that has 80 characters or less, as those are the ones that tend to get the most clicks. Find the best candidates.This seems like one of the most daunting parts of the process, and you’re right–it can be. However, that is typically the case when you don’t have the right tools to help you get the best candidates possible. It is no secret that the traditional way of finding candidates for a job in your company means weeding through stacks of applications that are honestly a waste of your time. However, by implementing recruiting software into your hiring process, you simplify finding top-notch candidates. One of the top recruiting software options is Breezy HR.
Breezy HR is an end-to-end recruiting solution that helps you find top talent in a way that is efficient and easy for you. Sounds great, doesn’t it? Run a background check.Fast-forward to when you’ve identified a great candidate for a position and made an offer. The next step is running a background check. This step in the process is vital as it keeps your company and employees safe. If you have customers, this is important for their safety, too. A background check is the best way to verify that they indeed are who they say they are. And to run a background check, the applicant must authorize it. Before diving into background checks, learn about your state’s specific laws surrounding them. There are some complicated legal requirements and restrictions on these types of checks, so be sure you know what is and isn’t allowed in the state your company is in. Some states only allow you to pull information about certain criminal history, while others require that the position meets specific requirements to even pull an applicant’s credit history. To ensure you comply with all the requirements and laws, you may want to use a third-party agency to do the background checks for you. This makes the process much easier and stress-free for you. We at QuickSprout have identified the top five background check companies. The Difficult Parts of Hiring EmployeesAs much as we’d like to only focus on the positives, that won’t help you find success in your hiring process. So, we’ve got to cover some of the struggles that people run into when hiring employees, too. Here are the most common roadblocks in hiring. Long lead times.The hiring process is typically not a quick one. From putting up the job posting to reviewing resumes, from interviewing to offers and everything in between, the time between the first and last steps of the process can be quite long. That is a challenge because most top candidates find jobs within 10 days, far longer than the average time it takes to hire. For this reason, some people suggest that you don’t wait to hire until you have an open position. Some companies are always on the lookout for strong candidates, and if they find someone who is the right fit, they hire them and then sort the rest out later. You can also mitigate some of the lead time by forecasting your hiring needs annually instead of monthly or quarterly. Suppose you’re able to forecast further ahead. In that case, you’ll be able to snap up great candidates for the positions you know are coming instead of waiting until you need someone immediately and starting the hiring process. Managing multiple job postings.Hiring managers or other professionals typically use more than just one website to list open positions. While it is important to get your job postings on as many relevant job boards as possible, that isn’t always as easy of a task as it sounds. The vast majority of hiring professionals struggle with using multiple different channels to place job openings, as that requires a lot of balancing. Not only are job boards a place they need to be posting on, but social media is as well. In fact, professional social networks like LinkedIn are the top sources of great hires. However, not all hiring professionals use these channels because they feel overwhelmed. Great recruiting software like Breezy HR helps manage multiple job boards and postings and keeps track of everything in one place. You’re not hiring for culture fit.Though the most crucial part of hiring employees is making sure they can do their job, that is not the only thing you want to consider. Company culture is something that often gets pushed to the wayside but is integral to the success of your hire and the company. If your hire doesn’t feel like he or she fits into the company, then chances are good he or she won’t stay very long. Or, if they do, they will cause waves for other employees. Pay attention to the beliefs, behaviors, and personalities of the people you are looking to hire and see if they align with your company’s values and the workplace environment. And yes, this also applies to those people who are working remotely. Company culture still exists when you aren’t physically in the same office together. You can help alleviate this issue by conducting behavioral interviews and background checks that may help any red flag come to light. Step 1: Get an Employer Identification Number (EIN)If you haven’t already, the first step is to register your business with federal and state authorities. It is a requirement that every business that hires employees has an employer identification number which is used for tax purposes. The best way to explain an EIN is that it is the equivalent of a social security number for companies. Check Your State’s RequirementsHow you get an EIN varies from state to state, so this is something you have to do via your state’s labor department website. Some states may require mailing in an application, while other states may be able to give you an EIN in just a few minutes. Step 2: Prepare for RecruitingNow that the registration and EIN are out of the way, you can get started on recruiting. Starting this step off right means that you have a higher chance of the recruiting process going smoothly and your company getting some strong hires out of it. Use Recruiting SoftwareThe top tool to help you with recruiting from start to finish is recruiting software. Breezy HR helps you attract the best candidates and one we rated very highly in our research. Whether you are recruiting in-house or via an agency, good software is key. Breezy HR offers all kinds of features, including:
One of our favorite parts about Breezy HR is that it solves one of the problems we discussed earlier: managing job postings. With this recruiting software, you can advertise your company’s jobs on over 50 different job boards with just one click. That means less time individually posting and more time focusing on the strong candidates.
You can also build Employee Referral Sites quickly and easily, which helps you get candidates that currently employees can vouch for. According to a LinkedIn study, employee referrals are four times more likely to be hired, and 45% of employees sourced from employee referrals stay at the company for at least four years. Breezy HR offers a few different pricing options that each open up additional features for you to use.
Define the RoleBefore you start doing any hiring, you need to figure out precisely what you need. What are the critical tasks that you need help with? Where is your company lacking? How can someone improve things? Once you’ve answered those questions, you can move onto the level of responsibility this person has. Is it an entry-level position? Or something more senior? With those questions answered, you can then decide what the pay is for the open position. This takes into account the work, the level of responsibility, as well as the budget. Lastly, think about the experience, education, and skills that you want from someone for this position. Write A Thorough Job DescriptionWith all of the above information, sit down and write the job description. The more well-thought-out and clear your job description, the higher chances of success you have of hiring the right person. Remember to keep the job title clear and accurate. You should definitely list out the job responsibilities and requirements and remember to talk about your company and why a candidate would want to work there. Do you offer perks or competitive benefits and compensation? Mention it in the description to attract good candidates. While you are trying to find a strong employee, candidates are looking for a great new employer. And the job description may be their first introduction to your organization. Step 3: Find Your CandidatesWith recruiting software in place, you can start the process of finding the best fit for your open positions. You want to get your job out there and attract the most qualified candidates. Here are three ways to find top candidates for open positions. Employee ReferralsEmployee referrals are one of the top ways to find strong candidates. Referrals save you time because someone that already works for you vouches for them. They also keep you from having to sort through a pile of unqualified resumes to find a couple of solid options (hopefully). Job BoardsPosting on multiple job boards helps to get the word out about your company openings. And Breezy HR comes in strong with the help in this step. Recruiting best practices say you should post your job on multiple job boards to get a broader reach. Social MediaLinkedIn is one of the top recruiting tools used today, so don’t forget to look for candidates there. You can essentially see their resume before you even decide whether to spend time pursuing them for any positions. If you choose to upgrade to LinkedIn Recruiter, you’ll be able to anonymously view people’s profile without it alerting them. It also lets you search across much wider audiences instead of only within three degrees of your connections. You can also utilize InMail to message candidates you are not connected to. Step 4: Conduct InterviewsNow that you’ve received resumes and sifted through all of the unqualified candidates, you hopefully came out with a few potential hires. Next comes the interview process. Here is an example of how to approach an interview.
When the interviews are over, make sure to thank the candidates and let them know when to expect a follow up. Even if you do not hire the person, they still deserve a personal rejection. Step 5: Make an OfferAfter the interviewing process, you’ll have your list narrowed down to the top candidate, a.k.a, your new hire. Now it’s time to offer them a job! This is an exciting time for both parties. Call FirstBefore sending out the official offer letter, schedule a time to talk and invite them to join your team. On this call, you can discuss the different terms of the offer, which includes:
Send Written Offer LetterIf the call goes well and the candidate accepts the verbal offer, the next step is sending an official offer letter that reiterates all the things you discussed on the phone. Ensure the offer letter includes all compensation and benefits information, plus anything you need from them for the next steps. The next steps might be to send back a signed offer letter, submit references or background check information, take a drug test, or any other pre-onboarding things. Step 6: Take Care of the Legal StuffTo comply with federal and state labor laws, you must meet a number of different legal requirements. For Your First Hire EverIf you have never hired an employee before, you need to do the following:
For A New HireIf you already have employees but have hired a new one, you need to do the following:
via Quick Sprout https://www.quicksprout.com/how-to-hire-employees/ Every small business that withholds income and payroll taxes from their employees‘ paychecks is obligated to report that withholding to the government. Typically, you would use IRS Form 941 or the Employer’s Quarterly Federal Tax Return to file this information. But if your business is smaller and has a limited tax liability, you may be eligible to file a different IRS tax form: Form 944, also known as the Employer’s Annual Federal Tax Return. Eligible employers can use Form 944 to file and pay federal income tax withheld from employees, along with Social Security and Medicare payments owed by employers and employees, only once a year instead of every quarter. What is Form 944?Form 944 is an IRS form that reports taxes, including state income tax (where applicable) and FICA taxes for Social Security and Medicare, that you withdraw from your employees’ paychecks. The primary purpose of creating this form was for smaller businesses that have fewer employees and hence, less tax liability. Think of this form as an annual tax return. You can be eligible to file IRS Form 944 if your employment tax liability is $1000 or less–in other words, if you expect to pay $4000 or less in total employee wages for the year. Moreover, Form 944 also requires information concerning the Additional Medicare Tax. While an employer isn’t required to pay this additional tax, it’s withheld from high-income employees and must be paid, along with the other employment taxes. The Basics of Form 944Now that you have a basic understanding of Form 944, let’s dive deeper to understand what needs to be done to fill the form accurately. Determining Employer EligibilityForm 944 eligibility cannot be self-assumed. You can’t just say you want to use it and have the IRS sign off. First and foremost, you need a confirmation of your eligibility in writing by the IRS. It’s possible for the IRS to notify you that your business is either eligible or required to complete Form 944. Once you get the go-ahead, you cannot file Form 941 in its place unless you’ve requested and received the IRS’s permission to do so. That said, you may continue to submit Form 941 every quarter even if you’re eligible for Form 944. If you haven’t received an IRS notification but believe your employment tax liability makes you eligible, you can contact the IRS by phone or email them to request this change. Be sure you make this request within the first few months of the year. If the IRS does change your file requirements, you should be receiving written notification from them soon enough. Additionally, you can request to be eligible to complete IRS Form 944 if you’re a new employer. When filing Form SS-4 (this is the application you must fill to get an employer identification number or EIN), you can mention you think you’ll meet the Form 944 filing requirements. The IRS will inform you about your employment tax filing requirements—whether you’ll file for IRS 944 or 941—when you’re issued your EIN. Gathering All Payroll Data—And Doing It AccuratelyYou must collect all information you need ahead of time before you start filing Form 944. As you now know, this form relates to payroll taxes, Social Security and Medicare taxes, and the federal income taxes that you’ve withheld from your employees’ paychecks. Make sure you have access to this information, along with the total compensation you’ve given to your employees throughout the year. Even better if you use reliable accounting or payroll software for this purpose. You see, these systems make it easier to access the necessary financial data quickly. Plus, some solutions also generate a report specifically detailing all of the information you need for Form 944. Knowing the Filing Right DatesYour request to file Form 944 must be made in writing between January 1 and March 15 of the current year. Alternatively, you can also call 800-829-4933 between January 1 and April 1 of the current year. As for filing, everything must be done by January 31 of the year after being reported. That said, you have until February 10 of the following year to file Form 944 if you made all the deposits on time and in full. The amount of your tax liability determines the deadline by which you must pay your payroll taxes.
Note: Make sure you pay your payroll tax deposits using the IRS EFTPS system. Social Security and Medicare Wages CalculationYou must calculate the appropriate Social Security wages and tips, Medicare wages and tips, and wages and tips subject to additional Medicare withholding in form 944. Once you do this, multiply these expenses with the specific amounts mentioned on the form. These amounts reflect the percentage of wages and tips that get deducted for Social Security and Medicare tax. You can make adjustments for sick pay or life insurance as specified on the IRS Form 944 instructions document, as well as any tax credit for performing or participating in research to get your final employment tax liability. Keep in mind you’ll have to report any deposits you’ve already made for the year too. Calculating all wages and tips is more nuanced. I’ve only given you a gist of things to keep this guide brief. Payroll taxes are complicated, and if you end up making any mistake, you’ll find yourself being penalized or fined. I highly recommend enlisting the help of a tax professional or outsourcing your payroll tasks if you face any difficulty when completing IRS Form 944. 5 Tools to Improve Filing Form 944You can’t file Form 944 accurately if you don’t have the correct payroll information. For this purpose, you need a reliable accounting and payroll solution—preferably that can fine-tune all the needed data—that gives you uninterrupted access to all compensation-related information. Below is a list of the five best payroll software solutions. OnPay
OnPay is a highly reliable and secure payroll service that comes packed with features and benefits. From unlimited monthly cycles to automated tax filing and payment to flexible periods and schedules, this tool gives you all—and more. It offers specialized payroll solutions for businesses operating in specific industries with specific requirements. For example, if you’re running a restaurant, OnPay can easily handle the unique taxes and wage reporting systems. Plus, you also get HR benefits that can be incredibly useful for mixed workforces comprising W2 employees and independent contractors. QuickBooks Payroll
The software automates local, state, and federal tax calculation and payment every pay cycle. It has an Auto Payroll feature that can considerably reduce the time you take to run weekly payroll. However, one of its biggest USPs, in my opinion, is its tax penalty protection. QuickBooks will pay up to $25,000 if you get a tax penalty because of an error in your payroll. Wave Payroll
Wave is another popular accounting software that offers a wide range of free accounting services. The payroll solution isn’t free, but it’s still one of the cheapest options on the market. Since this is a cloud-based payroll service, you can log in to your account via the Wave website from any device. It also offers tax support services for 14 states in the United States. If you reside in any one of these states, Wave will pay and file your state and federal taxes when you run payroll. The employee portal functionality, where you can invite employees to create and manage their own accounts, is another plus. Patriot
Patriot is a flexible payroll software solution that lets you choose between full-service payroll and a more affordable DIY solution where you’re responsible for filing your own taxes. You’re assured of unlimited payroll runs using any device, various payroll frequencies, and customizable hours, money, and deductions for both plans. Patriot also has an employee portal that employees can use to keep track of pay stubs, pay history, time off balances, and electronic W-2 information. Moreover, there’s no restriction on how you pay your employees. It allows payments via direct deposit or manual checks both. Gusto
No payroll solution list can be complete without mentioning Gusto. In addition to providing an unparalleled user experience, Gusto can calculate and file your taxes with little to no supervision from you. All your local, state, and federal taxes are automatically paid to the right government office for every payroll. Even the onboarding is super easy and straightforward customized according to the employer type. 5 Tricks for Filling and Filing Form 944 CorrectlyHere are some of the best tips to help you minimize errors and frustrations when filing Form 944. Let’s take a look. Hire a Reliable AccountantA good accountant should do more than simply preparing financial statements and doing your taxes. They should be willing to work with you all year round to keep track of income and spending. They must regularly monitor your gross and net profit and make sure you don’t have a cash flow problem. Start working with your accountant from day one—not just during the tax season. After all, good accounting is key for accurate data, which is key for filing Form 944 and avoiding expensive penalties and fines. Store Your Paperwork All Year LongIt’s crucial to keep all tax-related paperwork throughout the year. You want to save every receipt related to your employees’ compensation. You see, having all your paperwork handy and organized will make the process a lot easier. The IRS recommends keeping records for at least three years. Keep Up With All Your DeadlinesWhen dealing with Form 944, not only do you need to pay the federal income taxes, state income tax taxes, and FICA taxes on time but also request the IRS to get their written approval to file this particular form instead of Form 941. As you may realize, deadlines are vital here. If you don’t get the go-ahead from the IRS, you won’t have any other option other than filing Form 941. Separate Your Business Expenses From Your Personal ExpensesThe IRS may start looking at your personal accounts because of commingled money if they find your personal expenses mixed with your business expenses while auditing. Precisely why you should make a point to get a separate bank account and credit card for your business, and only business expenses—in this case, paying your employees—through them. Manage All Payroll-Related Activities ProperlyIf you face any difficulty filing Form 944, don’t hesitate to get in touch with a reputable company for assistance. Many business owners hire a lesser-known and unreliable payroll service to save money. Don’t be one of them. These company owners end up on the hook as they realize far too late the service wasn’t remitting any payroll taxes for the company. The IRS will check every year to check whether you’ve paid your tax liability, so you really don’t want to mess this up. What to Do NextIf you’re eligible for filing Form 944, you have to start collecting all the crucial information related to your employees’ compensation ASAP to avoid making any mistakes. Remember, any error can result in you getting heavily fined. Fortunately, having the right software tools to keep track of onboarding, payroll, and time and attendance will make the process less intimidating and time-consuming. You can check out these Quick Sprout guides to set yourself up for success.
via Quick Sprout https://www.quicksprout.com/form-944/ There is a big misconception that content marketing doesn’t drive sales. But if it didn’t work well, none of my companies would exist. Content marketing is an absolute necessity for brand survival and I’ve grown each of my businesses through content marketing. If you want to generate hordes of sustainable, long-term traffic without spending too much money, content marketing is the way to go. At its core, it’s very simple:
You’re on the right track if you are currently creating and distributing content. But for those of you not seeing results from these marketing campaigns, it can be frustrating. If you’re putting so much time and effort into this, why aren’t you seeing results? What’s the issue?
I see this problem a lot when I’m consulting businesses. They don’t have a clearly defined content strategy. If this sounds like you, it’s important you read this post carefully. It’s great that you are continuing to publish new content. But this isn’t effective if your sales aren’t increasing. Sure, content marketing can be used for many different things. Primarily, businesses use content marketing to:
All of these are great and critical for success. However, you need to learn how to create content that directly drives sales. That’s why you got into business in the first place, right? You wanted to make money. I want to show you what types of content you should be producing in order to generate strong sales from the rest of your content marketing efforts. Some of these might overlap with the content you’re already producing to generate traffic, but some will be new. If you’re starting to see a solid level of website traffic but aren’t sure how to turn those visitors into customers, this post should help you a lot. Let’s get started. 1. Understand how the conversion funnel worksBefore you can create highly relevant content, it’s important for you to make sure you’ve got a firm grasp on the conversion funnel. You’ll see different variations of this funnel depending on the marketing website or expert. It can also look slightly different depending on the industry and business model. But for the most part, the conversion funnel can be broken down into three stages:
The top of the funnel occurs when a prospective customer becomes aware of your company. They’re conducting research or looking for an opinion. Basically, they need an answer to something, and they are seeking insight. Once a consumer knows your brand exists, they enter the middle stage of the conversion funnel. This is the evaluation phase. They are still conducting research, but now they are taking it one step further. Consumers are trying to decide whether your product or service fits well their specific needs. Finally, the consumer reaches the bottom of the funnel when they enter the purchasing or conversion stage. This is the area of the conversion funnel you need to focus on the most when it comes to creating highly relevant content. The bottom of the funnel is your chance to explain to your customers why your product and service is the best for them. Show them how you differ from the competition. Educate the consumer. Explain what it will be like for them if they become a customer. Marketing campaigns that entice customers can include demonstrations, free consultations, free trials, estimates, quotes, coupons, and pricing. Basically, it’s anything to give them an incentive to buy. Once you understand the conversion funnel and, more specifically, the bottom of the funnel, it will be much easier for you to adjust your content strategy accordingly to drive sales. It doesn’t matter whether you are a B2C or B2B company, you’ll still need to evaluate your funnel.
Yes, you’ll notice some slight differences between the business models. But ultimately, the funnel can still be broken down into the three stages I just discussed. 2. Create a customer journey mapJourney maps are a great resource because they take you through the buying process even further than the conversion funnel. Your journey map will focus on events that take place after the purchase, instead of just before. While awareness and consideration will still be part of your journey map, you’ll also focus on your customer retention strategy. Analyze how the customer behaves after their initial purchase. This is very important when it comes to driving sales. That’s because you won’t always focus all your efforts on ways to acquire new customers. In fact, you shouldn’t be. Yes, of course, new customers are great. But it’s less expensive and more effective to target your current customers. A journey map can help you accomplish this. You’ll put yourself in the minds of your customers. Once you’re able to do this effectively, you can adjust your content strategy accordingly based on their points of view. 3. Track leads and conversionsWhere are your leads coming from? If you don’t know the answer to this question, it’s a big problem. This is one of the reasons why your content isn’t relevant and driving sales. Knowing how customers discovered you can help you understand why they made a purchase. Based on this information, you can create content that’s more specific to their needs. Since the majority of the customer journey is done on the Internet, it’s easy for you to track their behavior.
The best way to track your leads is with UTM parameters. Not sure what a UTM parameter is? Don’t worry, it’s pretty simple. In fact, I’m sure you’ve seen this before. If you’ve ever clicked on a link from an advertisement, the URL will be long and somewhat complex looking even if you’re just on a company homepage. That’s a UTM parameter. It’s a way for websites to determine where a lead came from. For example, did it come from Facebook, Twitter, Google Ads, a social influencer, or email marketing campaign? You’ll have different tags for each distribution platform to know precisely where the lead came from. Furthermore, you’ll have tags for each post within a specific platform. For example, knowing it came from Facebook is great. But where on Facebook? Which specific post? You’ll be able to figure this out with your UTM parameters. It’s easy to set these up with Google Analytics.
Just navigate to the “Demos & Tools” menu and select “Campaign URL Builder” from the list of options. Another reason why UTM parameters are important is because they can help you accurately measure your ROI. You know how much you’re spending on each campaign, so you’ll be able to see direct sales results to measure how successful everything was. Just make sure you accurately fill out the entire form so you don’t get confused:
After you fill out the required fields, this tool will automatically generate a custom URL you can use. I could go on and on about this topic. But I want to stay focused on creating content that drives sales. 4. Promote diverse ads on social mediaNow it’s time to take this process one step further. I’ve explained what you need to know about UTM parameters, but now you’ve got to put them to the test. Social media is a great place to do this because you’ve got lots of options. You can use paid promotions to target specific audiences. You just need to come up with ads that use different types of content. Start with a hypothesis. What types of content do you think will have the highest conversions? This will vary based on your industry, business model, target market, and other factors. But you need to make sure each campaign is different. Don’t get me wrong. You don’t want to waste money on irrelevant ads. But it’s important that you rule out content that doesn’t work early on. Remember, we’re focusing on relevancy here. Then you’ll use the UTM parameters that you’ve previously set up to track how effective different ads were. Now you can appropriately adjust your content strategy based on which ads had the highest success rates and directly drove sales. 5. Develop a customer personaNow that you know which content speaks to your audience the most, you can develop a customer persona to improve your conversion rates. This will help you learn more about the people you’re selling to. It’s similar to what we did earlier with the journey map, but a customer persona offers more detail. Again, based on your findings, you’ll continue to adjust your content strategy. Look at the factors associated with whom you’re selling to:
It’s much more specific to your broader target market. That’s why you won’t just develop one customer persona—you’ll be building several of these. Each one depends on many different factors. But ultimately, customer personas will help you develop relevant content strategy. 6. Take advantage of different formats of contentDon’t just stick with one type of content. Mix it up. Some different strategies to consider include:
This will vary depending on the platform you’re using and the audience you’re trying to target. But based on the research you’ve conducted on your conversion funnel, customer journey map, UTM parameter tracking, and customer personas, you’ll have plenty of information for each type of content. The best type of content is personalized. You can even use tricks such as storytelling to enhance your content. This approach will ultimately lead to more sales. Research shows that generating traffic and leads are the top marketing obstacles businesses are struggling to overcome:
By diversifying your content strategy, you’ll increase the chances of your content appealing to a wider audience. That’s because it will be relevant to their wants and needs. 7. Keep up with the latest news and trendsTo stay relevant, you need to keep your finger on the pulse. Understand what’s happening locally, regionally, nationally, and globally. Keep your eye on important news. Also, keep track of news and trends within your specific industry. Analyze your competition. Did someone else beat you to the punch? If a competitor is having success with a strategy, you need to know about it. Find some accurate news sources. Subscribe to industry newsletters and attend events. Whenever something major is happening that’s trending, you can use it to promote your content. For example, do you remember the ALS ice bucket challenge craze? If you were manufacturing buckets or selling ice, you could use that as a marketing ploy for your content strategy. Even if you were selling bathing suits, goggles, and such, you could get creative. Don’t get me wrong. I’m not saying you should try to take advantage of charities. I’m just trying to show how you can capitalize on trends and other newsworthy headlines. Just be creative, and apply it to your content strategy. 8. Teach and make sales with webinarsI want to make this clear right away: Just because a piece of content is geared towards helping you make sales doesn’t mean that it has to be a “salesy” piece of content. It can still be highly educational. The key difference, however, is that these types of content are suited better for making a sale than a general “X tips about Y” article. I started this post with webinars because it is an incredible type of content. Not only is it better from an education perspective (compared to most content), but when done right, it’s also better for sales—it can yield crazy numbers. Let’s look at a few examples. KISSmetrics has used webinars for a long time. At one point they produced 77 webinars, which had a total of 155,386 signups. Although only half of those who signed up actually attended the webinars (74,381), we were able to convert 16,394 of them. That’s a 22% conversion rate (of the people attending). Those results are pretty typical for high quality webinars. A few other businesses, such as Adobe and BuzzSumo, have revealed the results of their webinars. Adobe reported a 19% conversion rate, and BuzzSumo gets a conversion rate of about 20%. You might not get that high of a conversion rate right away, but it’s not improbable either. There are few types of content that convert as highly as webinars. I’m going to outline how to create a webinar right now. What a typical webinar looks like: In case you’re unfamiliar with webinars, let me give you a quick rundown of how they are typically made and run. A webinar is essentially a video conference. The video feed comes from your screen, and only your screen. Then, your audience can join the “call” at a set time, and you can do a live presentation. Typically, the only sound will come from your microphone, but you can have multiple people do the presentation or even unmute certain viewers if they’d like to speak. The whole point of a webinar is to teach the audience about a specific topic. Usually, it’s how to do something. In general, webinars range from 40 minutes to 2 hours. Take a second to realize the power of webinars: you have most of your viewers’ undivided attention for over 40 minutes. You can’t get that anywhere else. Finally, most webinars focus on high level topics—strategies, not tactics. So, while you won’t get a super detailed step-by-step breakdown of how to do one specific thing, you will get a blueprint of how to create a strategy to accomplish something much greater. The key parts of a webinar: There are five main parts of a webinar slideshow that you’ll need to create for your webinar. I went into much greater detail in this guide to webinars, but this outline will give you a higher level view of the whole process and clarify things. First, you have the introduction slide(s). Something I haven’t really mentioned is that webinars can attract viewers who aren’t part of your regular audience. So, while you’ll have some super fans on the webinar, there will also be some people to whom you should introduce yourself. This reinforces that you’re someone who they should listen to and that it’s worthwhile to spend the next hour or so of their lives paying attention to you. This is also the time when you re-introduce the topic. Then, you move right into the core content, which is the meat of the presentation. It can take upwards of 80% of the total presentation time. During this part, you walk the viewer through whatever process you’re trying to teach.
The most effective webinars are highly transparent, which is why I share a lot of personal company information with my viewers. Transparency is especially needed when you’re addressing a high level strategic topic. With tactics, it’s obvious whether something will or will not work. But with a strategy, viewers need real numbers and experiment results to prove to them why each part of the strategy is included. Once you’ve spilled the beans and given everything you have to give, you need to look at some overall results that can be achieved if they put your lessons into action.
Finally, you can take a minute to make them an offer. It’s typically an exclusive offer that they can’t find on your website.
The more the offer is tied to the topic, the better your conversion rate will be. The last component is the question period. You could do this before or after the pitch—it’s up to you. You could even do two question periods, one before and one after.
9. Get your product reviewed by influencersOne of the main reasons why your typical content won’t bring you any sales is because it doesn’t tie in with what you’re selling in any way. For example, you might sell coffee. And you might publish content like “The 5 mistakes you’re making when brewing coffee.” Your readers might read the article and enjoy it. But what does learning about brewing have to do with buying your coffee? Not a whole lot. And that’s okay—not all content needs to have a sales angle, but some content should. The most direct type of content that sells is a product review. But it’s also something you can’t really create yourself. If you make a new post reviewing your own product, of course your readers will assume it’s biased (because it is!). Instead, you need to find bloggers, freelance writers, and journalists who are willing to review your product. How to find content creators who will review your product: To begin with, you’ll need a list of people who might be interested in reviewing your product and have an audience that contains your target audience. For the rest of this section, let’s pretend that you’ve just released a new time management tool. Now, you’re trying to get reviews for it, which will drive sales. To start with, search in Google for “top (type of product)”:
Go through the results on the first page, and write down all the alternatives. Next, we need to build a list of all potential sites and writers who might review your product. To do this, we want to find sites that have already reviewed time management tools—specifically, those tools that you just wrote down. One by one, you need to search for “(name of competing product) review”:
For popular products, this could bring up hundreds of reviews. You’ll see that the top few reviews for a popular, established product are on big authority sites. In this case, they are on PC Mag and PC World, which are both huge. It would be awesome to get a review on those sites as well. However, unless you have a well-known brand or a strong existing relationship with writers on those sites, it’s going to be difficult. Unless you have a product that is very different from all the rest and revolutionary, I wouldn’t suggest trying to land reviews on those sites right away. You can try, but expect a lot of rejection. Instead, I propose a more methodical and strategic approach… How to maximize your chances of landing a successful review: When you’re starting from scratch, it’s difficult to get a lot of attention. You need to be able to prove that (1) your product is of high quality and (2) that your target audience likes it. Essentially, you need social proof. How do you get it? You start at the bottom and work your way up. Forget about those top few results when you search for your competitors’ reviews. Instead, dig into the 3rd page, 4th page, 5th page, and deeper results to find reviews on less authoritative sites. Writers on these sites are sent hundreds of review requests every week, and they are much easier to convince to review your product. Down on the 5th page for our example search, I found a Rescue Time review on an unknown blog.
They probably don’t have a ton of readers, so it’s not going to spike your sales. However, a review on a small blog can still yield a few sales, so it’s not like it’s a waste of your time in the short term. Additionally, smaller bloggers often have a tight-knit group of subscribers. Sometimes, smaller blogs drive more sales than larger ones. The best part about reaching out to a blogger like this is that there’s a good chance they will be happy to review your product. I would find their email address and then send them something like this:
There are three things in particular about the outreach email that you need to understand:
Send out as many of these as you can to lower-tier sites. Not all of them will agree to do a review, but you’ll be able to get at least a handful. Next, you start to target larger sites. If you started on the 5th page of results or lower, now you might want to try the sites on the 3rd and 4th pages. The outreach emails should be similar, but you should also include a line near the end like:
This type of paragraph introduces the social proof that you need so badly at this point. The bigger the two sites that you include are, the more effective it will be. In addition, you’re providing reassurance that their audience will enjoy it. Again, this will get you another handful of reviews if you contact 100-200 sites (10-20 sites for 10 competing tools). Finally, you just repeat this whole process. As you get reviews on better and better sites, start using their names in your outreach emails. By the time you get to the top few results on the first page, the biggest sites, you should have some decent sites to include as social proof. Note that this entire process can take months to complete. However, during this time, you should still drive an increasing number of sales with the initial reviews you land. 10. Design an email sales funnelPeople put a lot of value and trust in emails. When they get one from someone they know, they usually give it their full attention and expect to take some sort of action. It could be just replying to the email, but it could be clicking a link and buying something as well. There’s a bit more to it than that, but it’s one of the reasons why email marketing is by far the most effective selling channel.
If you are going to leverage content marketing, you need an email solution. Without it, you won’t see a big ROI. I’ll share the numbers below, which will help you understand why you need to sign up for an email service provider…and you don’t have to pick one that is expensive either. We don’t spend any money to acquire emails… our only cost is for us to send out emails. We spend a bit under $2,000 a month for our email service and we send out an email blast every time we release a blog post. We also use it to announce webinars and send out email drip sequences to users. But if you are strapped for money, you can use MailChimp, which is free. On average, we post one to two articles a day, and we try to publish a few infographics each month. The end result each month gets a lot of traffic from our efforts.
How to get sales through emails: The best way to sell most products through email isn’t by sending a random email saying “buy our stuff” even if that feels like the easiest thing to do. Email gives you the opportunity to send a series of connected pieces of content to your subscribers. You can use these to educate your subscribers, help them understand their problems, and then finally introduce solutions (your products). A series of emails like this is essentially a mini sales funnel:
And it’s incredibly effective. There’s no right or wrong email funnel. You might have three emails in it, or you might have 20. It depends on the complexity of your product, the cost of it, and even how advanced your email marketing provider is. However, there are three general types of emails that you will want to include in the following order:
While it’s not required, I think it’s also a great idea to add at least one email where you follow up with anyone who purchases something from you. It’s one small thing you can do to gain lifelong customers. By thinking of a sales funnel as a whole, you can combine all these emails to take your audience one step closer to a sale every email you send. 11. Use content to get access to your target audienceBlog posts aren’t the greatest places for selling products. People reading them aren’t in a buyer’s mindset. The same goes for many other types of content, like social media posts, YouTube videos, slideshows, and more. The better plan is to use your content on these other channels to get attention (traffic) and then get that traffic onto an email list. Then, you can sell much more effectively through email. Option #1 – Start with blogging: I love blogging because I’ve seen the power it can have to help just about any business. I’ve built multiple 7 figure businesses mostly through blogging. But I rarely sell in blog posts. In fact, I can’t think of the last time I even mentioned my services in a post. The key is that I have signup forms on my posts—any visitor can sign up for my email list. If you haven’t already been doing that, I can help you. I’ve written many posts on how to create blog content that gets attention and that will help you effectively convert that traffic into email subscribers::
Option #2 – Social media has one purpose: There are a few exceptions, but for the most part, selling on social media doesn’t work. You won’t be able to tweet out a link to a sales page and get people to visit the page expecting them to be in a buyer’s mindset. However, it is possible to send them to a blog post or a landing page where you offer a lead magnet, which will help you get them onto your email list. That is the purpose of social media from a sales perspective (it’s good for other things as well). Some social media sites, such as Facebook, even allow you to integrate your email list with your profile so that your followers can sign up right on the social networking site.
Otherwise, you can always just link to your content and drive your followers to a page that has some sort of an opt-in form on it:
Option #3 – Slideshows and videos: Besides your blog and a select number of social media sites, there are many places where you can find traffic that you can get onto your email list. In fact, there are thousands. However, two in particular are more commonly used for business, so I’ll focus on those. Those two are Slideshare and YouTube, which focus on publishing content in slideshow and video formats respectively. Getting a popular slideshow on Slideshare isn’t easy, but if you can achieve that, you can expose your slideshow to tens of thousands of people on the site. Then, you can put a link to a page on your website (hopefully a landing page with a lead magnet offer) either on the last slide of the slideshow or in the description:
YouTube is similar. If you produce high quality videos consistently, you can get thousands of views on each of them. If a video goes viral, you could get millions of views. You drive traffic back to your site by linking to a landing page or blog post in the description of videos:
12. Focus on the types of blog content that convertAlthough many types of blog content do not produce any sales, some types of content actually do. If you’re looking to increase sales from your blog itself, start producing more of these types of content on a regular basis. Content type #1 – tutorials: There are two main types of tutorials, both of which are great for selling. The first type is where you explain in-depth how to use a specific product. For example, I did this in one chapter of my advanced guide to link building when I covered how to use the tool ScrapeBox.
The key is to not only include incredible detail but also make it useful. Show readers how to actually accomplish something with the product:
In this example, I showed my readers how to find free proxies and build links with the tools. This type of tutorial works best when you have a fairly well-known product already (most SEOs know ScrapeBox even if they haven’t used it). Because of this, this type of tutorial often lends itself to selling products as an affiliate. The other type of tutorial involves showing your audience how to accomplish something. Then, you include your product in one of the steps of the tutorial. A great example of this is Ann Smarty and her product MyBlogU. She routinely writes tutorials on her own site and others and includes MyBlogU as a tool that will help the audience accomplish their goals. For example, she wrote a post about how to write newsworthy content:
In the article, she mentions the tool as a way to accomplish a specific step in the process:
Content type #2 – product reviews: A good product review can convince just about anyone considering it to actually buy it.
However, you need to understand what a good product review is. Most reviews suck. They’re incredibly biased, contain no actual detail of the product in use, and are obviously written just to generate sales. A good product review is authentic and as unbiased as possible, and it’s clear that the writer has used and tested the product. There are four main steps to creating a great product review:
Content type #3 – case studies: Finally, case studies are a great way to get new customers. They consist of a detailed account of how a past customer used your product or service successfully. They are best used for complex products, where it’s not clear to potential customers if the product is right for them or not. HubSpot is a company that produces a steady stream of new case studies because they know they work:
There’s a lot that goes into writing an effective case study, which is why I wrote an entire post dedicated to showing you how to do it. ConclusionContent marketing is arguably the most effective type of marketing at your disposal today. However, you need to make sure that you are using content not to just generate traffic but to convert that traffic into sales. You need to make sure your content is relevant if you want to generate sales. Figure out how to leverage different elements at the bottom of the conversion funnel. Then, create a customer journey map to give you a better understanding of the consumer’s wants. Use UTM parameters to track their behavior and measure the success of different campaigns. Promote those ads on social media. Once you realize which promotions had the most success, you can build customer personas to dig even deeper into the minds of your customers. Use the resources, tools, and analytics I mentioned to identify the type of content that speaks to your customers the most. Adjust your content strategy accordingly. Stay up to date on the most recent news and trends to stay relevant. If you follow the tips I’ve outlined in this guide, making your content more relevant, you’ll see a significant impact on your sales numbers. via Quick Sprout https://www.quicksprout.com/content-marketing-and-sales/ Organic search remains an important way to generate traffic for your blog. It’s an essential part of blog marketing and in the following post we’ll show you the steps and tools you need to optimize your posts to help rank your blog. Let’s get started.
1. SEO friendly blog designDid you know that building a beautifully-designed website can be just as important to search engine rankings as site architecture and knocking out high-quality content? It’s true.
But what exactly should you pay attention to? To help you, I’ve put together a list of ten elements for good blog design that are also proven to help your search engine rankings. 1. Keep important content above the foldThis is pretty standard, and some would even argue that it’s not that important since people are trained to scroll, but in my own tests and the tests of others, I’ve seen it proven over and over again. So, keep the important information in those top 768 pixels. Research has shown that people do scroll, but they actually spend 80% of their time above the fold and only 20% below. This brings us to the topic of sliders, which are pretty popular. I’m not a fan of sliders because they tend to confuse the user. When a user arrives on a page and the real estate above the fold is dominated by a slider, the hunt is on. That’s never a good user experience. Instead, if you decide to use a slider, make sure that its position is justified. In other words, make sure that a slider is the most important thing you want a user to see/do when he or she arrives at your website/blog. For example, it might be justified to use a slider to feature your top products or top content on a site. It’s justified on Entrepreneur:
But notice how the user stays in complete control. That is another essential factor you must keep in mind when creating a slider. In the case of Quick Sprout, the important information is two-fold: the latest blog post and the call-to-action for a free report. So, always determine what is the single purpose of the page…and then make sure it is above the fold. 2. Keep the number of links on a page under 100While Google recommends that you keep the number of links on a page under 100, this is not for search purposes, but design and user experience purposes. In fact, Matt Cutts published a page with close to 200 links on it. Why does Google recommend you limit the number of links to 100? It used to be that Google would only index up to 100 kilobytes of a page…that equalled to about 100 links. Now Google can easily index a page much larger than that. So, what happens if you decide to place more than 100 links on a page? Google might crawl you and look at you like a spammer. However, what you do might be legitimate, and having over a hundred links, like Cutts does, can also work if it is justified. In that case, you will only pass on a limited amount of PageRank because there are tons of links on that page. How the user experiences the page is more important these days than PageRank or pure SEO measures, so limiting 100 links to a page is a good idea. 3. Create hub pagesOne of the best ways to get your content out of the archives and delivering SEO value to your site is by creating a hub page of your best content. For example, you could divide content into beginner, novice and expert advice on a particular topic and then link to all that content on a single page. You could also break it down by themes like Problogger does on its Archive page:
Why is this important? For two reasons: it’s important for user experience, but it also gives your old pages new life, thus bringing a sluggish low-performing page back up to search engine significance. 4. Limit your ad spaceIt’s plain and simple: when it comes to designing your blog for awesome SEO, you’ve got to limit the number of ads you use. If you don’t, you’ll slow down your load time, which will hurt your traffic. From a user standpoint, people despise ads and give a thumbs down to sites with too many of them. If you absolutely must use ads, then look at your analytics to determine the top two or three highest-performing ads, and then cut the rest. 5. Design your site for speedNext, you’ll want to evaluate your site speed. It’s been shown that users who can search faster are happier. In fact, Google found out that slowing down search results by as little as 400 milliseconds will actually reduce the number of searches by over half a percent. In the SEO realm, however, speed isn’t as much of an important signal as the relevance of a page is. But like with most things online, when it comes to speed, problems can accumulate. So, you need to fix as many of them as you possibly can, speed being one of them. How fast is your site? Use Google’s Page Speed tool. This is what I came up with when I tested Quick Sprout:
The report, which takes less than five seconds to generate (maybe more on larger sites), showed me recommendations that ranged from experimental to high priority. I don’t know about you, but I find that very helpful. Click on the link “enable compression,” and you get this page:
As you can see, I need to get to work. Another tool to measure the speed of your site is Site Performance page inside Webmaster Tools. You can find out how people use your site around the world, what kind of response time they have on the site, what monthly trends are and recommendations on improving site speed. Since the only expense to improve your site speed is how much sweat you invest, it pays to do it. 6. Keep your images smallI can’t express enough how important images are to web content these days. This is why I’ve written articles like Forget Blogging as Usual, which demonstrate that to draw in readers, you need to provide images and graphics. But a bloated image can slow that page download, thus decreasing site speed. So, the simplest way to do this is to save images as .jpgs and text/headers as .gifs. If you have an image that’s not a .jpg, use a tool to save it as a .jpg. The Performance Golden Rule says that 80%-90% of user experience is based on downloading images, stylesheets, flash, etc., thus it’s a good idea to spread that content over multiple servers using a Content Delivery Network like Akamai A CDN is a set of servers that cache your web objects like scripts, URLs, text and graphics, in effect increasing bandwidth, which reduces site latency and stress on a single server. In other words, you improve site speed. 7. Design your navigation for UX and SEONavigation is both important to your user and to search. Spiders crawl navigation to help them determine the architecture of the site, much like the site map. The user, on the other hand, uses navigation to get around your site. Often I’ve seen UX trump search by developers using navigation built with javascript or Flash. This is a huge no-no because search engines cannot crawl your navigation if you build it in javascript or Flash. Instead, you need to use standard HTML and CSS to get the best of both worlds. But you can get away with adding visual appeal to a HTML/CSS nav bar using Flash like the Atlanta Botanical Garden did:
8. Use breadcrumbsLike navigation, both search engines and users find breadcrumbs useful. Users find them useful to locate where they are on your site, especially if they came through a deep page. Here’s an example of what you shouldn’t do:
That’s a little confusing from a UX viewpoint, don’t you think? Of course, Google gets it:
The arrows show you the direction of the hierarchy from parent to child, and each set is a link, with the terminating page not being a link. Search engines find this method useful because it helps them categorize content appropriately. 9. Build beauty into your web designAs the age of sentiment search grows, user experience will help determine how a search engine will rank a website. Let’s say people find their way to your blog through a search. They land on your page, look around, do not like what they see because it is shoddily designed and then bounce out of there. Google, for example, will then ask whether they want to block that search result or not. If the user chooses to block it, then you are doomed. That’s a mark against you.
But let’s say, they don’t block it. Google is still going to wonder why the user bounced off the page and ended back up on the search results again. It’s likely to count against you. That’s why you need to design your site to attract and keep the users. This starts with a well-designed site. I’ve spent years testing different designs of Quick Sprout, looking for that optimized look. When you are testing, the most important things you need to test for are page views, time on page and bounce rate. Design a beautiful site to lower those rates. 10. Crawl and validate your siteAs a sort of review when it comes to designing an awesome website for search engine optimization, you need to crawl and validate your site to determine where you are. What should you test and how? Well, here’s a checklist to help you see what needs to be crawled and validated…and then I’ll share with you a tool to help you do just that. You must validate:
You can use the Crawl Tools by SEOmoz or the W3C validation tools to test your website and find all the documents that need to be fixed in priority. Once you’ve tested and identified all the problems, prioritize, fix and then re-test. Fix again and then, instead of using tools to re-validate, have family and friends test the site to get the user’s angle on your site. 2. Optimize Blog PostsPeople are looking for information online. Blogging is one way to feed the demand for information. Optimizing your blog posts for organic search accomplishes two things:
Whenever you’re creating online content you want to think about the reader first. For the most part, when you focus on the reader the SEO part of the equation will be taken care of without much effort. But there are some important steps to take to optimize your blog posts so that you communicate with the search engines so they can rank your posts. For this post we’ll cover only relevant information and provide the steps for optimizing your blog posts for SEO. Here are those steps. Note: We won’t spend much time on the basics like title, URL, etc. There are countless posts on those topics, but we will include them because they are essential to effective blog SEO. 1. Keyword And Focus
When marketing your blog posts you’ll often be covering the topics that your target audience is looking for online. You’ll be writing about hot topics, trends and common industry questions. You’ll also be doing keyword research to find out what your audience is searching for on search engines. When creating each blog post you want to have one main keyword phrase in mind for each post. From that one focus keyword phrase you might have additional secondary keyword phrases. In most cases, you’ll naturally use the secondary keywords when you write the post, but if you’re cognizant of them ahead of time you can make sure to include them. An example might be writing a post for the keyword phrase “living room design”. That is your focus keyword. Secondary keyword phrases might include:
You get the picture. From your blog post ideas you’ll need to extrapolate the main keyword focus. Once you do that you can create or recreate your title. 2. A Great TitleIt could be argued that the title is the most important piece of your blog.
Obviously the content needs to be outstanding, but if your title isn’t appealing nobody is going to click to read the content whether it’s from a link on social media, a search result or anything else. To capture attention your title has to be intriguing to your target audience. It has to really entice them to want to click. Some say you can’t do both, but it is possible if you know the secret. Here are some examples of catchy titles:
Each of these titles uses a specific formula known for getting clicks (and there are many others) while also using the focus keyword phrase. Types of posts that demand clicks include:
Also notice that the last title in the list is an example of the type of posts that are easy to market. It includes tips from experts. You can interview experts in the industry and get them to share the post once it’s published. Here are a few rules for finalizing your title:
Even though title tags are based on pixel count width rather than a number of characters, it’s worth keeping titles to 60 characters or less. Keep titles natural, relevant and clear for readers. 3. URL Structure
There are a few theories on creating URLs for blog posts. One school of thought is to use full title as your URL. Let’s say you chose the title: 101 Inspirational Living Room Design TrendsYour URL ending would become: /101-inspirational-living-room-design-trends/ This is a fine title. The other thought is that shorter URLs are better. So to keep it short you would use the URL: /inspirational-living-room-design/ Both are valid, but you don’t want to come across as blatantly targeting what you think search engines want. Create the URL to provide the most relevant information to your audience. When they see the URL they should instantly know what the post is about. A few rules for creating blog URLs:
4. META Description
The meta description is another important element for encouraging clicks from search engine results. The major item people see on the search engine result pages is the title. Along with the title there are now more visual elements such as video screenshots and author avatars resulting from Google Authorship, which are all referred to as rich snippets. But a secondary item on the SERPs is the description. This is the smaller text under the Title that describes in more detail what is on the page. When writing your descriptions you want to share a little bit of what the reader will find in the full article. Entice their interest. Use the focus keyword phrase. Keep it under 160 characters. Don’t stuff it with keywords. Write as if you were writing an introductory paragraph for your article. The purpose is to convince the searcher to click through to your post.
5. HeadingsIt’s a simple thing, but headings are something easy to overlook when formatting your blog posts. Books have chapters for a reason. Chapters break up the content. It’s easier to digest content when it comes in segments. Using your main focus keyword and secondary keywords in the headings gives the reader hints as to what the content is about when they scan your article. And the search engines use it as a signal too. 6. Internal LinkingInternal links help market you blog posts as readers read your blog posts. When someone is done reading your content you have to give him or her a next step. If you link to 4 or 5 previous blog posts you give the reader something to do next and it benefits you. They continue to read your content. They stay on your site. You continue to build that trust and relationship that leads to a sale. Again, blog readers appreciate internal links as long as it’s not overdone. And because readers show preference toward internal linking, search engines do as well. Internal linking gives search engines an indication of relevant content on your blog. By linking from an authoritative post on your blog to another relevant post you indicate that both posts are important. Internal links can also increase traffic and time on site, which are two additional indicators search engines use to gauge the relevance and authority of your blog. 3. Use WordPress SEO PluginsWordPress is the most popular blogging content management system available. One reason WordPress is popular is because of the community of developers it has. The software comes with a huge market for free and premium plugins. We covered, in detail, WordPress and necessary plugins that make your WordPress site an SEO powerhouse. We’ll add a few to the list for blog marketing purposes as it relates to organic search. 1. Yoast WordPress SEO Plugin
It’s the best SEO plugin for your blog. In another post on SEO we covered the detailed items you want to take care of to make your blog optimized for organic search. Yoast is a free plugin. That’s a bonus. It’s been downloaded nearly 7 million times as of this writing. With over 3,000 reviews it has nearly a perfect 5 out of 5 rating on WordPress. You can do just about everything with this plugin when it comes to optimizing your blog posts. 2. Google XML Sitemaps
Google XML Sitemaps is a simple plugin. You don’t have to do much to set it up, but it gives Google the information it needs to know what is on your site. (be sure to disable Yoast sitemaps if you use this plugin alongside it so you do not create duplicate XML sitemaps) 3. W3 Total Cache
Site speed is a huge factor in website and blog success. People expect your site to load quickly. There is nothing more frustrating to someone than waiting and waiting for content to load. Too many WordPress blogs take too long to load. Getting a quality WordPress host will be a big help, but adding the W3 Total Cache will add another layer of improvement. 4. Hunt For LinksFor this part we’ll stick to how you can hunt for links for the blog posts you create. 1. Go To Popular Blogs In Your IndustryGo to the popular blogs in your industry. You probably have a few that you know and follow already. To find a few more search for “your industry” + blog and you should get a good list of blogs to use. 2. Look For Blogs That Publish TrackbacksA common item used by most blogs is the trackback. This is a blog’s way of showing appreciation for a link. When another blog or website links to the post there is a trackback listed near the comments on the original post. From your list of industry blogs, create a list of blogs that allow trackbacks. 3. Find The Most Popular Posts On Those BlogsFrom the list of blogs that allow trackbacks, look for the most popular posts. These will be the ones with the most social shares, comments and tracks. 4. Create Content Better Than The Popular PostsNow you know the type of posts that are popular with your target audience. Your goal now is to create blog posts that go beyond those popular posts. Add more valuable content to the topic with your blog post. This will obviously take time, but it will be worth it because you’ll be able to build even more links than the original blog generated. 5. Build A List Of People To Contact From The TrackbacksOnce you have your content created you can go back to the trackbacks and parse through the information. Some will be from smaller blogs that would be nice to get a link from, but not ideal. Others will be from huge websites that may or may not link to your post.
Then there is the sweet spot. These are the blogs in the middle that have pretty good clout, but aren’t big enough to ignore your emails. 6. Email The Bloggers From The Trackback ListOnce you have your list of sweet spot blogs you can email them letting them know about the new, amazing piece of content you’ve created. Mention that you saw that they commented/linked to the original blog post. Then mention that you’ve taken the topic even further with an advanced or more in-depth post. Leave it at that. If you’ve done a good job a few will link to your post. 5. Blog Consistently and Keep With It
I’ve been blogging for longer than ten years. Ten years! And I haven’t quit. That’s a long time. I’m not trying to toot my own horn here. I simply want to make a point. Why haven’t I stopped blogging? After all, I get tons of traffic from old blog posts that I wrote two, four, and even eight years ago. Why do I keep at it? Writing is punishing work. It’s tough, and it takes a long time. Don’t I have better stuff to do like binge-watching Netflix or just relaxing? Why am I so devoted to blogging? I’ll let you in on a secret. I actually love what I do. That’s one reason. I blog because I like to do it. But there’s another reason. It’s a business reason. And it’s built on data. If you know anything about SEO, you know that Google values fresh content. Fresh content is a significant factor in positively influencing ratings. The logic here is that the more frequently you update your site, the more frequently Googlebot (Google’s crawling bot) visits your site. In turn, this gives you the opportunity to achieve better rankings. Although you can update your site in several different ways (not to mention all the different types of content you can create), writing new blog posts tends to be the simplest way to generate fresh content. So let’s go back to my question: why do I keep blogging? Why are you blogging? Should you quit? Should I quit? Are there better ways to do marketing, gain traffic, and grow conversions? Is blogging truly all it’s cracked up to be? More specifically, just how big of an impact does it have on SEO? In this article, I’m going to do away with niceties, guesses, and “best practice” advice. Instead, I’m going to dish up the data so you can get the cold, hard facts on what happens if you decide to stop blogging. Some key statsFirst, here are just a few statistics from Kapost to put blogging in perspective:
These are some legit numbers. They show just how monumental of an impact blogging can have. But what would happen if you stopped blogging? You pull the plug. You quit. You’re done. No more publishing. What would happen? Would it have any catastrophic consequences, or would it merely be a mild impediment? Let’s take a look at a study that put this to the test. 251 days of no bloggingWordPress developer/social media manager/SEO expert Robert Ryan conducted a simple yet enlightening experiment. In 2015, he refrained from posting any new content on his blog for 251 days. That’s eight months and seven days. Here are some of his key findings:
What can we take away from these stats? Blogging affects overall trafficWhen Ryan quit blogging, his traffic rapidly fell by 32%. The image quality is low, but here’s the chart that he posted:
The fact that Ryan’s overall traffic dropped by nearly a third during this time is tangible evidence that there’s a correlation between your blog output and your overall traffic volume. Quite frankly, I find it a bit alarming to see such a dramatic drop just because of not blogging. Of course, we should keep in mind that his experiment lasted for over eight months. If you stopped blogging for only a month or two, the consequences probably wouldn’t be this extreme. However, it still wouldn’t do you any favors. This brings up a good point. What if your business runs into trouble, you get sick, or something else happens that prevents you from blogging for a time? I suggest having a backlog of articles to publish at all times. I like to have several posts scheduled ahead of time. If something unexpected comes up, at least I know my posts will go live according to the schedule. Organic traffic can take a massive hitA 42 percent drop in organic traffic is colossal. For some businesses, that kind of drop could make the difference between making money and losing money. An organic traffic loss of that magnitude is similar to receiving an algorithmic penalty. Most websites earn most of their traffic organically.
If you’re in the “business services” industry, you earn a disproportionate amount of organic traffic.
Where does all this organic traffic come from? It comes from content. More specifically, it comes from blogging. Organic traffic is nothing to wink at. This is the lifeline of your business. This is your audience. It’s hard to dispute that Google does indeed show preference to sites with consistently fresh content. As Moz explains,
It’s all theoretical, of course. No one knows exactly how Google’s algorithm works. But we can’t dispute the fact that quitting a blog leads to an organic traffic nosedive. By having a dynamic site (publishing content) as opposed to a static one (not publishing new content), you provide Google with new content to crawl and index. In turn, this keeps you on Google’s radar in a positive way. You also have to consider the fact that each new blog post presents an opportunity to generate more backlinks and rank for additional keywords. I imagine that you want to see an uptick in traffic like this:
The fact is, you can’t get traffic like that unless you blog like you mean it. When you stop blogging for an extended period of time, your stream of organic traffic can dry up, which can obviously have some undesirable consequences. More blogging equals more leadsThe stat from Kapost, stating that brands with 15 blog posts per month average 1,200 new leads per month, and Ryan’s stat—stating that traffic to his contact page fell by 15 percent—show us just how intertwined blogging and lead generation really are. This makes sense when you think about it. No blogging means much less organic and overall traffic. In turn, fewer visitors are landing on your website, which means fewer leads. Blogging, quite obviously, leads to more leads.
Notice this data from MarketingCharts.com. Their data shows that a higher blogging frequency is positively correlated with higher customer acquisition rates.
Quitting blogging is a conversion killerThe final and perhaps most alarming of Ryan’s findings was the drop in overall site conversions (28 percent). I can connect the dots to see how this could happen. Few people blog just for the heck of it. We blog because it makes a significant difference. We blog because it builds conversions. But how does this work? How is blogging so inextricably linked to conversions? From my experience, I’ve found blogging to be an incredibly effective way to build rapport with my audience and get them comfortable with the idea of buying. For example, before a prospect would want to go ahead and purchase Crazy Egg, there’s a good chance that they would first want to explore “The Daily Egg,” which is the accompanying blog. I don’t sell anything on that blog. I just provide value, value, value.
In fact, two stats from Aabaco found that “60 percent of consumers feel more positive about a company after reading custom content on its site.” It’s about fostering positive feelings, as vague as that sounds. Furthermore, “78 percent of consumers believe that companies behind content are interested in building good relationships.” Good relationships are built one blog post at a time. Basically, blogging builds trust. If you blog the right way, you can demonstrate transparency.
Transparency, in turn, creates trust. There’s no secret here. If you want to truly influence purchases (conversions), you should be blogging. Customers look to content to grow and sustain positivity and goodwill towards the brand. This positivity and goodwill influences conversions. You’ll earn more conversions because you are blogging. It’s that simple.
I would also make the point that stopping blogging out of the blue can make you look a little flaky in the eyes of customers. Some may even wonder if you’re still in business. No one wants to do business with a place that seems quiet and untended. You might still be in business, but if your blog isn’t buzzing with new content and activity, users might get the idea that you’re not around to serve them. This will kill your conversions. For these reasons, you can see how a lack of blogging can slowly trickle down to hurt conversions and eventually result in a considerable decline in customers. Jeff Bullas provides an excellent explanation of how blogging builds credibility in this infographic:
These aren’t just random stats. These are concrete data-driven signals that your blog builds your credibility. And your credibility as a business influences whether or not people will buy from you. The takeawayWhile I can’t say for sure that you would experience the same level of backlash that Ryan did, it’s fair to say that quitting blogging for an extended period of time isn’t going to help you. Even going a single month without an update could throw a wrench in your SEO. For this reason, I can’t stress enough just how important it is to be consistent with publishing blogs. Everyone has their own opinion on what the bare minimum is, but most bloggers would agree that you should strive for at least one per week. A blog such as the Huffington Post (yes, it’s a blog) publishes an article a minute. They can do that because they have a ton of semi-free and syndicated content being pushed out. If you’re Forbes, you might publish more than 1,000 articles a month.
Obviously, you won’t be able to keep pace with Forbes or Huffpo, especially if you’re blogging for your personal brand. Instead, you should focus on consistency. As this article shows, when you quit blogging, your traffic and conversions tank. If you stay consistent, you’ll win. ConclusionOrganic search remains a major source of traffic for blogs. Following the tips in this post will help set your blog up for success with organic search. In general, write in-depth articles that are seen as better than any other source of content by your target audience. If you create something better than everyone else you’ll have no issue achieving good results in the organic rankings. Use WordPress and its free and premium plugins to optimize your blog, pages and posts. It can help clean up the content so you’re communicating correctly with the engines. Finally, create the type of content that is most shared and linked to by your target audience and influencers in your industry. Links remain a major part of the organic search algorithms so getting those key links over time will benefit your blog. Blogging accomplishes much more than simply demonstrating your expertise and building trust. It plays a major role in SEO, and the frequency of your blogging can determine how much traffic you bring in, how many leads you generate, and ultimately how many conversions you make. If you want to win at the game of online marketing, you’ve got to be publishing content. And you can’t stop. Internet marketing is a marathon, not a sprint. As a ten-year veteran of this sprint, I can attest to the fact that it gets ugly and tiring, and there are times when you want to quit. But I can also attest to the fact that your hard work pays off. Sure, at times you might feel like you’re banging your head against a wall, but all that work is doing something. It’s growing your audience. It’s building trust. It’s pushing up conversions bit by bit, day by day, month by month. Don’t quit. via Quick Sprout https://www.quicksprout.com/seo-for-blog/ Northwest Registered Agent is an industry leader in the business formation space. Don’t let the name mislead you. In addition to registered agent services, Northwest Registered Agent provides an extensive list of business services across all 50 states. The company is known for its exceptional customer service. This is largely due to the fact that Northwest Registered Agent is family-owned and operated. While the organization has grown to employ over 200 customer service reps nationwide, they still maintain the same “small business” principles. Compared to other business formation services on the web, Northwest Registered Agent is really unique. They don’t have any investors or partners, and they go above and beyond to protect your privacy. If you’re looking for a cost-effective and reliable service to form your LLC or corporation, Northwest Registered Agent should be a top consideration. Is Northwest Registered Agent right for you? Continue reading to learn more about the services, plans, pricing, and read real reviews from existing customers. Get started with Northwest Registered Agent today. Northwest Registered Agent Business Formation ServicesNorthwest Registered Agent is best known for its business formation services. These offerings can be segmented into three main categories—LLC services, incorporation services, and registered agent services. We’ll take a closer look at each one of these with an in-depth review of the services below. Northwest Registered Agent LLC ServicesNorthwest Registered Agent makes it easy for anyone to form an LLC, regardless of your location. While the LLC formation process is generally the same across the country, each state has a specific filing process. After you select a state, they’ll walk you through the specifics for your location. For example, here’s what you’ll see if you want to start an LLC in California:
Northwest Registered Agent provides a detailed explanation of each step for anyone who wants to register an LLC on their own. You can even download the documents for free and follow the instructions to do it yourself online. So if you’re a DIY type of person, you’ll love this option. Even if you’ve never gone through the process before, the instructions provided are very straightforward. With that said, Northwest Registered Agent can take care of the entire filing process on your behalf. Most people take advantage of this service as opposed to doing it on their own. There are two paths to choose from—their regular formation service and their VIP Service. With the regular service, you get walked through a couple easy steps, including the business name you want, contact info, and membership information. Early on, you can even select standard filing time or express filing. For regular formation, select “Pay Up Front” under “How Do You Want To Be Billed?” This starts at $225 ($100 for the filing and $125 for registered agent services), plus state fees. Before payment, you’ll have the option of adding on additional services:
They even offer apostilles (for doing business in a foreign country) and a second telephone number. Depending on the state, you can expedite the filing process for an upcharge as well. You’ll definitely need the EIN, but most of you will likely be able to skip the other extras. Once you finalize the order, the professional filers at Northwest Registered Agent will immediately begin reviewing your information. If there’s an error or they have any questions, you’ll get a phone call ASAP for a resolution. You’ll be able to track the status of the order directly from your online account. Northwest Registered Agent will also send you email updates to keep you informed. You can sign up for VIP Service from Northwest Registered Agent at the beginner of the LLC formation wizard. Just select “Pay Monthly” under “How Do You Want To Be Billed?” and you’ll see the state filing fee, filing service fee, registered agent, and EIN are all included for a low monthly fee that varies from state to state. Basically, you pay Northwest Registered Agent back for the total fees incurred in filing in smaller chunks. You cannot select optional add-ons a la carte, like you can with the regular LLC formation service. But the VIP Service includes everything important:
The VIP Service is also a great way to keep registered agent services beyond year one at a reasonable price.
Overall, Northwest Registered Agent will be an excellent option for anyone who wants to form an LLC. Whether you want to do it alone or hire Northwest Registered Agent to handle everything for you, they have what you need to succeed. Northwest Registered Agent Incorporation ServicesThe incorporation services from Northwest Registered Agent are extremely popular as well. If you’re new to this, the website has tons of resources and detailed information about the different types of corporations and processes for getting started. Similar to the LLC services, you’ll get state-specific guidance when you use Northwest Registered Agent to incorporate your business. They give you the option to download incorporation documents and do it yourself online for free. While it’s nice to have this option, most people choose to hire Northwest Registered Agent to handle everything for them.
You can use Northwest Registered Agent to start a C corporation, S corporation, or nonprofit corporation. The incorporation services follow the same formation plan structure as LLCs—you can choose to pay up front to use their regular service starting at $225 plus state fees. Through that, you can add on essentials like an EIN for $50 or other useful but not necessarily vital extras. The VIP Service includes filing service fees, state filing fees, registered agent services, and an EIN all for a palatable monthly price that depends on the state you’re filing in. You simply pay monthly to Northwest Registered Agent to spread out the expense of filing and to keep registered agent services on hand. Whether you’re forming a C-corp, S-corp, or nonprofit, Northwest Registered Agent can get you up and running in no time at all. Registered Agent Services from Northwest Registered AgentAs you can imagine (based on the name), Northwest Registered Agent is known for its registered agent services. Compared to other registered agents on the market today, these services are second to none. The service is offered in all 50 states.
Northwest Registered Agent goes above and beyond what’s required of a registered agent. They provide all of the basic services like:
But they also offer premium services at no additional cost, including:
It’s the best registered agent service for LLCs and corporations on the web. The service costs $125 per year and it comes standard with every business formation package. They also offer bulk discounts. If you need the service in five or more states, the rate drops down to $100 per year. For those of you who already have an existing business, Northwest Registered Agent makes it easy for you to switch registered agents if you want to benefit from their exceptional service. With “registered agent” in the business name, this shouldn’t come as much of a surprise. Overall Pricing and ValueNorthwest Registered Agent provides transparent pricing on all of its services. Whether you’re forming an LLC or corporation, the base cost remains the same. They charge $100 + state fees for the filing service and $125 for the registered agent service. Unlike other business formation services on the web, the registered agent service is not optional. Even though it’s listed as a separate line item on your order, you can’t remove it and get a registered agent elsewhere (although I don’t see why you’d want to). They don’t offer different pricing tiers or bundles either. Just pay the base rate, and then other add-on services as needed. Popular extras include:
Generally speaking, Northwest Registered Agent is not one of the cheapest business formation services you’ll find on the web. This is especially true when you start adding upsells to your order. With that said, you’re paying for better value. If you just look at the prices and compare Northwest Registered Agent to the entry-level plan of a competitor, the starting rates might seem high. But when you start to compare those packages side-by-side, you’ll see that Northwest Registered Agent provides the most bang for your buck. Of course, you can also go with the VIP Service, which packages together filing fees, EIN, and registered agent services into a monthly bill. This can vary a lot from state to state (as you’re basically paying Northwest Registered Agent back month to month), but several states are as low as $30 to $40 per month for both LLCs and corporations. Additionally, Northwest Registered Agent has free services as well. If you want to register your LLC or corporation on your own, you can do it directly from their website. They’ll walk you through the process and even provide you with free state-specific documents. User ExperienceThe user experience with Northwest Registered Agent can be described in one word—simple. Everything is transparent and straightforward. The website is clean, easy to navigate, and lets you get started quickly. Once you select your state and entity type, Northwest Registered Agent automatically provides you with state-specific information. It even includes details about the tax rates for your state, documentation required for opening a bank account, and more. One of my favorite parts about the user experience is that you can skip ahead to view other sections of the form as you’re signing up and going through the process.
Most business formation services force you to create an account and provide certain details about your company before you move on to the next step. But Northwest Registered Agent doesn’t impose these restrictions. So, you can skip ahead to see the total cost of your order, including the add-ons and state fees, before creating the account. Other services on the web aren’t as transparent, and try to sneak this information in at the end when it’s time to pay (after you’ve already spent a ton of time filling out forms). From start to finish, you can complete the process in less than ten minutes. Customer SupportNorthwest Registered Agent’s customer service is unmatched—period. When you call, someone answers. They don’t have phone trees, so the agent you speak with will be able to assist you without having to transfer you to someone else or another department. If you reach their voicemail, they’ll return your call within two hours. You’ll never get a “no-reply” email from them, so you can always reach a representative via email if you have a question. All emails are answered on the same business day. The entire support operation is 100% US-based. All of the business formation and registered agent services come with Corporate Guides. These are business experts located throughout the country, with local insights related to your business. If you have a question, they can provide an answer. As a family-owned and operated business, Northwest Registered Agent doesn’t have any partnerships or investors, and they’ll never sell your data to third parties. They won’t let payments get in the way of providing exceptional service. Northwest Registered Agent understands that mistakes happen, especially when it comes to online payments. That’s why they never charge a late fee. In short, their customer support is top-notch. I can’t emphasize this enough. If you don’t believe me, just give them a call or send them an email with a general inquiry—you’ll be impressed. Final VerdictAt the end of the day, we can confidently recommend Northwest Registered Agent. In addition to the registered agent services, it’s a great option for anyone looking to form an LLC or incorporate. They offer fair and transparent pricing, accompanied by exceptional customer service. Even if you want to file your formation documents on your own, Northwest Registered Agent provides free document downloads and walks you through the process at no cost. It’s tough to find anything negative to say about these services. via Quick Sprout https://www.quicksprout.com/northwest-registered-agent-review/ Like any business venture, running an ecommerce store isn’t easy. But with dropshipping, you can sell products online without ever touching the inventory. No manufacturing, no storage, no shipping labels—you don’t even need to pay for the goods upfront. You can run a dropshipping business from your couch with minimal overhead and collect profits without worrying about complicated logistics. This guide will teach you everything you need to know about starting a dropshipping business—even as a complete beginner. The Easy Parts of Starting a Dropshipping BusinessThe easiest part about starting a dropshipping business is setting up your online store. All of the best ecommerce platforms support dropshipping. So if you have no experience building a website, you can get up and running with an ecommerce platform in a matter of minutes. Shopify has everything you need to create an online store out of the box.
It’s just a matter of selecting a template and customizing the site with your own content. Your ecommerce platform should integrate seamlessly with your dropshipping provider as well. So your product catalog, inventory, and even product images can be automatically updated on your website. Another easy part of starting a dropshipping business is the cost. You don’t need a ton of money to get started here. The upfront investment is limited to your business formation fees, ecommerce platform subscription, and dropshipping provider fees. In many cases, the total cost here is less than $500. Getting a bank loan or pouring your life savings into a new business isn’t required. Dropshipping is low-risk and flexible. It’s something you can do as a side hustle, and you won’t need to secure any office space or warehouse leases. You can run a dropshipping business from your laptop. The business formation process is easy, too. There are online business formation services out there that can handle all of the paperwork and legal filings on your behalf. It’s a fast and cost-effective way to legally form a business entity for your online store. The Difficult Parts of Starting a Dropshipping BusinessJust because the concept of dropshipping is simple, it doesn’t mean that it’s easy. Many entrepreneurs think they can start a dropshipping business, put it on autopilot, and just watch the money roll in without doing any work. But that’s rarely the case. While there’s no shortage of potential products to sell online, finding the right products to sell on your site is a tall task. You need to put in lots of research and effort to find products that are profitable but also in high demand. Assuming you’ve done this properly, then you need to build your brand and drive customers to your website. You’ll be competing with hundreds, if not thousands, of other businesses online. Why should someone buy from you instead of Amazon, Walmart, or other more established businesses? Building a reputable brand online and driving high-converting traffic to your website can take years. To make your brand more appealing to potential customers, you’ll also need to establish a social media presence, get positive reviews, and focus on other areas of your site for leads, like a blog. All of this takes lots of time, and it’s not something you can do overnight. Once you start selling products online, you’ll also have to deal with customers. How are you going to manage pre-sale inquiries, post-sale support, and returns at scale? When you’re just getting started, you can probably handle a few questions per week on your own. But at scale, this is impossible for one person to manage. You need to put a plan in place that will support the growth of your dropshipping business. So when you start selling more products, things will continue to run smoothly without customer service bottlenecks. Step 1 – Decide What To SellLots of people know they want to start an online store, but they have no idea what they’re going to sell. Even if you already have an idea, don’t skip ahead to the second step just yet—verify that your idea is worth pursuing and there is interest in it. There are several things to consider as you’re going through this process. But profitability needs to remain at the forefront the entire time. Many experts will tell you that you need to be passionate about what you’re selling to succeed. But that’s only true to a certain extent. While it’s nice to sell something you’re interested in, you need to make sure that your interest will actually make money. For example, let’s say you love fitness—specifically weight lifting. Selling workout equipment online may not be very profitable. Weights and large pieces of equipment will have higher shipping costs and potentially eat into your profits. On the flip side, let’s say you know nothing about the fitness space, but you discover products in this category have substantial profit margins. It could be tough for you to market your brand and succeed if you don’t know about the category. Ideally, there should be a balance between selling something you’re interested in and selling something profitable. Select Your NicheTrying to sell your product to everyone and anyone is a recipe for disaster. The best dropshipping businesses are laser-focused on a specific niche. Establishing a clearly defined target market before you do anything else will help ensure that you’re not dumping money into a product category that won’t work. For example, let’s say you want to sell clothes. Everyone wears clothes. But you need to narrow your niche to something more specific, like men’s yoga clothing. Then you can build your target market and brand around this category. Try to build your niche around a target market with disposable income. If you’re a student starting a dropshipping business as a side hustle between classes, it could be tempting to target college students since this is a niche you’re familiar with. But do college students have enough money to buy whatever you’re selling? Not necessarily. Run a Competitive AnalysisOnce you’ve narrowed down your product category and niche, you need to research the competition before proceeding. Regardless of the category, you’ll always have competitors. But some spaces are undoubtedly more crowded than others. Avoid saturated markets that are dominated by big players in the industry. Run some keyword trend analysis and compare the costs to advertise different terms or phrases in your niche. This is a great way to see how many other businesses are fighting for the same customers. Look for the low-hanging fruit. Selling a product with a 5,000 monthly search volume and $0.75 average CPC (cost per click) on Google is better than a product with 500,000 monthly searches and an average CPC of $32.50. The latter is far too saturated and will be tough for you to penetrate and make money. Step 2 – Choose Your Business StructureOnce you’ve validated your business idea and decided what to sell, it’s time to legally form a business. Formally creating a business puts separation between you and the company. Not only can it protect your personal information, but it also offers liability protection. For example, let’s say a customer gets hurt using one of your products and sues the company. A business entity can shield your personal assets from the lawsuit. The easiest way to set up your dropshipping business entity is with a business formation service. These online platforms make it easy for anyone to start a business with little investment required. It’s easier and less expensive than hiring a lawyer or trying to fill out and file the paperwork on your own. LegalZoom is a top option in this category.
I like LegalZoom because the platform has a reputation that speaks for itself. The service has been used to form over two million businesses across a wide range of categories. LegalZoom offers several popular entity types, registered agent services, and legal consulting services for businesses as well. So you can get everything you need in one place. In addition to its simplicity and reliability, LegalZoom is extremely affordable. Business formation services start at just $79 plus state filing fees. All you need to do is answer some simple questions online, and LegalZoom will take care of the rest. They’ll handle all of your state filings, federal filings and get your EIN (employer identification number) as well. Here’s a brief overview of different entity types you can choose for your dropshipping business: Sole ProprietorshipSole proprietorships are the easiest to form because the filing requirements are minimal. State and federal filings aren’t required—your business income gets reported on your personal tax returns. But sole proprietorships don’t offer any liability protection. So your personal assets might be in jeopardy if you’re using this structure to run your dropshipping business. LLC (Limited Liability Company)An LLC is one of the most popular business types for online stores. An LLC establishes a separate entity for your business. While the liability protection isn’t necessarily bulletproof, it offers much more protection than sole proprietorships. LLCs combine the taxing structure of a sole proprietorship with the liability of a corporation. CorporationCorporations fall into two categories—C corps and S corps. The biggest difference between these two options is taxation. S corporations have pass-through taxation, meaning shareholders (owners) report income and losses on their personal tax returns. C corporations are taxed twice. Generally speaking, LLCs will be the best option for most dropshipping businesses. Corporations work well if you’re getting outside investors and want to sell stock in the company, which isn’t typical for dropshipping sites. Step 3 – Build Your Online StoreNow it’s time to create your website and ecommerce shop. The easiest way to do this is through an ecommerce platform. Just make sure the ecommerce platform you’re using supports dropshipping out of the box. Shopify works well for most new dropshipping businesses.
The platform has everything you need to start selling online immediately. You can create a professionally designed online store in a matter of minutes by choosing a template that fits within your niche. Shopify also offers solutions for helping you find the best products to sell online. It’s also easy to get paid with Shopify. You can take advantage of the platform’s built-in payment processing or integrate a third-party payment processing solution to your site. Another reason why I like Shopify so much is that you can sell online through multiple sales channels. In addition to your website, Shopify supports sales on Facebook, Instagram, eBay, Amazon, and Walmart Marketplace. Plans start at just $29 per month, and you can try it free for 14 days. Step 4 – Select a Dropshipping SupplierOnce your online store is up and running, it’s time to figure out where your products will be coming from. It’s important to use a supplier that seamlessly integrates with the ecommerce platform you’re using. This will make it easier for you to manage online orders and limits the amount of work you need to do when a customer buys something on your site. Ideally, the order will go straight to the supplier without any manual steps required on your end. Compare SuppliersWhen comparing suppliers, you need to find a balance between price, quality, and reputation. Some suppliers might be really cheap, but the products are of poor quality. For some of you, this might not be important. But others will prioritize quality. It all depends on the type of brand you’re building. Your supplier will ultimately be a direct reflection of your business. The customer doesn’t care where the product comes from or if you’ve never actually seen the inventory in person. They ordered something from your website—so if they’re unhappy, you’ll get blamed. Integrate the Supplier With Your Ecommerce PlatformConnect your supplier to the ecommerce platform. For simplicity’s sake, let’s say you decided to go with Shopify. There are hundreds of different integrations available on the Shopify App Store to simplify your dropshipping process.
The exact integration process will look a little different depending on the ecommerce platform you’re using and the supplier you choose. Step 5 – Market Your Online StoreThe first four steps are relatively straightforward. But once everything is in place, the hard part begins. Now you need to drive customers to your website. This can be a time-consuming and potentially costly process depending on the methods you choose. Here are some ideas to get you started:
The key here is to try and keep your customer acquisition costs as low as possible initially. Then find ways to retain your customers after the initial purchase so that they buy more in the future. Don’t get discouraged if you’re not selling products on day one. It takes time to have success in this space. via Quick Sprout https://www.quicksprout.com/how-to-start-a-dropshipping-business/ For most businesses, their most valuable and important asset is their customers. So it makes sense that finding the right Customer Relationship Management software is vital to the success of your business. If you’re scratching your head thinking that this tool is going to be yet another app to add to your business tools, think again. Some CRM software will integrate directly with your Gmail inbox. This means bringing powerful CRM functionality to your favorite email platform. It also means you don’t have to spend time learning completely new software and can manage your customer relationships in the same place you communicate with them. If this sounds perfect to you, stick with us! We spent hours researching and testing the best CRM software for Gmail out there and today we are going to tell you all about them. The Top 6 Best CRM for Gmail
We’re going to take a closer look at the features, benefits, and pricing of each software below. Use this guide to find the best CRM for Gmail for your business. If you’re interested in looking into CRM solutions that don’t specifically integrate with Gmail, you can also check out our list of the best 8 CRM software solutions in 2021. #1 – NetHunt — Best for Most
At Quick Sprout, we prefer not to be vague when it comes to recommending what a software tool is best for. But in the case of NetHunt, it truly is suitable for just about everyone. No matter whether you are a freelancer, small team, or a large company, NetHunt is ready to support you with its feature-rich CRM software that will integrate directly into your Gmail inbox.
With NetHunt, it’s all about automation. You can automate your entire CRM process from capturing inbound leads to nurturing them into a sale with personalized email sequencing. You can kiss data entry goodbye too. NetHunt will automatically capture client data from multiple forms such as web forms, inbound emails, LinkedIn, and Facebook. You can even automate the sales pipeline. NetHunt uses clever algorithms to move leads along the pipeline depending on their actions such as replying to an email. Some other features NetHunt offers are:
Not only is NetHunt consistently presented as a top contender in the Gmail CRM software market, but it’s also one of the most affordable on the market. NetHunt pricing plans include:
If you’re not sure which plan to choose, NetHunt offers 14-day free trials for all its plans. #2 – Streak — Best For Tracking Sales Pipelines
Streak is one of few Gmail CRM options that is completely integrated with Gmail, meaning it lives directly inside your Gmail inbox. It comes with all the Google Workspace integrations too. Streak is considered more of a lightweight CRM option, but don’t let that deter you. Streak packs a punch with tons of juicy CRM details like pipeline and lead generation features. Its pipeline tool is one of the best around. You’ll be able to keep your pipeline moving at all times by setting up and customizing a perfect process for your team to follow–no matter the scenario!
Furthermore, Streak will automatically capture data from your contacts and emails and add them to your pipeline. You can set up notifications to alert you as things progress through the pipeline so you’ll never forget a follow-up task. Some other features Streak has to offer include:
Streak offers a range of pricing plans with the flexibility to choose billing monthly or annually. You can even get started on a very basic plan with Streak for free!
Get started for free with Streak today! #3 – HubSpot — Best Free Gmail CRM Tool
HubSpot is a household name in the CRM world, so it’s only natural that they would make the top list of Gmail CRM software. HubSpot offers comprehensive CRM tools to all types of businesses for free. It is important to point out that although the free version has a lot of features, they may not be as robust as what you need as your company scales. Luckily, HubSpot also offers phenomenal paid plans to support you as you grow.
HubSpot’s free Gmail CRM tool is implemented as a Chrome extension. It helps to streamline its user’s workflow by optimizing email tracking and sales with features like:
You’ll also be able to log emails with one click, and track email opens and clicks in real time, all under one roof. The great thing about choosing HubSpot Gmail CRM is that as your business grows you’ll have one of the most extensive CRM software tools out there, already at your fingertips. You can start using HubSpot for free today. If you want to start with one of its feature-rich plans the pricing tiers are:
#4 – Copper — Best For Automations
When Google itself recommends a software, you have to acknowledge that it is likely one of the best in the market. Copper is exactly that. One of the first CRM software to integrate CRM and Gmail beyond sidebar status, Copper is built with Google Material Design. Within the CRM platform, email tracking, call logs, and contact management, all look and feel like Google Workspace.
Copper offers powerful AI-driven capabilities in a bid to give you back more time. It takes care of tedious and time-consuming tasks such as recording emails, calls, and events, while you focus on building customer relationships. What we particularly love about Copper is the email automation features. You can automate follow-up emails with personalized templates and set automatic reminders for when it’s time to personally get in touch with a prospect or buyer. Some other features Copper has to offer include:
If you want to give Copper a go, you can do a 14-day free trial totally commitment-free. When your trial is over, Copper offers three pricing plans:
#5 – Agile CRM — Best For Contact Management
If you’re looking for a straightforward CRM software that offers simplified and easy contact management, Agile CRM is the one for you. Agile CRM’s Chrome extension for Gmail will streamline communication between the CRM platform and your Gmail inbox. This does mean there is some tab switching involved to get the complete overview of your data. Luckily its two-way contact sync allows you to access contacts from both systems, so you won’t need to enter the data twice.
Agile CRM also offers a unique contact management feature–a 360-degree contact view. This feature allows you to build a detailed profile for each contact including contact information, communication history, social media profiles, interests, points of engagement, and much more. Furthermore, you can access all of this information from a single contact page. If this isn’t giving you everything you need to woo the prospect and nurture the relationship, then we don’t know what will. You’ll also be able to:
If you’re looking for the bare minimum, you can get away with Agile CRM’s free plan. Alternatively, its paid pricing plans based on a two-year contract are as follows:
The free plan can be used for up to 10 users, so why not get started for free today! #6 – Insightly — Best for Managing Enterprise-Level Relationships
Insightly is built for enterprise-size sales and relationship management. Insightly is a bit different from the other tools we’ve looked at today. Not only does it focus on sales and marketing, but it also offers project management software. In a nutshell, it’s a CRM and project management powerhouse. Building and maintaining complicated and large-scale relationships is easy with Insightly. Its relationship map feature allows you to create a comprehensive web of interactions between the customer, the business, and other partners. At a glance, you can quickly determine who knows who, and build a clear view of an organization’s structure and networks.
While Insightly’s Gmail integration isn’t particularly robust, it offers key CRM tools such as Kanban sales pipeline and relationship maps designed to nurture your customer relationships. There will be some significant tab-switching between the two platforms but for the feature-rich software you receive for your trouble, we think it’s worth it. Although Insightly is certainly geared to enterprise-size organizations, its free option for two users positions it well to cater to freelancers or startups as well. Paid pricing plans look like this:
Why not try one of Insightly’s paid plans for free today! How to Find The Best Gmail CRM For YouWith so many great software to choose from how do you tell the difference? How do you decide which one is the right CRM tool for you? Of course we have an underlying methodology to follow when it comes to narrowing down the top picks of this list. Obviously our first point of focus is seamless integration with Gmail. Then depending on the size and scope of your business, you may want to consider which of the existing software you use can also integrate with your chosen CRM software. Aside from ensuring the software covers the other standard criteria such as price and ease of use, here are some things that you should factor into your buying decision if you’re looking to step outside of the options mentioned above. Bulk Email ManagementHaving the ability to store and easily send email templates is one thing, but the ability to send personalized bulk emails to your contact list at once is a game changer for organizations with lots of contacts. Instead of manually addressing and sending the same email to hundreds or thousands of contacts, your CRM tool should do that for you. Ideally, it would also be great if your Gmail CRM tool could automatically tag and label emails as they land in your inbox. This will help you to prioritize the leads that are hot and nurture the leads that need a little more attention. If you are running a smaller business with only a handful of contacts, this criteria may not be as important to you as others. However, it’s still a great feature to keep in mind when searching for the right CRM tool, even if it’s a feature of a higher paid plan of your chosen software provider. This way you’ll have the option to upgrade to this feature if you find your contact list growing beyond your means. Automation & SchedulingAutomation and scheduling almost go hand-in-hand with bulk email management. In a nutshell, you want to take as much work off your plate and put it in the hands of the software. Your Gmail CRM software should offer enough automation to prevent any bottlenecks from arising in your sales pipeline. These automations can either be in relation to email leads or responses, or to do with other business processes such as tracking leads through the pipeline and invoicing. Similarly, an excellent feature to look out for in your CRM software is scheduling. This is particularly important for organizations who may be working on a global scale across multiple time zones. But in general, having the ability to prepare emails and schedule them for a time when your prospects are most engaged is going to offer plenty of advantages to your business. Team CollaborationWhether you’re a team of two or a team of 20, transparency and collaboration among the team is vital to nurturing customer relationships. As a prospect, there is nothing more frustrating than having to repeat conversations with different representatives multiple times over. This shows a lack of communication and collaboration among the team that you could be working with. Therefore it’s vital that you consider implementing a Gmail CRM that will not only help you to organize and automate your entire email process, but will also encourage seamless team collaboration. Some of the key features to keep an eye out for are the ability to tag colleagues in tasks or updates, share common files or templates, share appointment dates, and share notes on customer contact information. Not all Gmail CRM software options have these collaboration features. Although it would certainly be beneficial for a small team, if you need to pay more than you can afford for a plan to include these features, it may be a deal-breaker for you. Instead, look out for plans that include collaboration features on its higher plans so you know you can grow into these features as your team grows. SummaryWhat’s the best CRM for Gmail? That depends on what you’re looking for! If price is your number one priority, you simply cannot go past CRM powerhouse, HubSpot. Alternatively, if you’re looking for software that will integrate with your inbox as if it has been there forever, tools like NetHunt or Streak are great options. At the end of the day, the best software for me isn’t going to be the best for you. Do your research while keeping our criteria in mind and sign up for lots of free trials. Testing is a great way to narrow down what your key requirements in a software are. via Quick Sprout https://www.quicksprout.com/2021/06/28/best-crm-for-gmail/ Many HR managers know the pressure that comes with unexpected attrition, leave of absence, or volatile hiring swings. The need to fill an open position urgently can quickly send the HR department into a tailspin. Often, the department has to divert resources to recruiting, neglecting other crucial core duties. A contract recruiter brings the experience and expertise needed to resolve hiring challenges quickly at a fraction of the cost of onboarding a permanent recruiter. The Easy Parts of Hiring a Contract RecruiterThe good news is that you won’t have to struggle to find a good contract recruiter. Many seasoned professionals are choosing to go their own way for various reasons. Whether it’s building professional networks, freedom, or flexibility, the talent pool is jam-packed with highly competent and experienced contract recruiters.
Application tracking software such as JazzHR makes the collaborative process even easier. The software helps with the entire recruiting process, including candidate sourcing, offer letters, and automated onboarding. JazzHR is the perfect tool if you’re bringing in a contractor. The software offers collaborative hiring features and doesn’t charge on a per-user payment plan. You get unlimited users on all its plans. The basic plan, Hero, costs just $39 per month. You can upgrade to the higher tiers to enjoy unlimited open jobs.
JazzHR offers a free 30-day trial if you’d like to try out the software before committing. The Difficult Parts of Hiring a Contract RecruiterThe hardest part of this process may be deciding precisely what type of contract recruiter you need. There are two types of contract recruiters. The line between a contract recruiter and a recruiting agency that specializes in contract hiring is often blurred. A contract recruiter generally refers to an individual recruiter that you hire to work only for your business–as an independent contractor/freelancer. They are not full-time employees and are typically paid hourly wages with no benefits and have a contract term limit with the potential for extensions. There are also contract recruiter agencies that match you with a contract recruiter that fits what your organization is looking for. These recruiters work as employees for the agency, and you are one of several accounts they manage and submit resumes to. Your company will have a contract or agreement with the agency as a whole and not the individual recruiter. Step 1: Decide on the type of contract recruiterIt’s not always obvious which kind of contract recruiter is the better option for your needs. Here are three main factors to consider when making that choice: Consider your budgetHiring a recruitment agency will cost more. If you have simple hiring needs and a tight budget, a freelance recruiter might be the way to go. These recruiters often have a ready pool of potential candidates and a strong network of prospects to meet your hiring needs. Consider the complexity of the positionOne advantage of hiring a contract recruiting agency is the pool of recruiters at your disposal. When hiring for high-level positions, it may be worth paying extra. The agency can break down the recruitment process into parts and delegate the correct recruiter for each part of the hiring process. Having multiple recruiters working on your open positions, all with experience hiring for your industry, can be invaluable. For example, the agency may designate a junior recruiter for the early part of the process, screening resumes for the right qualifications. Then, the junior recruiter may hand the resumes off to a more senior recruiter for interviews, and finally to the HR business partner for salary negotiation and offers. Consider the scope of workYour scope of work will ultimately lead you in the right direction when choosing between a freelancer and a recruitment agency. You may only need the contract recruiter to source and interview candidates before handing them off to your in-house hiring manager. In this case, an independent recruiter will fit the bill. However, if you need multiple positions filled urgently and also require the recruiter to onboard new hires, it may be worth hiring an agency. Of course, you may be able to find a freelance recruiter to handle the entire process for entry-level, temporary, or contract positions. Remember, hiring a freelance recruiter may require you to interview and meet with several before choosing the one you wish to hire. Agencies within your industry are typically easier to move forward with, and you can work with multiple agencies simultaneously–as you pay if they place a candidate with you. There is no upfront cost to hiring an agency, though their pricing is inevitably more expensive than a freelance recruiter. Evaluate your scope of work against the recruiter’s skills and competency to figure out which is the better option for you right now. Step 2: Decide the Attributes of the Contract RecruiterOne of the significant benefits of hiring a contract recruiter is the time it frees HR reps to perform their core duties. Recruiting and onboarding new hires can quickly turn into a full-time engagement. It would be unfortunate if HR were dragged into the hiring process that you outsourced for good reasons. To keep this from happening, hire a contract recruiter who has the skills to handle the entire job at hand competently. Market knowledgeA great place to start when determining a good fit is the recruiter’s knowledge of your industry. A recruiter specialized in your industry will already know where and how to recruit the candidates you are looking for. They’re also in touch with industry trends and can offer fresh insights into your hiring process. Metrics-orientedYou want a contract recruiter who is obsessive about metrics. It’s not just about how many employees the recruiter sources. Other details like how long the new hire stays, how well they fit into the organization, and job satisfaction is equally important. A recruiter who works with cold, hard numbers is someone you can count on to bring in suitable candidates. ExperienceA good contract recruiter should have demonstrable experience in your industry. Look for other organizations similar to yours that the recruiter has worked with. What was the success rate? What do previous clients have to say about the recruiter? If the contract recruiter has a positive track record, chances are they will meet your hiring needs. Step 3: Conduct InterviewsThere is only so much you can learn about contract recruiters on paper, so shortlist candidates for a face-to-face interview. In some cases, you might have to pay the recruiter whether or not the position is filled, specifically if you hire a freelancer. For this reason, you want to take special care to screen candidates, so you have the right person for the job. For a recruiting agency, you can typically either skip this step altogether or choose to meet only with the main account manager you’ll be working with. With agencies, you are not paying an upfront fee, only when a candidate is actually working. For contractor positions, agencies get paid a markup on hourly wages. When working with a recruiting agency, you will skip steps three through five. After you decide which agency to work with, you and the agency with review and sign a contract and will move directly into them working on your open positions. After signing a contract and giving them the open roles, move to step six. But for independent contractors, you’ll definitely want to meet with the candidates and make sure they understand your industry, company, and needs. Prepare beforehandThere is crucial information you will should collect before interviewing contract recruiters. Prepare adequately to ensure that the interviews go smoothly. Some of the information you’ll need might include:
This information includes what the recruiter needs to know to do the job and also gives them the information of what they can expect working in the recruiter role for your company. Conduct the interviewAsk about their placement success rate. This single metric can tell you a lot about the recruiter’s competence. Ask about the candidates’ success rate, particularly in situations closely resembling yours. For example, you may hire because of rapid and unexpected growth. Find out if the recruiter has experienced a similar scenario and the outcome. Other interview questions to ask include:
Non-disclosure and non-solicitation agreementsNon-disclosure and non-solicitation agreements are standard practices in contract recruiting. You need to make sure that confidential information doesn’t leak to other organizations or your competition. Come up with a comprehensive non-disclosure agreement and discuss it with your recruiter. Similarly, a non-solicitation agreement means that the contract recruiter cannot poach your employees once you hire them. A contract recruiter refusing to sign any of these documents may be a red flag. Pick the candidate you think will fill your open positions with high-quality hires. Step 4: Create a Statement of WorkSince your recruiter is working on a contract basis, it’s more important than ever that there is a clearly defined Statement of Work (SOW). This agreement helps to ensure that both parties meet their obligations. Additionally, a detailed scope of work increases the chances that the contract recruiter will meet your expectations. Write down your most important objectivesThink about what you’d like the contract recruiter to achieve and put it down in writing. Possible recruitment objectives may include:
Think about previous challenges in your recruitment process and hand over the task to the contract recruiter. Chances are they have dealt with the same issues before. Be as specific as possible about your hiring objectives to make it easy for the recruiter to match your expectations. Identify specific recruiting tasksYour hiring objectives set the tone for the recruitment process, and specific recruiting tasks form the basis of your scope of work. Think through everything you wish the recruiter to accomplish on your behalf. Consider the number of open positions to be filled, the timeframe, and the priority for filling the positions. Think through the scope of work early on in the process. It is not unheard of for recruiters to pick CVs at random to beat a close deadline. Also, some won’t even read the cover letters at all if they are pressed for time. Give your contract recruiter enough time to vet the candidates properly, and you’ll both be happy with the outcome. Iron out reporting detailsContract recruiters work independently, but they still need your organization’s support to accomplish their objectives. Introduce the recruiter to their manager, the HR team, and other people they’ll be working with. Make it clear who the recruiter reports to and their goals. Designate a go-to person the recruiter can approach to solve any problems, questions, or concerns. Ideally, this should be the same person that the recruiter will hand off to at the end of the contract. Step 5: Set the Contract Recruiter Up for SuccessSecuring top talent hinges on a successful collaboration between the contract recruiter and your organization. There are a few things that you can do to make the recruiter’s job more manageable and leverage their expertise and experience to find the best candidates for your open positions. Onboard the contract recruiterYou can rely on your typical onboarding process to seamlessly transition the recruiter to your organization. Start before the recruiter arrives by ensuring that they have all the tools they need to do their job. These tools include a desk, approvals to use websites, login permissions, a voice mailbox, email, access to your recruiting software, recruiting marketing materials, telephone lists, and space to interview. HR should be proactive in making sure that the recruiter hits the ground running. Introduce the recruiter to essential personnelFacilitate face-to-face meetings between the recruiter and the people they’ll be working with. Where possible, assign a hiring manager to help transition the recruiter. Chances are they will have many questions, and having a go-to person will make the transition easier. The meeting could be an informal breakfast or lunch where the contract recruiter can get to know the team. Decide on meeting frequencyContract recruiters are known for their independence. The typical recruiter is happy to work primarily from their home offices, but on-site visits are inevitable. Brainstorming sessions, sourcing ideas, and client updates may require face-to-face meetings, in addition to interviewing candidates at the office. Initially, a weekly on-site visit with the contract recruiter will help to keep everything on track. You can later reduce the frequency of the meeting as the recruitment progresses if and when it makes sense. You may face some resistance initially. Contract recruiters prefer to work independently, and your managers are busy. Reiterate the importance of these meetings and schedule them only as necessary. You can leave it up to the recruiter and managers to schedule the frequency of the sessions. Agree on recruitment metricsConsult with the contract recruiter about which metrics you will be tracking. Involve your managers and stakeholders when coming up with essential recruiting metrics. Basic recruitment success measures may include:
Discuss with the contract recruiter how often they’ll report on these measures. Also, arrange the manner and format of reporting on the recruitment process. Step 6: Follow Up With Recruitment ActivitiesMuch as contract recruiters aren’t your direct employees, there is still a level of follow-up involved in your working relationship. The trick is not to cross the line to micro-managing. Contract recruiters understand this reality and are happy to collaborate with you. The same goes for recruiting agencies. They want to collaborate with you and need your feedback to know they are sending over the right candidates or where to pivot if they aren’t. Provide continuing feedbackMost recruiters want to know how well they are doing and if they are meeting your expectations. Continuing feedback about what’s working and what could be adjusted will be great for your working relationship. This feedback goes both ways. Contract recruiters also have their own ideas for recruiting, interviewing, and selecting new hires. Tap into their experience and expertise to streamline your hiring process. Setting regular feedback sessions will help to spot mistakes early enough in the recruitment process. These sessions don’t have to be face-to-face. A quick call or email should suffice in most cases. You can schedule in-person meetings any serious concerns. Feedback isn’t just about the recruiter. Make sure you are giving feedback on resumes and candidates you receive from them. If the candidates are not the right fit for the open position, give immediate feedback of why they weren’t a good fit and where to focus (skills, experience, personality, etc.) for better suited candidates. This feedback is invaluable and saves all parties time. Offer a helping handYour recruiters need to understand your organization’s mission, values, and company culture ro have a complete picture of your company. But it is inevitable that they won’t know everything from your initial conversations. For example, the contractor may not be familiar with your company’s managerial style, goals, or business units. Be ready to offer a helping hand or direction where asked. This is where a go-to point of contact comes in handy to answer any questions that may arise. Eliminate roadblocksWith a clearly defined scope of work, the contract recruiter’s job is crystal clear. However, issues like office politics, unexpected interruptions to recruiting, and sudden changes in priorities come up. Keep the recruiter and other interested parties in the loop in case of any roadblocks in the process. Also, work proactively to remove any hurdles that might make the recruitment process harder or more complex than it needs to be. via Quick Sprout https://www.quicksprout.com/how-to-hire-a-contract-recruiter/ Worried that you weren’t naturally born with the skills necessary to become a good leader? If these skills aren’t inherent to you, you can learn the leadership skills necessary to help you reach new heights in your career. And even if you feel you were born a natural leader, you may need some help honing those skills and ensuring you’re using your power in a way that benefits you, your employees, and your company. One of the best ways to gain skills and put them to good use is by taking an online leadership course. Courses like this will help you to become an effective leader that can drive your company to success. There all kinds of leadership courses available, and we have researched to compile a list of the best leadership courses to help you become an all-star leader. The Top 7 Best Leadership Courses
More in-depth reviews of the top 7 leadership courses are below. Read on to learn about who it benefits, how it benefits them, and potential drawbacks. This information will help you determine which courses are right for you. #1 – CCL Leadership Development Program – Best for Most Leaders
Center for Creative Leadership offers a wide range of leadership courses, including Leading for Organizational Impact, Maximizing Your Leadership Potential, Frontline Leader Impact, and more. However, what we love the Center for Creative Leadership for the most is its Leadership Development Program. For starters, it is the longest-running program like this in the entire world. That means it’s had plenty of time to work out any kinks and issues in the program and make it one that people trust to teach them the leadership skills they’re after.
This five-day immersive class can be taken either online or in-person, so you have the choice of a format that works best for you. The length of the class means it is intense, but that you will get through it quickly and be able to apply what you learn in less than a week. This class is best fit for leaders who are in a mid-to senior-level position, and looking to “turn management challenges into leadership opportunities.” Here is some of what you will learn in this class:
With over 50,000 graduates of this course, the Leadership Development Program is one you can trust to increase your self-awareness and help you to have better influence as a leader. Once the course is complete, you still have access to post-program support to continue the learning process – something that is key as a leader in a constantly changing world. This program does come with a hefty price tag, however. The online course will set you back $7,600. Learn more about this course by visiting the Center for Creative Leadership. #2 – Strategic Leadership and Management – Best for New Managers
If you are new to a leadership position, consider taking Coursera’s Strategic Leadership and Management course, conducted by the University of Illinois at Urbana-Champaign. Nearly 200,000 students have taken this course, so it is one you can trust to guide you through the process of entering into leadership. The main focus of this course is general, everyday leadership that includes teaching how to manage people, organizations, organizational design, strategic planning, strategy implementation, and more.
This class is intended for beginners and is 100% online so that you can learn on your own schedule, in your own time. The pace of it is set to be completed within 8 months, which means spending about 3 hours a week on the course. It can be finished in a shorter period of time if you can dedicate more hours to your study weekly. Strategic Leadership and Management is comprised of 7 different courses that cover a variety of topics in leadership including:
Upon finishing the class, and the hands-on project as part of the capstone, you receive a leadership certificate from the University of Illinois. To take this class via Coursera, the cost is $49 per month for the topic. If you complete one course per month, that means less than $400 for the entire certificate. #3 – Mindfulness Practices – Best for Reducing Stress
There is no denying that stress is inevitable as a leader. The key to stress is learning how to approach it and tackle it in a way that minimizes its negative effects. One way to do this is via LinkedIn Learning’s Mindfulness Practices course. Mindfulness is being talked about more and more lately, and it can and should be extended beyond your personal life and into your professional life. By working on mindfulness, you, as a leader, are better able to reduce your stress and deal with challenges.
In true mindfulness spirit, this class is available to learn anytime and anywhere through both apps and offline access. Mindfulness Practices will take you through the following topics:
Upon completion of this course, you should have the skills to change the pathways in your brain to respond better to stress in a world that will never stop throwing stress at you. The purchase of this course will cost you $35 and includes:
#4 – Team Facilitation: The Core Skill of Great Team Leaders – Best for Managers with Teams
Udemy is a strong choice for leadership courses for many reasons, but one big one is that the classes are available to anyone, anywhere in the world. In addition to that, Udemy requires no prerequisites so you can get the ball rolling with learning whenever you feel ready to do so. The Team Facilitation: The Core Skill of Great Team Leaders course is the ideal class for managers who work with teams. This will likely be true for most leaders, but especially for those who feel they are struggling in the team aspect of their position.
This course will help you:
The above are all crucial parts of leading a team and should be learned before you can expect to find success and happiness in your leadership position. The structure of the course follows this outline:
All the lessons in this class are available via on-demand video and you get full lifetime access with the purchase of the course. In addition to that, you get 4 downloadable resources that you can put into practice in your work. The cost of this class is $99.99 and has a 30-day money-back guarantee. #5 – Nonprofit Ready Leadership Training – Best Free Classes
We know exactly what you’re thinking: “But I don’t work for a nonprofit, so this isn’t relevant to me.” But you might want to think again. While Nonprofit Ready Leadership Training does indeed focus on nonprofit applications, there are skills and lessons to glean that are important to know even if you are not a nonprofit leader yourself. Whether your business has a charitable giving arm, supports a cherished cause, or simply exists alongside nonprofits, there’s a lot the business world can learn from nonprofit leadership.
The courses serve as a great place to start for those who are just entering into the world of leadership. And, it’s a free way to get some information that will surely help you build your skills. Yes, they’re all 100% free, though Nonprofit Ready does require you to sign up for an account to access the free online courses. These classes offer a wide array of different online leadership resources and provide the opportunity to take advantage of self-paced teaching on topics such as:
Learn more about the courses on offer from Nonprofit Ready by heading to their site today. #6 – Leading Teams Remotely – Best for Remote Leaders
If you are a leader working with a remote team, then the TrainUp Leading Teams Remotely course is made for you. Though the actual work you and your team are doing may stay the same, how the work is done is completely different. And this course will help you navigate those differences and changes.
The courses via TrainUp are self-paced, which allow you to fit them into your schedule when you can. However, the sooner you can tackle this course, the more you and your team stand to benefit. Included in this course are lessons on:
You can opt to take this course either online at any time or live, virtually on a specified date. The cost for the online course is $69, and the cost for the virtual course is $119. #7 – Agile Leadership Principles and Practices – Best for Modern Leaders
While many companies are still using traditional leadership methodologies to drive their employees, others are opting to modernize and go with agile leadership principles that are more focused on facilitation and communication. If this sounds like the type of leadership you’re interested in pursuing, the Agile Leadership Principles and Practices course could be for you.
The approach to leadership taught in this course teaches you about how leaders can work to help their team rather than stand in their way. The course is 4 weeks long and requires about 2-3 hours a week. However, it is self-paced, so you can complete it quicker if you choose. By the end of this course you will know about:
Agile Leadership Principles and Practices is free to audit but will cost you $119 to get a certification. (We recommend paying the price to get a certification, as you get much more out of the course.) How to Find The Best Leadership Course For YouChoosing the best leadership courses for you depends on a few different things. Not all courses will work for all leaders, so it is important to know a few things before you start diving into courses. Below are the criteria we used to pick the top leadership courses for this article. Use these when doing your research to find the courses that are right for you. Type of LeaderNot everyone is the same type of leader, and that’s what makes the world of leadership exciting. If we all led in the same way, things wouldn’t be very interesting, would they? There are some fundamentals to leading that all leaders should have nailed down (hence the courses above), but not all leaders need the same skills. As mentioned above, some courses are ideal for those working with a remote team. If you and your whole team are in an office, this course won’t be relevant to you. Similarly, if you are leading a sales team your skillset is different than someone who is leading a creative team. It is important to determine what type of leader you are, and what skills you need to learn and expand on in order to be successful in your work. Where You Are In Your CareerAre you fresh off a promotion to a leadership position? Or have you been leading your team for years? In order to find the leadership course that benefits you the most, you need to find one that aligns with where you are in your career. Where You Want To Go In Your CareerAre you looking to climb the ladder of leadership into a higher position? Or are you happy with where you are and are simply looking for a course that allows you to hone your leadership skills? Finding the right leadership course requires you to take a look at where you want to go with your career. What is the driving motivation behind you taking a leadership course? Are you looking to grow? Once you know your personal goals as a leader, you can find the course that matches. Your ScheduleAs a leader, your schedule is likely packed. This means taking advantage of free time or canceled meetings is important when it comes to fitting in your leadership course. For this reason, a course that has a flexible schedule and is self-paced may be best for you. However, if you know that you have evenings open where you can give your undivided attention to learning, you may find that you’re best suited to a live class that is taught at night. Determine what your schedule allows, and what works best for you, and find a class that aligns with those needs. SummaryWhat’s the best leadership course? Center for Creative Leadership’s Leadership Development Program is our number one recommendation. It works for a variety of different leaders and is best for turning the inevitable challenges in leadership into opportunities for you, your team, and your company. However, as mentioned above, choosing the best leadership course for you depends on a few factors that only you can determine. There is no shortage of solid leadership courses out there that will help you to gain the skills you want and need to succeed. via Quick Sprout https://www.quicksprout.com/best-leadership-courses/ |

Sean BrianWhile radishes deter certain insects naturally, they require similar growing conditions as carrots. Although the crops both have roots, radishes grow and germinate quicker, allowing carrots to continue growing in the soil space available when the radishes are harvested, Archives
April 2023
Categories |

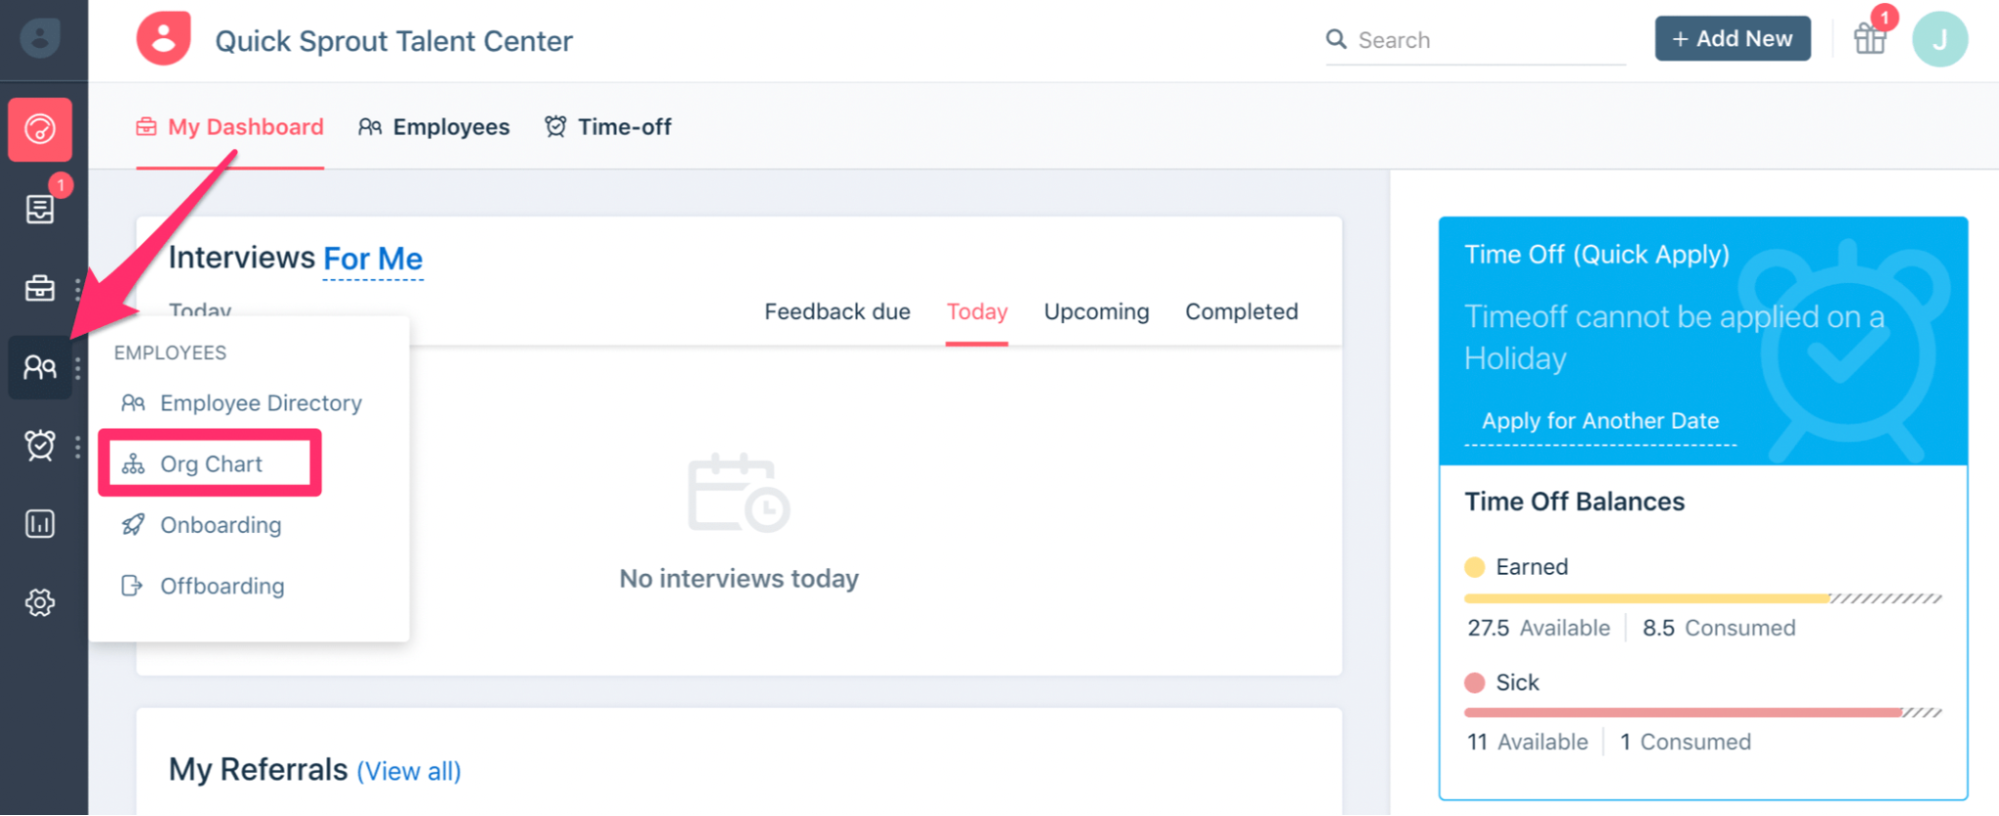
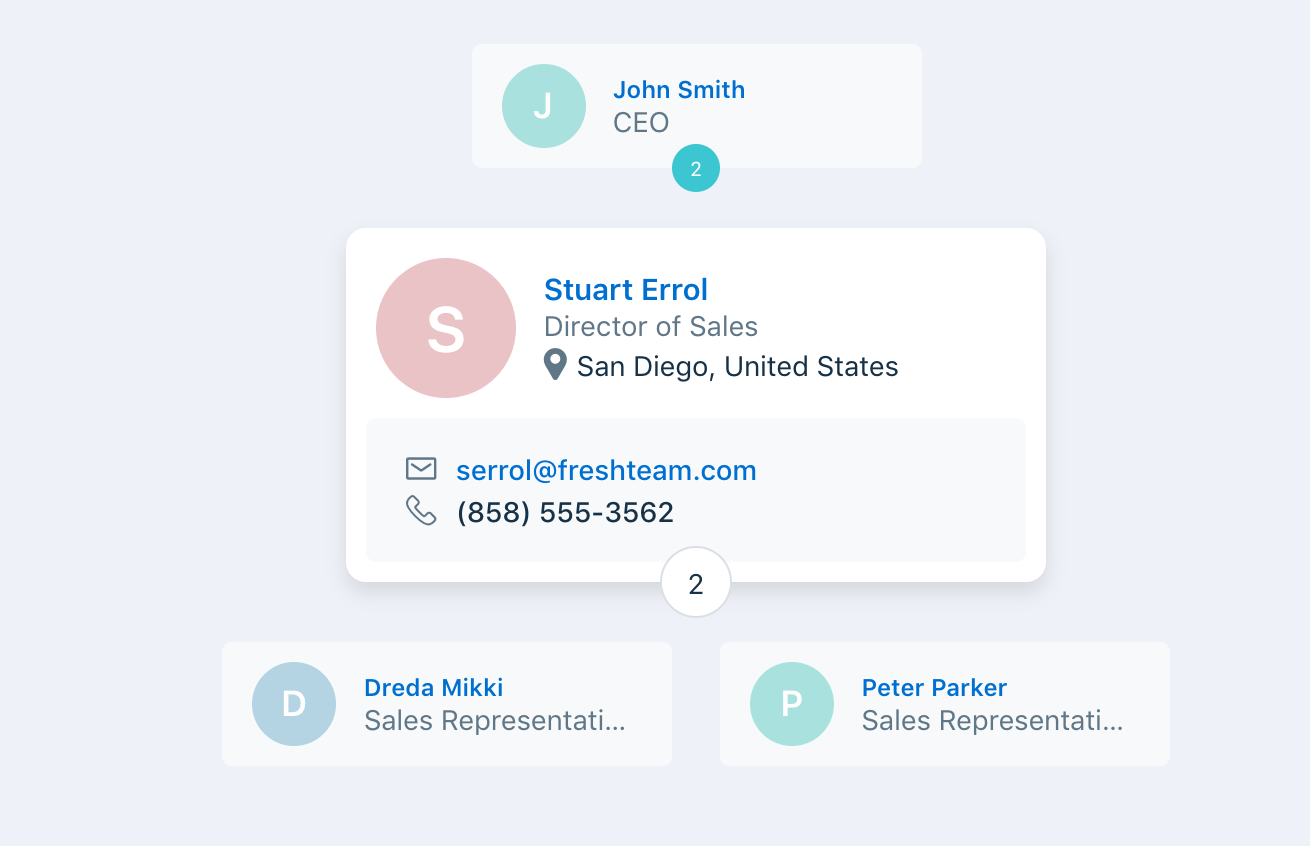
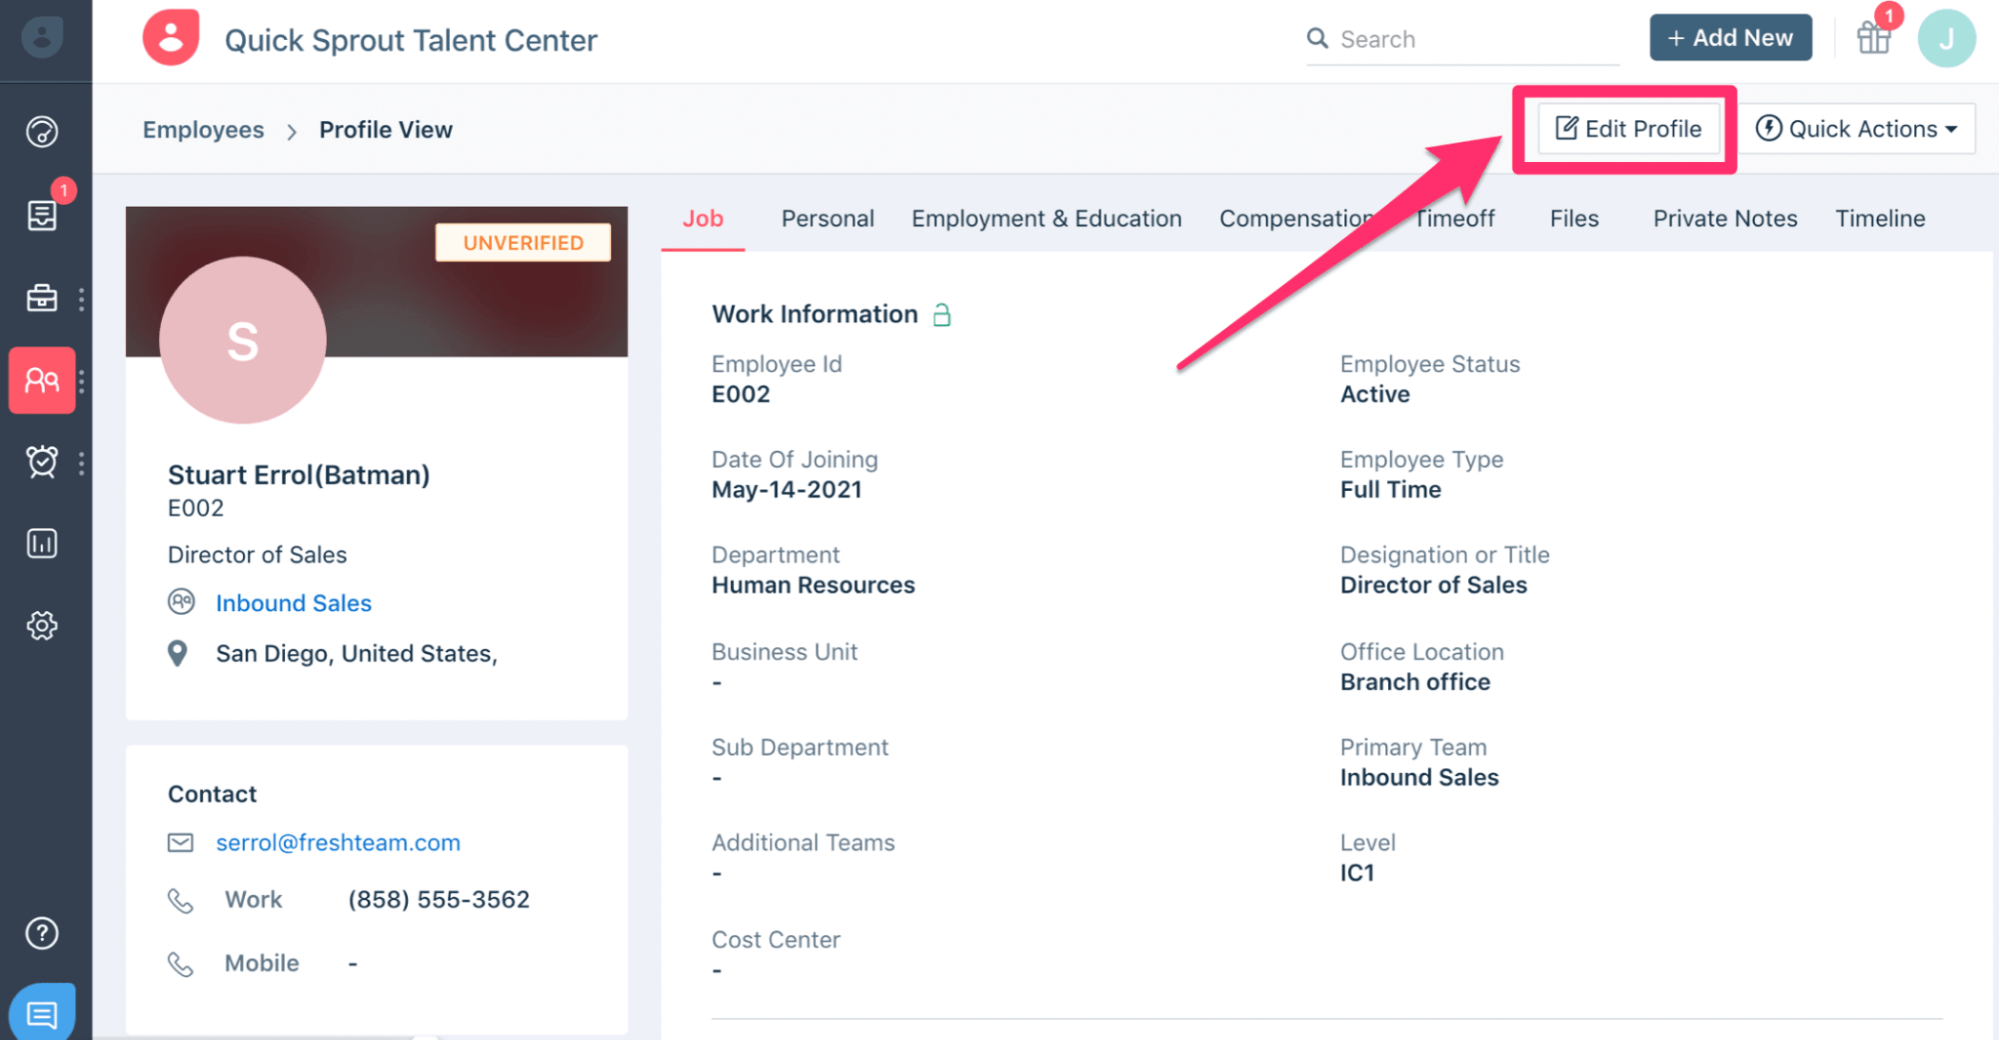
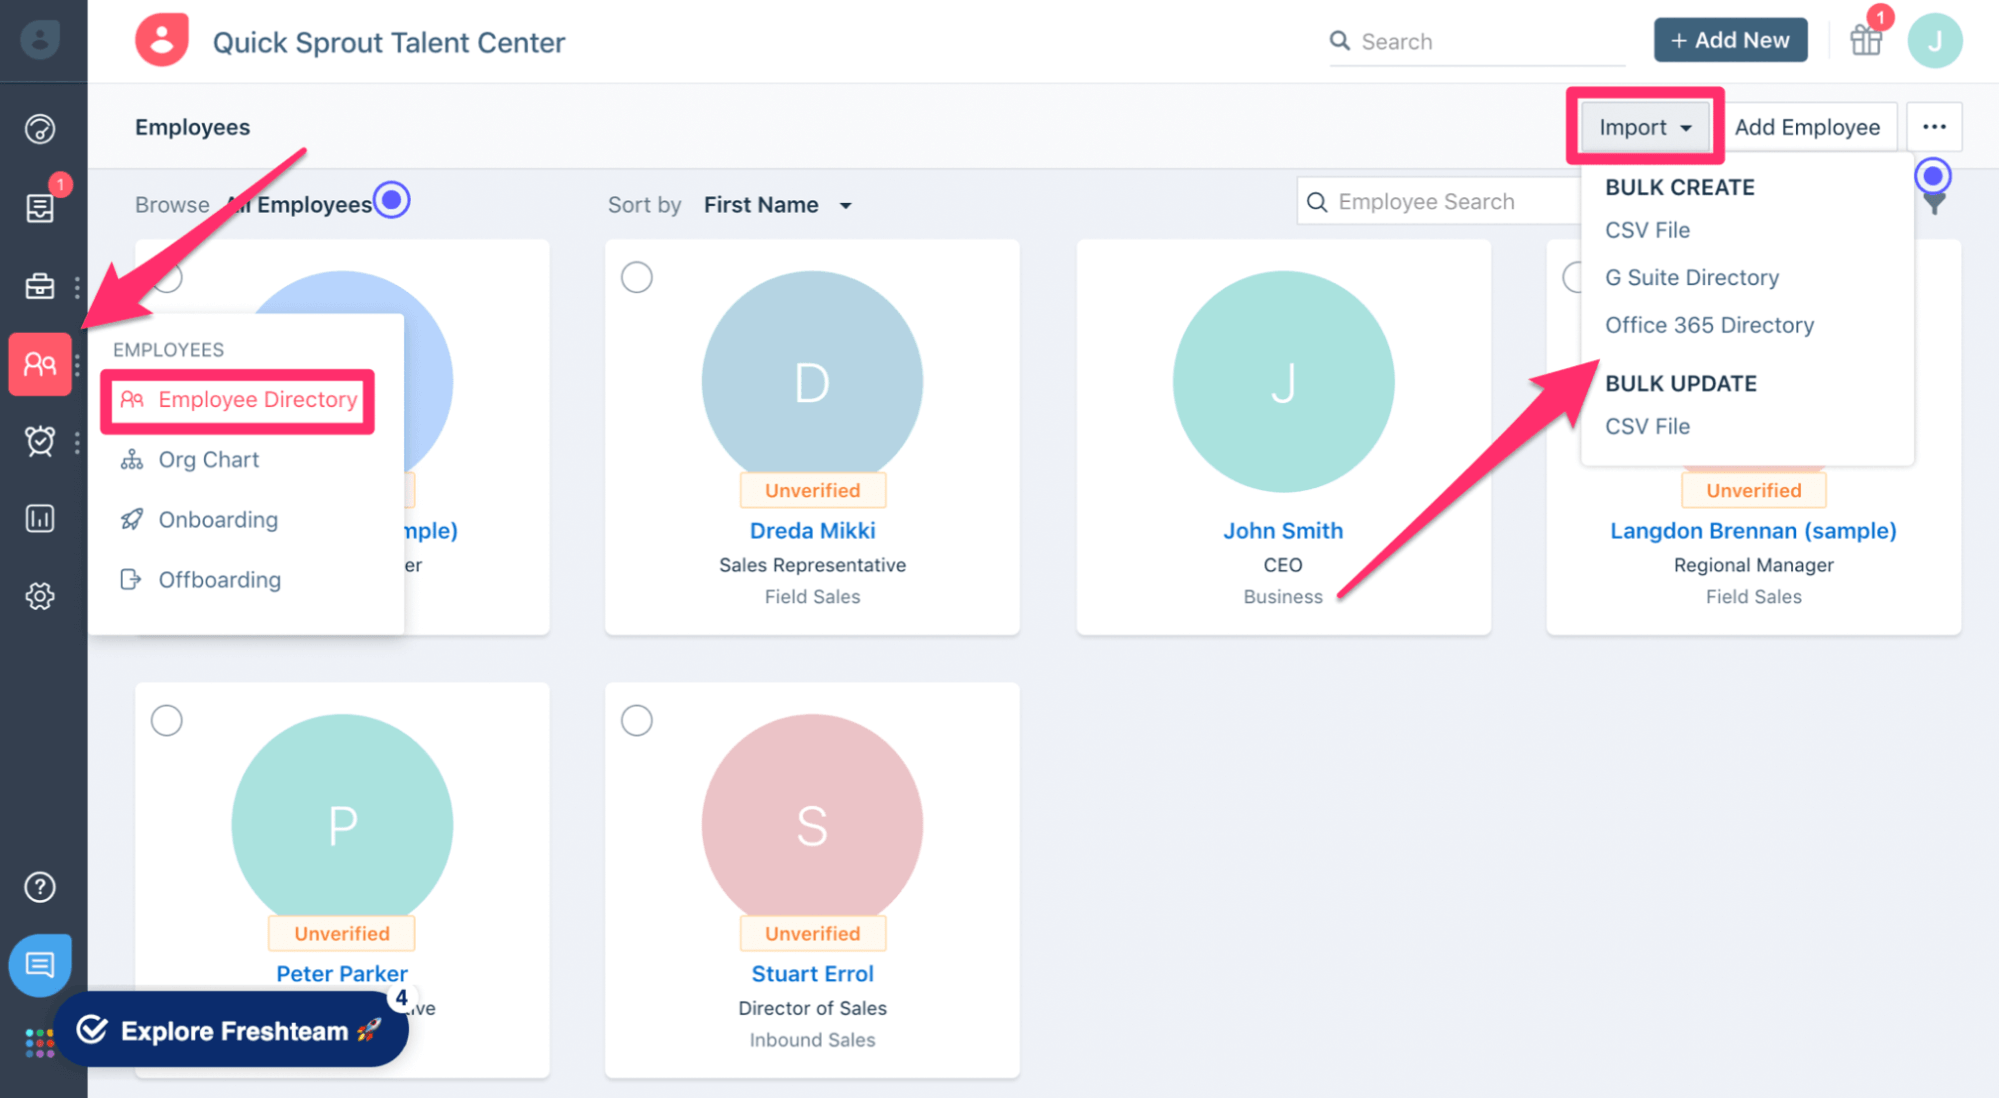
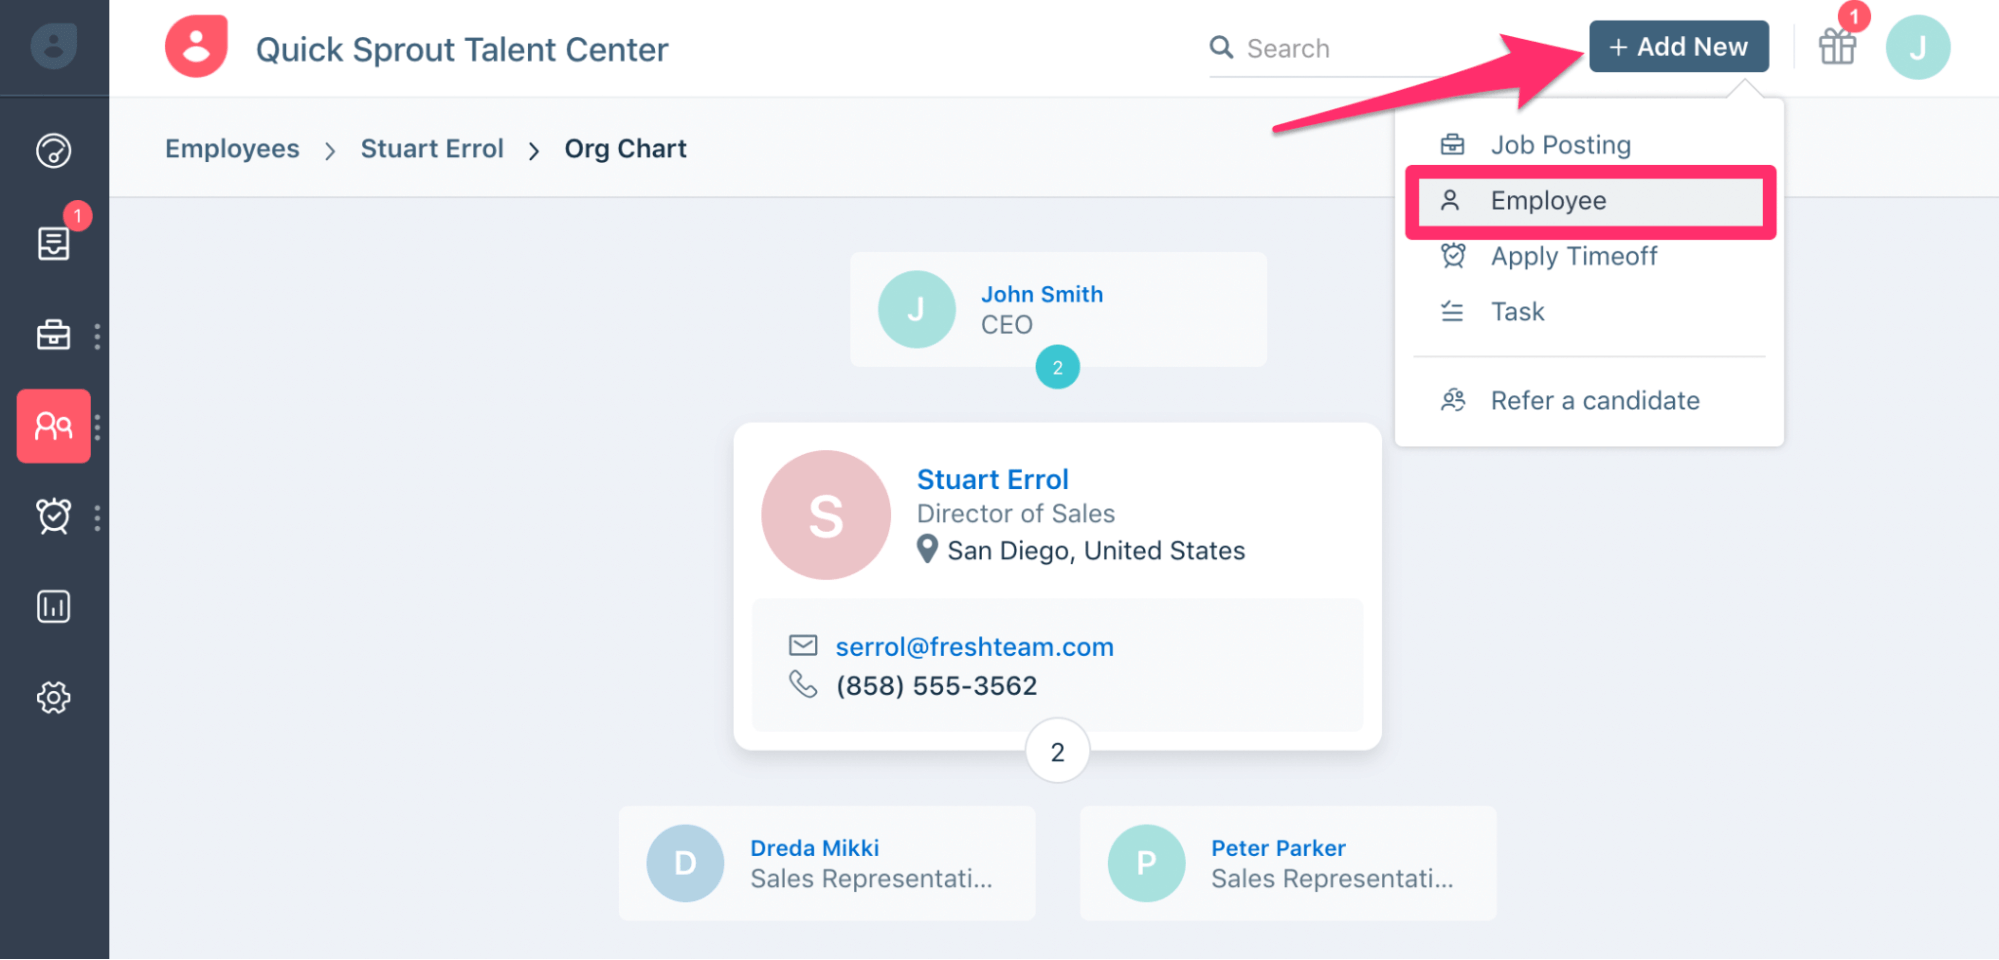
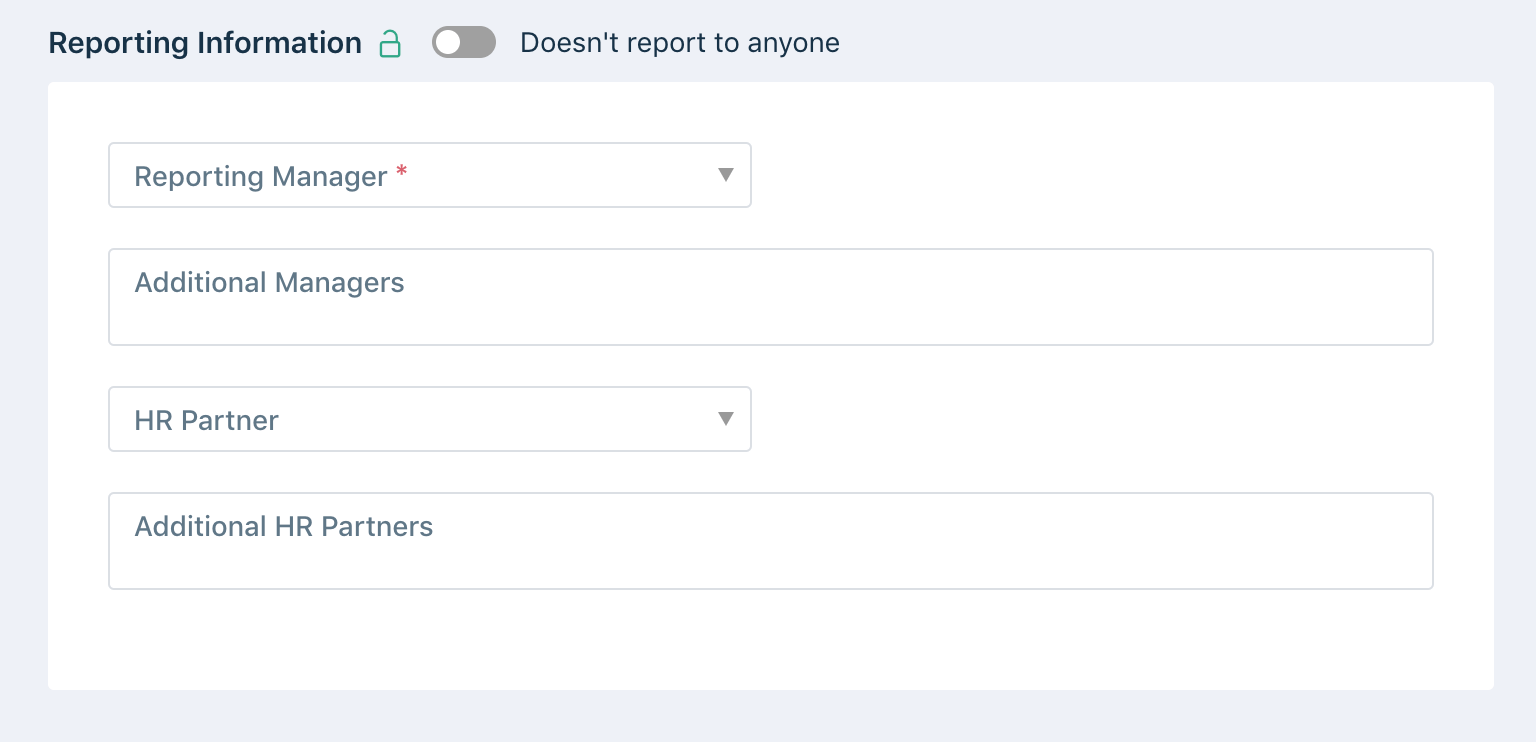
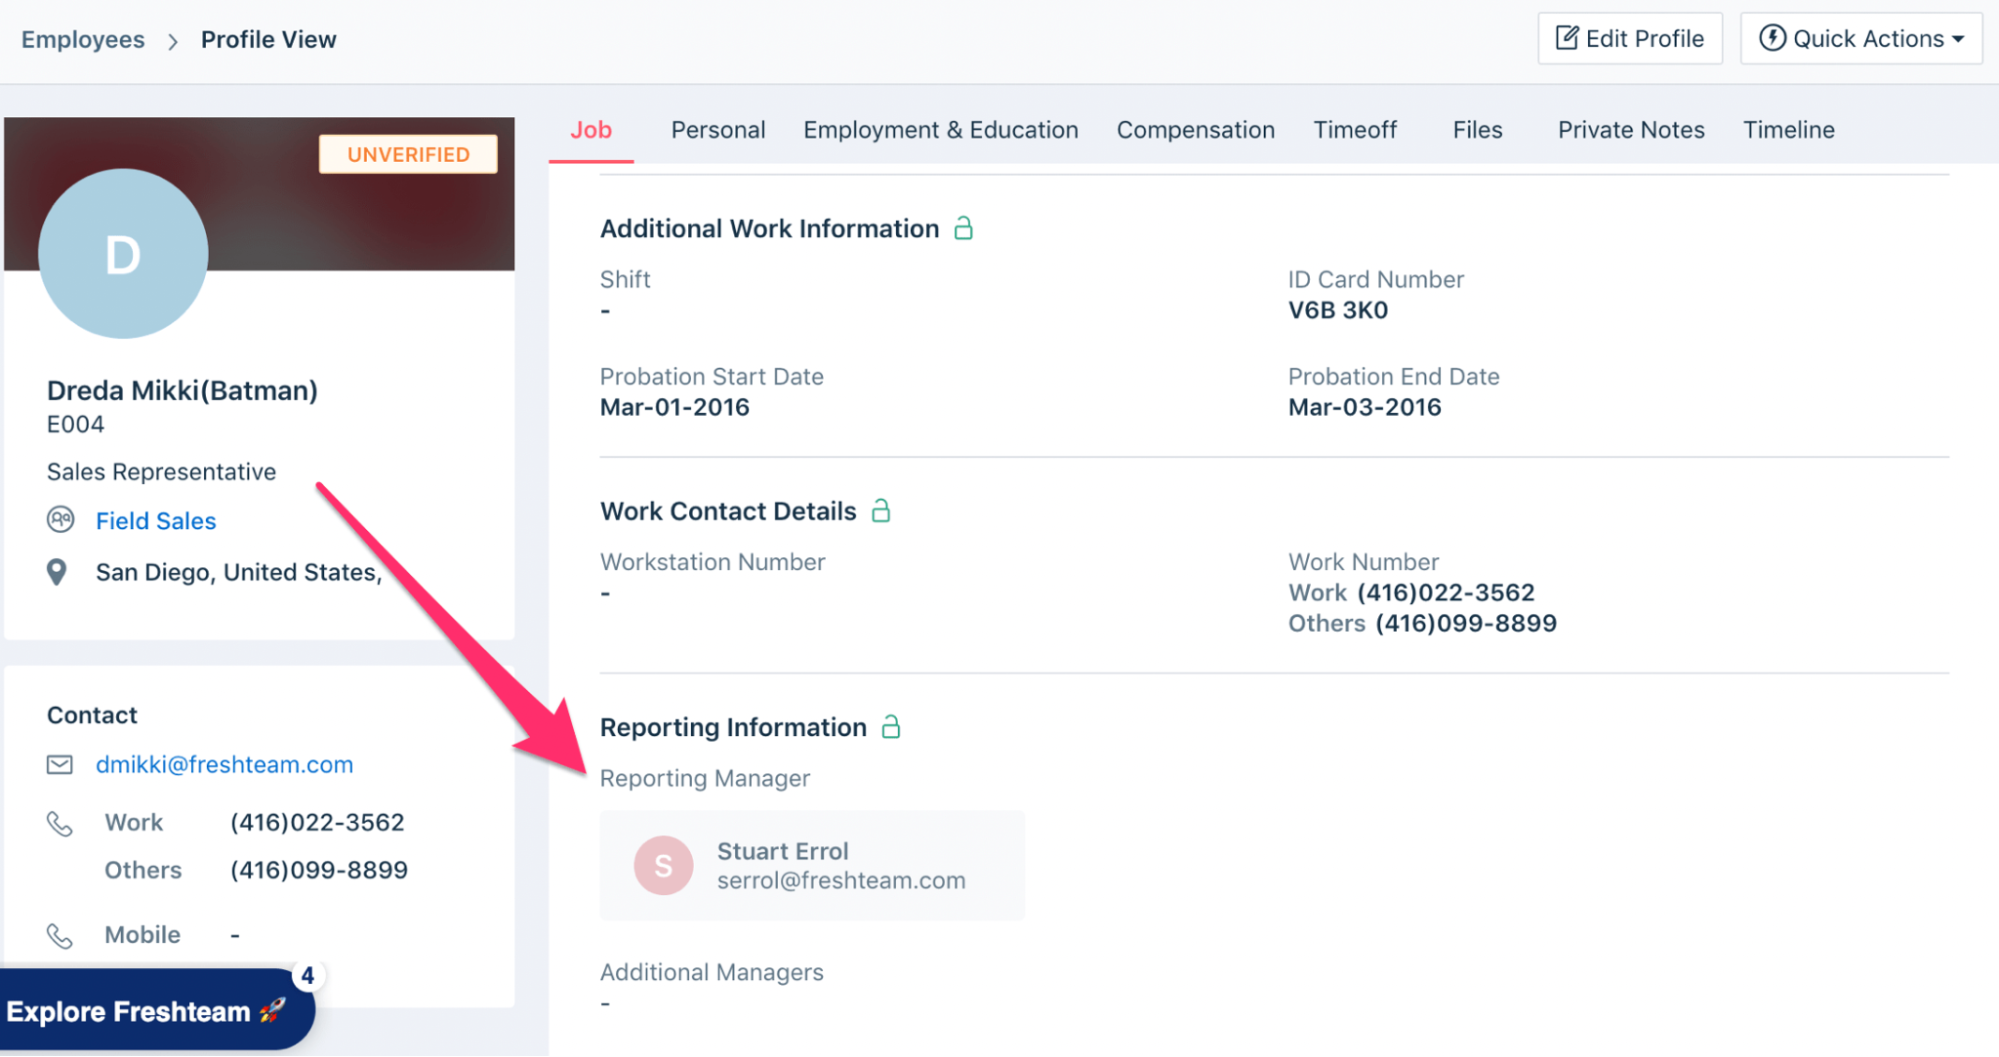
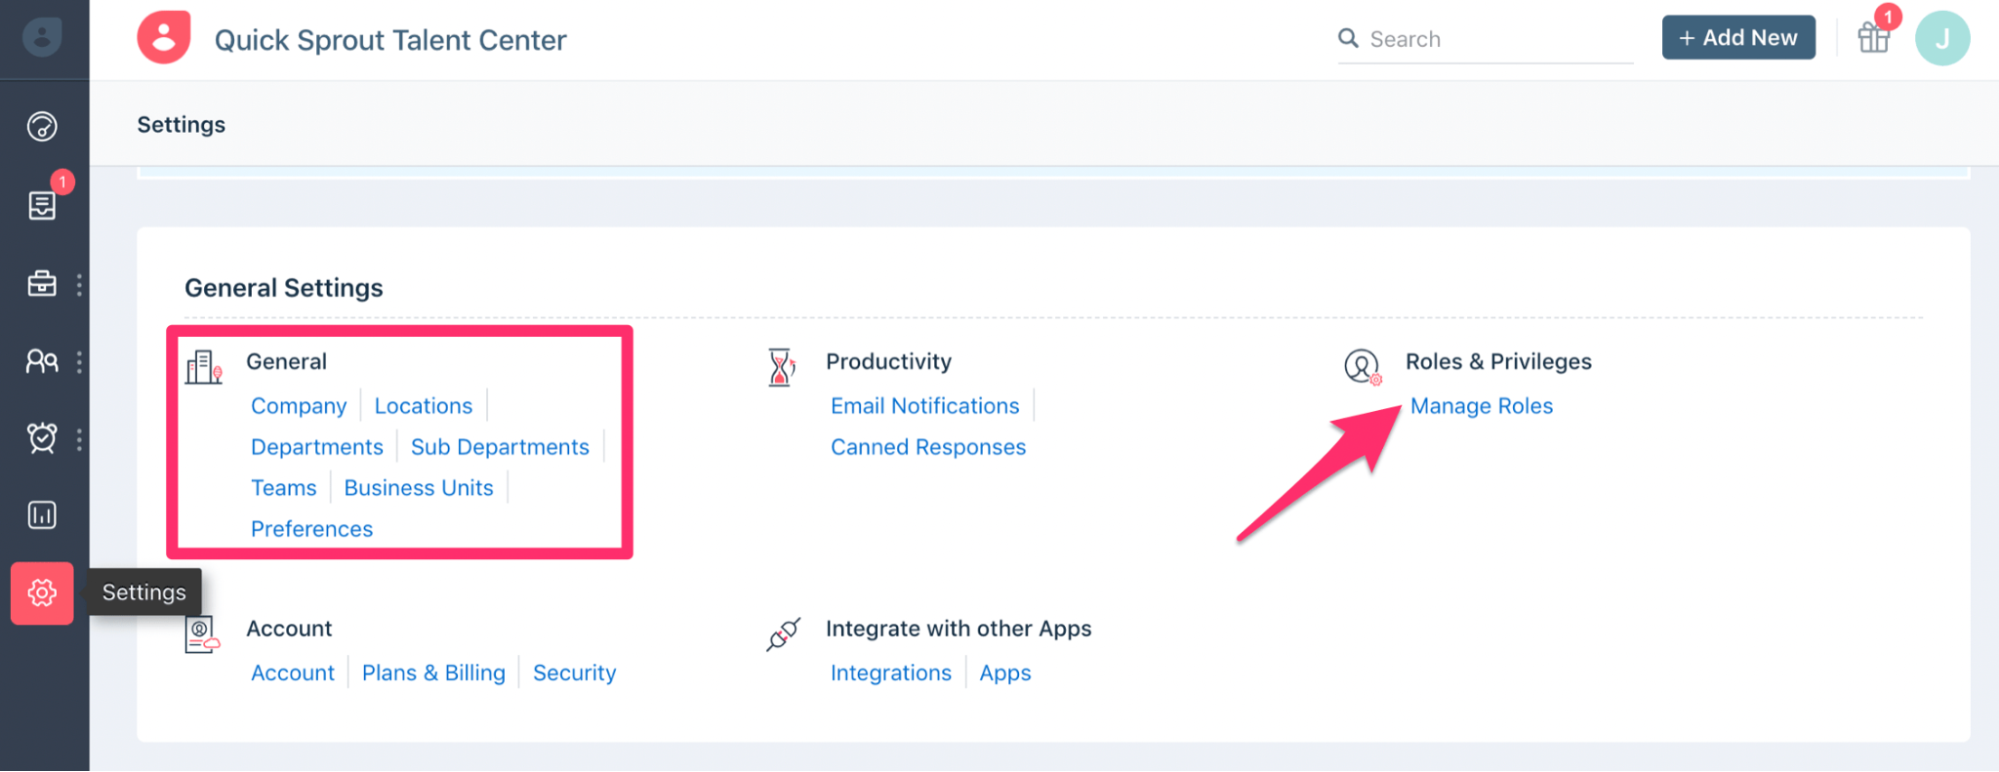

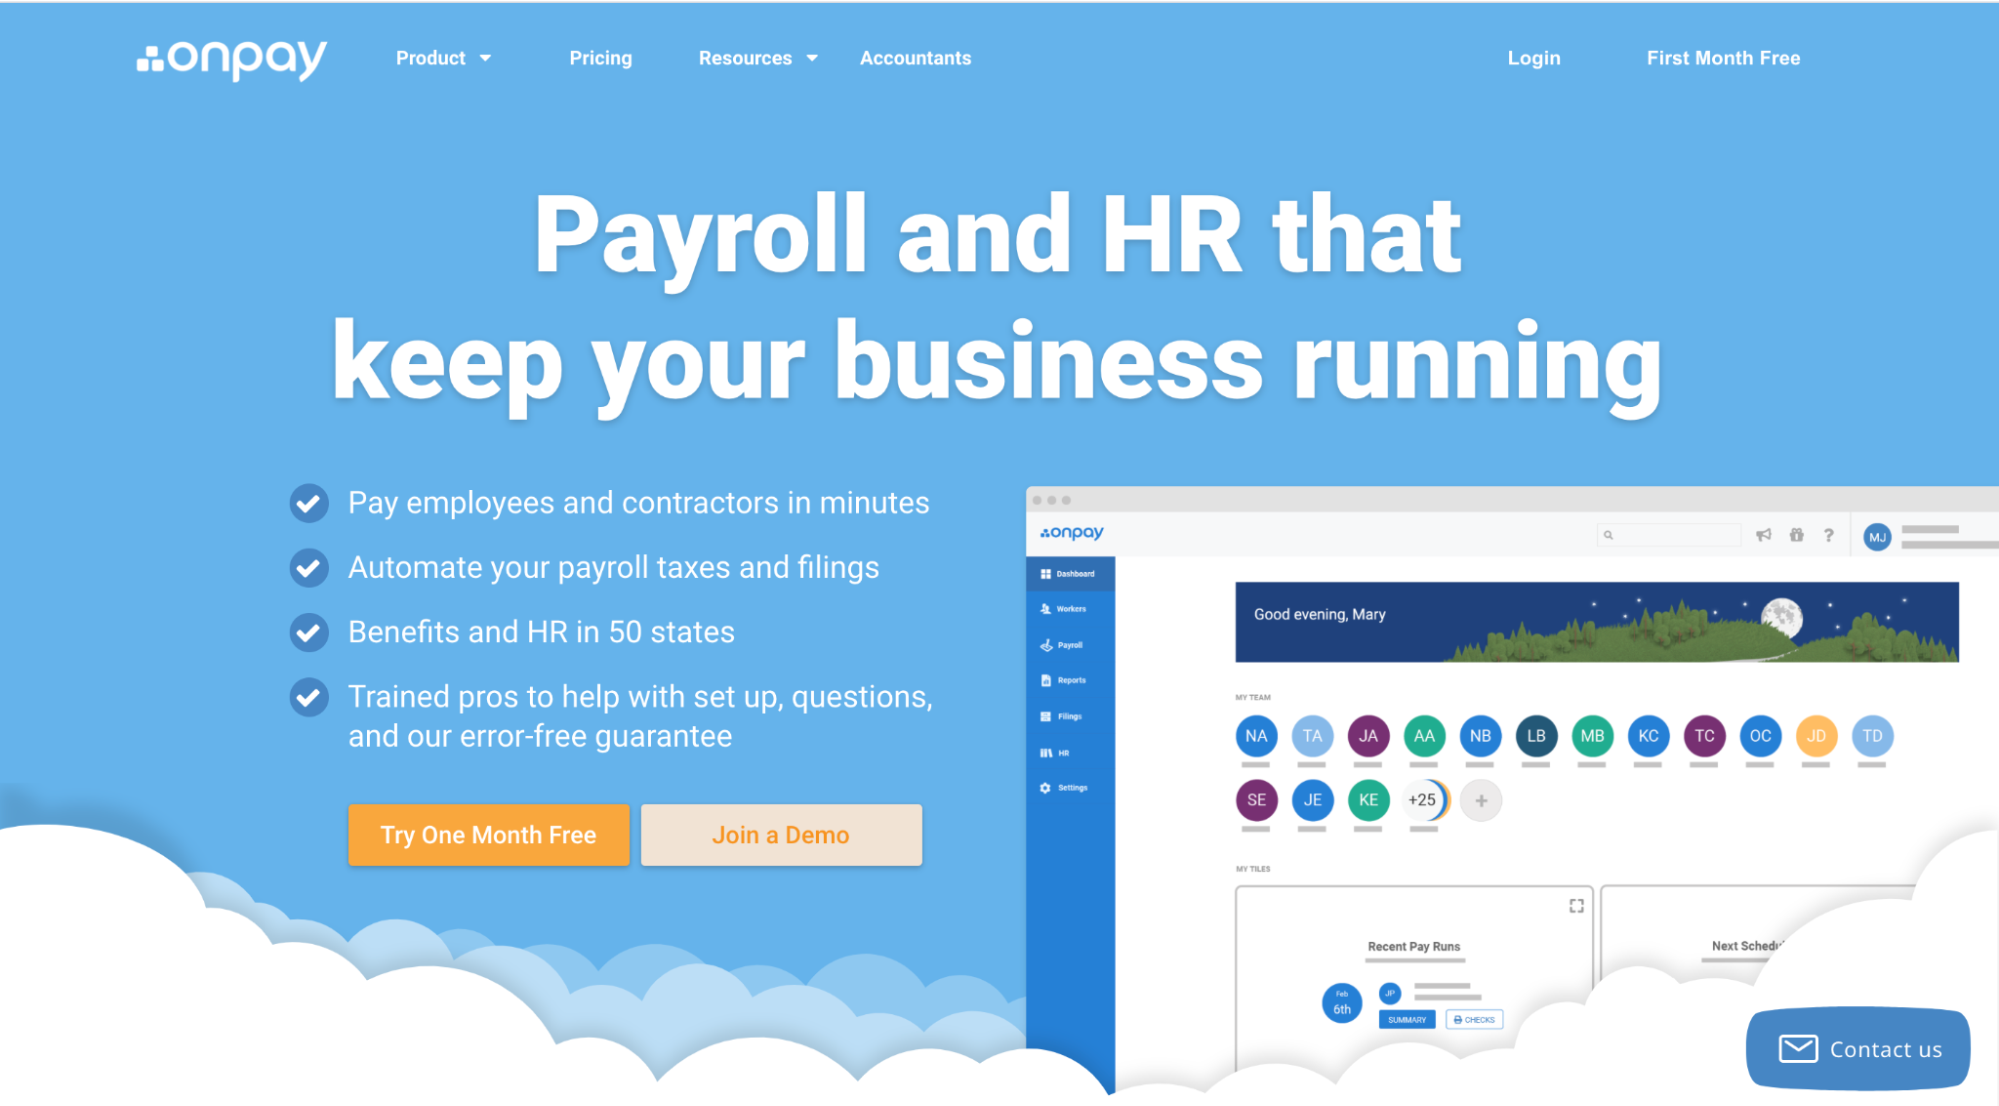
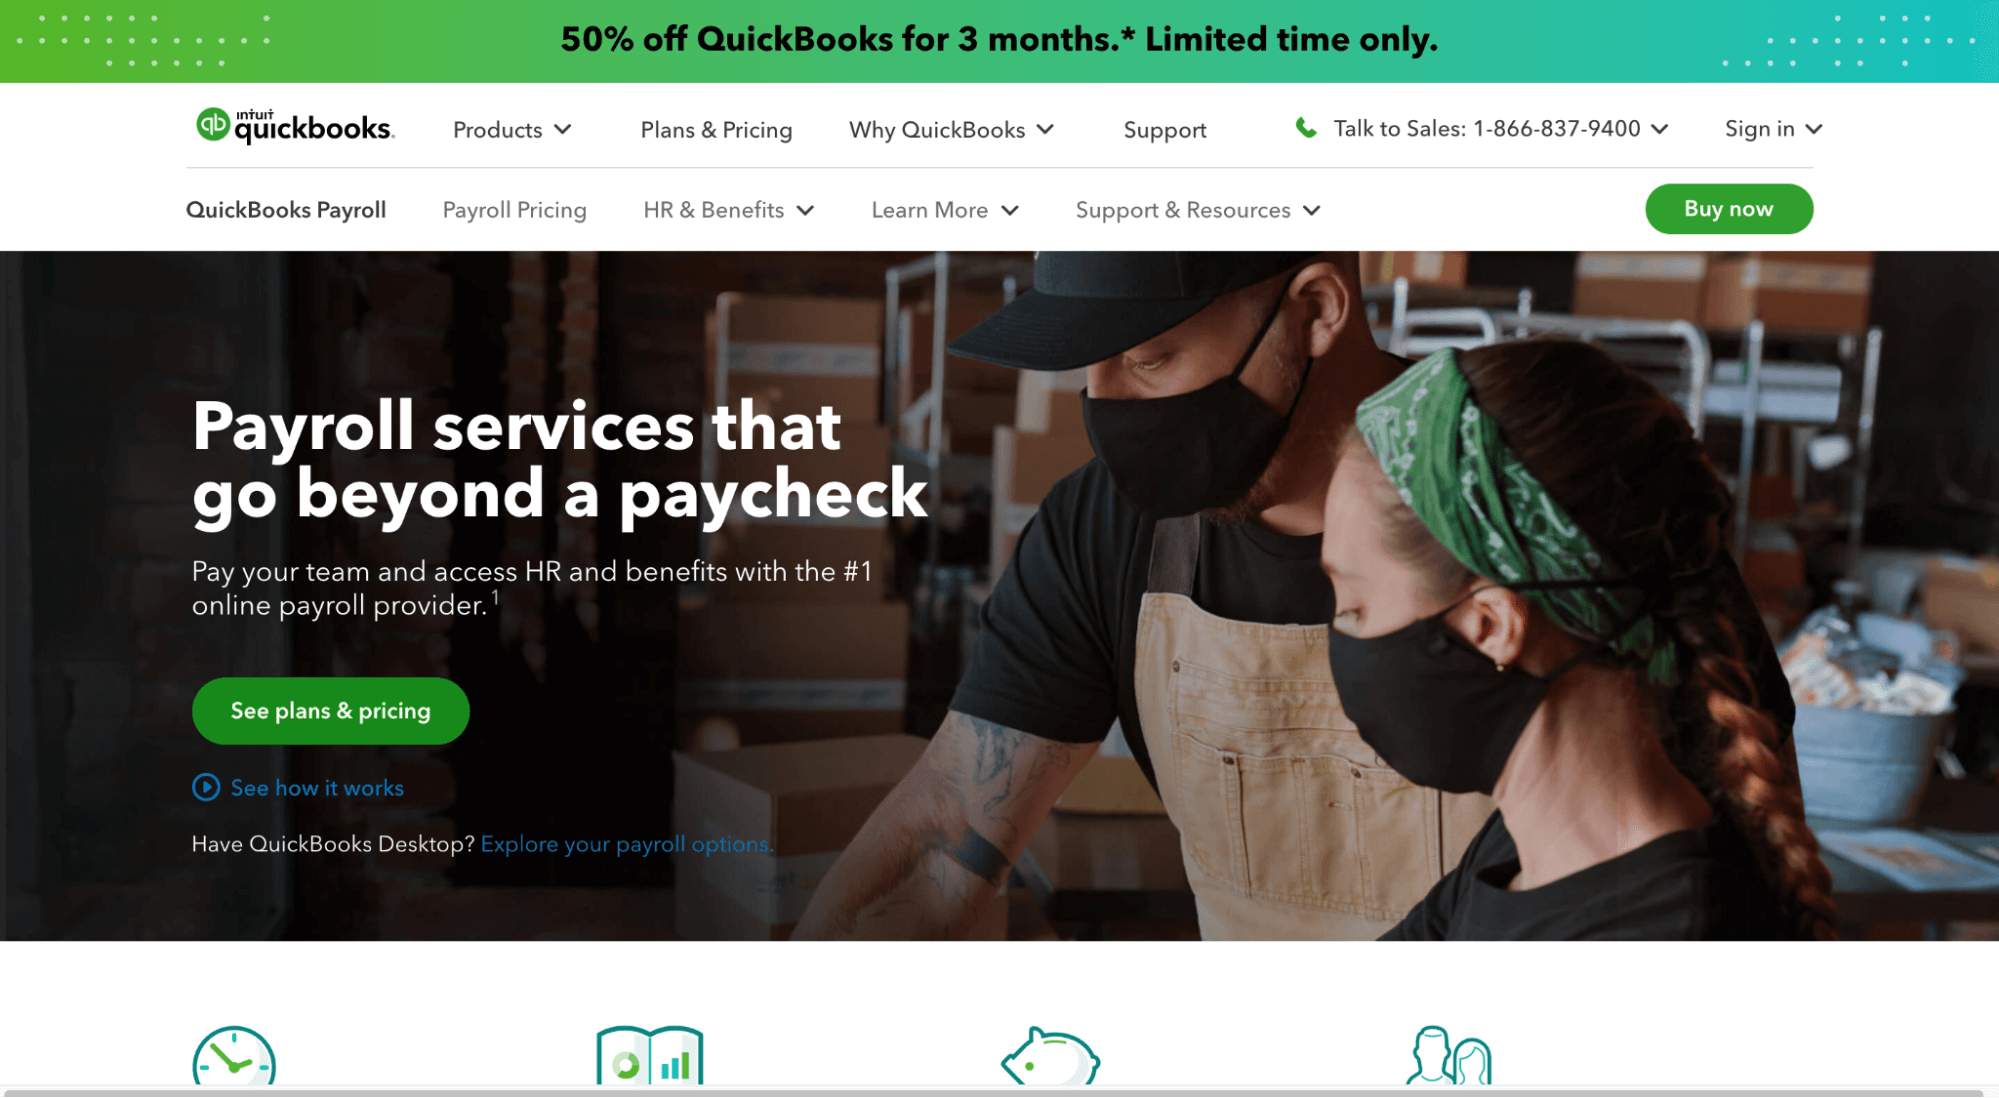

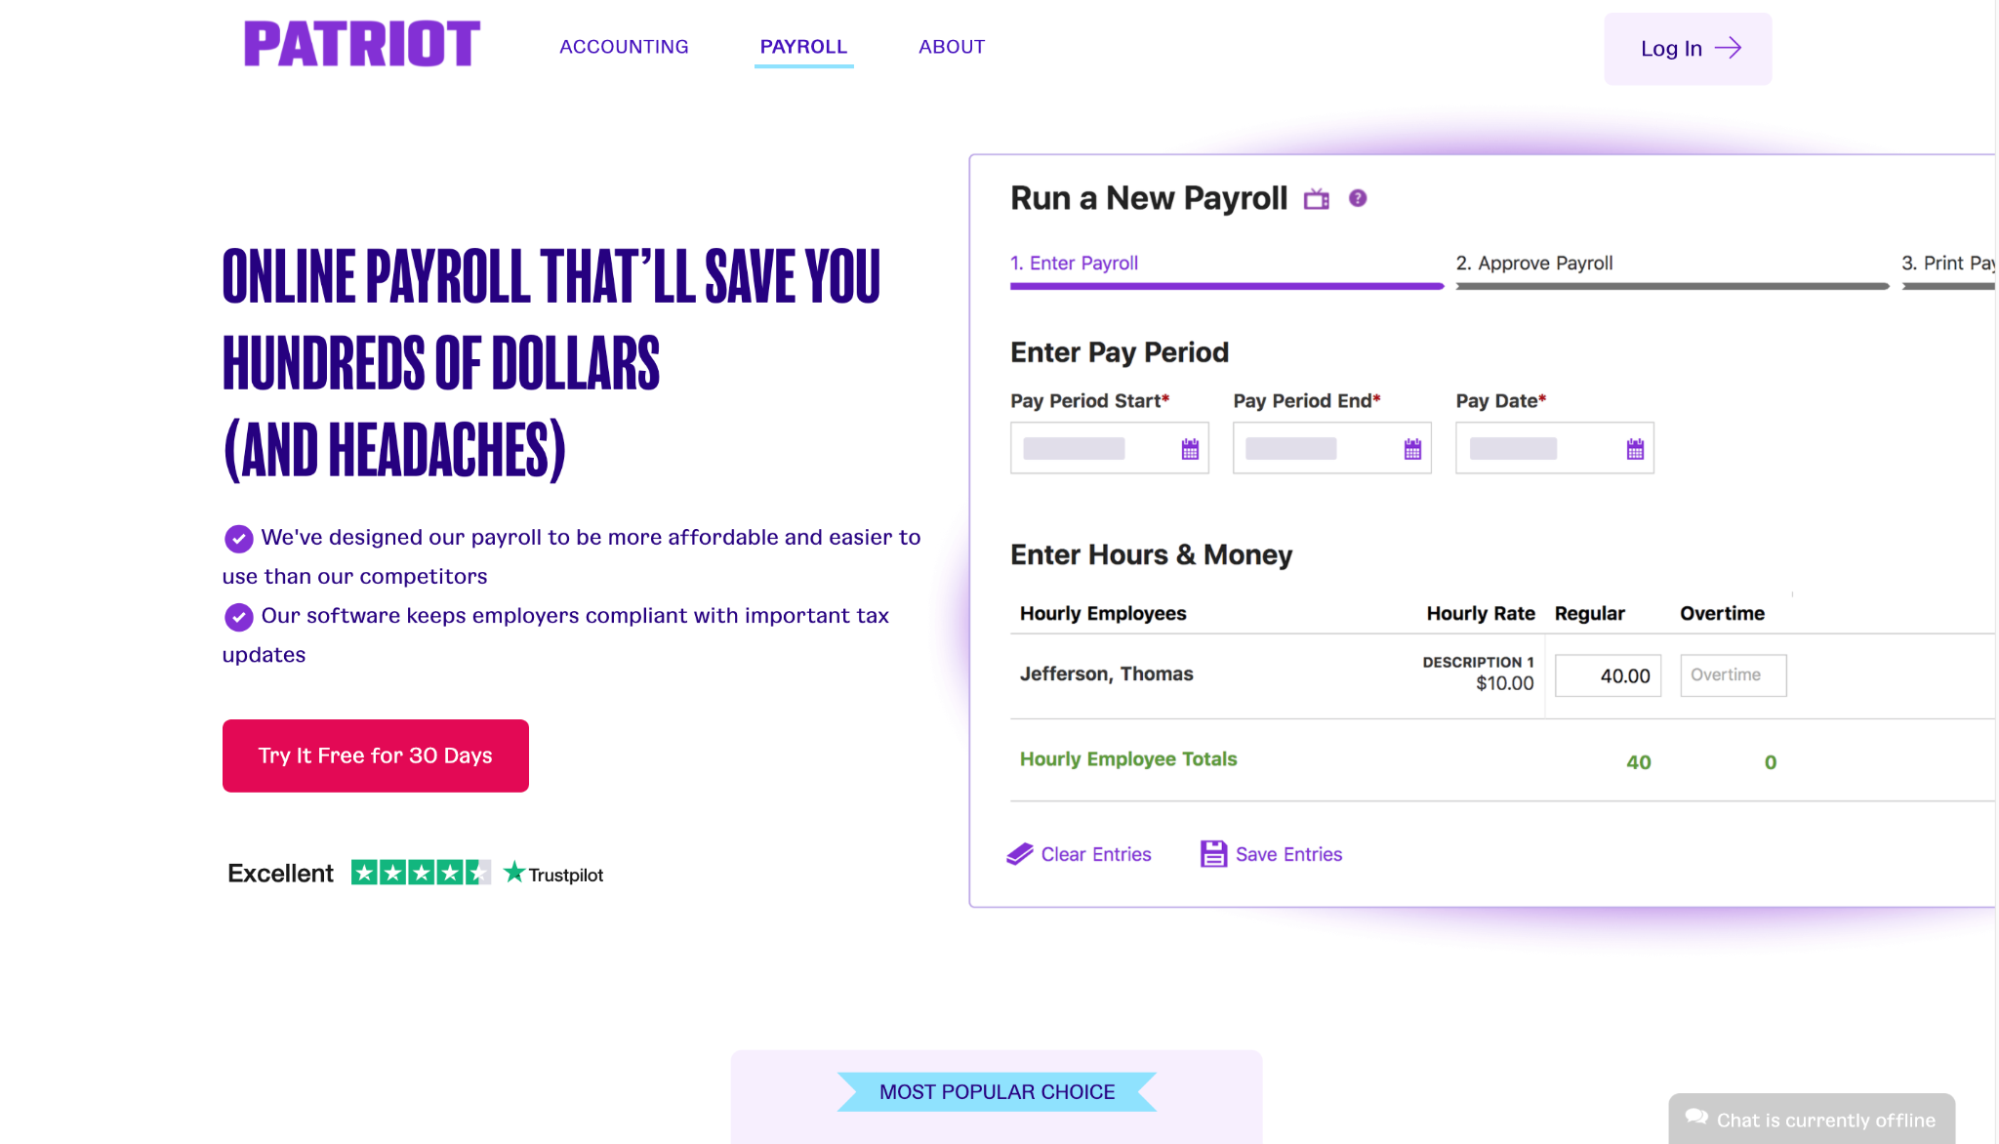

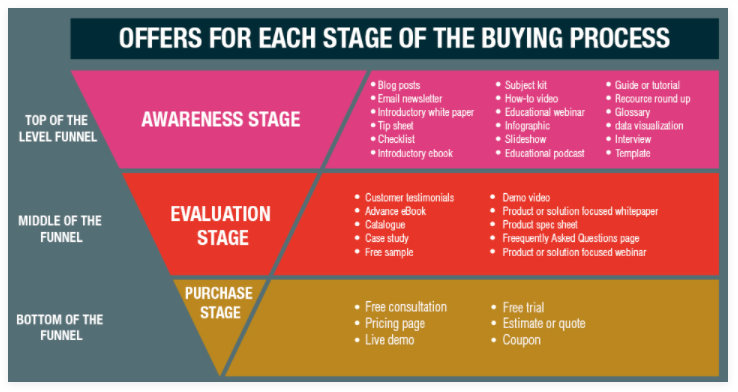

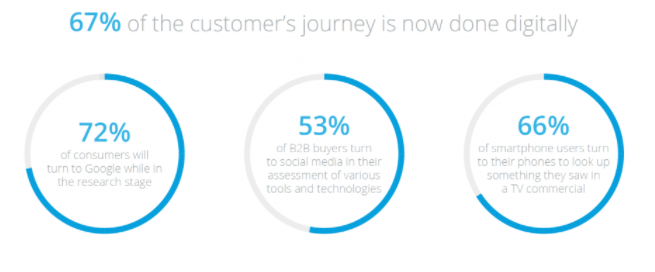
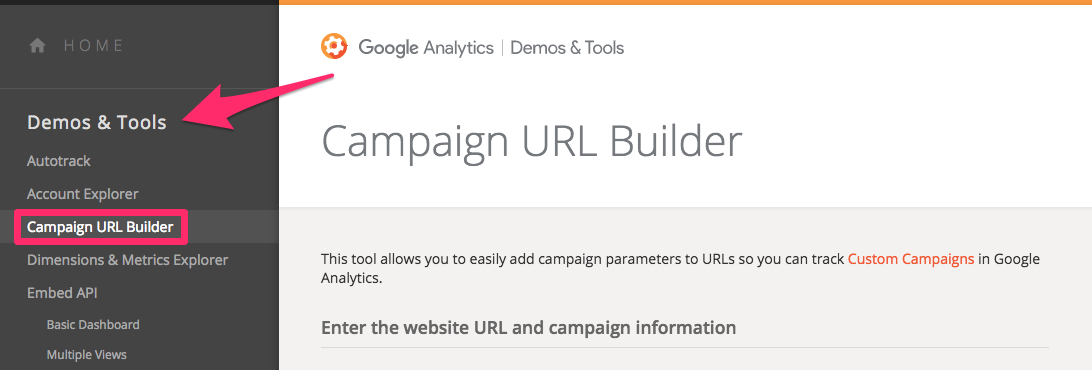
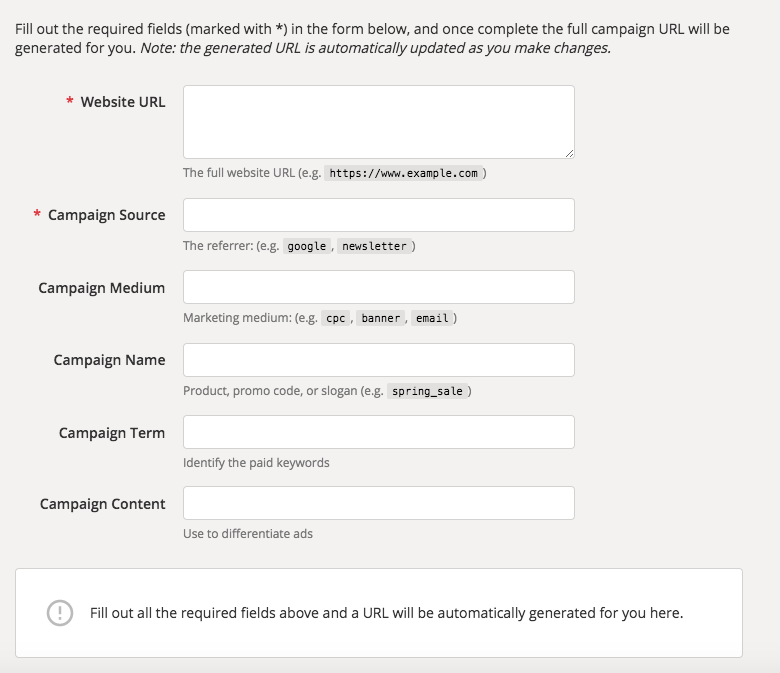
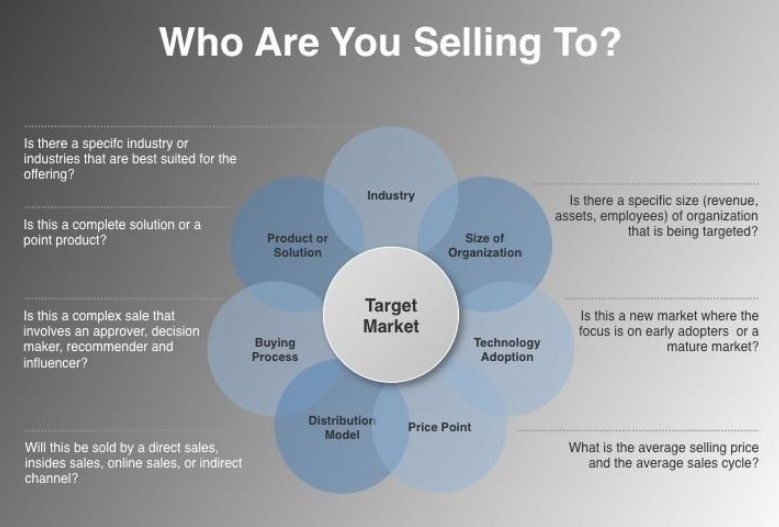
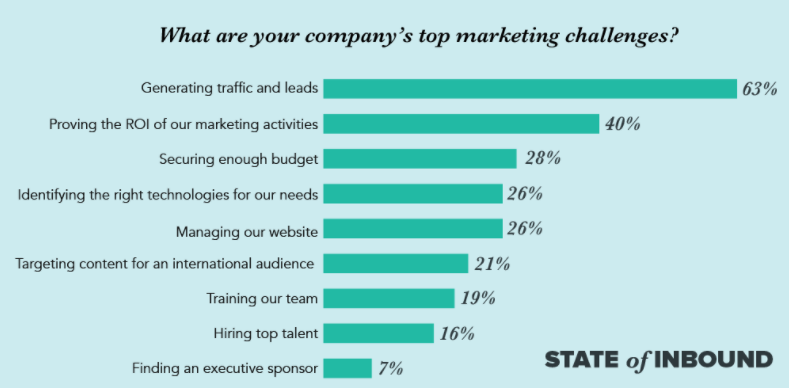
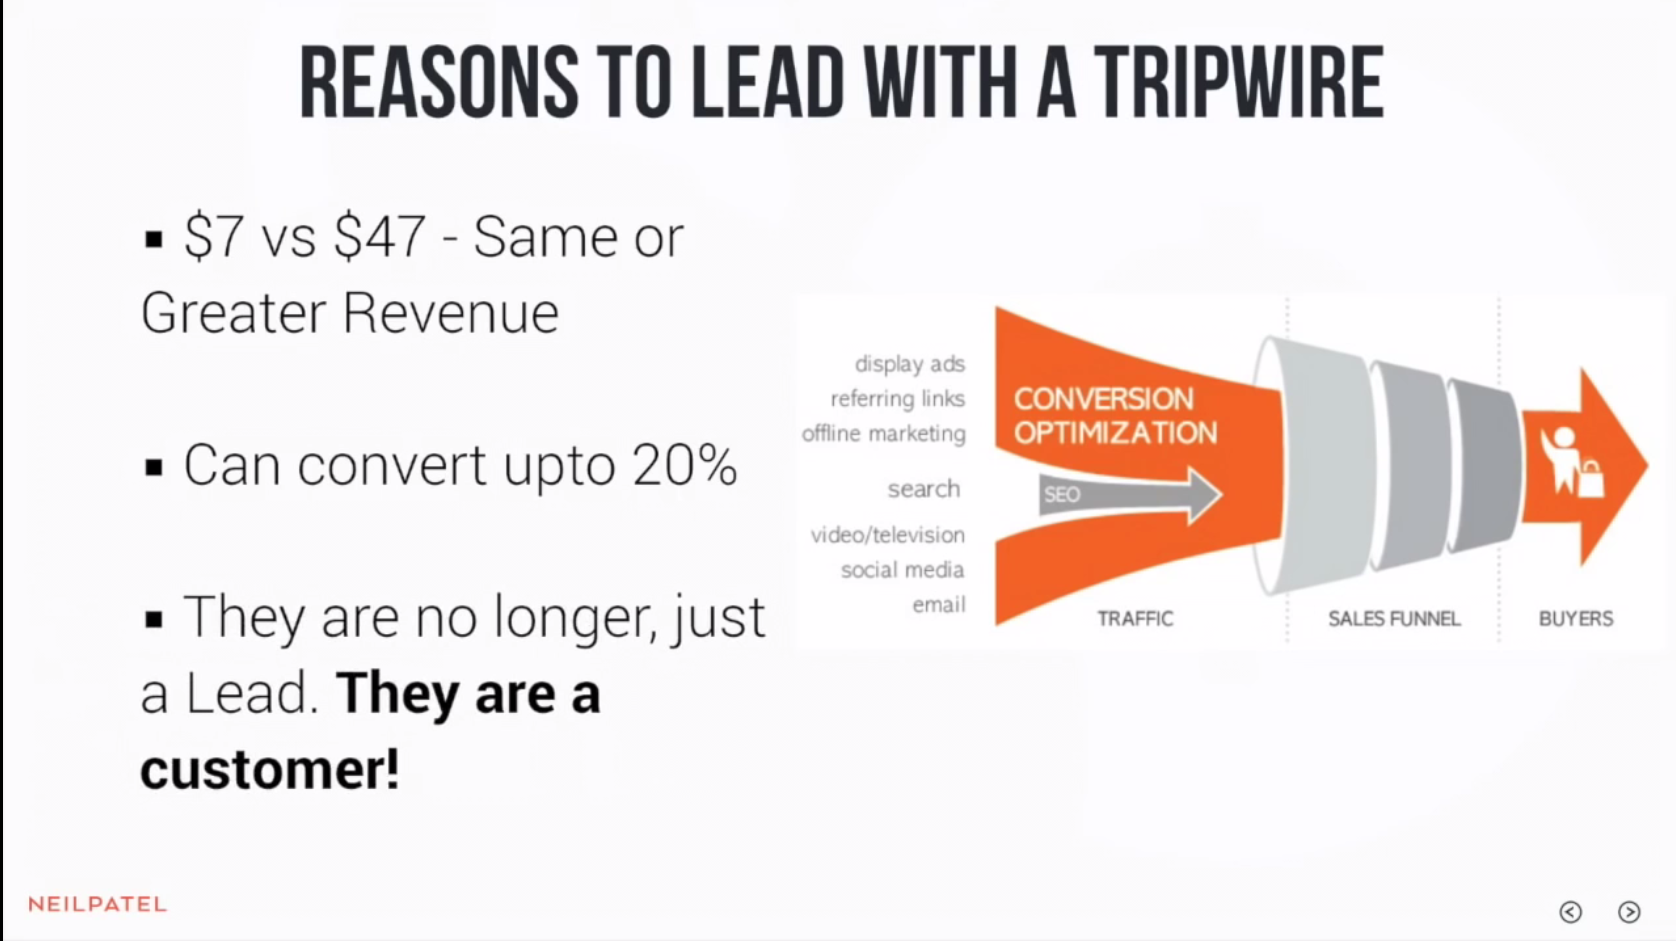
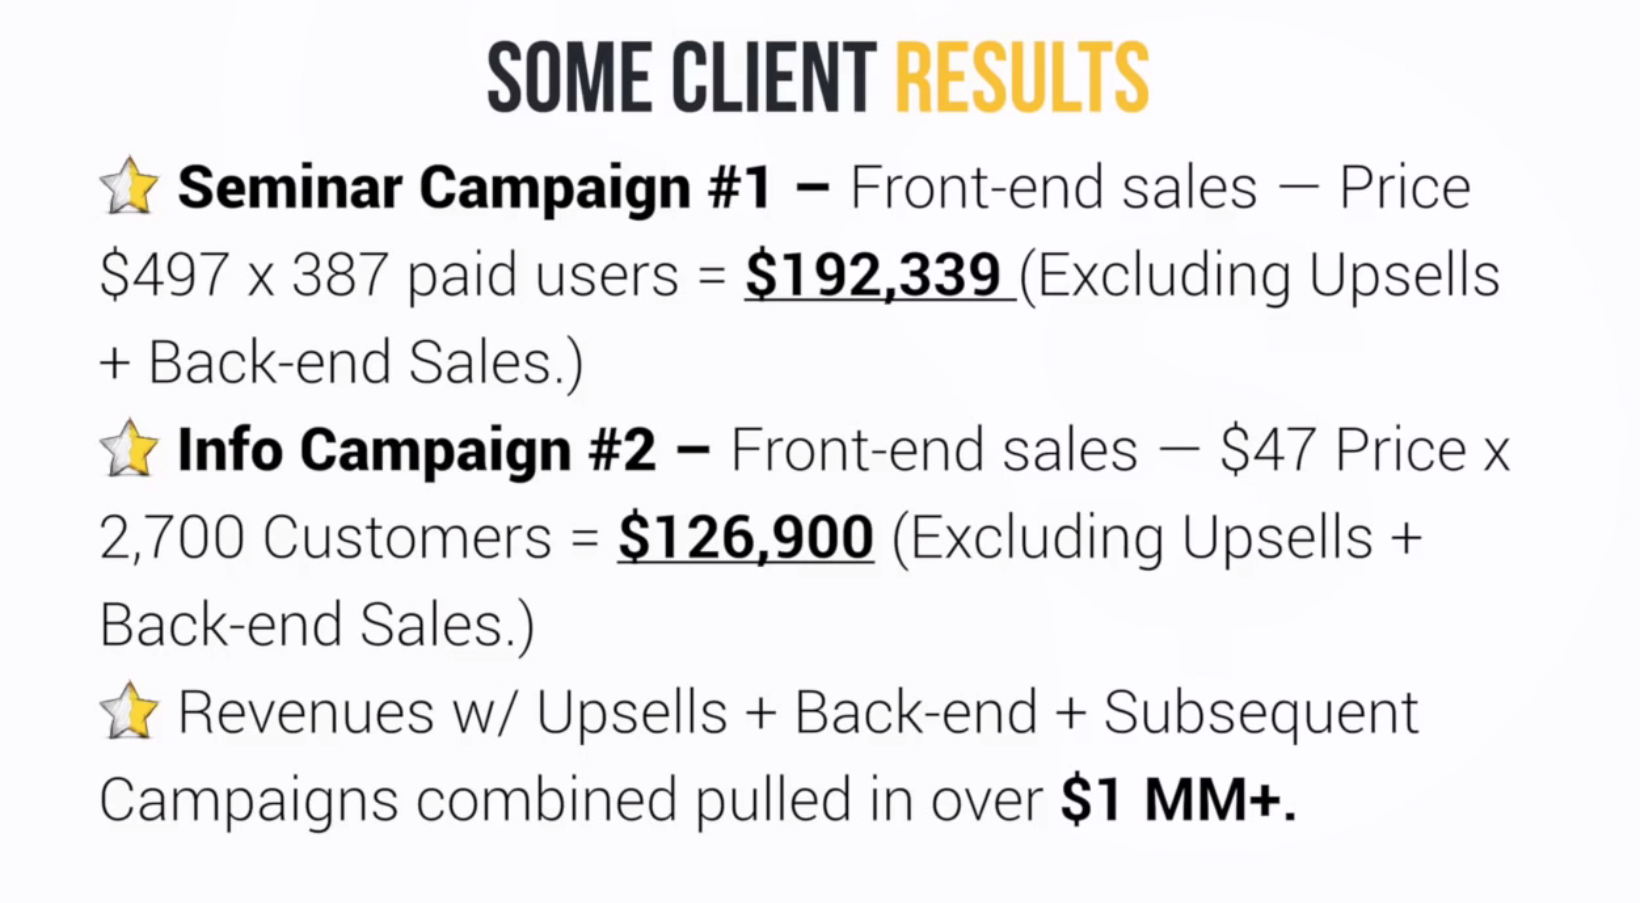

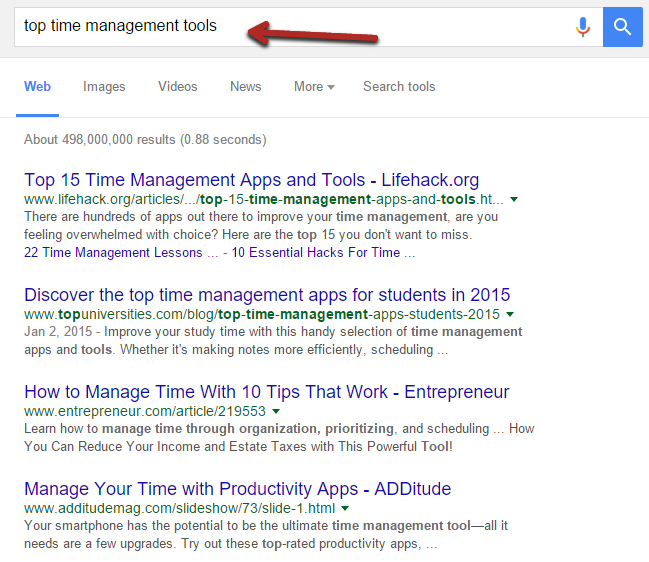
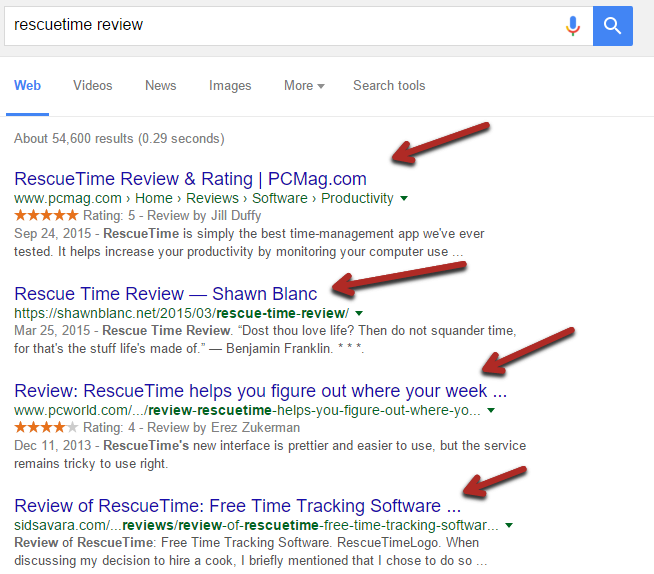
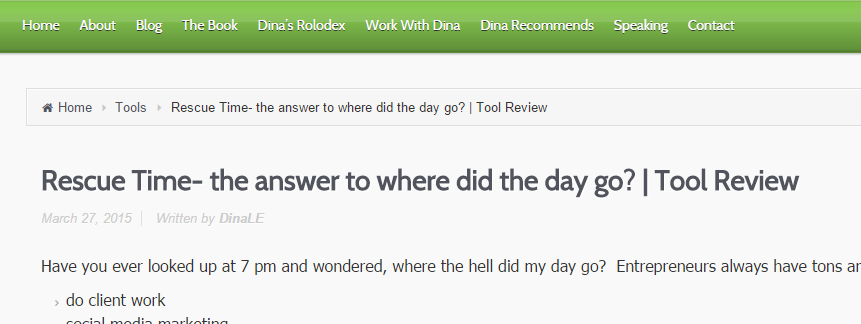
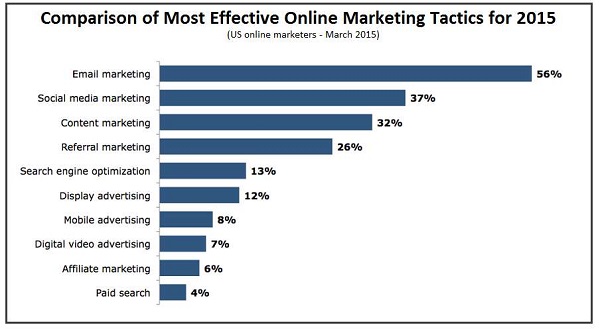

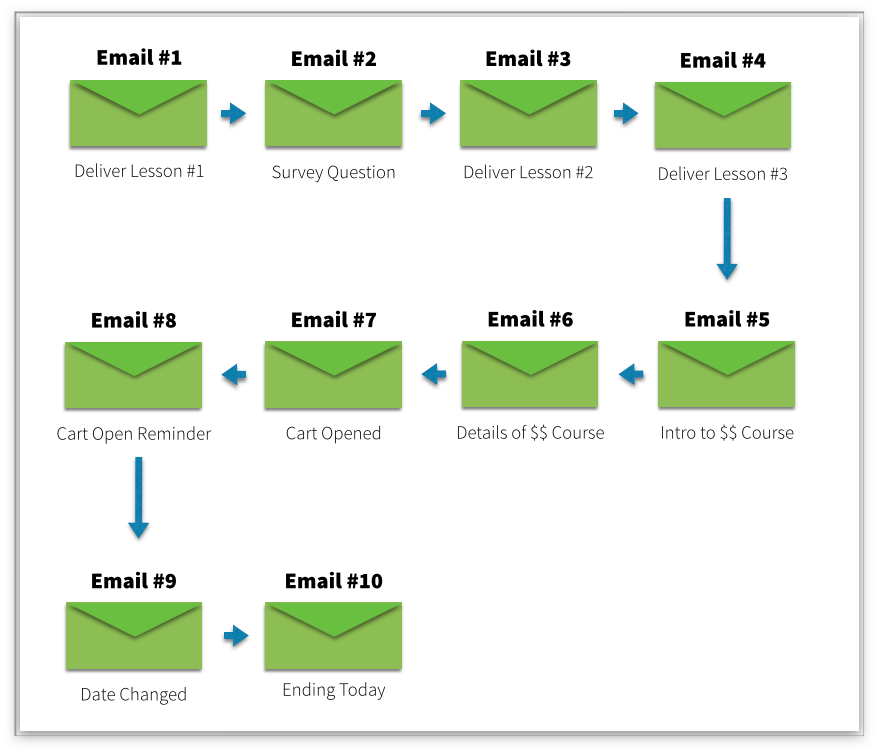
 3. Product offer (last 1-5 emails) – Finally, you want to offer your limited time discounts or bonuses. This is more important if you’re selling something like a course that is only available during a certain time period.
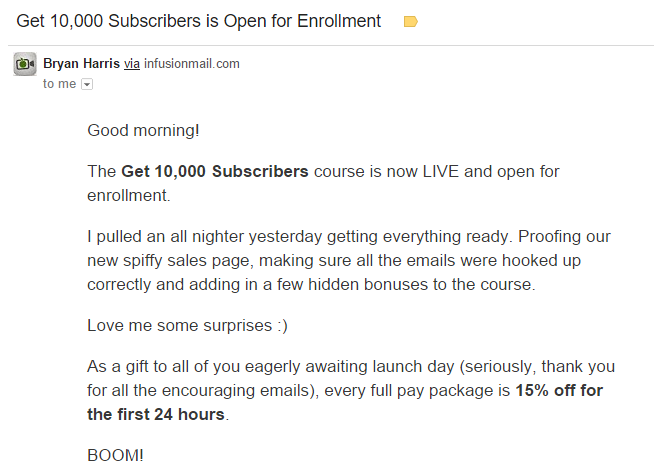

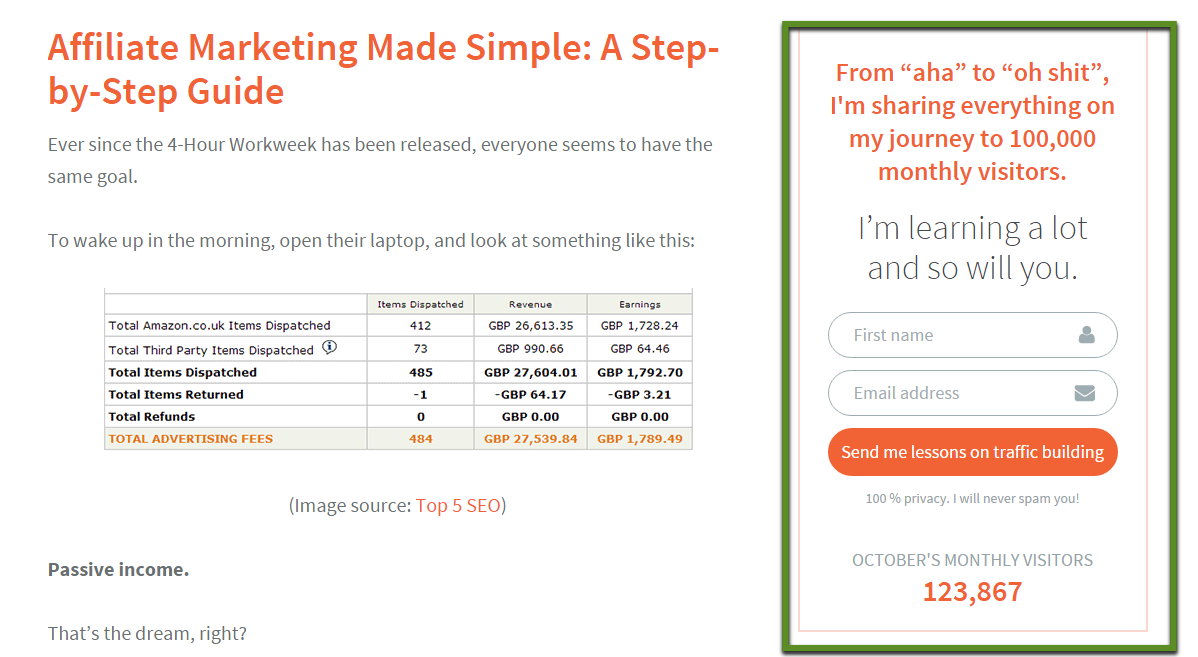
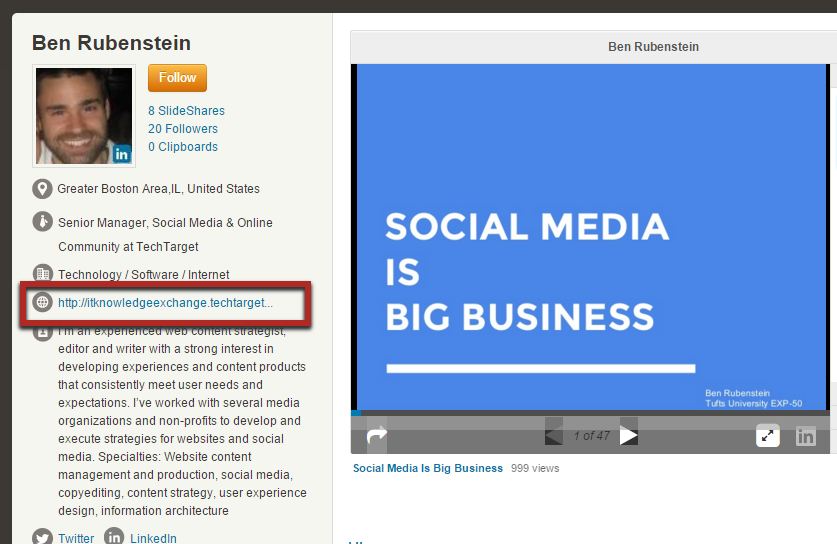
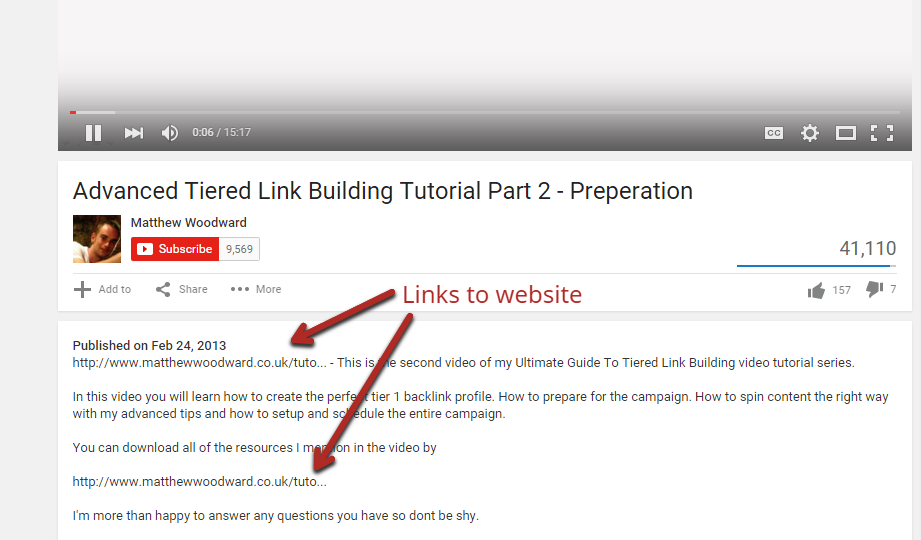

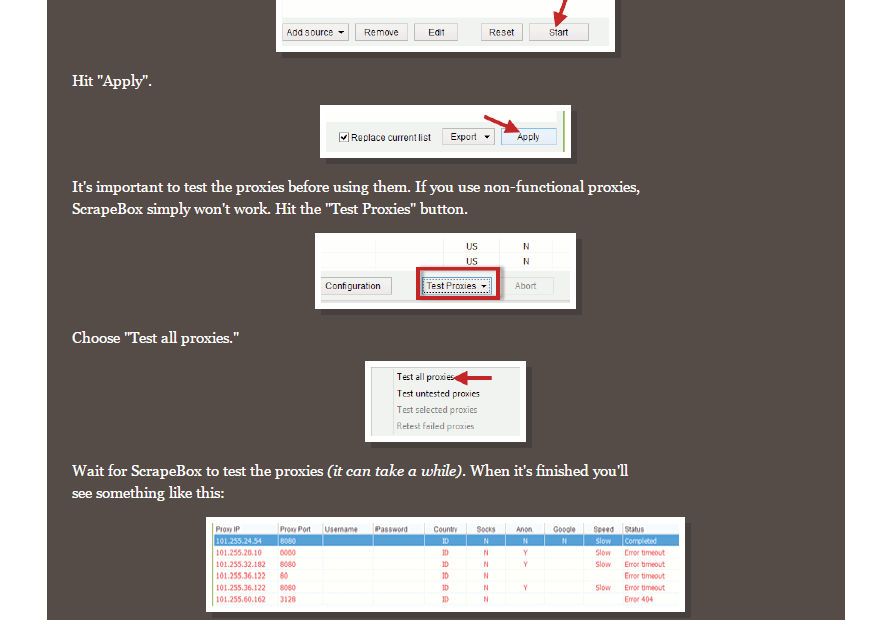

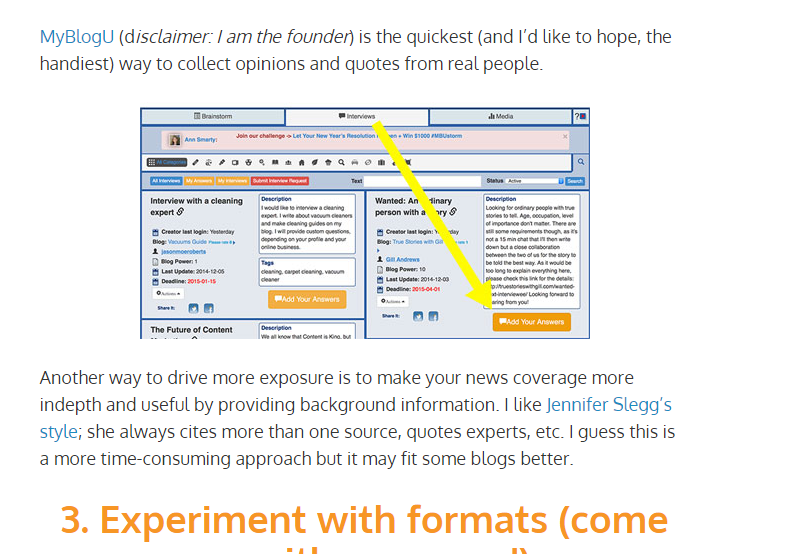

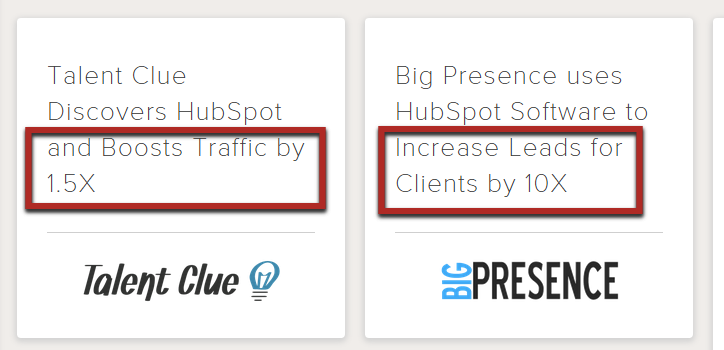


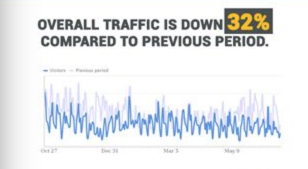
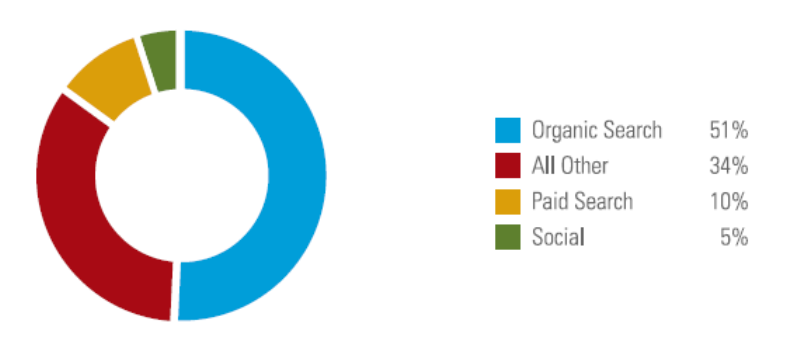
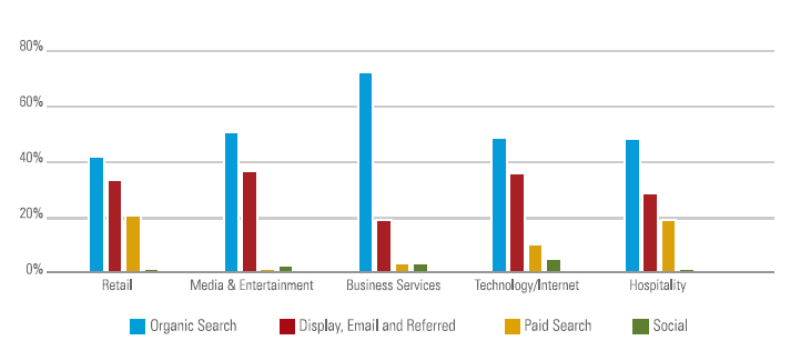


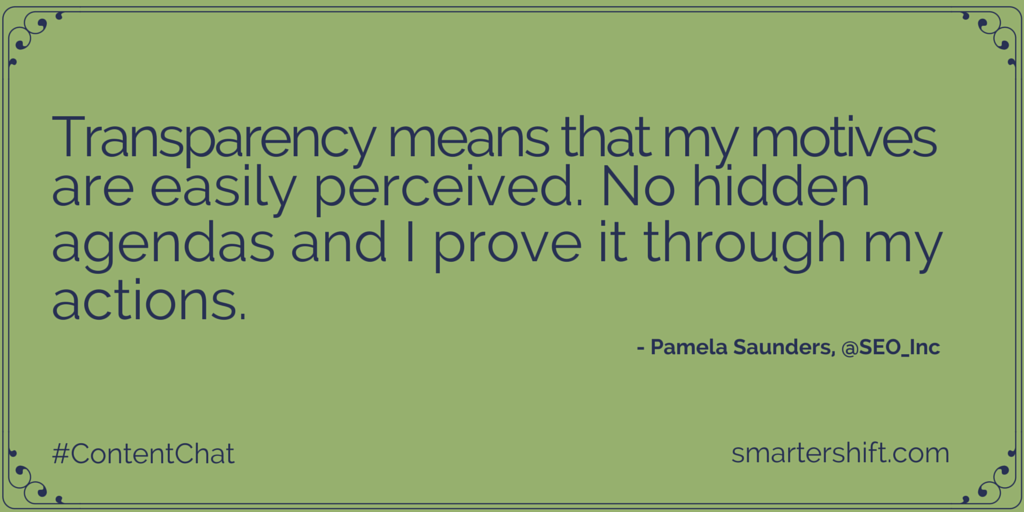
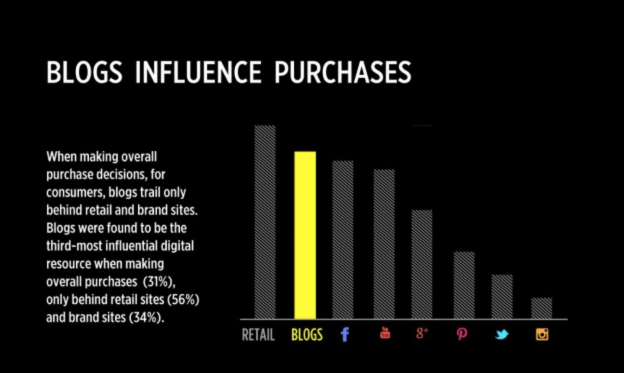

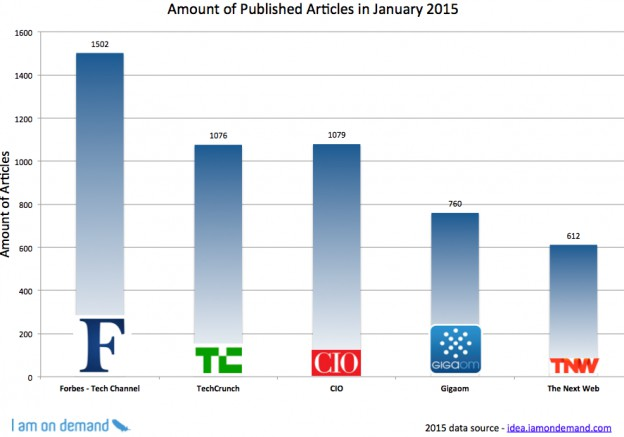
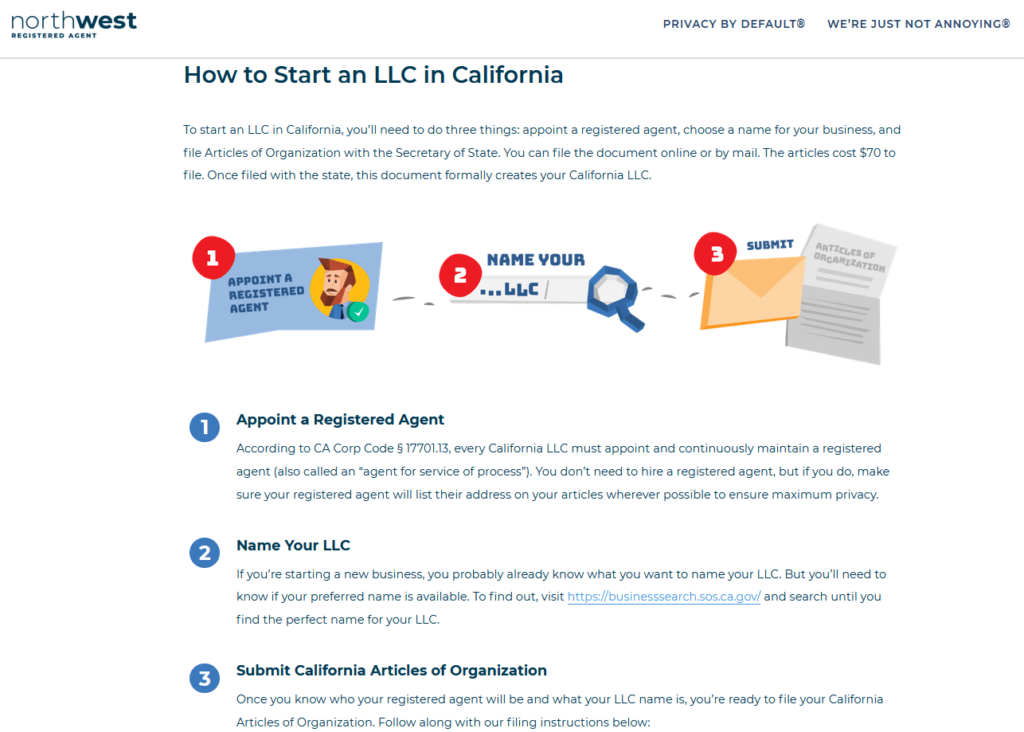
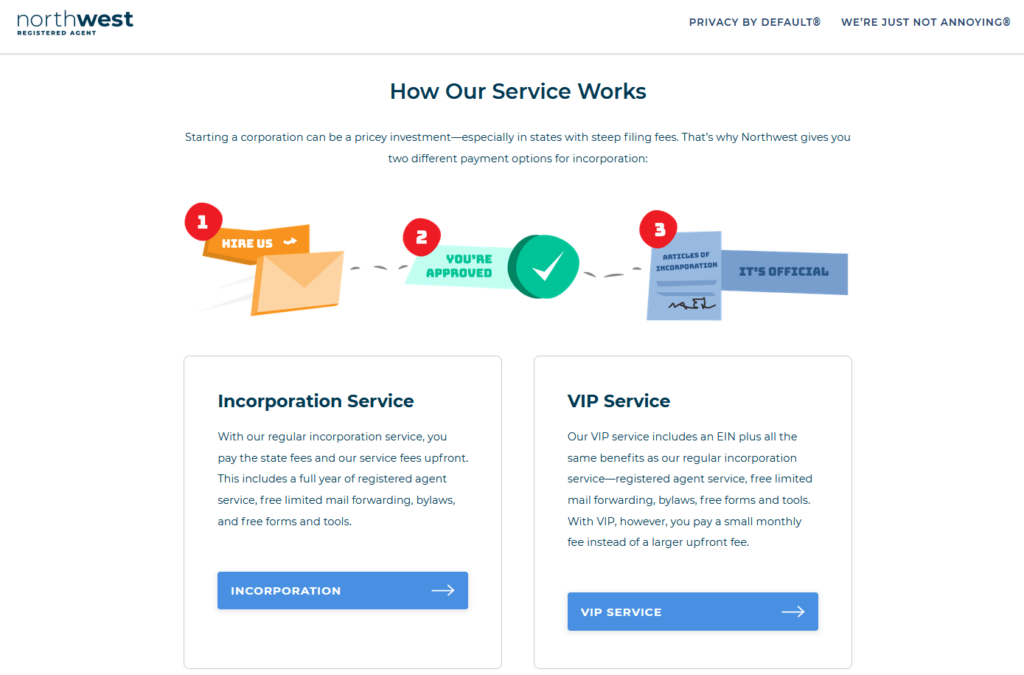
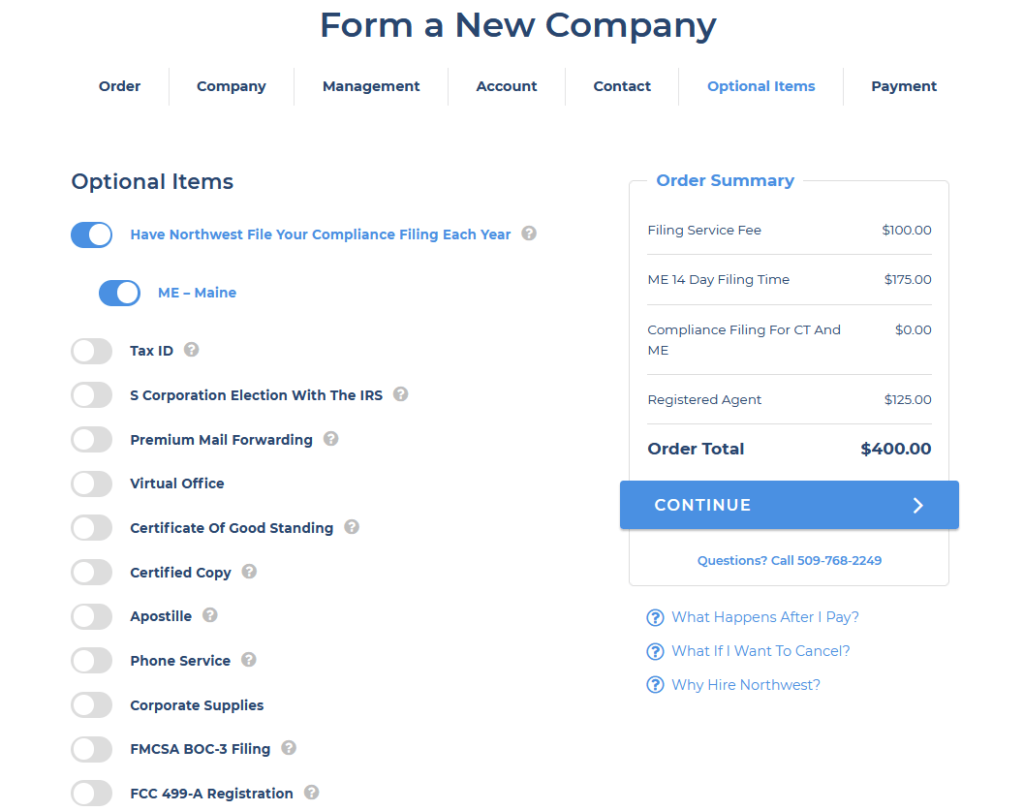


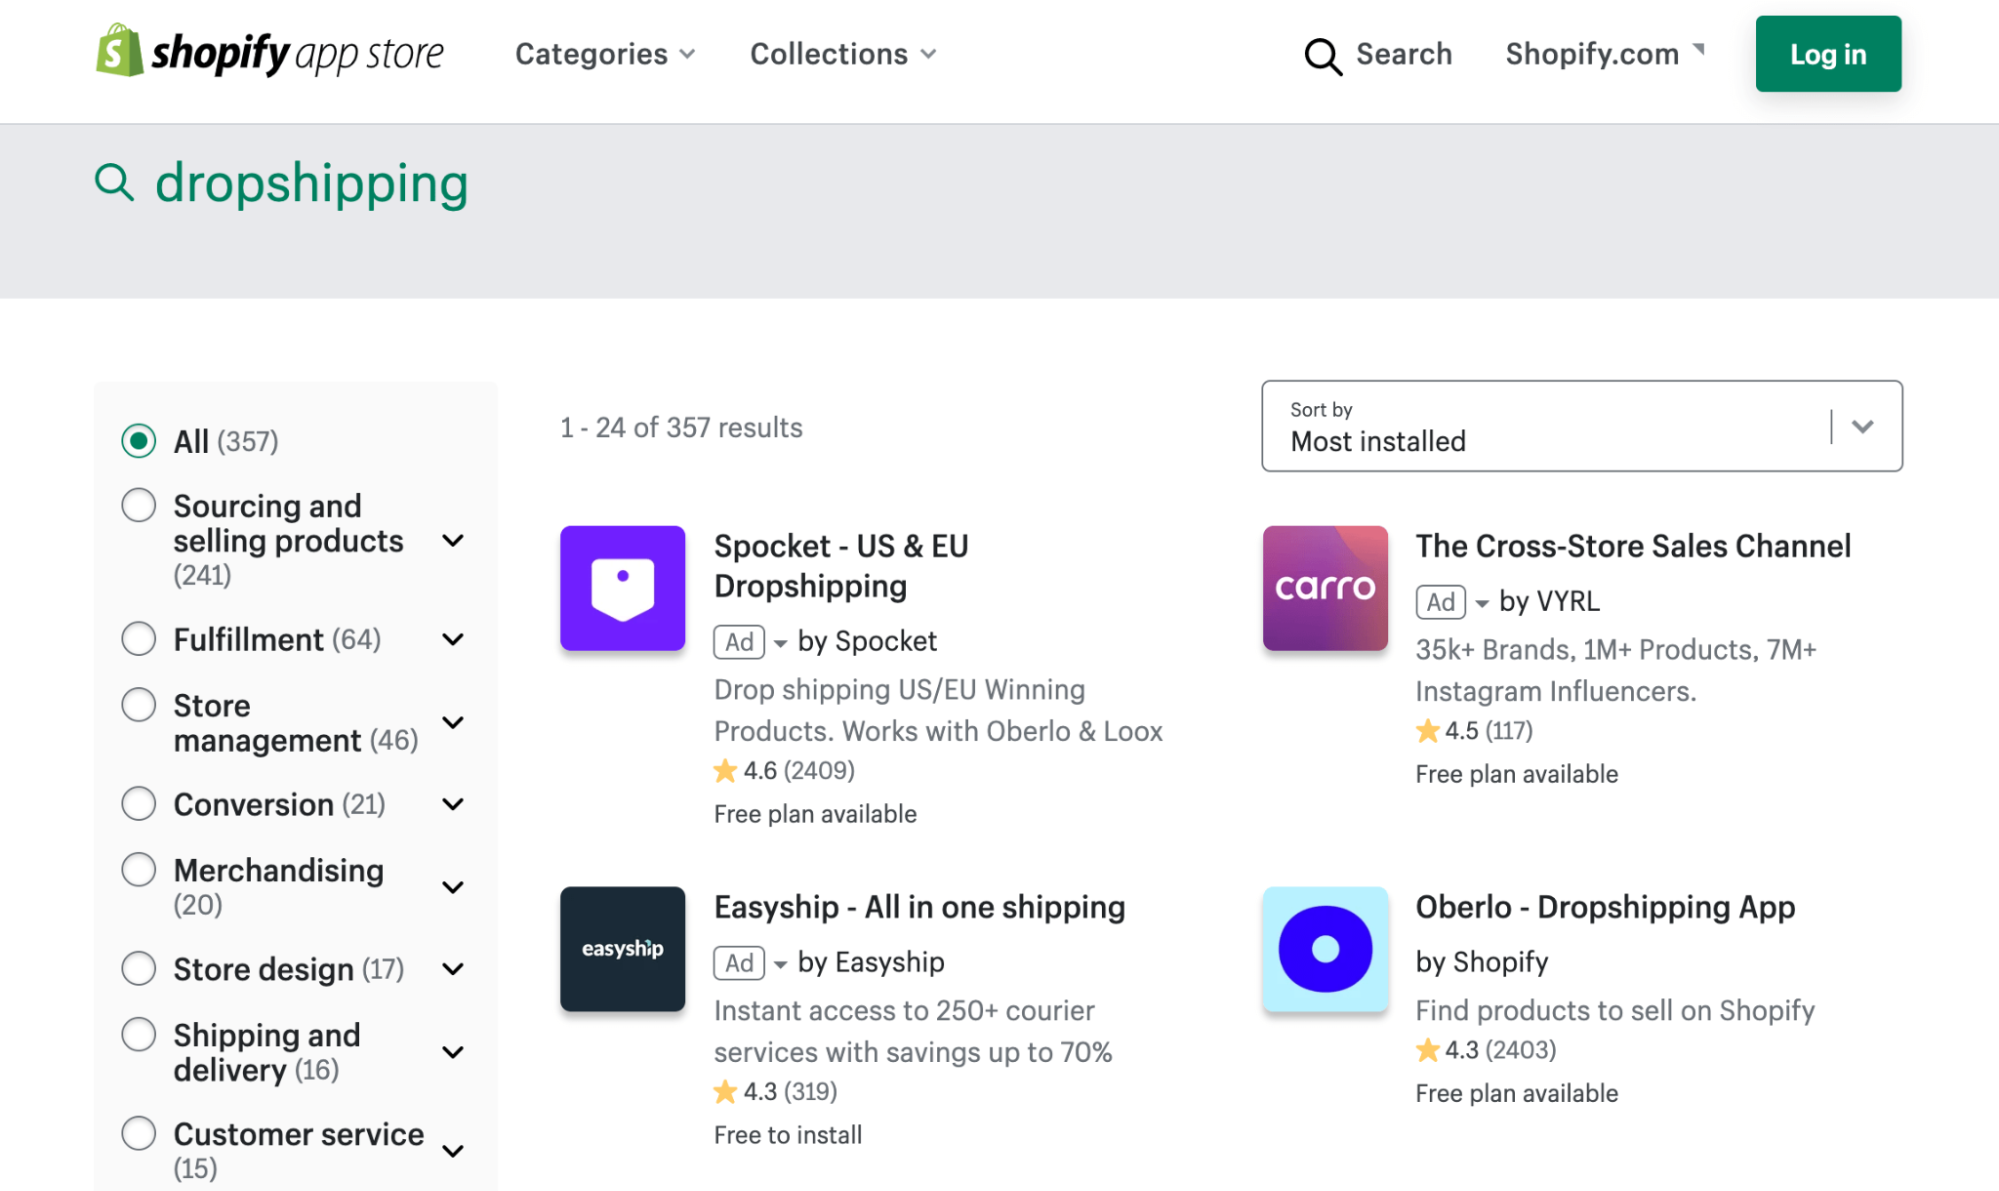


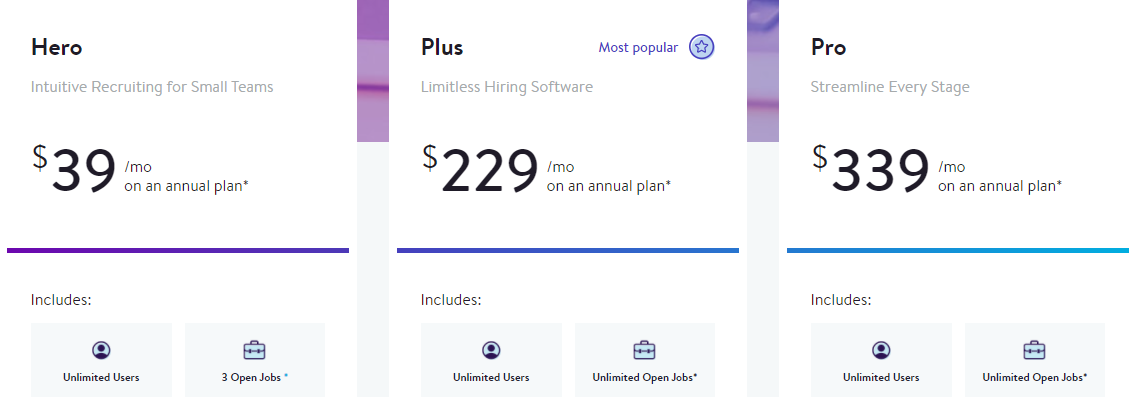


 RSS Feed
