|
Blogging is arguably the best content creation strategy for promoting your website. Publishing blogs on a regular basis boosts your site traffic, adds SEO value, generates leads, helps you build backlinks, and increases your internal linking opportunities. Blogging gives your website visitors a reason to keep coming back to your site and stay on your pages for longer periods of time. Furthermore, blogs are highly shareable. It’s a great way to increase your exposure on other platforms. The list goes on and on. I could sit here all day and talk about the benefits of blogging. That’s why I publish so many blogs on a regular basis and have done so for years. So for those of you who already have an active blog, that’s great news. You’re already on the right track. But now it’s time to take your blog to the next level. You can use this part of your website as a lead generation tool. The best way to do that is by building an email list.
It doesn’t matter what type of website you have; this strategy can be applied. Some of you might have an ecommerce site with a blog as a supplemental page. Others may have a website that’s strictly dedicated to blogging. The rest of you probably fall somewhere in between. Regardless of your unique situation, you need to use your blog to get email subscribers. Here’s why. Email marketing yields a massive ROI. Studies show that marketers average a $44 return for every $1 they spend on email campaigns. That’s a 4,400% return! People on your email subscriber list will spend more money than your other customers.
Plus, seemingly everyone on the planet uses email. Well, at least everyone who is landing on your blog pages. According to Statista, there will be roughly 5.6 billion active email accounts worldwide by the end of 2019. In the United States, 91% of all Internet users have an email account. Here’s something else to consider. 99% of people with email account check their messages on a daily basis. 73% of Millennials say that email is their preferred method of communication from businesses. Simply put, email marketing works. But before you can benefit from these campaigns, you need to build your list. That’s what inspired me to write this guide. I’ll show you how to turn your blog into an email opt-in machine. Choose an email marketing serviceBefore you can collect emails, you need to be signed up for an email marketing service. You won’t be sending out individual messages or bulk emails manually—that’s just crazy talk. Email software makes it easy for you to collect, manage, and contact your subscribers. Plus, you’ll gain valuable insight on the success of your campaigns. Email marketing services will tell you things like:
For those of you who already have email marketing software, you can skip over this part; unless of course, you want to switch providers. These are some of the top email marketing options on the market right now:
There are dozens of other legitimate email marketing services out there for you to consider, but they are all extremely similar. Pricing is typically based on the number of subscribers that you have on your list. As the list grows, the price increases as well. Don’t worry; this is a good thing. You want to have a huge email list. Plus, as we said earlier, you can expect a high ROI from your email marketing campaigns. Choosing your email software is based on personal preference. You might want to consider a free trial to test out the navigation, user experience, and features before you finalize your decision. But for the most part, you really can’t go wrong if you choose one of the options that I listed above. Create an opt-in formNow that you’ve signed up for a service, you need to create an opt-in form to place on your website. You should definitely have a dedicated landing page on your website for email sign-ups. But you’ll also want to have sign-up forms on other pages of your site as well, including your blog main page, and every blog that you publish. You can create these forms through your email software. Again, the instructions and wording will vary slightly depending on which service you’re using. But it should be very straightforward and easy to find. Then just generate a shortcode of the form to embed on your website. You’ll probably create several of these, which we’ll talk about in greater detail shortly. Here’s a basic example from Search Engine Land of what the final version of these opt-in forms will look like on your blog.
This screenshot is from the blog homepage. It’s very simple. On the right side of the screen, there’s an option for visitors to sign up for their newsletter. The only piece of information required to join this mailing list is an email address. Short opt-in forms increase the chances that more people will sign up. If your forms require a first name, last name, email address, phone number, zip code, favorite color, and mother’s maiden name, it feels like you’re one step away from asking for the person’s social security number. That’s overkill. Think about it. All you really need is their email address. Other information makes it easier for you to personalize the customer experience, but you can worry about that down the road by asking them to create a user profile or account. For now, just focus on getting them to subscribe. Search Engine Land continues to apply this strategy on all of their blogs.
Here’s what it looks like when you click on an individual blog post. Before the title, they give you another chance to opt-in through a simple form. As you can see, it’s not quite the same as the first form, but it’s very similar. They don’t stop here either. There is another opt-in form at the bottom of each blog post as well.
By putting these opt-in forms all over the blog, it increases the chances that people will sign up. Notice what all of these forms have in common. None of them are obtrusive. Website visitors can still navigate and read without having to deal with any pop-up windows, sliders, or anything else that could ruin their experience. As I said earlier, you’ll want to create multiple versions of your opt-in form so it’s easier for you to track. Eventually, you’ll run tests to see which ones are performing the best. But I’ll talk about those tests later on. Add an incentiveWhy should someone sign up to get emails from you? It’s a fair question. Sure, you want their email address so you can monetize them, but what are they actually getting in return? If you don’t give people a reason to sign up, they probably aren’t going to. Think about how many emails you get on a daily basis. If it’s anything like me, you’re getting hundreds. In fact, the average office employee receives 121 emails each day! Not everyone will be so willing to just subscribe to every opt-in form they see without thinking twice about it. But by adding an incentive, it can dramatically improve your chances. Here’s a great example from the Conversion XL blog.
This simple sign-up form is similar to the examples we saw before. However, this one is pitching the website visitor from a different angle. Rather than just saying “subscribe for weekly updates” or something along those lines, they are offering a free ebook. As you can see, the book is about mastering conversion optimization. In order to get the free ebook, the person has to provide their email address. There is a box below that line saying the user will also be getting updates via email. There are tons of ways for you to employ this strategy on your blog as well. For example, let’s say you operate an ecommerce site. On your blog posts, you can pitch a discount code for joining an email list. Offer a dollar amount or percent discount off of the visitor’s next purchase. Just think of something that goes beyond “sign up.” Learn how to craft the perfect value proposition and add it to your opt-in forms. Use a sticky barIf you don’t want an opt-in form in the sidebar or within the content itself, like the previous examples we looked at, you can always use a sticky bar as an alternative. As the user scrolls through your blog, the sticky bar will remain in place at the top of the page. This is another non-obtrusive way to collect email addresses with your blog. Here’s an example of how HubSpot uses this strategy.
The “subscribe” button is at the top of every blog post. So this will always be in view as people read through the blog. If you click on this button, you’ll see the following options:
Subscribe via email is the top option. Once someone clicks on this, they’ll be provided with an opt-in form similar to the ones we saw earlier. Keep in mind, these added steps may not generate as many subscribers as other methods. But with that said, website visitors who go through this process will be more qualified leads. You know that they’re interested in getting emails if they complete the extra steps. Check out my guide on creating a double opt-in landing page as a way to qualify your leads as well. This type of sticky bar is just another approach for you to consider. Create a visual CTAInstead of a traditional opt-in form, you could try making something that’s a little bit more inviting to draw attention to your email list. In this case, a custom visual image with a CTA should do the trick. You can put this at the top or bottom of your blog posts. Here’s what this looks like on the IMPACT blog.
Notice how this looks different from the other examples we’ve looked at so far. The entire visual is dedicated to getting subscribers. It includes a photo, value proposition, and CTA button. IMPACT is enticing readers to sign up by power in numbers. Psychologically, if 50,000+ people are doing something it must be good, right? That’s the idea behind this strategy. I also like how the image shows the newsletter on a mobile device. It’s very relatable to the audience. This tells the story of someone who can get updates to their phone, which is super convenient. Since 61% of all emails are opened on mobile devices, this makes a ton of sense. Overall, this is a creative way to draw attention to an email list on a blog post. Run A/B testsEvery element of the email opt-in forms on your blog should be tested.
Start with one idea, then move on to the other. The idea behind A/B testing is that everything can always be improved. You might think you have the perfect opt-in strategy, but that’s not always the case. Some of you will be surprised to learn that a subtle change can drastically increase your sign up conversion rates. Let me take a moment to circle back to what we discussed earlier in terms of creating multiple opt-in forms. This makes it easier for you to test out different elements and variations. For those of you who plan to take an approach like Search Engine Land and place forms in multiple areas throughout the blog, you can figure out which one is performing the highest. You may ultimately decide that one of them can be eliminated. Then you can continue A/B testing the most popular forms to ensure that it converts at the highest possible rate. ConclusionYou’re not getting the most out of your blog until you start using it as a tool for building an email list. The first step to implementing this strategy is choosing an email marketing software. Then you’ll use that software to create opt-in forms to place on your blog. From here, it’s just a matter of figuring out how you’re going to present that form to your website visitors. Adding an incentive, using a sticky bar, or creating a visual CTA are just three ways to drive conversions. You’ll ultimately want to test out all of your strategies make sure that your blog is performing at the highest possible level. via Quick Sprout https://www.quicksprout.com/how-to-build-an-email-list-on-your-blog/
0 Comments
Creating content is hard work. It takes time, effort, and resources to make landing pages, write blogs, build custom infographics, and create videos for your website. But all of that hard work will go to waste if people aren’t navigating to your site. Creating the content itself is only half of the battle. Now you need to make sure that it’s optimized for search engines so you can drive organic traffic to your pages. That’s why you need to understand the importance of meta tags. Once you learn how meta tags work, you can optimize them to boost your Google search ranking. The higher you rank, the more clicks you’ll get; it’s really that simple.
In fact, 75% of all clicks go to the first page of Google search results. The top result of any given search gets roughly 33% of clicks. While positions two and three get 15% of clicks and 9% of clicks, respectively. What happens if your site is on page two of Google? That’s close enough, right? Wrong. According to Forbes, the second page of search results only gets 6% of all clicks—and that’s distributed throughout the entire page. We’ve reached a point in the world of SEO where websites can no longer afford to ignore meta tags. I’ll explain everything you need to know about crafting title tags and description tags that will maximize your SEO value and boost your click-through rates. What are meta tags?Let’s start with the basics. Meta tags are basically just HTML text that describes the content on a particular page. However, you won’t see the tags on the front-end site of any web page. Instead, these tags are written on a page’s code. The purpose of a meta tag is to give search engines additional information for what the page is all about. Crawlers will be able to get a good idea of what type of content is on your page by the text and heading tags. But the meta tags give these crawlers even more to work with. Furthermore, your meta tags can appear in the SERPs, even though they aren’t actually part of the page. Let me show you an example so you can see what I’m referring to.
We’ll keep things simple here. If you search for Quick Sprout on Google, our homepage will be the top result. I took a screenshot so you can verify this. But instead of the search engine just providing a link to our site, there is some additional text underneath the URL in the search results. This is the meta description of our homepage. Now, let’s navigate to the page itself. If you land on the Quick Sprout homepage, you’ll see that the text in the SERPs is nowhere to be found on the page.
Look what happens when I search for that text. There are zero results. How is this possible? That’s because the meta description is in the code. Anyone can look at the code of a page to see if it has meta tags. You just need to know where to look. So if we right click on the Quick Sprout homepage (or any page on any website) you can click “view page source” to see the code. You’ll be redirected to a new window where you’ll see a bunch of syntaxes that can tough to decipher.
Rather than looking for those tags manually, you can use the “Command + F” search function to your advantage. This time when you search for that exact text, you can see that it’s on the page. I highlighted this meta description tag in the screenshot above so it’s easier for you to see. If you click closely, you’ll see other meta tags in this code as well. We’ll discuss some of these other tags in greater detail as we continue through this guide. Types of meta tagsAs I just said, there are several different types of meta tags that can appear in the code of a web page.According to Google, there are actually nine meta tags and related items that their search engine recognizes. With that said, some of these are pretty technical. I don’t want to spend time diving deep into all of them. So instead, we’re going to focus on the most important meta tags that have the biggest impact on SEO and CTR. Title tagsTechnically, title tags are not actually meta tags. But they’re treated the same way and recognized by Google, just like a meta tag. Your title tag will still appear in the <head> of your HTML code, along with the rest of the meta tags on that page. Title tags are usually used jointly with a description to provide a high SEO value for a web page. Here’s something else that you need to understand about a title tag. This is not the same as the header of a page or the title of a post. In fact, the two can be completely different from each other. Here’s an example so you can see exactly what I mean.
This is a screenshot of search results for a page on Search Engine Land. I highlighted the title tag, which is how it looks on search engines. Here is that same title tag, except written in the code of that page.
As I knew it would, this title tag in the page source matches exactly how it’s displayed in the Google results. This is very easy to follow so far. But now let’s take a look at the page itself.
The heading on this page doesn’t match the search title, nor does it match the code. Simply put, the title tag and headline does not need to be the same. You can use alternative title tags for SEO value. In this case, “SEO Guide” will have a much better SEO value than “Chapter 1” for searches. I’m sure that’s why Search Engine Land made the change for their title tag. You need to realize that the title tag will be the first thing that people see in the search results. That’s why it needs to be a clear indication of what that landing page will be about. Title tags should be crafted in a way that can be understood by real people, while still speaking to search engines. Meta descriptionWe talked about meta descriptions earlier when I showed you the example from Quick Sprout. These snippets are meant to tell crawlers, as well as humans, what they can expect to see on a page. Again, this won’t appear on the page itself, but it will show up in the SERPs. Here’s the thing. Technically, your meta description won’t automatically be the snippet shown in the search results. According to Google, there are two ways that these snippets are determined.
Google “sometimes uses meta tags to generate snippets.” This is the exact wording from Google a webmasters support page. But in my experience, if your page has a meta tag, that’s what will be used in the SERPs. This is a great way to control how your site appears in search engines, in addition to showing crawlers what your page is about. Use your meta description as a way to differentiate your page from other websites in the results. Explain why your website is offering exactly what the user is looking for, based on their particular search. Robots meta tagsRobots tags are a little bit more technical, so I don’t want to spend a ton of time on them. But these tags are definitely worth bringing up since they have an impact on both SEO and CTR. Examples of the type of controls used with robots meta tags include:
For those of you who want a more advanced way of improving your site’s technical SEO value, review my guide on how to optimize your robots.txt file. Meta tags best practicesAs I said before, you’re going to want to focus primarily on title tags and meta descriptions. So use this as a checklist, guide, or reference to make sure you’re optimizing these two tags the right way for SEO and CTR. Don’t use keyword tagsIf you look at other online guides about meta tags, you’ll see that some “experts” will tell you to include keyword tags. That’s a waste of time. Keyword tags are an outdated SEO tactic. In fact, it’s been nearly a decade since Google announced that they don’t use keyword tags as a factor for rankings. You can even refer back to the page I referenced earlier about the types of tags that Google recognizes. Keywords aren’t on the list. That’s because their crawlers are so advanced that they can extract keywords from the content without needing those tags. Plus, it prevents people from adding irrelevant keywords to their HTML code just for the sake of ranking. With that said, you’ll still want to use keywords in your title tag, meta description, and heading tags. But having separate keyword tags won’t give you any added SEO benefit. Avoid duplicate descriptionsEvery page on your website should have a meta description. But if you’re using the same meta description (or slightly different versions of the same meta description) on more than one page, it won’t be helpful when those pages appear next to each other in the search results. Here’s an example.
Users won’t know what to click here. The meta descriptions don’t add any value, so they’ll probably just skip over the results and move on to another option. This would definitely damage your CTR. Plus, Google always tries to prioritize the user experience. So if they notice duplicate or similar descriptions on your website, they may just eliminate those snippets from the search results altogether when your site is being indexed, which would be another harmful scenario for your CTR. Meta descriptions are so valuable to users when they’re making a decision of what site to click on in a list of search results. For those of you who are using duplicate descriptions as a shortcut since you’re strapped for time and don’t want to create one for every page, you need to learn how to prioritize. At the very least, have unique descriptions for the most important pages on your site. Eliminate weak meta descriptions and just rely on rich snippets to appear in the SERPs. Be descriptiveIt may sound redundant for a meta description to be descriptive, but you’d be surprised how often I see people make this mistake. This is not an opportunity for you to just blindly stuff as many keywords as possible into your page code. The meta description needs to make sense. That doesn’t necessarily mean that it always has to be in a complete sentence format. But with that said, it has to add value to real people, as well as crawlers. Keyword stuffing for bots can result in Google removing your snippet from the search results. Prioritize quality. Give people a glimpse at something that isn’t displayed on your pages. Don’t just take the shortcut and make your meta description the same as your subheader. That’s not the best way to maximize SEO value. Don’t use quotation marksRemember, your meta description is going to be in your HTML code. So certain characters will impact the way it’s displayed. Whenever a double quotation mark is added to a meta description, the remaining text that appears after the quotation mark will be cut off when it appears in the search results. So just be aware of this when you’re writing a description. It’s probably in your best interest to avoid special characters and just stick to plain text. ConclusionGreat content alone won’t maximize your SEO value. There are lots of other factors at play when it comes to your search ranking and CTR metrics. You need to learn how to use meta tags to your advantage. The three meta tags that have the biggest impact on SEO and CTR are:
For the most part, you’ll want to prioritize title tags and meta descriptions. You can move on to robots.txt files when you’re ready for a more advanced strategy. Use this guide of best practices for crafting title tags and meta descriptions that will positively impact your SEO ranking. via Quick Sprout https://www.quicksprout.com/how-to-craft-meta-tags-for-seo-and-ctr/ In a perfect world, all of your website traffic would be organic. That’s the most ideal scenario for everyone. But sometimes it can take 6, 12, or even 18 months for you to really notice the benefits from your organic search strategies. That’s not to discourage you. While you should stay the course and continue to prioritize SEO best practices, you can always use paid ads for the time being to drive more traffic to your site. So for those of you who have available funds in your marketing budget, I’d definitely recommend that you give PPC campaigns a try. The best way to run paid ads is with Google AdWords. Google does an amazing job of giving you the tools to ensure that your ads are viewed by people who are most interested in your business. One of the most effective campaign approaches is remarketing.
What is remarketing?It’s a way to expose your ads to people who have previously viewed your website in the past. Since these visitors are already familiar with your brand, it’s more likely that they’ll convert when they see your ad in SERPs or on a Google partner site. Getting traffic to your website is obviously great. Who doesn’t want more traffic? But if those visitors aren’t converting, you’re not going to see a high ROI on those paid ads. That’s where remarketing comes into play. Here’s a simple visual representation to show you exactly how remarketing works.
It’s a very easy concept to understand. Basically, your website visitors will be tracked based on their behavior. Then your ad will appear when they’re browsing on another site in the future. I’m sure this has happened to you before. You search for something like “hotels in Miami” and then later that day you see an ad for a hotel website that you were browsing earlier. That’s a remarketing campaign. For those of you who have never used this strategy, I’ll explain every step you need to take to set this up with Google AdWords. Implementing a remarketing strategy will boost your conversion rates and generate a higher ROI for your ad spending. Generate the remarketing codeThe first thing you need to do is generate a remarketing code from your Google AdWords account. Then you’ll eventually add this code to your website so Google can track visitors and ultimately apply this strategy via partner sites. I’m going to assume that you already have a Google Ads account. If not, take a moment to set that up. It’s a quick process and free to do so. You won’t pay anything until you actually start running ads. Once you’re signed in to Google AdWords, click on the “tools” icon at the top of your dashboard to expand the menu.
Then navigate to the “shared library” column and select “audience manager,” as pictured above. When you land on this page, you’ll see that you’re already in a remarketing section. On the left side of the screen, click on “audience sources” to continue.
When you get to this page you’ll see five different options:
These are all ways that you can track customers for remarketing campaigns. But for our purposes today, you’re going to select “set up tag” from the “Google Ads tag” box.
Now you need to determine the type of remarketing campaign that you want to run. You’ll be presented with two options. The first choice is very straightforward; collect general data about website visitors. Basically, this means that if someone lands on your site, they will be a candidate for your remarketing campaigns. But just because someone visits your site, it doesn’t automatically mean that they’re interested in what you’re offering. Sometimes people will land on your site by mistake. Or maybe they realized that what you’re offering isn’t actually what they need. It’s possible that your products are out of their price range. There are tons of different factors at play here. So remarketing to everyone and anyone isn’t always the most effective way to drive conversions. That’s why you should consider the second option. Google lets you collect data based on specific visitor actions to show more personalized ads to people. For example, you could target only people who added something to their shopping cart but didn’t convert. After you pick the type of remarketing strategy you want to pursue, Google will automatically generate a code for you. Add the tag to your websiteOnce the remarketing code has been generated, you need to install the tag on your website. For those of you who choose the second option involving specific visitor actions, you’ll see that two codes have been generated.
The global site tag should be added to every page on your site. This will be installed in the <head> section of your page HTML. Here’s an example of what it looks like when the tag gets generated for you on AdWords.
The event snippet tags are a little bit more complex. You cannot just install the code on your site as it reads in the auto-generation box. There are placeholders in the code that need to be updated based on the type of event you’re tracking for remarketing. Remember, the whole purpose of this strategy is to find people who are most likely to covert. So the snippets won’t go on every page of your site. Instead, they’ll only be added to pages where those certain actions take place, such as an add-to-cart page or a product page. Here’s an example of an event snippet code with those placeholders.
As you can see from what I’ve pointed out above, there are parts of the tag that need to be replaced with a value for tracking purposes. Let’s break this down even further. From the top, you can see that this snippet is measuring page views by default. But other examples of events include things like:
Once you set an event, you need to change the value items, and ID parameters to correspond with your remarketing campaigns. This all depends on your business and the type of website you have. These choices are extremely versatile. Google gives you the option to be very specific within your business vertical. Recently, Google updated the code for their tags. So for those of you who previously installed a remarketing tag on your site in the past, you should update those old tags. Google says that the old ones will still work, but they recommend generating new global tags and event snippets for future use. There are three ways to install these tags on your website.
Every option is pretty self-explanatory. Google will walk you through the process each step of the way. If you decide to do this on your own, just make sure you realize that the placeholders need to be changed. Otherwise, the campaigns won’t work. Item parametersAs I explained before, you need to update the placeholders in the event snippet code to track specific actions by visitors on your website. The item parameters will vary based on the type of business vertical that you choose. These are the categories:
So if you have a retail site, the ID could represent something like a unique product. Here’s another example using a different vertical. If you have an airline or operate a website that sells flights, your event snippet tag could look something like this:
This event is specifically tracking people who purchased a flight from London to LAX. So one of their remarketing campaigns could be an ad for upgrading their seat, getting a hotel, or renting a car when they arrive at their destination. To view the full list of requirements and examples of item parameters in your industry, check out this resource from Google. I’d also recommend reading this Google support page that discusses custom rules for remarketing campaigns. Update your privacy policyOnce you have all of this set up and the code is installed on your site, you need to make some additional changes to your website as well. Your privacy policy needs to be updated to tell your site visitors exactly what you’re doing. According to Google, these are the requirements for what your updated privacy policy needs to cover:
Don’t skip this step. It’s unethical to deceive your website visitors. Plus, Google states that you need to disclose all of this information if you’re using AdWords for remarketing. Create custom audience listsNow it’s time to customize exactly who you’ll be targeting with remarketing. Go back to the “audience manager” page on your AdWords dashboard. Then navigate to the “audience lists” tab and click on the plus (+) sign to add a new audience.
Next, you’ll be presented with different options for where this list will come from.
For our purposes today, go ahead and select the “website visitors” option. Next, you can add more information about this list by naming it and changing the settings. Here’s what that page looks like:
First, you should name your audience. Be specific so you’ll be able to distinguish it from other lists. You’ll be able to select this audience later on when you run your ads. Next, you can update custom information about their behavior and actions on your site. Here are your options:
For example, maybe you want to target website visitors who landed on your “about us” page but didn’t visit your product page. Or maybe you want to target people who visited a product page and a shopping cart page. Depending on the options you choose, you’ll add those specific URLs as well. Then it’s time for you to determine how long you want this audience list to be kept on file. By default, this is set to 30 days, but it can be as long as 540 days. Depending on the page and campaign, you’ll want to adjust this accordingly. If you’re promoting impulse buy products, you’d probably want it set significantly lower. Or if you’re promoting a specific landing page for a holiday sale, you’ll want to make sure the ads don’t run past that holiday. For the most part, 30 days should be fine. You can always experiment with other periods of time when you create new audience lists. Launch your remarketing campaignAfter your settings are in place, it’s time for you to put all of this to the test. You need to create and run your ads. Go back to the AdWords dashboard. Find “campaigns” on the left side of the screen.
Click on one of the plus signs to start a new campaign. Next, you’ll be prompted to choose your goal from one of the following options:
You can pick whatever you want from this list. But for conversions, you’ll probably want to choose sales, leads, or product consideration. Next, you’ll decide on the campaign type. For remarketing, select the “display” option.
This is your chance to customize all of the settings and parameters for your ad. You’ll set things like:
After you finalize all of this, scroll until you see the “audiences” section.
Click on the “browse” tab in the middle of the “edit targeted audiences” window. Navigate to the third option, as I highlighted in the screenshot above. This will allow you to pick how certain audiences have interacted with your business. From here, you can choose a list from the custom audiences that we created in the previous step. You could also choose all audiences or audiences that have been optimized by AdWords. Then it’s just a matter of creating your ads and launching the campaign. Your ad creation process will vary based on your remarketing campaign. For example, if someone viewed a specific product and already purchased it, then it wouldn’t make sense to show them an ad for that same product. Whereas if they added an item to their cart but never finalized the purchase process, showing them that same product again would entice them to buy. ConclusionIf you’re going to spend money on PPC campaigns with AdWords, I strongly recommend you run remarketing ads. With remarketing, you have the ability to target qualified leads. These are people who have already been to your website and completed some type of action that was close to converting. Since they’re already familiar with your brand, website, products or services, getting those visitors to finalize the conversion will be much easier than advertising to someone who has never heard of you. Track your conversions. See which types of ads, actions, and custom audience lists are driving the best results and highest ROI. Then you can double down on those campaigns and make changes to ones that aren’t performing as well. That’s how you drive conversions with Google AdWords using remarketing campaigns. via Quick Sprout https://www.quicksprout.com/how-to-get-more-conversions-from-adwords-using-remarketing/ I wrote a ton of blog posts. Over the last year alone, I’ve published a minimum of three blogs per week here at Quick Sprout. Some weeks it was even more, at times with multiple posts per day. If you’ve been reading my blogs for a while now, you know that everything I produce is long-form content—just like the post you’re currently reading. This means it falls somewhere in the 1.800-3,000+ word range. I’m not writing quick 500-word pieces for the sake of publishing at a high rate. Over the years, I’ve covered lots of in-depth topics about content marketing, website optimization, conversions, SEO, and other related subjects. But today I want to share with you a seemingly small and subtle SEO hack that can drastically improve the performance of your content.
I’m referring to heading tags. Some of you might be more familiar with these than others. I’m sure some of you even use them in your posts, whether you realize their SEO value or not. I use heading tags in everything that I publish, including this post that you’re reading right now. In fact, you’ll see them throughout the post as we continue. I’ll make sure to bring attention to them so you know exactly what I’m talking about. So follow along this guide to see how you can improve your content with heading tags. What is a heading tag?Before we go any further, let’s make sure we’re all on the same page here. So far in this guide, I’ve used two heading tags:
There will be several more used throughout the guide as well. By definition, these are HTML tags that specify headers on a website. Let me break that definition down for you even further. HTML (hypertext markup language) is the language used to create pages on websites. Tags are the code that tells a web browser how the content should be displayed on the page. There are six types of heading tags; H1-H6. Each tag can be ranked from highest to lowest in the order of significance, which is clearly illustrated by the size.
You can add these tags to your content before you publish your work. Here at Quick Sprout, we use WordPress. But I don’t typically write my blogs directly in that platform. I work in Google Docs, just because I think it’s more user-friendly for writing long-form content. Whether you’re using Docs, Microsoft Word, or another platform to produce content, you’ll be able to find those header options in the menu bar. Here’s what it looks like in Google Docs:
It’s very straightforward. The options for H4 and higher won’t appear until after you add H3 tags to your content. Here’s what the tags look like if you’re working directly in WordPress.
Again, it’s about as straightforward as it gets. You can verify that the headers are applied properly into your content by viewing the source code of a page. In WordPress, just switch from the visual editor to the text editor to see the HTML code. You can also view the source code of any page, even after it’s been published. For example, let’s look at some previously published content here at Quick Sprout. Here is a post I wrote about online marketing for beginners.
I’ve pointed out the different headers above. I’m sure you’re used to seeing content like this (especially on Quick Sprout). Now, you might look at this and just think the font is larger. All of the main text is written in size 11, the title is size 20, and the subheader is size 16. While this might be the case, it’s not that simple. Changing the size of the font alone doesn’t equate to a heading tag. If you check the source code of the page, you’ll see what I mean. Right click on any web page to see the source code. In fact, you can do it with what you’re reading right now. Then just click “view page source” and it will bring you to the source code. Here’s what that looks like for the Beginners Guide to Online Marketing.
Finding those h tags in the source code is like a needle in a haystack. So use “command + f” to your advantage. Then just search for h1, h2, h3, etc… I pointed out the tags to make it obvious. As you can see, H1 tags were used for the title, and an H3 tag was used for the first subheader on the page. SEO value for heading tagsNow let’s get into how heading tags are connected to SEO. By the way, here’s another heading tag (above) that I used for this subsection. There has been a debate for quite some time amongst SEO experts about how much of an impact heading tags actually have on SEO. You can’t compare their value to things like domain authority or backlinks, but heading tags still play a factor in your search ranking. That’s because they make it easier for search engines to read and interpret your content. If you just have big walls of text without subheaders, it’s going to be difficult for bots to know what your page is about. This can be compared to your overall website architecture as well. Just like your homepage and top-level content have a hierarchy that makes it easy for crawlers to index pages, the heading tags explain the importance of topics on the page. Without headers, you’re relying on search engines to take all of your text at the same face value, which won’t help your search ranking. John Mueller, the senior webmaster trends analyst at Google was quoted saying that Google uses H tags to understand the structure of text on a page. So it’s clear that they provide some SEO value. Furthermore, research from the Hook Agency shows some of the most important factors of on-page SEO.
Two of the top ten factors are related to your heading tags. I’ve found some really great case studies on the web that back up this claim as well. Here’s one of my favorites conducted by Search Eccentric. The study is about a company called Motorcars Ltd. They’ve been in business for over 40 years, but in the digital era, they struggled to rank in search engines for their keywords. After analyzing the website, it was clear that there was plenty that could be improved upon. One of the things that they changed was adding H1 and H2 tags to the site. The purpose of this was to improve the visibility and make the content more SEO friendly; simple, right? Take a look at the results of this tactic. The changes had a huge impact on their search results.
After the heading tags were added, the company held the top ranking spot for two of their targeted keywords. They held a top three position for five of their top keywords. As you can see from the chart, they jumped hundreds of ranking spots. Now, all of this can’t be attributed to the header tags alone. They also removed dead links and fixed some navigation issues. But the heading tags definitely played a huge role in their success. How heading tags impact user experienceIn addition to the SEO benefits of heading tags, adding these to your site will also help improve the user experience. As a result, you’ll get more traffic to your site, frequent repeat visitors, and people will stay on your site for longer stretches of time. This simultaneously adds more SEO value as well. How can heading tags benefit visitors on your website? For starters, it just makes your content cleaner and more organized. 43% of people say that they skim blog posts. You need to make your content easy to skim by adding headers. Take this post you’re reading now as an example. Let’s say you already knew what heading tags were before you started reading. You may not think it’s necessary to read the first section. It would be very easy for you to skip over it because the tags are clear. But if I eliminated all heading tags from the post, it would create a large wall of text that is extremely difficult to read. Here’s an example to show you what I mean.
This content is not scannable, and it’s just one excerpt of several pages in the same format. Now, let’s look at another example, only this time with heading tags used by Conversion XL.
This is much easier to scan, and it’s visually appealing. Now, is it possible to get this same effect just by making the font bigger and bolder? Sure, but why wouldn’t you take advantage of the header tags to get the SEO benefits as well? In case you’re wondering if these are actual heading tags or just larger font, I checked the source code to prove it.
As you can see, they used H2s and H3s for this part of the post. Although it’s not pictured in this screenshot, an H1 tag was used for the title. Heading tags best practicesNow that you know why you need to add heading tags on your website, I’ll go through some of the best practices to follow. Each best practice on my list is going to have a heading tag as well. You’ll see what I mean as you continue reading. Only use one H1 tag per pageH1 tags should be saved for the title. By default, the title of your post should automatically become an H1. But you can view the page source code and the text editor to verify that. If for some reason that’s not the case, you can always add it in yourself. The idea here is that the H1 tag is the most important. Adding more than one will not only be less visually appealing, but it could potentially confuse crawlers when they’re indexing your content. Use natural keywords in headersWhen possible, you’ll always want to have keywords in your headers. However, it’s a common misconception that every heading tag needs to be stuffed with keywords. That’s just not the case. As with all of the content you create, the text needs to be natural and readable. If you can get some keywords in there, that’s great. If not, don’t try to force it. A great resource for finding keywords to put in your headers is Google. Just scroll to the bottom of the page and look for related searches. Let’s say you were writing a blog post about the benefits of yoga. Here’s what those related searches look like.
These keywords could be potential H2s or H3s of your post. You wouldn’t put “benefits of yoga Wikipedia” in one of your headers, because that’s not natural and doesn’t make sense. But things like yoga benefits for men, benefits of yoga in the morning, or how to maximize yoga benefits would all be appropriate. Use heading tags generouslySome people will tell you to use heading tags sparingly, but I think that’s another misconception. I’m not saying you should have them every other line, but use them as you see fit. If a post calls for three, then use three. If it calls for 10 or 20, then use 10 or 20. In most cases, the longer a post is, the more heading tags you can use.
Here’s another quote from John Mueller at Google. He says you can use as many heading tags as you want. Again, I’d still stick with just one H1 tag. But for H2, H3 (and so on), use as many as you need. In most cases, I don’t find it necessary to go beyond H3 or H4. SEO aside, I think that’s too complex for the reader. So find other ways to organize your content instead. You could always use bold or italics to emphasize something, as opposed to getting all the way to H6. ConclusionHeading tags are a subtle, yet powerful, SEO hack. In addition to showcasing important content to search engine crawlers, they also make it easier for website visitors to consume content on your page. I highly recommend adding heading tags to your content. As you can see from this blog, I use them all of the time. So use this post as a reference for implementing heading tags and following the best practices. via Quick Sprout https://www.quicksprout.com/how-to-use-heading-tags-to-get-more-search-engine-traffic/ SEO goes far and beyond keyword research and building backlinks. There is also a technical side of SEO that will largely impact your search ranking. This is an area where your robots.txt file will become a factor. In my experience, most people aren’t too familiar with robots.txt files and don’t know where to begin. That’s what inspired me to create this guide. Let’s start with the basics. What exactly is a robots.txt file?
When a search engine bot is crawling a website, it uses the robots.txt file to determine what parts of the site need to be indexed. Sitemaps are hosted in your root folder and in the robots.txt file. You create a sitemap to make it easier for search engines to index your content. Think of your robots.txt file like a guide or instruction manual for bots. It’s a guide that has rules that they need to follow. These rules will tell crawlers what they’re allowed to view (like the pages on your sitemap) and what parts of your site are restricted. If your robots.txt file isn’t optimized properly, it can cause major SEO problems for your website. That’s why it’s important for you to understand exactly how this works and what you need to do to ensure that this technical component of your website is helping you, as opposed to hurting you. Find your robots.txt fileBefore you do anything, the first step is verifying that you have a robots.txt file to begin with. Some of you probably never came here before. The easiest way to see if your site already has one is by putting your website’s URL into a web browser, followed by /robots.txt. Here’s what it looks like for Quick Sprout.
When you do this, one of three things will happen.
Most of you will likely fall into the top two scenarios. You shouldn’t get a 404 error because the majority of websites will have a robots.txt file setup by default when the site was created. Those default settings should still be there if you’ve never made any changes. To create or edit this file, just navigate to the root folder of your website. Modify your robots.txt contentFor the most part, you normally don’t want to mess around with this too much. It’s not something that you’re going to be altering on a frequent basis. The only reason why you would want to add something to your robots.txt file is if there are certain pages on your website that you don’t want bots to crawl and index. You need to get familiar with the syntax used for commands. So open up a plain text editor to write the syntax. I’ll cover the syntax that’s most commonly used. First, you need to identify the crawlers. This is referred to as the User-agent. User-agent: * This syntax above refers to all search engine crawlers (Google, Yahoo, Bing, etc.) User-agent: Googlebot As the name implies, this value is speaking directly to Google’s crawlers. After you identify the crawler, you can allow or disallow content on your site. Here’s an example that we saw earlier in the Quick Sprout robots.txt file. User-agent: * Disallow: /wp-content/ This page is used for our administrative backend for WordPress. So this command tells all crawlers (User-agent: *) not to crawl that page. There’s no reason for the bots to waste time crawling that. So let’s say you want to tell all bots not to crawl this specific page on your website. http://www.yourwebsite.com/samplepage1/ The syntax would look like this: User-agent: * Disallow: /samplepage1/ Here’s another example: Disallow: /*.gif$ This would block a specific file type (in this case .gif). You can refer to this chart from Google for more common rules and examples.
The concept is very straightforward. If you want to disallow pages, files, or content on your site from all crawlers (or specific crawlers) then you just need to find the proper syntax command and add it to your plain text editor. Once you’ve finished writing the commands, simply copy and paste that into your robots.txt file. Why the robots.txt file needs to be optimizedI know what some of you are thinking. Why in the world would I want to mess around with any of this? Here’s what you need to understand. The purpose of your robots.txt file isn’t to completely block pages or site content from a search engine. Instead, you’re just trying to maximize the efficiency of their crawl budgets. All you’re doing is telling the bots that they don’t need to crawl pages that aren’t made for the public. Here’s a summary of how Google’s crawl budget works. It’s broken down into two parts:
The crawl rate limit represents how many connections a crawler can make to any given site. This also includes the amount of time between fetches. Websites that respond quickly have a higher crawl rate limit, which means they can have more connections with the bot. On the other hand, sites that slow down as the result of crawling will not be crawled as frequently. Sites are also crawled based on demand. This means that popular websites are crawled on a more frequent basis. On the flip side, sites that aren’t popular or updated frequently won’t be crawled as often, even if the crawl rate limit has not been met. By optimizing your robots.txt file, you’re making the job of the crawlers much easier. According to Google, these are some examples of elements that affect crawl budgets:
By using the robots.txt file to disallow this type of content from crawlers, it ensures that they spend more time discovering and indexing the top content on your website. Here’s a visual comparison of sites with and without an optimized robots.txt file.
A search engine crawler will spend more time, and therefore more of the crawl budget, on the left website. But the site on the right ensures that only the top content is being crawled. Here’s a scenario where you’d want to take advantage of the robots.txt file. As I’m sure you know, duplicate content is harmful to SEO. But there are certain times when it’s necessary to have on your website. For example, some of you might have printer-friendly versions of specific pages. That’s duplicate content. So you can tell bots not to crawl that printer-friendly page by optimizing your robots.txt syntax. Testing your robots.txt fileOnce you’ve found, modified, and optimized your robots.txt file, it’s time to test everything to make sure that it’s working properly. In order to do this, you’ll need to sign into your Google Webmasters account. Navigate to “crawl” from your dashboard.
This will expand the menu. Once expanded, you’re going to look for the “robots.txt Tester” option.
Then simply click the “test” button in the bottom right corner of the screen.
If there are any problems, you can just edit the syntax directly in the tester. Continue running the tests until everything is smooth. Be aware that changes made in the tester do not get saved to your website. So you’ll need to make sure you copy and paste any changes into your actual robots.txt file. It’s also worth noting that this tool is only for testing Google bots and crawlers. It won’t be able to predict how other search engines will read your robots.txt file. Considering that Google controls 89.95% of the global search engine market share, I don’t think you need to run these tests using any other tools. But I’ll leave that decision up to you. Robots.txt best practicesYour robots.txt file needs to be named “robots.txt” in order to be found. It’s case-sensitive, meaning Robots.txt or robots.TXT would not be acceptable. The robots.txt file must always be in the root folder of your website in a top-level directory of the host. Anyone can see your robots.txt file. All they need to do is type in the name of your website URL with /robots.txt after the root domain to view it. So don’t use this to be sneaky or deceptive, since it’s essentially public information. For the most part, I wouldn’t recommend making specific rules for different search engine crawlers. I can’t see the benefit of having a certain set of rules for Google, and another set of rules for Bing. It’s much less confusing if your rules apply to all user-agents. Adding a disallow syntax to your robots.txt file won’t prevent that page from being indexed. Instead, you’d have to use a noindex tag. Search engine crawlers are extremely advanced. They essentially view your website content the same way that a real person would. So if your website uses CSS and JS to function, you should not block those folders in your robots.txt file. It will be a major SEO mistake if crawlers can’t see a functioning version of your website. If you want your robots.txt file to be recognized immediately after it’s been updated, submit it directly to Google, rather than waiting for your website to get crawled. Link equity cannot be passed from blocked pages to link destinations. This means that links on pages that are disallowed will be considered nofollow. So some links won’t be indexed unless they’re on other pages that are accessible by search engines. The robots.txt file is not a substitute for blocking private user data and other sensitive information from showing up in your SERPs. As I said before, disallowed pages can still be indexed. So you’ll still need to make sure that these pages are password protected and use a noindex meta directive. Sitemaps should be placed at the bottom of your robots.txt file. ConclusionThat was your crash-course on everything you need to know about robots.txt files. I know that lots of this information was a little technical, but don’t let that intimidate you. The basic concepts and applications of your robots.txt are fairly easy to understand. Remember, this isn’t something that you’ll want to modify too frequently. It’s also extremely important that you test everything out before you save the changes. Make sure that you double and triple-check everything. One error could cause a search engine to stop crawling your site altogether. This would be devastating to your SEO position. So only make changes that are absolutely necessary. When optimized correctly, your website will be crawled efficiently by Google’s crawl budget. This increases the chances that your top content will be noticed, indexed, and ranked accordingly. via Quick Sprout https://www.quicksprout.com/how-to-optimize-your-robots-txt-file/ There are so many different elements of SEO. For the most part, all of these various aspects can be broken down into two main categories; on-page SEO, and off-page SEO. The biggest factor of off-page SEO is backlinks. While on-page SEO is comprised of elements like content copy, title tags, meta descriptions, internal linking, and site architecture. It’s nearly impossible (unless you get extremely lucky) to have a successful on-site SEO strategy without conducting keyword research. There are tons of tools on the web to help you with finding keywords related to your business, but Google Keyword Planner is arguably the most powerful.
The best part about this tool is that it’s completely free for anyone to use. All you need is a Google Ads account. It’s also worth noting that the primary purpose of the Keyword Planner is for PPC advertising. But with that said, you don’t need to spend any money on ads to do your keyword research with this tool. The only thing you won’t be able to access is the exact monthly search volumes for specific keywords. As you’ll learn shortly, you’ll still be able to see an average range, but Google will only show exact volumes when you run an ad campaign. I’m assuming that most of you already have a Google Ads account. If not, it’s very easy to set up. So go ahead and do that as soon as you’re ready to proceed. Then just follow along this guide to learn how you can take full advantage of the Keyword Planner for bringing your SEO strategy to an elevated level. Google Keyword Planner featuresBefore we dive too deep into the specifics, it’s important for you to understand exactly what the Keyword Planner can be used for. As I said before, this tool is designed with PPC ads in mind. So about half of what you’ll see is going to be geared toward running a successful paid search campaign. These are some of the top benefits of Google Keyword Planner:
It’s worth noting that some of these features are only available if you sync your Google Ads account with your Google Analytics account. For our purposes today, we’re going to stick to the features that focus on finding keywords that you can use to improve your on-page SEO strategy. Discover new keywordsThe first thing you should use the Keyword Planner for is finding new keywords. This is very straightforward. Once you know what keywords are related to your site, brand, niche, or a specific campaign, then you’ll be able to use those keywords to improve the content and on-page SEO of your website. So log into your Google Ads account and navigate to the Keyword Planner.
From your Google Ads dashboard, click on the “tools” icon in the top right corner menu bar. This will expand the menu, showcasing an additional five categories. Now select “Keyword Planner” from the planning list on the left side of the expanded menu. Next, you’ll be presented with two options.
For now, just select “find new keywords.”
Next, it’s as simple as entering keywords into a search bar and letting Google take care of the rest for you. Although it seems simple, this is probably the most important step of the entire process. The Keyword Planner tool is extremely advanced, but it can’t provide you with valuable keywords unless your initial search terms lead it in the right direction. A great benefit of this search bar is that it allows you to enter words, phrases, and a URL that’s relevant to your business. To get the most out of your searches, I recommend taking full advantage of the search options at your disposal. Here’s a look at an example of what a search would look like if I was conducting keyword research for content here at Quick Sprout.
As you can see, I used some single words like “SEO,” two-word phrases like “content marketing” or “ecommerce conversions,” and even some three-word phrases like “small business marketing.” I also included a link to the Quick Sprout homepage to give the tool a better understanding of the content related to our site. This is much better than just adding “marketing” to the search bar without adding anything else. Analyze the search resultsOnce you begin your initial search, you’re going to get lots of information thrown at you. Do not be overwhelmed or intimidated by this. We’ll eventually narrow down the results. Again, if you’re not planning to run any PPC campaigns, you can ignore some of this data. First, let me show you how to read and interpret the results.
There’s a couple of things I want to point out right away. The Keyword Planner generated 4,403 keyword ideas based on my initial search. By default, the results that you’re going to see are based on the last twelve months of search data. But you can play around with that to see how the data changes if you view those keywords over a longer or shorter period of time. Before you get new keyword ideas, the Keyword Planner shows you results for what you’ve already searched for. The only columns you’re going to want to look at are average monthly searches and competition. Ad impression share, top of page bids, and account status are all for pad ad campaigns. As you can see, the average monthly search ranges are pretty broad. For example, it says that the search range for “SEO” is from 100,000 to 1 million. There is a big difference between 150,000 searches and 950,000 searches, which both fall into that range. But the only way to get the exact data is by running an ad. The competition data is crucial. High competition keywords are going to be more challenging to rank for since more people are running paid ads for these words and phrases. But maybe you can try to gain an advantage over your competitors by taking steps to outrank them organically. Some of you might have more success with low competition keywords. It all depends on your priority and the keywords in question. By looking at the search results above, the term “social media marketing” has a high competition level, while “link building” is low. Let’s keep this information in mind as we continue. Now it’s time to analyze the keyword ideas based on the keywords that we searched for.
Here are the top 12 keyword ideas, sorted by keyword relevance. I highlighted some of the suggestions to give you an idea of how you should be approaching this process. All of the keywords on the list are useful and worth incorporating into your content. But you need to find ways to prioritize them. Low competition keywords with high search volumes might seem like the easiest for you to rank for. But it doesn’t always work out that way. For example, look at the data for “social media.” It has a high search volume and low competition, so it must be a home run—right? Not necessarily. Since that topic is so broad, it will be tough to rank for. That’s probably why people aren’t spending money on PPC campaigns to rank for that term. On the flip side, “social media manager” at the bottom of the screenshot has a high search volume and high competition level, making it a challenging keyword to rank for. Now let’s take a look at the keyword ideas that I boxed.
Both of these have high search volumes and medium competition levels. Ranking organically for these keywords won’t necessarily be easy, but it’s definitely not impossible. Even though a term like “web marketing” has a lower search volume, it’s still in that 1,000 – 10,000 range, and has low competition. I boxed that as well because it’s related to the two other terms we’re discussing. You could potentially use these three terms to conduct a new search that’s more specific. But we’ll get into that shortly. Before you get into anything more complex, you should experiment with filtering the results. Organize the keyword ideas by low competition, high competition, low search volume, and high search volume. Narrow your searchNow that you’ve taken some time to sort your list of keywords, you’ve probably realized that 4,400+ keywords are too much. Lots of these keywords won’t be used by you. So you’ll want to narrow the results to make sure that you’re only seeing ones that are the most relevant, and will actually benefit your SEO strategy. The easiest way to do this right away is by changing one of the filters from “broadly related ideas” to “closely related ideas.”
As you can see, this filter alone cut the search results in half. So scroll through and get more keyword ideas using the new results. Use the keywords on this list to help you create new searches that are highly relevant. Refer back to what I did earlier. I took SEO company, digital marketing agency, and web marketing from that initial list of ideas. Here’s what the search results look like for those keywords combined with the Quick Sprout URL.
Those new terms combined with the closely related filter yielded 296 keyword ideas. This list is much more reasonable for you to manage. As I mentioned earlier, you can also narrow your results by locations, language, and search networks. For example, let’s say you have a local business that has retail locations scattered across New England. You don’t need to get data on the entire United States.
Instead, you can just focus on those six states in New England. With that said, this feature is definitely more beneficial for those of you who will ultimately run PPC campaigns. In this case, you can choose to only target users who are searching in that region. But it’s still worth seeing how the competition and search volume changes if you adjust the location. With each list of ideas, you can download the information as an excel spreadsheet as well. In my opinion, this makes it easier for you to keep notes and organize the data in a way that aligns with your SEO plan and content strategy.
Just look for the “download keyword ideas” button at the top right corner of each page. View keyword forecastsHead back to the main keyword planner page that we landed on earlier. Only this time, we’re going to select the other option; get search volume and forecasts.
We previously saw the search volume when we were discovering new keywords. It showed us data from the past 12 months. Maybe you changed around the date range and saw something different. While the Keyword Planner tool won’t show you projected search volumes for the future, it will show you a forecast for your keywords if you decide to run a PPC campaign. Based on those three keywords that we looked at most recently, Google projects that a PPC campaign would get 20,000 impressions and 280 clicks for $580 per month. The average search position would be #3. This is not an ideal forecast. But it’s not awful either. Personally, I wouldn’t proceed with it. But this decision is completely up to you. You can use this tool to give you a better idea of how certain keywords will perform. If you can find a way to get 20,000 monthly impressions organically using these keywords, it will be better than paying for it. But you might see forecasts that are worth pursuing based on the keywords, projections, and the budget that you’re willing to allocate for paid keywords. ConclusionNow that you have your list of keywords, it’s time to enhance your website’s on-page SEO. Decide which keywords you want to prioritize, and then produce content that will help you rank for those terms. Write blog posts and guides. Create images, videos, and infographics. Produce content that’s a combination of these. Focus on your title tags, header tags, and internal linking with exact-match keywords. You can refer to my complete guide on SEO for more information on how to do this. There’s a section in here for on-site SEO that will help you out tremendously. Start experimenting with Google Keyword Planner. Since it’s free to use, it can’t hurt to try. Once you get familiar with navigating and searching, you can use this guide as a reference to help you find keywords that will be easier to rank for. via Quick Sprout https://www.quicksprout.com/how-to-use-google-keyword-planning-tool/ In the past, I’ve shown you how to build links and traffic from link roundups. This strategy involves creating content that will get featured in a weekly or monthly roundup post on other websites. Now I’m going to teach you how to create an expert roundup. What’s the difference between these two? Rather than trying to get your link featured on another site’s roundup post, you’re going to create content on your own website using expert opinions. At the end of the day, this will have similar advantages to getting featured on a link roundup. Creating expert roundups will still help you build backlinks, boost your website traffic, and add plenty of SEO value. Why are expert roundup posts so great?
Here’s the thing. Not all of you have a well-known name or platform, especially if you’re just starting out as a blogger. That’s OK. We’ve all been there. I’m not saying this to sound rude or harsh, but why should someone take your advice? You might know what you’re talking about, but nobody knows that. If you’re an up and coming blogger, getting experts featured on your blog will give people a reason to visit your site and consume your content. Here’s an analogy. Let’s say you’re an avid golfer and you want to start giving people golf lessons. But if nobody knows who you are, they have no reason to listen to you, even if you’re offering excellent tips and advice. Now let’s say you can get Tiger Woods to attend one of your golf camps. People will definitely listen to him since he’s a household name and arguably the best golfer on the planet. His presence at your golf lessons will get people to come and ultimately validate your legitimacy. You’ll get even more exposure if Tiger Woods promotes your golf lessons by telling people that he’ll be there. You can apply this same analogy to your blog posts. Only instead of one expert, you’re going to get dozens to share their opinions. So how do find these experts and get them to participate? I’ll explain everything you need to know in this guide. Why expert roundup posts are so effectiveLet me take a minute here to reverse the roles for a second. Hypothetically speaking, pretend a blogger reached out to you to participate in their expert roundup. They value your opinion and want to share it on their website. When their post gets published, you’d share it—right? Absolutely. These posts get a ton of traffic since the experts who are part of the roundup will eventually share the content as well. Here’s an example from the Small Business Ideas Blog.
Brian Liang wrote created this post about blog promotion, which is ironically related to the topic that we’re discussing right now. He got 40 experts to share their marketing advice. All he did was ask them one simple question. What can bloggers and marketers do to be more effective when promoting their content? This is a question that so many people can relate to, and will be eager to hear the advice of experts in the industry. All different types of experts answered the question.
By getting people from different niches to participate, it increases the exposure even more. So, how did this post perform? Check out this information from the backlink checker at Ahrefs.
It has 342 backlinks from 95 referring domains. If you look back to the first screenshot of the blog itself, you can see that it has more than 4,000 social media shares as well. Expert roundups generate a ton of traffic. That’s because everyone who participates will, at the very least, throw the link up on their social media platforms. As an industry expert, they most likely have large social followings. You might even get backlinks and your link shared with their email subscribers. Since a roundup that contains insight from a wide range of experts is such a valuable piece of content, it has a greater chance of being shared by other people as well, even if they weren’t one of the contributors. It might even end up on a link roundup. Expert roundups validate your website and build brand awareness. The fact that all of these experts were willing to participate and be part of something on your website shows a lot about who you are. Industry leaders won’t do this for just any average Joe. Plus, the backlinks you’ll get from major websites will boost your domain authority. Roundup posts help you build strong bonds and relationships with influencers. This is a great networking opportunity for you. These experts are building links with your roundup. Whenever you introduce an expert, it’s common practice to say who they are with a link to their website. So they benefit from the exposure as well. They might even ask you to write a guest post for their website or something like that in the future. Another top benefit of a roundup post is that it adds a new perspective to your content. You get to switch it up instead of publishing the same thing over and over again. Find industry expertsObviously, you can’t write an expert roundup without the help of experts. Don’t expect these people to come to you and say, “Hey! On the off chance that you create an expert roundup, I’d love to be included in it.” That’s unrealistic. Instead, you need to get out there and find them. The easiest way to do this is by looking for other expert roundup posts. So use Google to your advantage. I’ll give you an example. Let’s say you want to create a roundup about blogging mistakes. Just run a search for something along the lines of “blogging mistakes expert roundup.” Here’s one of the top results.
19 blogging experts talk about their mistakes in this post. There is a table of contents that includes a list of the bloggers and the amount of money that their blog generates each month.
Use this list as a resource. It’s up to you to prioritize which experts you want to contact. You could just make a list of all of them, or go for the big ones who make $50k, $100k, or $400k per month. Creating a spreadsheet is the best way to stay organized. The list should include:
In the status column, you’d put notes like, “Sent email on 5/14 — waiting for reply,” or something like that. Don’t stop building your list of experts with just one post. Here’s another top post from that same Google search.
This similar blog shares the opinions of 17 experts. So between these two posts alone, you’ve got 36 potential experts to reach out to. Continue adding to the list. Eventually, you’re going to narrow it down. Don’t just take their “expert” label at face value. You need to check out their websites, credentials, and metrics like domain authority. Look at how frequently they publish content. View their social media pages to see if they’re willing to share content from other websites. Make sure they’re a good writer and have a strong following. If you see someone on your list that’s an expert, but they don’t have lots of social media followers, don’t publish content frequently, and have a site with a low domain authority, you don’t need to prioritize them. You may ultimately decide not to reach out to them or include them in your roundup. Send your pitchOnce you have your list of experts compiled, it’s just a matter of finding their contact information, which should be pretty straightforward. Rather than just submitting a general inquiry on a website form, it’s always better to try and get their personal email address. For example, we’ll look at Adam Connell from Blogging Wizard as an example, since he was the first expert in the post that we were just talked about. I went to his website and navigated to the contact page.
This page shows an email address. Normally, I wouldn’t like that because it’s so general. However, since this is Adam’s website, I’m confident that he’ll receive the message. The page also states that all email inquiries need to start with “Hey Adam” to ensure it’s not a spam message. As you can see from this page, you could also reach out to him via social media. Your outreach messages should be very concise. For this example, you could say something like: Hey Adam! I’m doing an expert roundup post on my website [link to website] about blogging. Could you please answer this question for me? “What was the biggest struggle or hurdle that you had to overcome as a blogger?” Thanks in advance for the help. I really appreciate it! I’ll include your name, brief bio, and a link to your website in the roundup as well. After you send the message, update your spreadsheet with notes so you can keep track of managing your communication with all of these people. Don’t go overboard and ask them for more than they’ll be willing to deliver. As you can see from the example, all I did was ask one question. So the response can be as long or as short as he’d like it to be. If you ask an expert to send you a 2,500-word case study, don’t expect a response. Follow-up with emails if you haven’t heard back after a week. Hey! I know you’re busy but I just wanted to follow up with you on this question again. Do you have a rough idea for when you’ll be able to answer? No rush. I just want to plan accordingly. Thank you! A follow-up message like this increases the chances that they’ll participate. Top elements of an expert roundupNow that you’ve reached out to the top experts in your niche, it’s time to go through their responses and start writing your roundup post. If you want the post to be successful, it needs to have the following elements: A great questionThe responses given by the experts will only be as good as the question you ask them. If you ask them a yes or no question, don’t expect a high-quality response. On the flip side, if you ask for their life story, it’s going to be too long and unappealing to the readers. Instead, look for questions that will actually add value and help people who are looking for insight. Review blog comments, forums, and Google related search suggestions to get inspiration for crafting the perfect question. Epic headlineDon’t make your expert roundup to sound like an average “how-to” post or guide. Let everyone know that this post is different. Here’s an example of a roundup written by Ian Blair at BuildFire.
The title is great because it’s very clear. Readers know they’re getting advice from 32 different experts. They also know exactly what the post is going to be about. For more assistance with this, check out my guide on writing attention-grabbing headlines that convert. Skimmable headersExpert roundups are long. So you need to make sure the post is formatted properly so it’s easy for readers to navigate. Let’s say your blog has 25 experts answering a question. Realistically, people aren’t going to read all 25 responses. Your headers need to be clear so that anyone can scroll through and view the answers from specific experts. Quality imagesImages are another great way to break up the content and make your blog more reader-friendly. Consider using a picture of each expert with their name and bio. We saw this with one of our example posts earlier. PromotionYour work isn’t done once the roundup has been published. Now it’s time to make sure that the post performs at a high level. For starters, you’ll want to share it on all of your distribution channels (as with all of your blog posts). But you’ll also want to make sure the experts in your post do the same thing. Don’t expect these participants to be refreshing your website every day waiting for the post to go live. Let them know that the post has been published and send them a link. The best way to do this is with a “thank you” message. You might also want to consider asking top experts for an exclusive interview. This type of content can be used for your YouTube channel or podcast. Plus, it strengthens your relationship with them and increases the chances that they’ll consider you for guest posting opportunities. ConclusionExpert roundups and link roundups are not the same things. However, both of these strategies can help you drive traffic to your website, build backlinks, improve brand awareness, and increase your authority. In my experience, experts are willing to participate in these roundups because they get increased exposure as well. So it’s a win-win scenario for everyone involved. You just need to make sure that you find the right experts, ask them the right question, and promote the blog properly to ensure that it performs at the highest possible level. So keep this guide as a reference for creating epic expert roundup blog posts on your website. via Quick Sprout https://www.quicksprout.com/how-to-create-an-expert-roundup-blog-post/ The most extensive and comprehensive introduction to online marketing that you’ll find anywhere.
1. Be Laser Focused on Your Customers
Your customers, prospects, and partners are the lifeblood of of your business. You need to build your marketing strategy around them. Step 1 of marketing is understanding what your customers want, which can be challenging when you’re dealing with such a diverse audience. This guide will walk you through (1) the process of building personal connections at scale and (2) crafting customer value propositions that funnel back to ROI for your company. Get Started 2. Build Your Marketing Framework
Mediocre marketers think in terms of campaigns. Great marketers think in terms of growth frameworks. Learn how to position your marketing strategy into a sustainable, ROI-positive revenue engine for your brand. Gone are the days of shallow branding. Leverage metrics to build a solid revenue stream. Get Started 3. Develop Your Brand’s Story
When people spend money, they’re thinking with both their rational and emotional brains. The most effective marketing frameworks appeal to both. Storytelling is one of the most powerful tools that your company can wield to build customer connections. This guide will walk you through the mechanics of cultivating your company’s story. Get Started 4. Get ‘Em to Your Site: Foundations of Traffic Acquisition
You can have the most amazing web storefront, blog, or product in the world, but if you’re not getting traffic, your business’s growth strategy will fall flat. This post will walk you through some of the most common free and paid traffic acquisition frameworks for bringing visitors to your website. Get Started 5. Get the Plumbing Right: Foundations of Conversion Optimization
Traffic acquisition is only half the marketing equation. You need to invest the time in building a strategy for driving sales. Conversion optimization is the practice of (1) converting first-time visitors into customers and (2) converting first-time customers into repeat buyers. This post will teach you how. Get Started 6. Build Audience Connections with Content Marketing
Content marketing is more than just blogging. When executed correctly, content including articles, guides (like this one), webinars, and videos can be powerful growth drivers for your business. Focus on building trust and producing amazing quality. And most of all, make sure that you’re capturing the right metrics. Create content to generate ROI. Measure the right results. This guide will teach you how. Get Started 7. Find Customers with Paid Channel Advertising
Paid channel marketing is something you’ve probably come across in some form or another. Other names for this topic include Search Engine Marketing (SEM), online advertising, or pay-per-click (PPC) marketing. Very often, marketers use these terms interchangeably to describe the same concept — traffic purchased through online ads. Marketers frequently shy away from this technique because it costs money. This perspective will put you at a significant disadvantage. It’s not uncommon for companies to run PPC campaigns with uncapped budgets. Why? Because you should be generating an ROI anyway. This post walks through the basics of how. Get Started 8. Amplify 1:1 Connections with Email Marketing
Email marketing has a bad rap. Why? Because in the majority of cases, it’s spammy. When executed correctly, email marketing can be incredibly powerful. The trick is to prioritize the human-to-human connection above the sale. Balance automation with a personal touch. This post will teach you how. Get Started 9. Drive Incremental Sales Through Affiliate Marketing
It’s hard to believe that the Internet is now multiple decades old. Affiliate marketing has been around since the earliest days of online marketing. It’s a great solution for businesses that are risk-averse or don’t have the budget to spend on upfront marketing costs. Use affiliate marketing to build a new revenue stream for your ecommerce or B2B business. Get Started 10. Get Found with SEO
Search engines are a powerful channel for connecting with new audiences. Companies like Google and Bing look to connect their customers with the best user experience possible. Step one of a strong SEO strategy is to make sure that your website content and products are the best that they can be. Step 2 is to communicate that user experience information to search engines so that you rank in the right place. SEO is competitive and has a reputation of being a black art. Here’s how to get started the right way. Get Started 11. Get the Word Out with PR
You’ve launched an amazing product or service. Now what? Now, you need to get the word out. When done well, good PR can be much more effective and less expensive than advertising. Regardless of whether you want to hire a fancy agency or awesome consultant, make sure that you know what you’re doing and what types of ROI to expect. Relationships are the heart and soul of PR. This guide will teach you how to ignore the noise and focus on substantive, measurable results. Get Started 12. Launch Your Social Strategy
Your social media strategy is more than just a Facebook profile or Twitter feed. When executed correctly, social media is a powerful customer engagement engine and web traffic driver. It’s easy to get sucked into the hype and create profiles on every single social site. This is the wrong approach. What you should do instead is to focus on a few key channels where your brand is most likely to reach key customers and prospects. This post will teach you how to make that judgment call. Get Started 13. A Quick Note on Mobile
Most businesses aren’t optimized for the mobile web, and that’s a problem. We operate in a cross-platform world. Smartphones and tablets are taking over. If you’re not optimizing your site for mobile visitors, you are likely losing money. Learn how to craft a data-driven mobile approach. This guide will help you learn the ropes. Get Started via Quick Sprout https://www.quicksprout.com/the-beginners-guide-to-online-marketing/ There’s no ranking factor more important than links. If you want to rank, you need to have lots of links pointing back to your website. As simple as it sounds, a link is not a link. There are variables, such as: relevancy and authority. We have over 30 guides that will help you master link building. General Link Building GuidesLearn the basics. This is the best place to start if you are new at building links. How Many Links Should You Build to Your Website? A Step by Step Guide to Modern Broken Link Building How to Create a Link-Building Strategy from Scratch What Is a “Good Link Profile” and How Do You Get One? 7 Link Building Mistakes You Ought to Avoid 7 Ways to Make Your Brand and Content More Likable How to Combine PR with SEO for the Biggest Success Types of Content That Attract The Most Backlinks The Quest For The Perfect Link Outreach GuidesThe Link Builder’s Guide to Email Outreach 7 Reasons Your Outreach Emails Aren’t Getting Responses and How to Fix That Tactical Link Building GuidesThe Guide to Link Building Techniques 4 Ways to Boost the Conversion Rates of Your Link Building How to Leverage Link Blending and Stage 2 Link Building to Maximize Your Rankings 7 Lessons Learned from Publishing 300 Guest Posts Relationship-Based Link Building Guide Advanced ScrapeBox Link Building Guide .Edu and .Gov Link Building Guide A Guide to Turning Images Into Links Advanced Link Building GuidesHow to Get Backlinks: The Complete Guide A Thirty-Day Plan for Gaining 100 Authoritative and Relevant Backlinks to Your New Website The Ultimate Guide to Content Link Building How I Built 826 Backlinks to a Single Article in 8 Weeks Here’s the Process to Help You Consistently Build 7 Backlinks a Week The Ultimate Guide to Guest Posting in 2019 via Quick Sprout https://www.quicksprout.com/link-building/ |

Sean BrianWhile radishes deter certain insects naturally, they require similar growing conditions as carrots. Although the crops both have roots, radishes grow and germinate quicker, allowing carrots to continue growing in the soil space available when the radishes are harvested, Archives
April 2023
Categories |
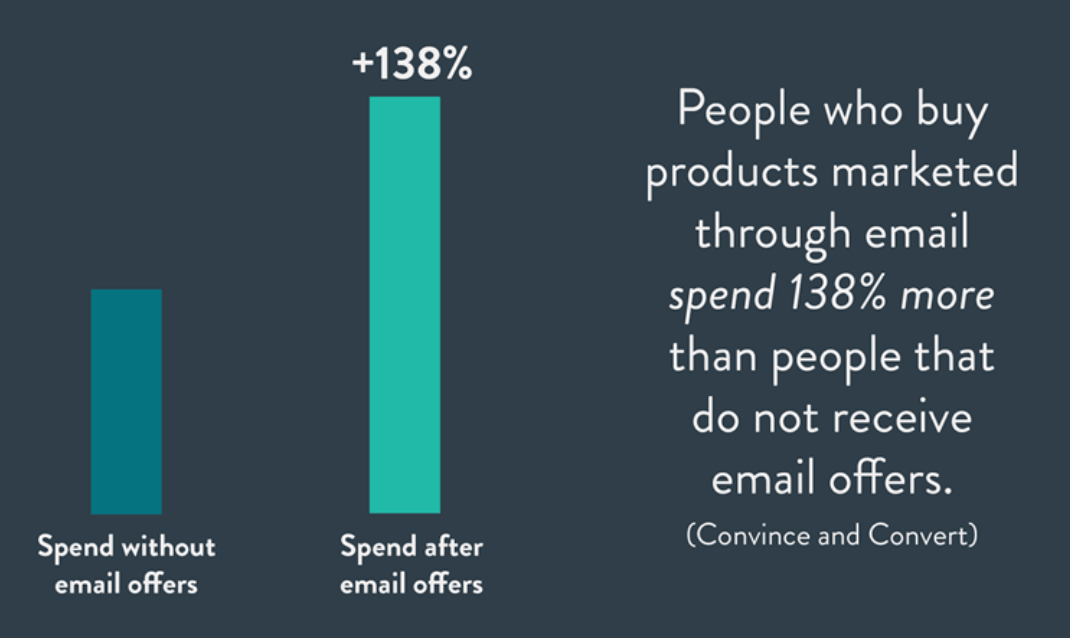
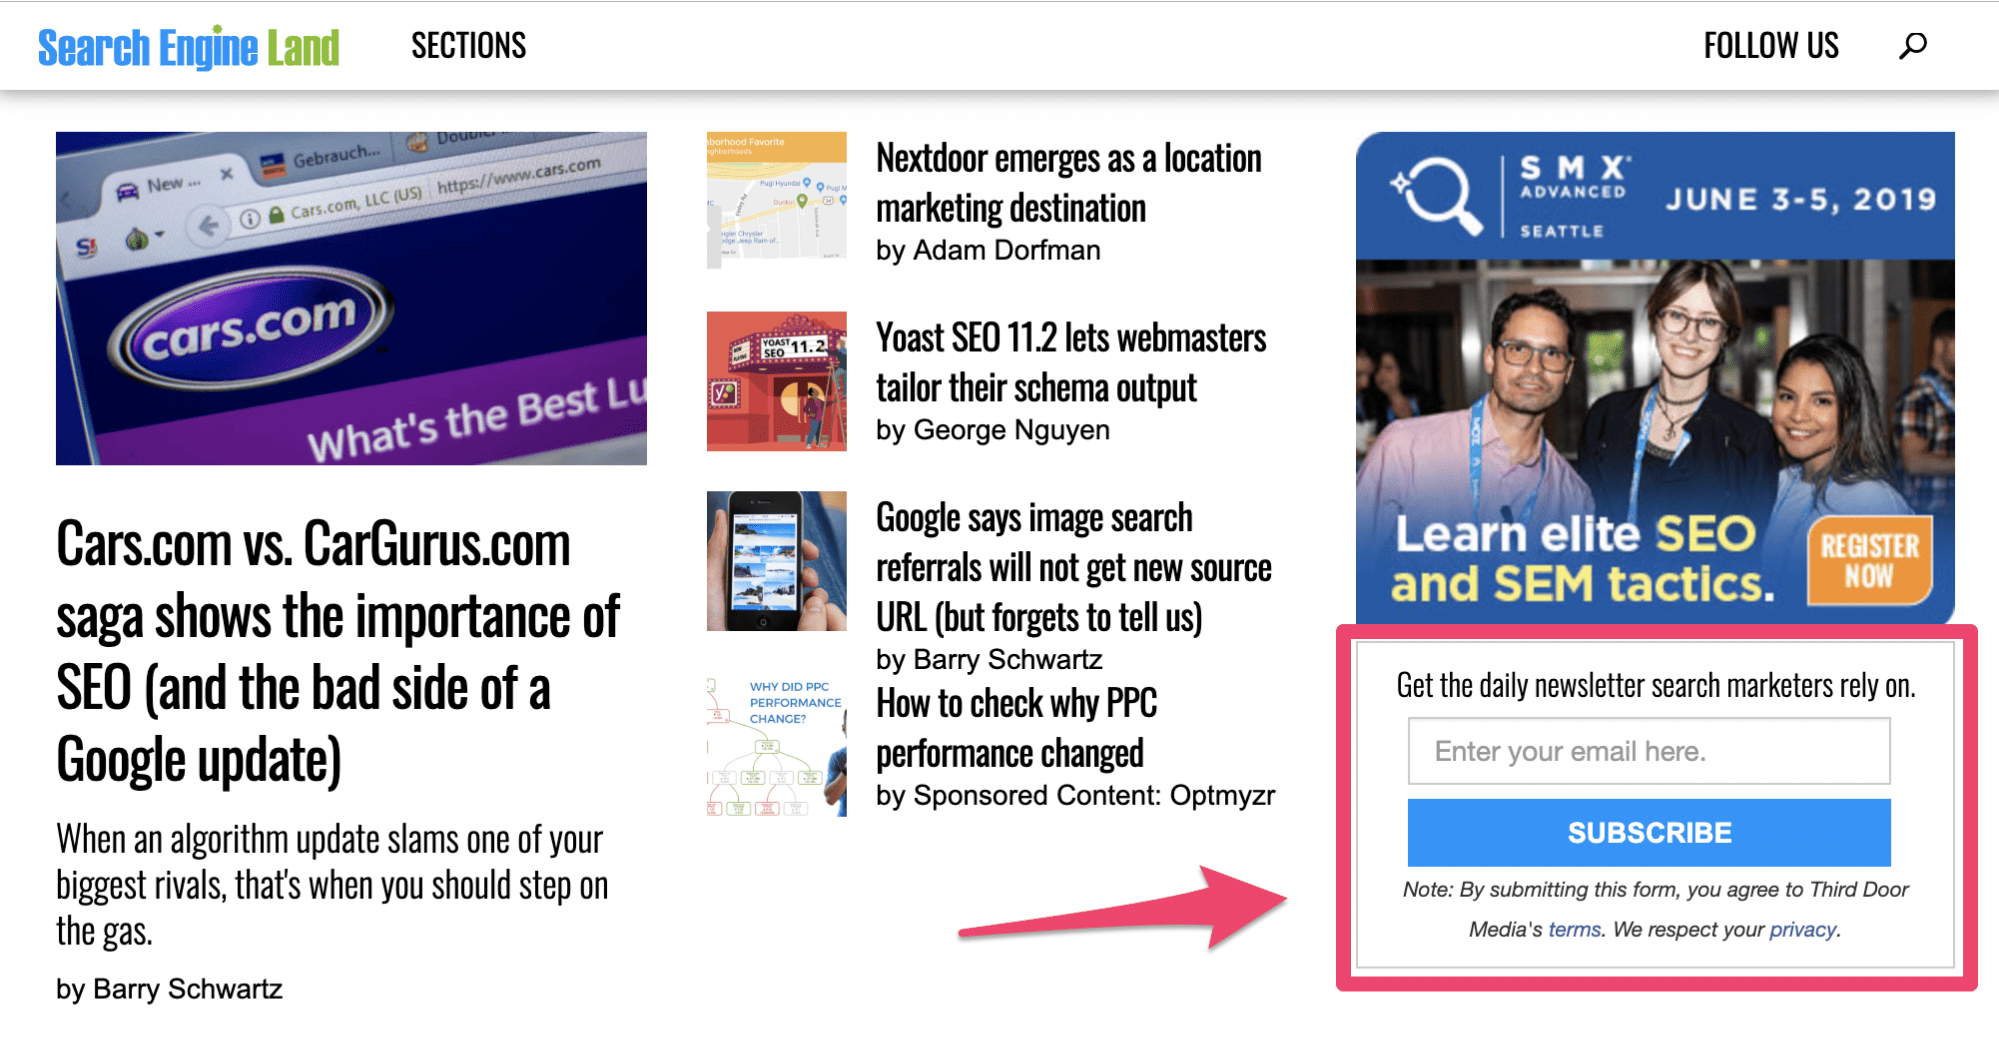
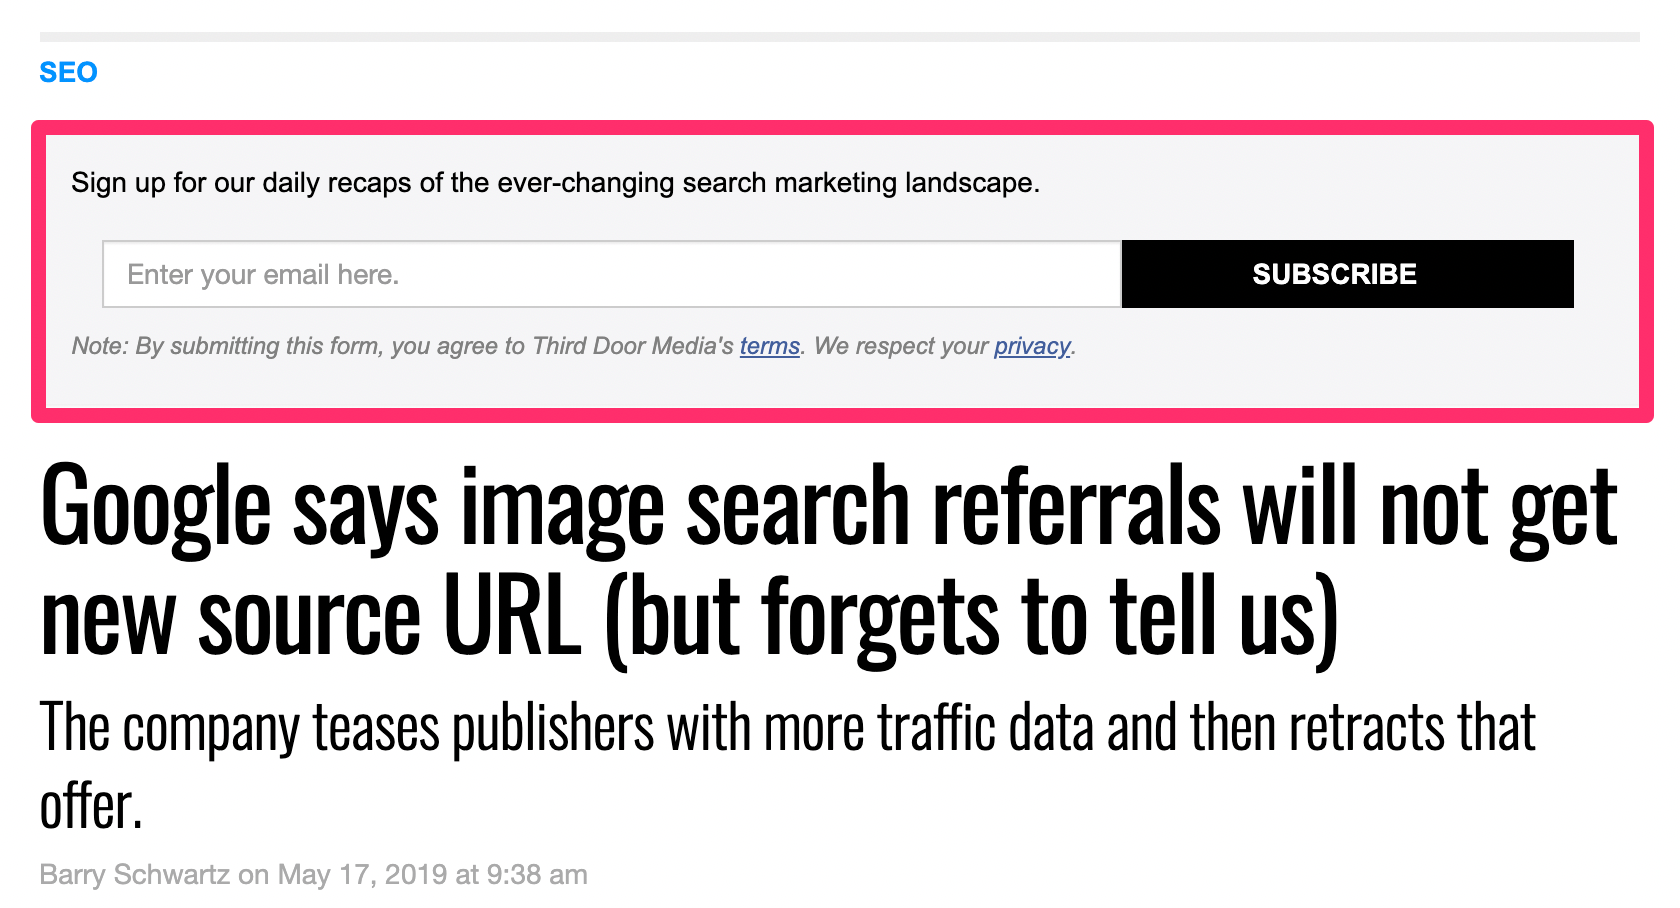
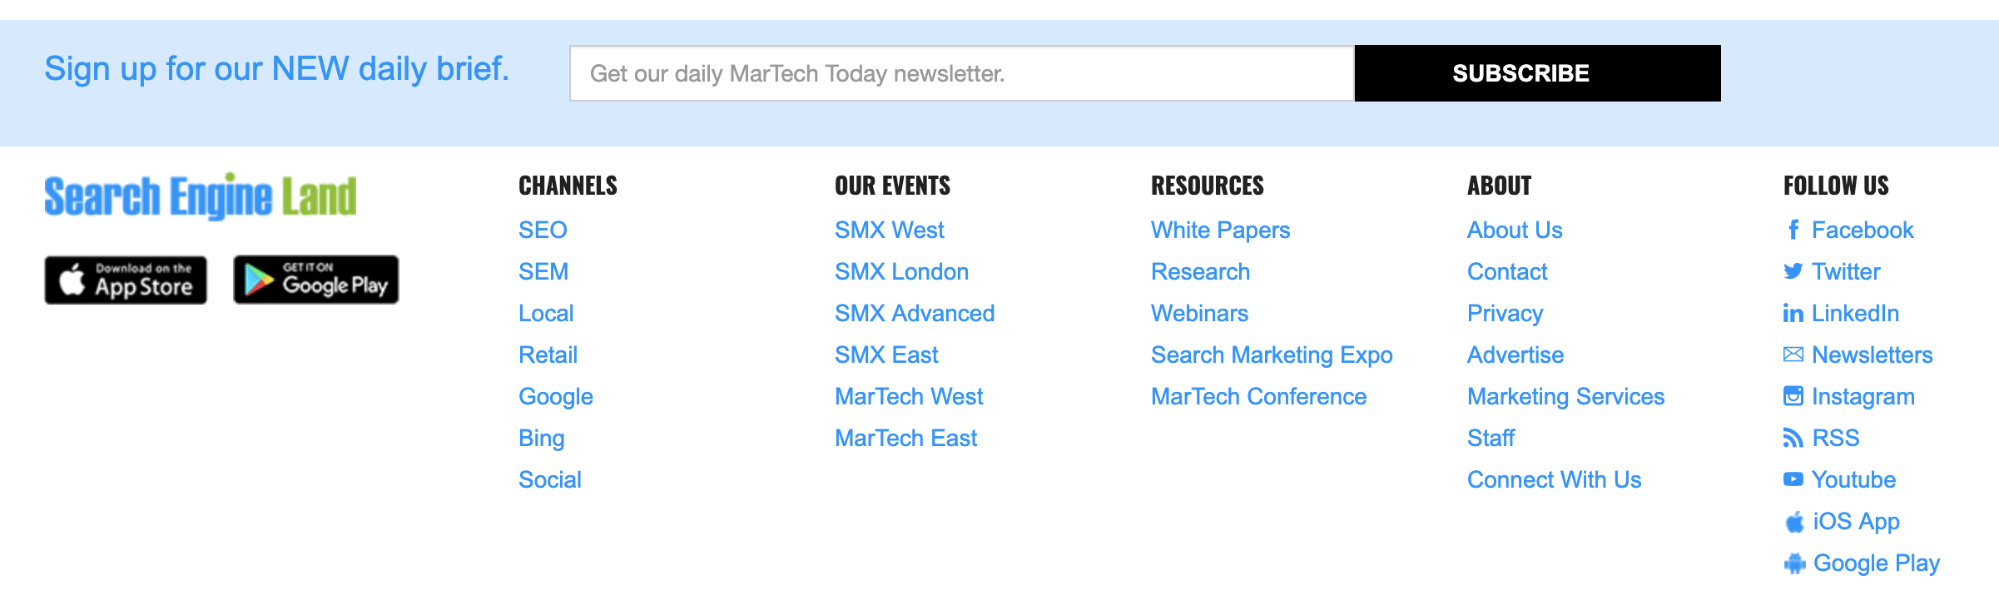
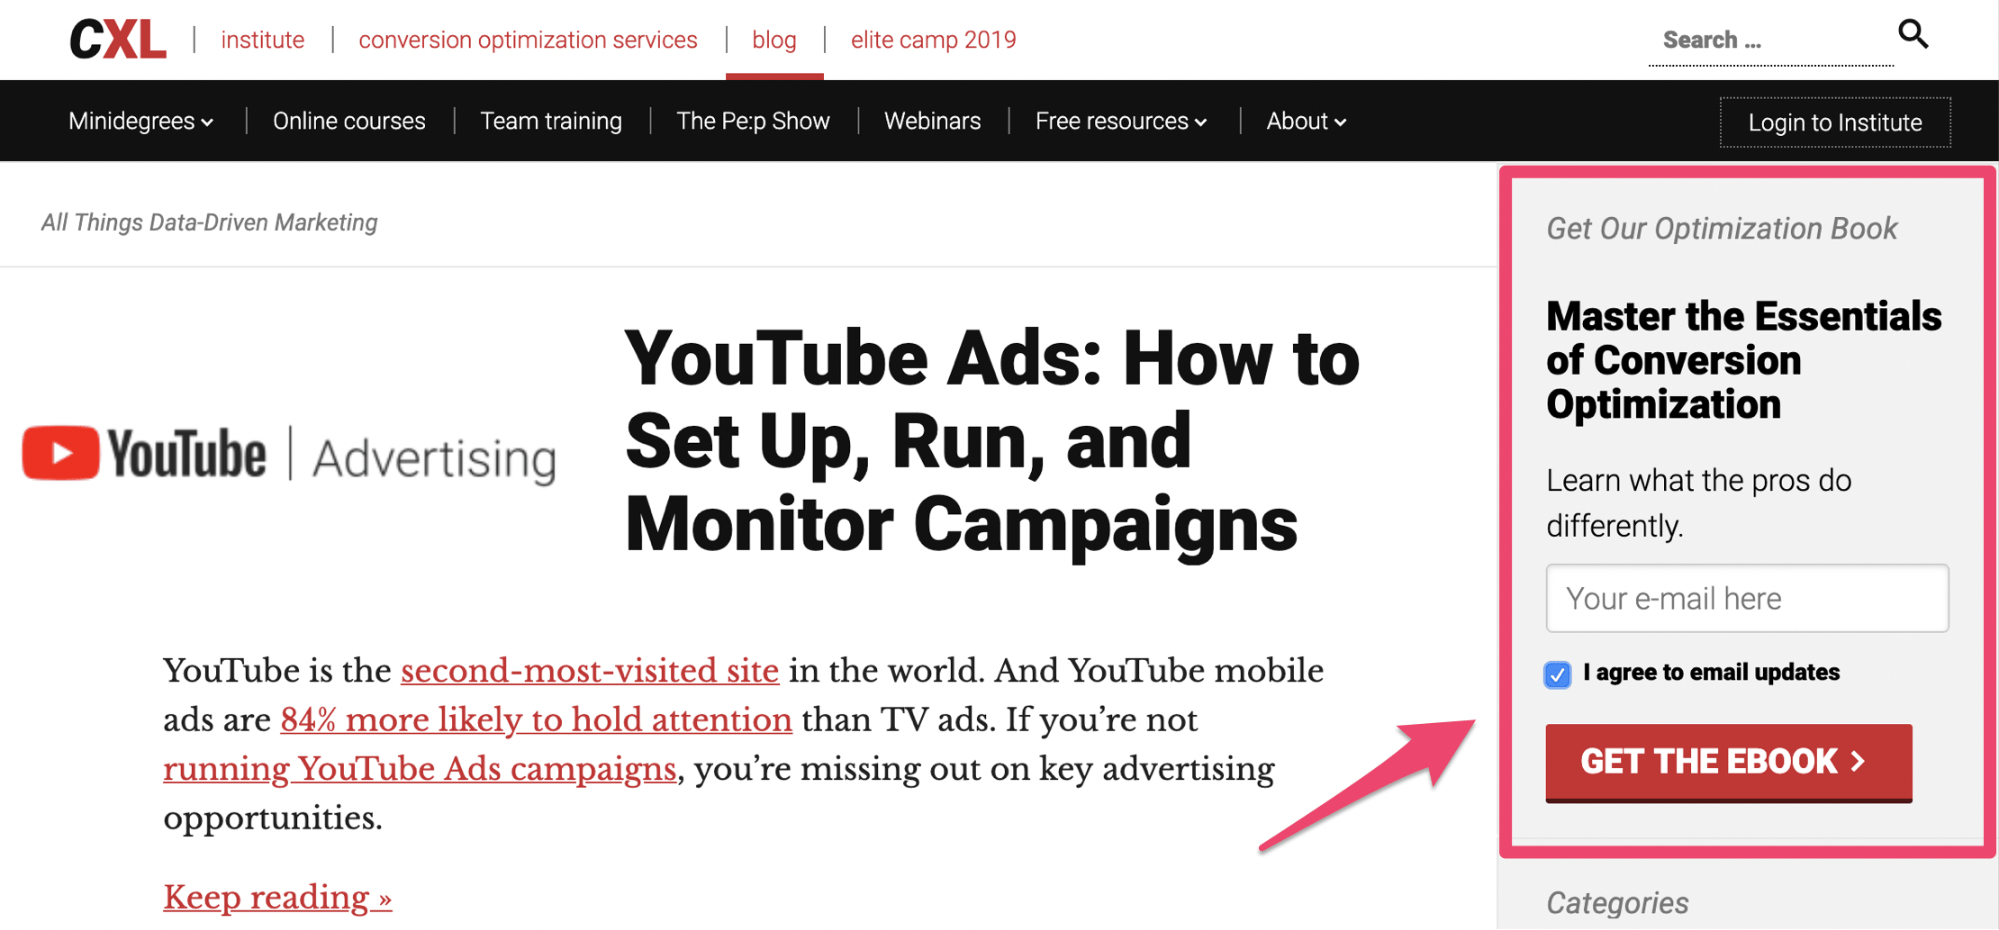
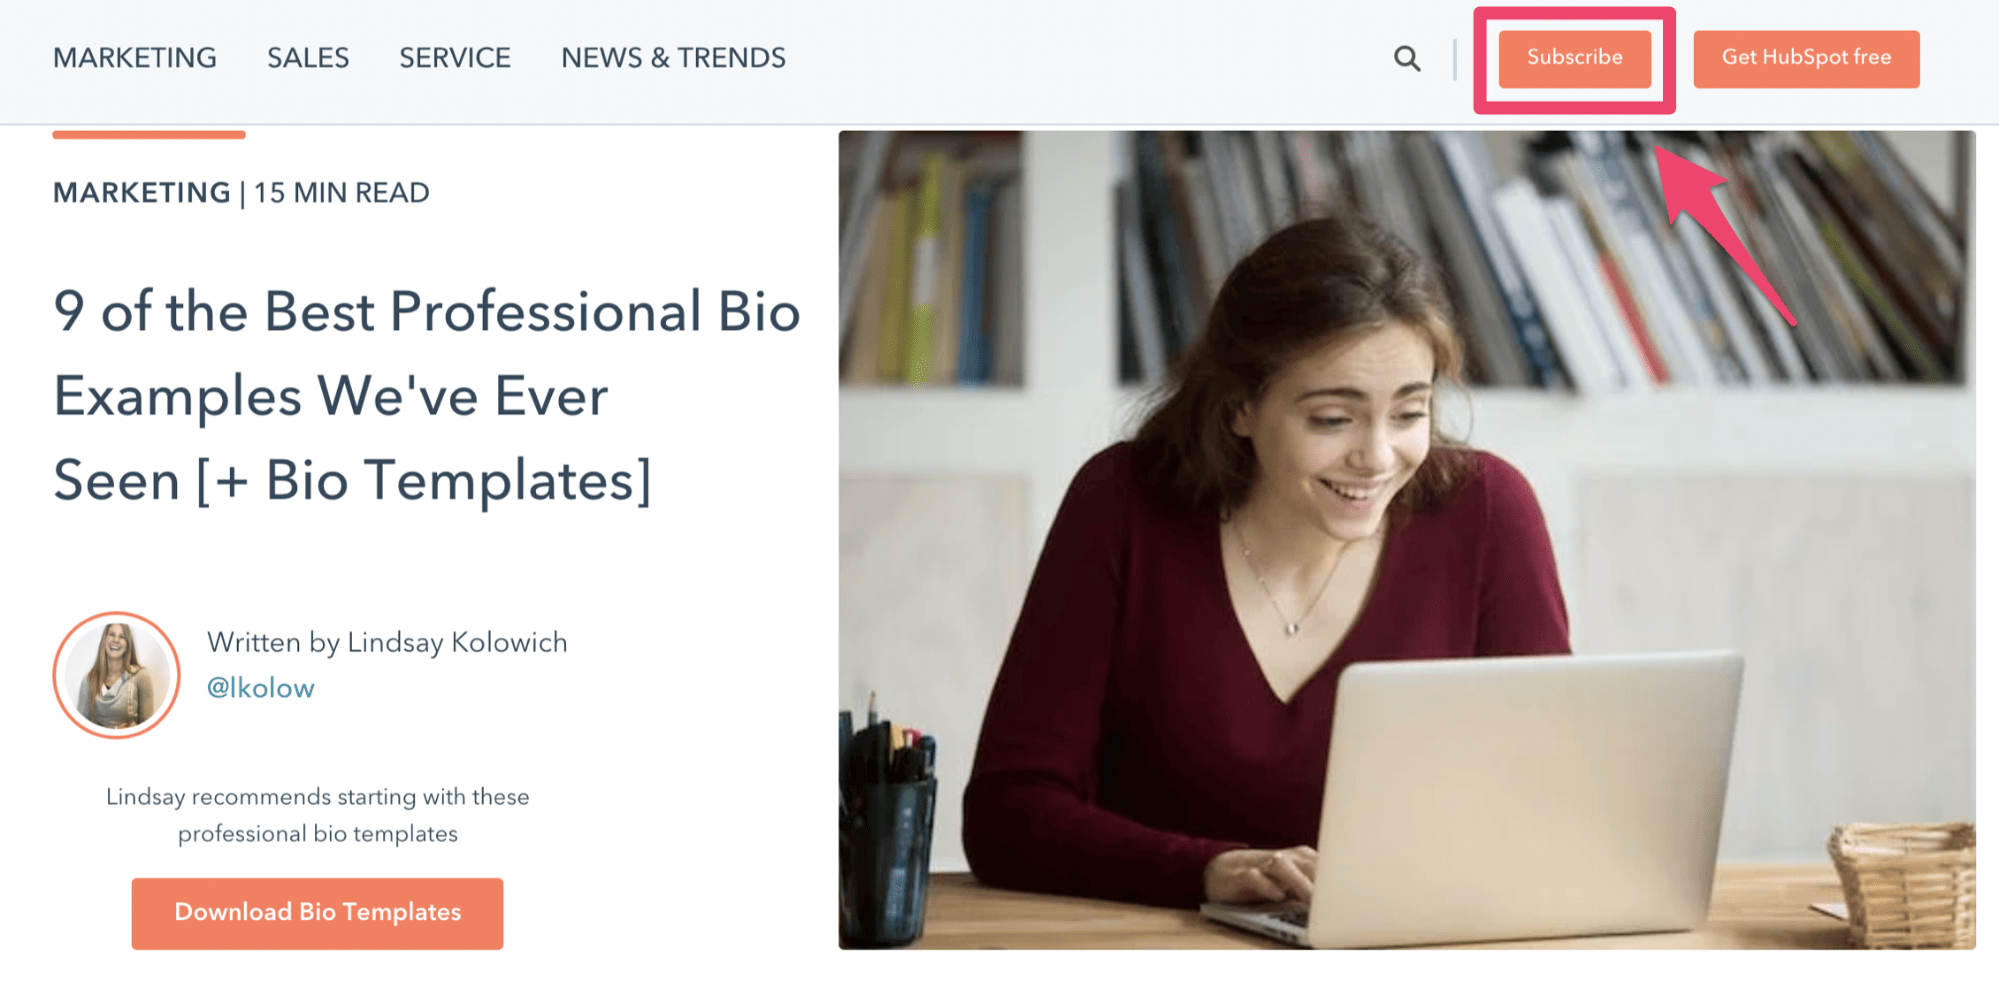


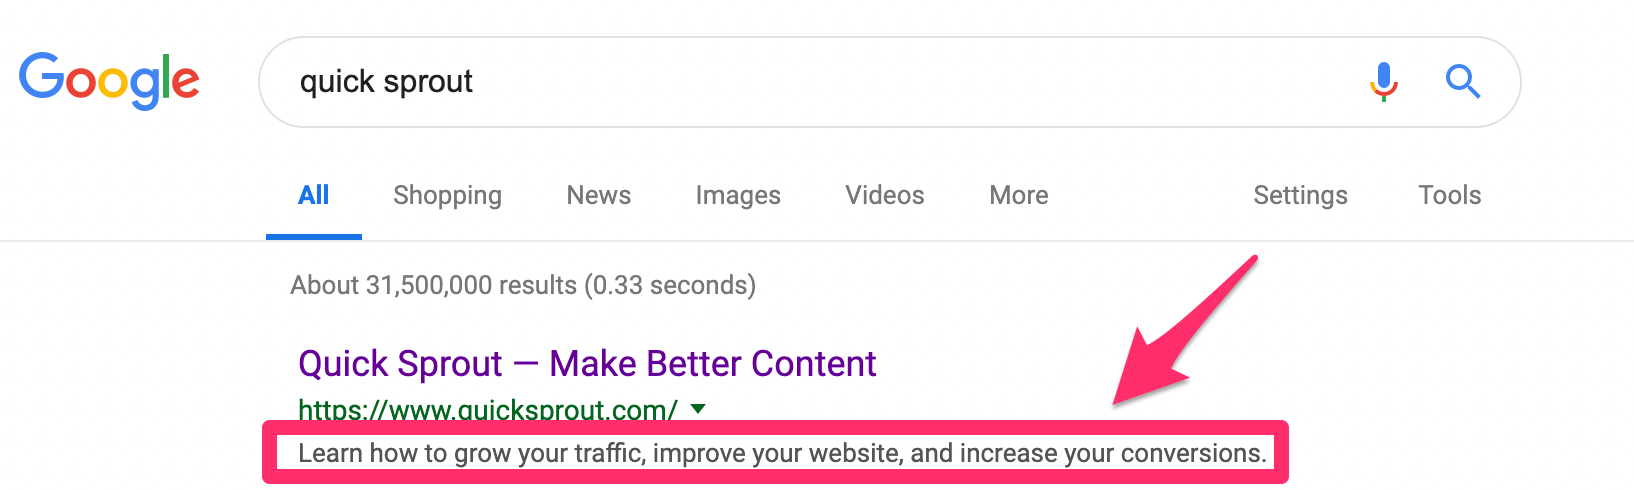
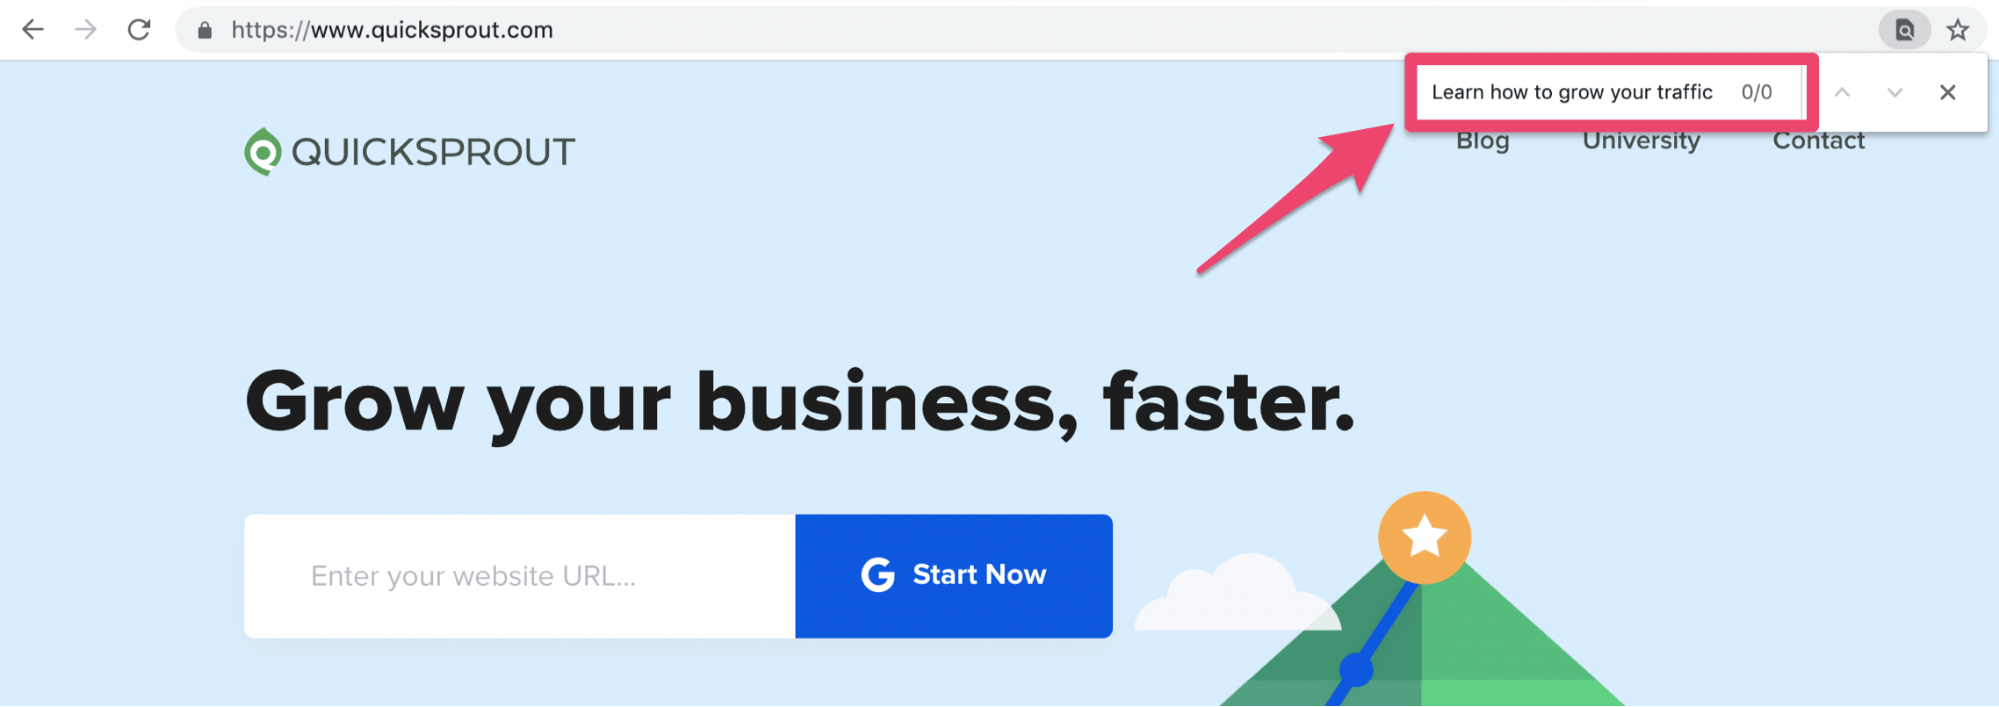
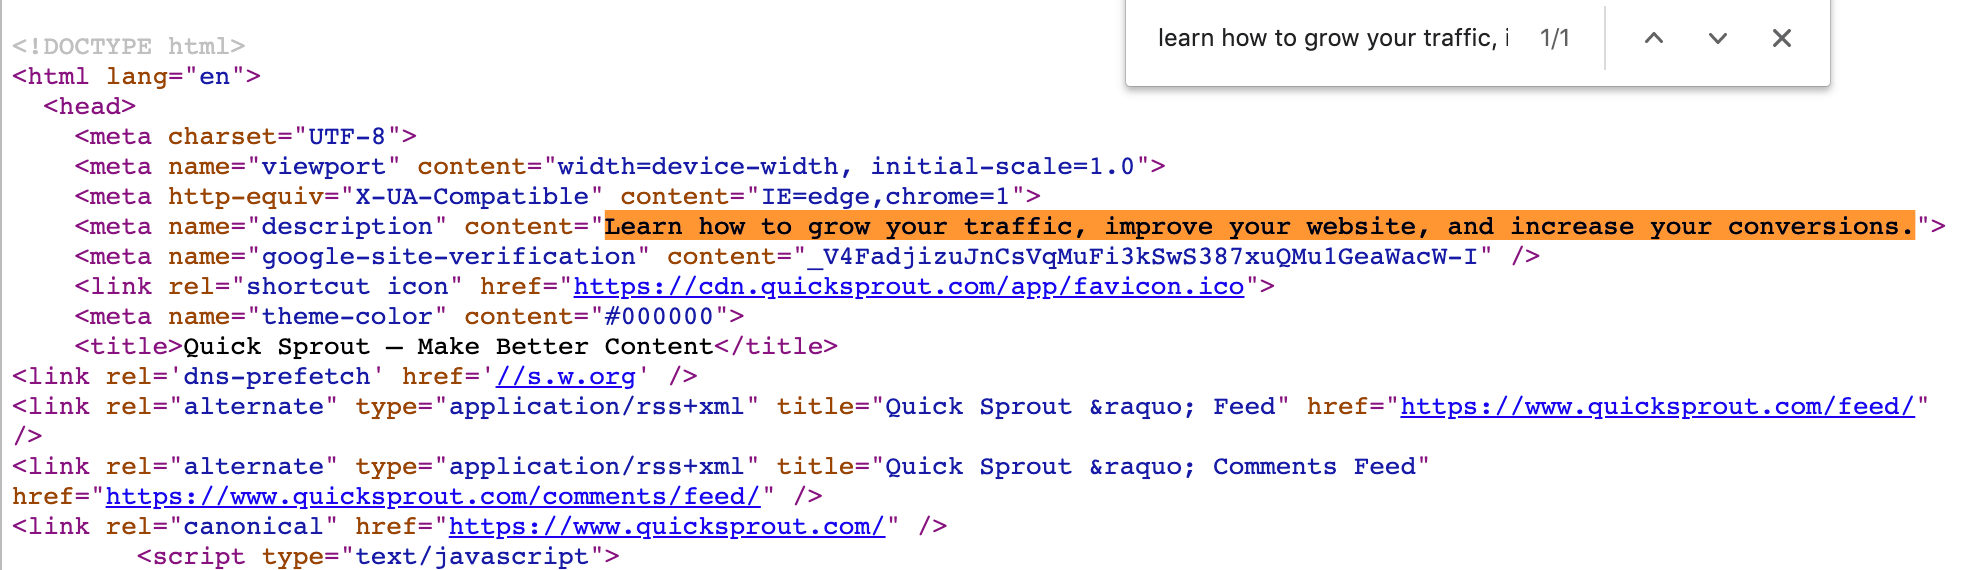


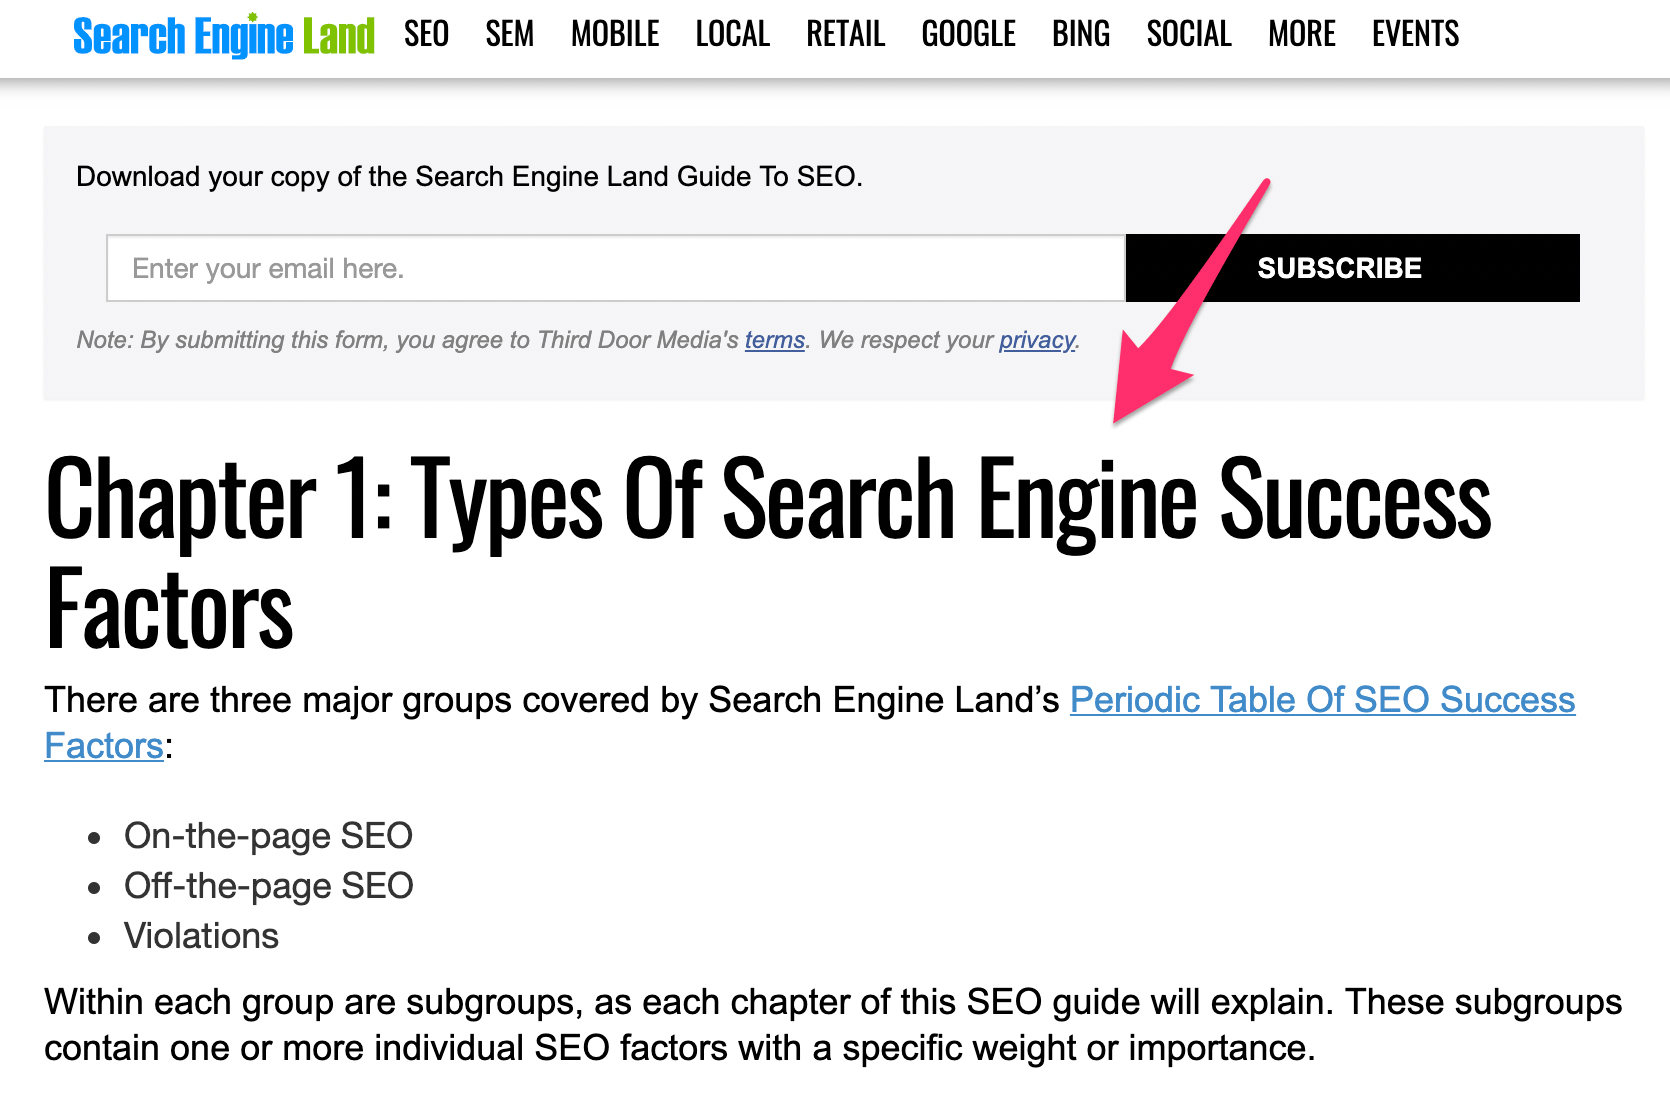
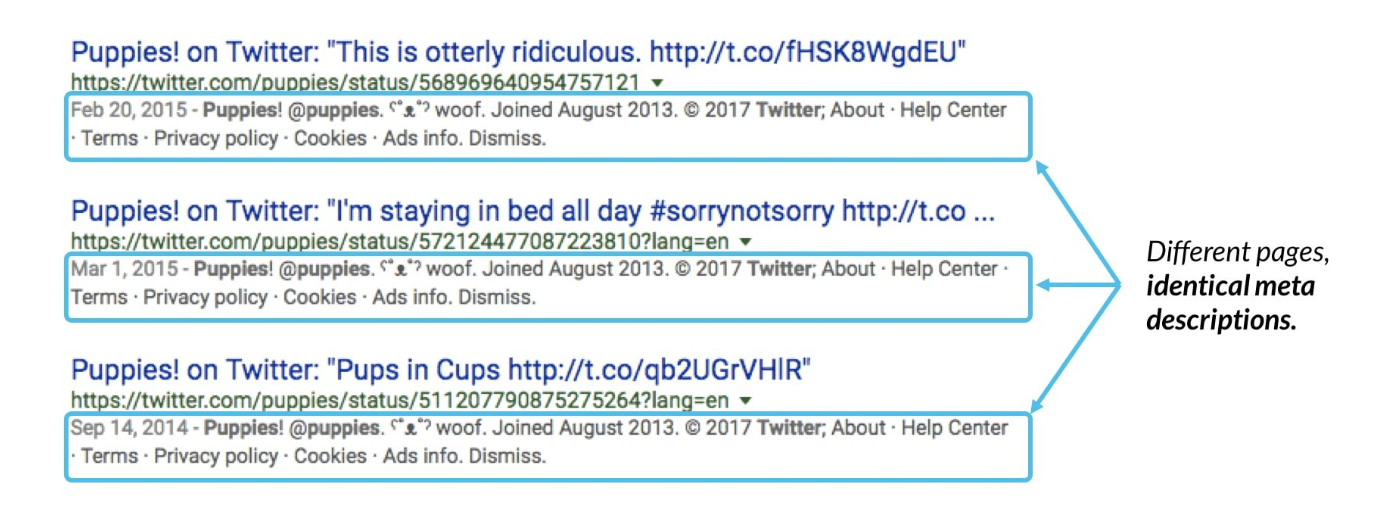
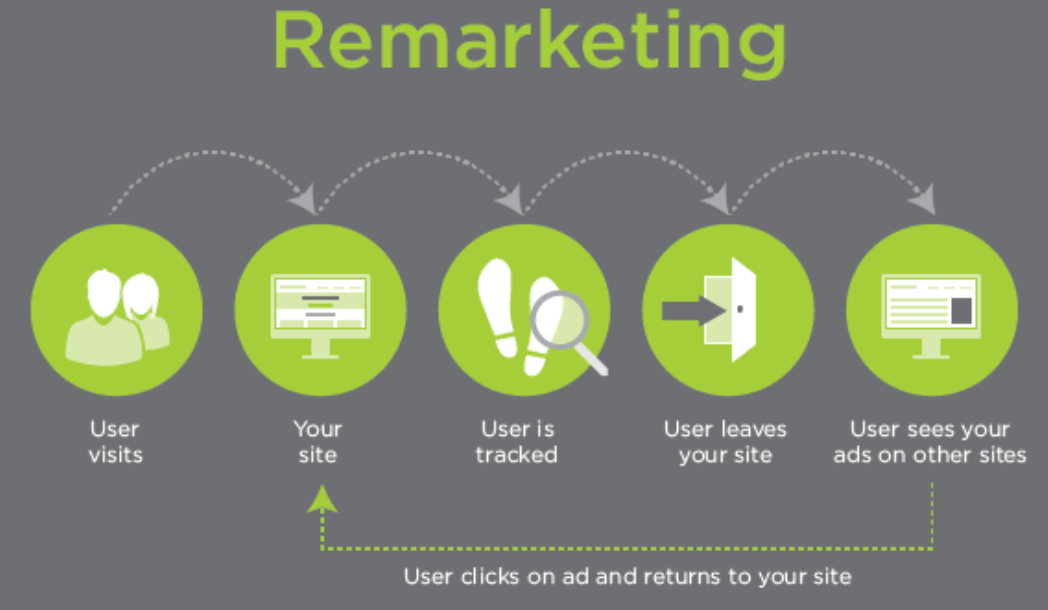

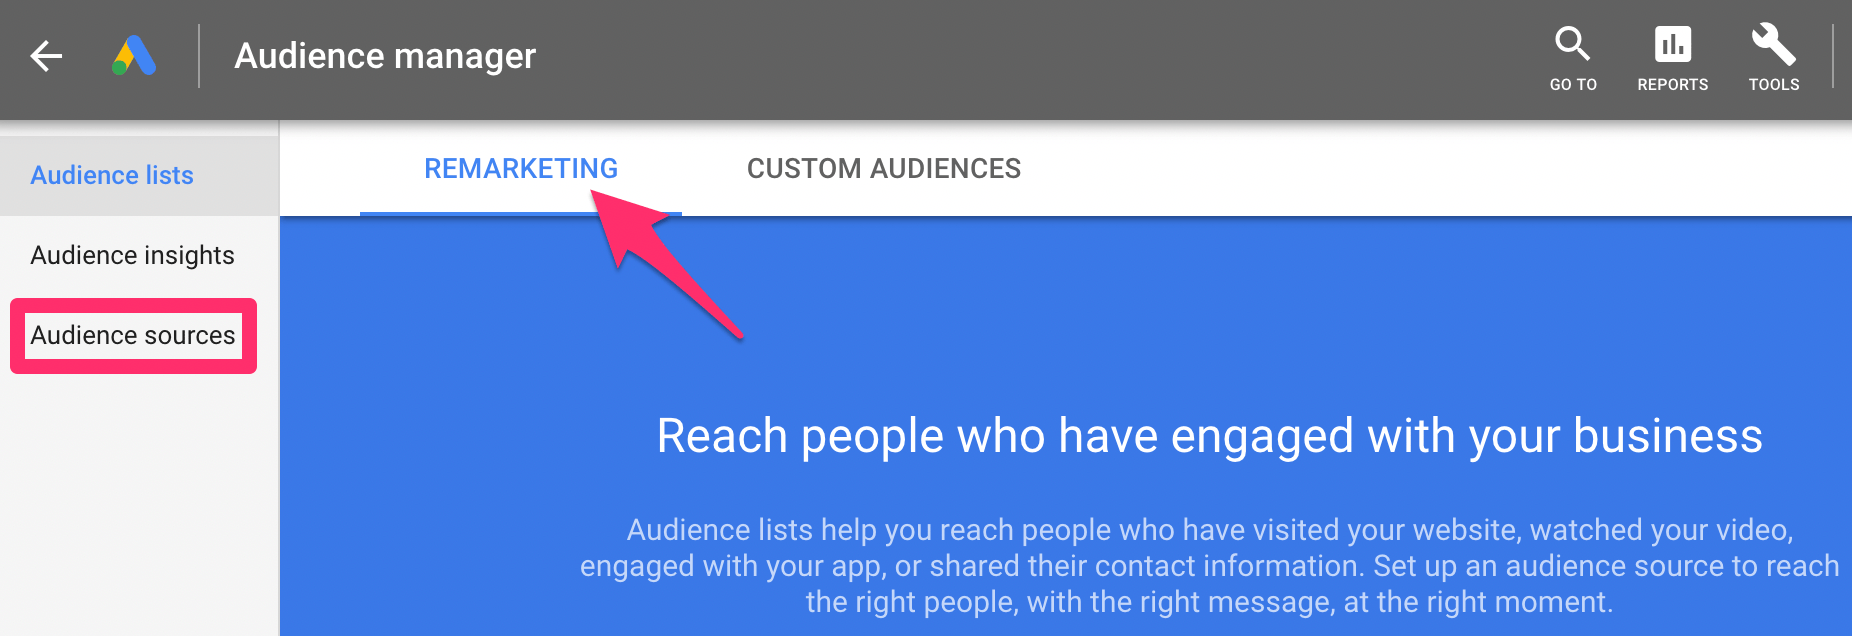
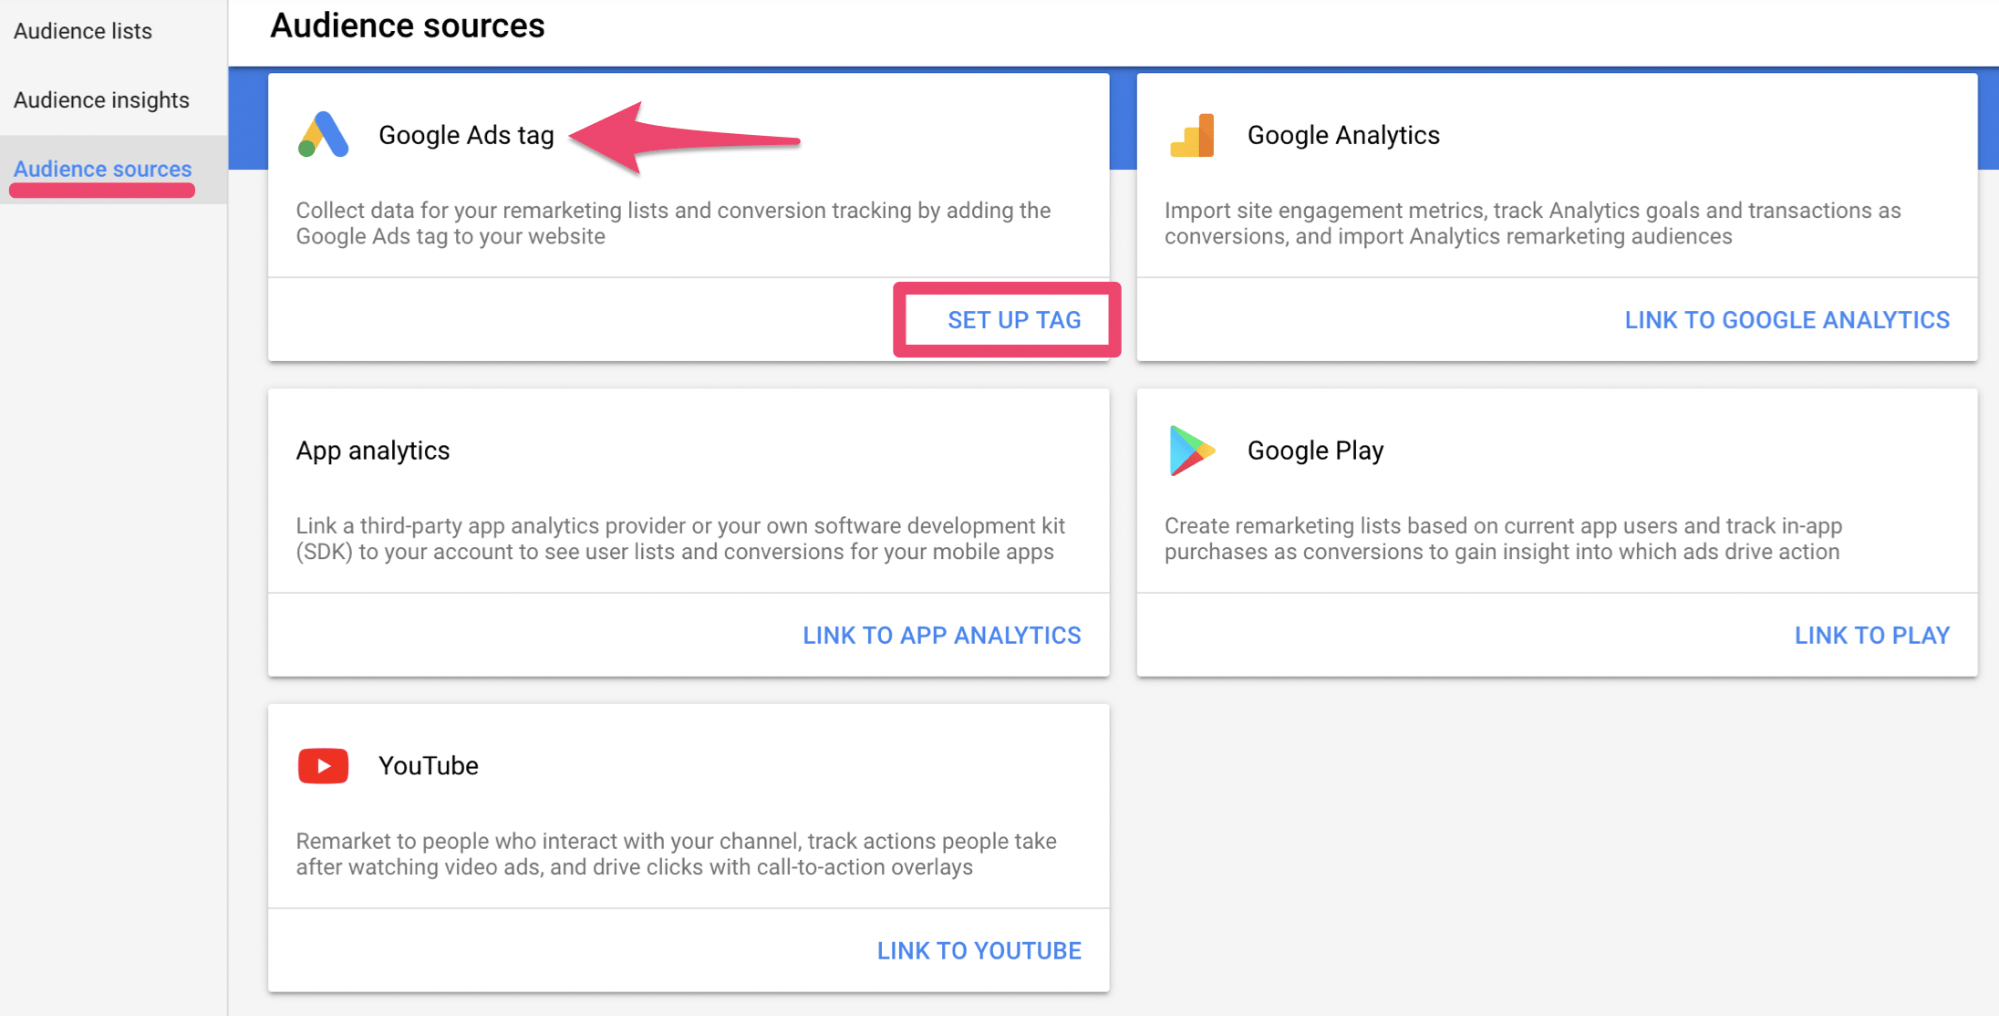
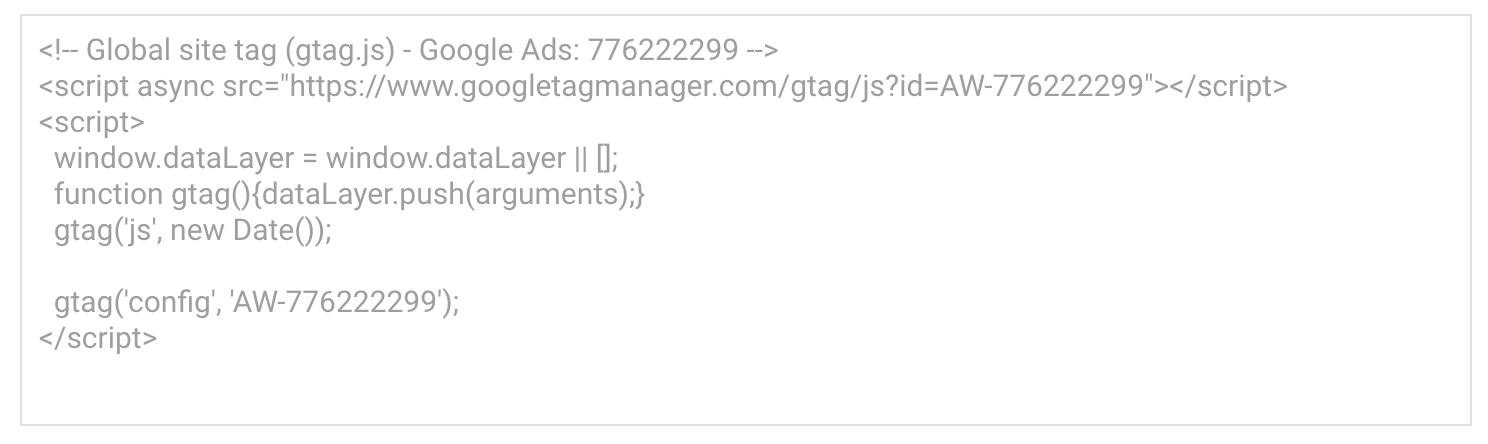
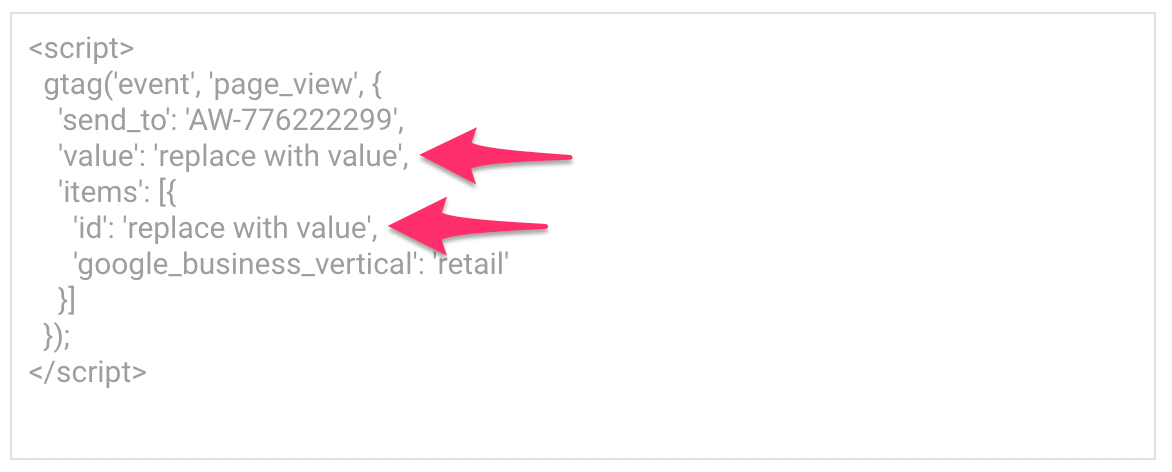
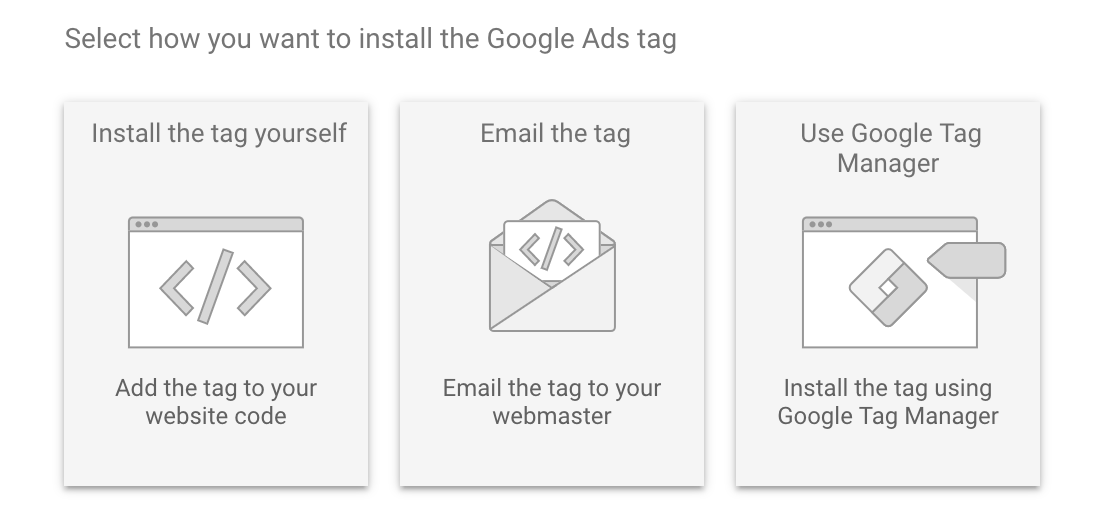
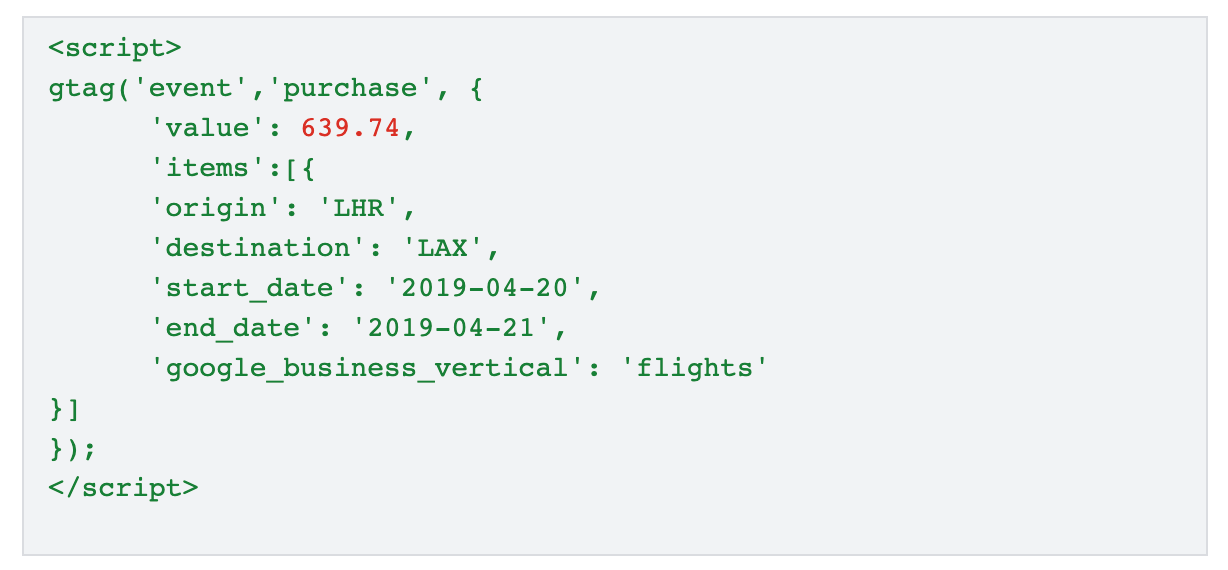
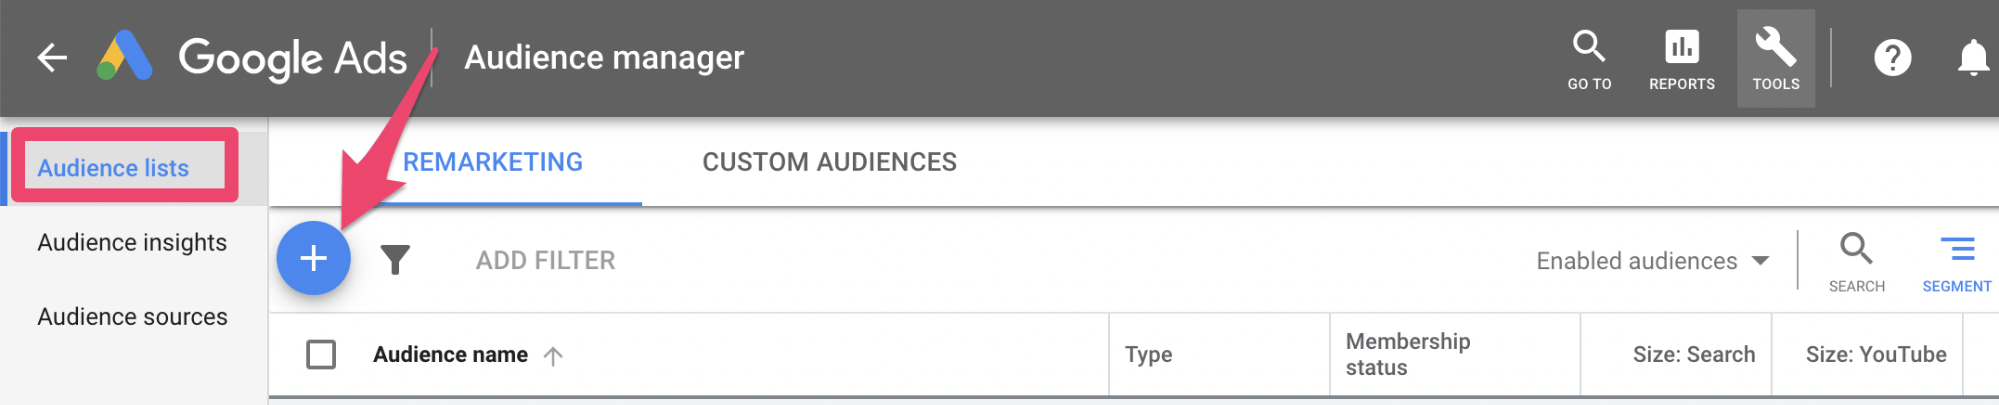
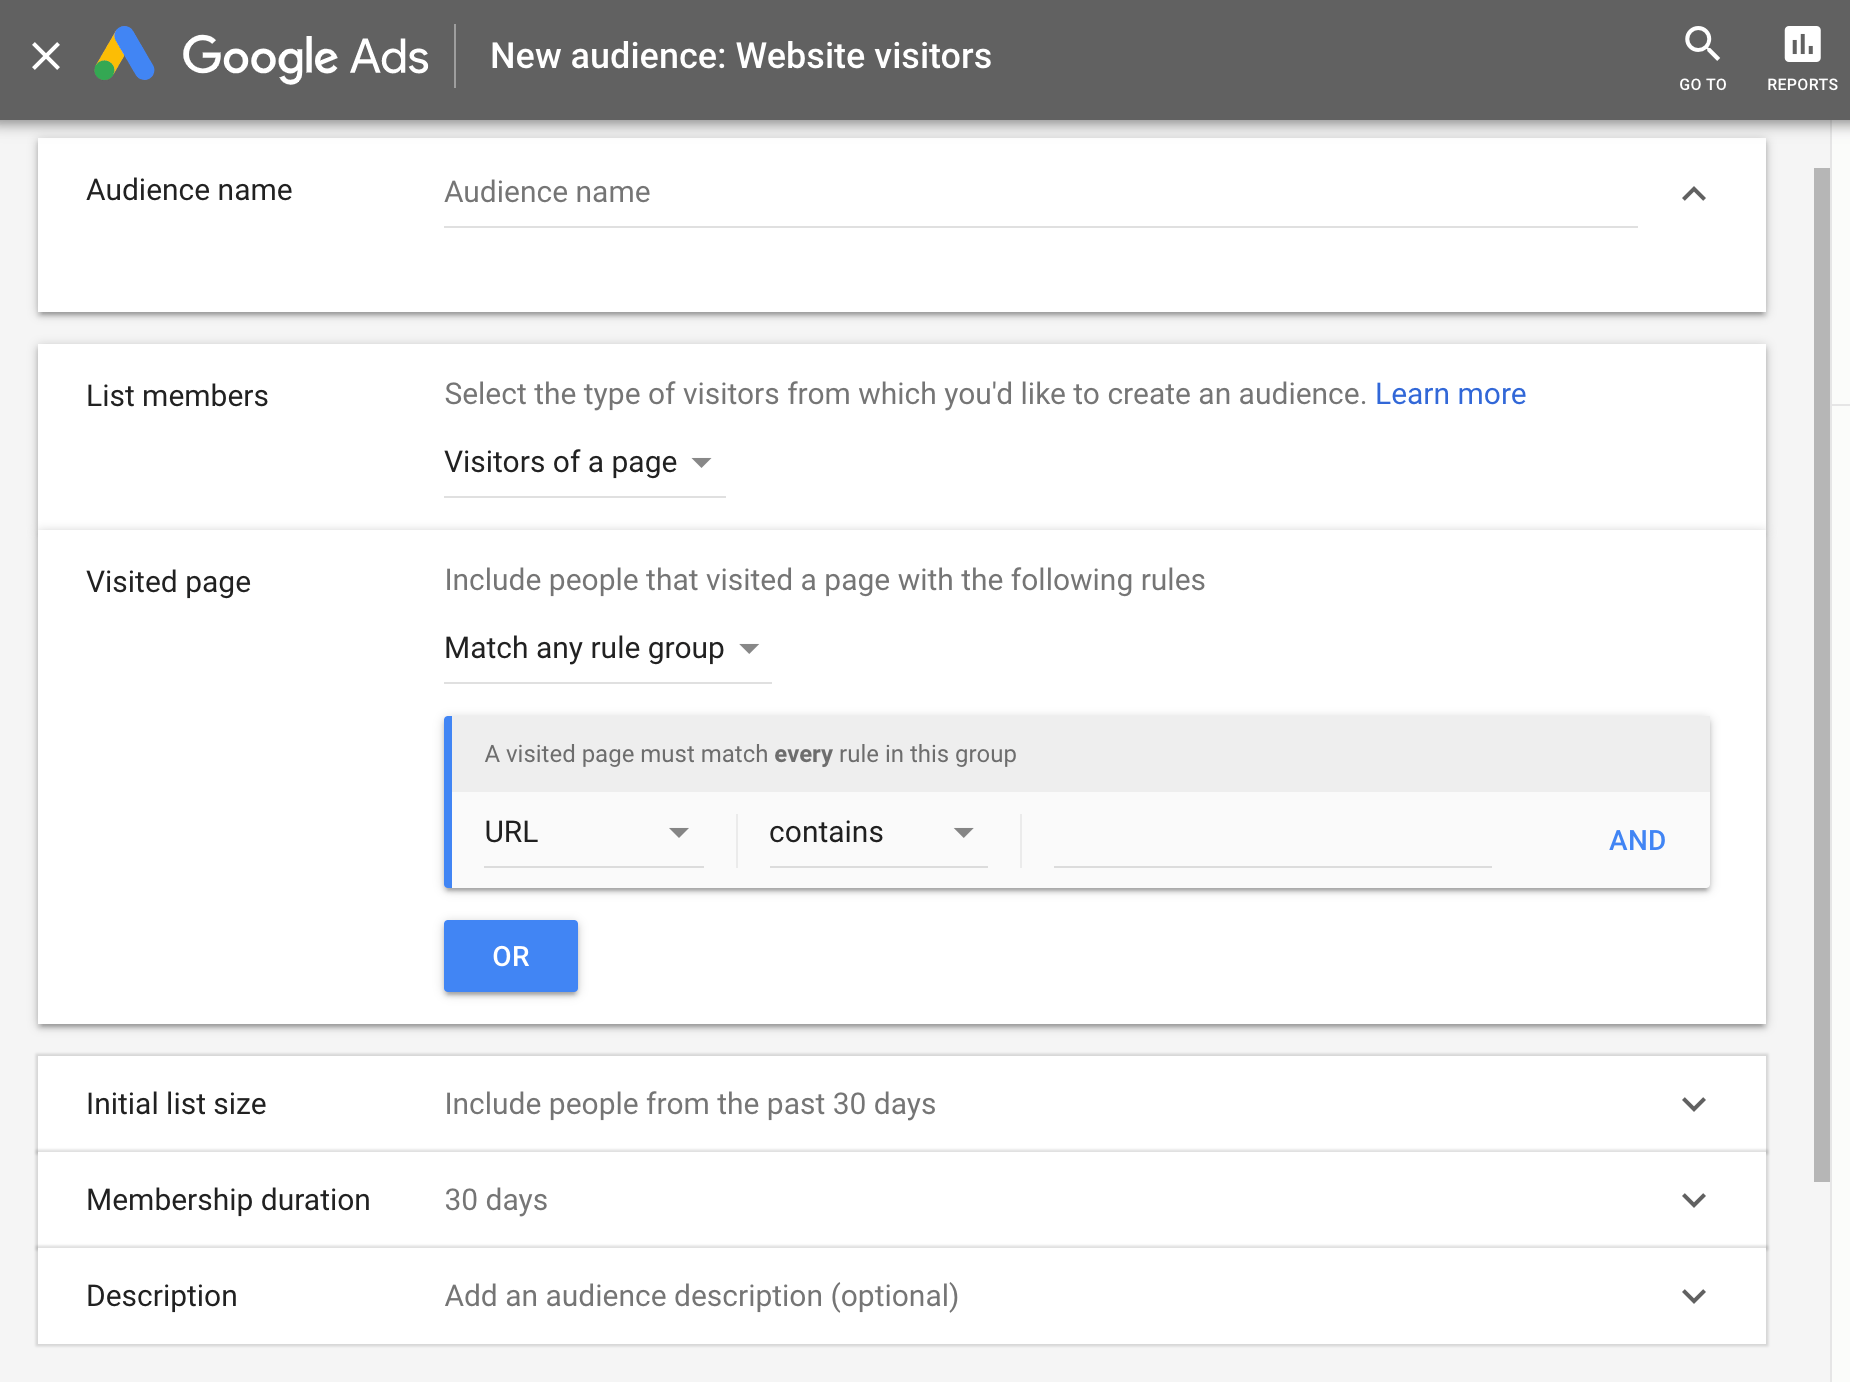
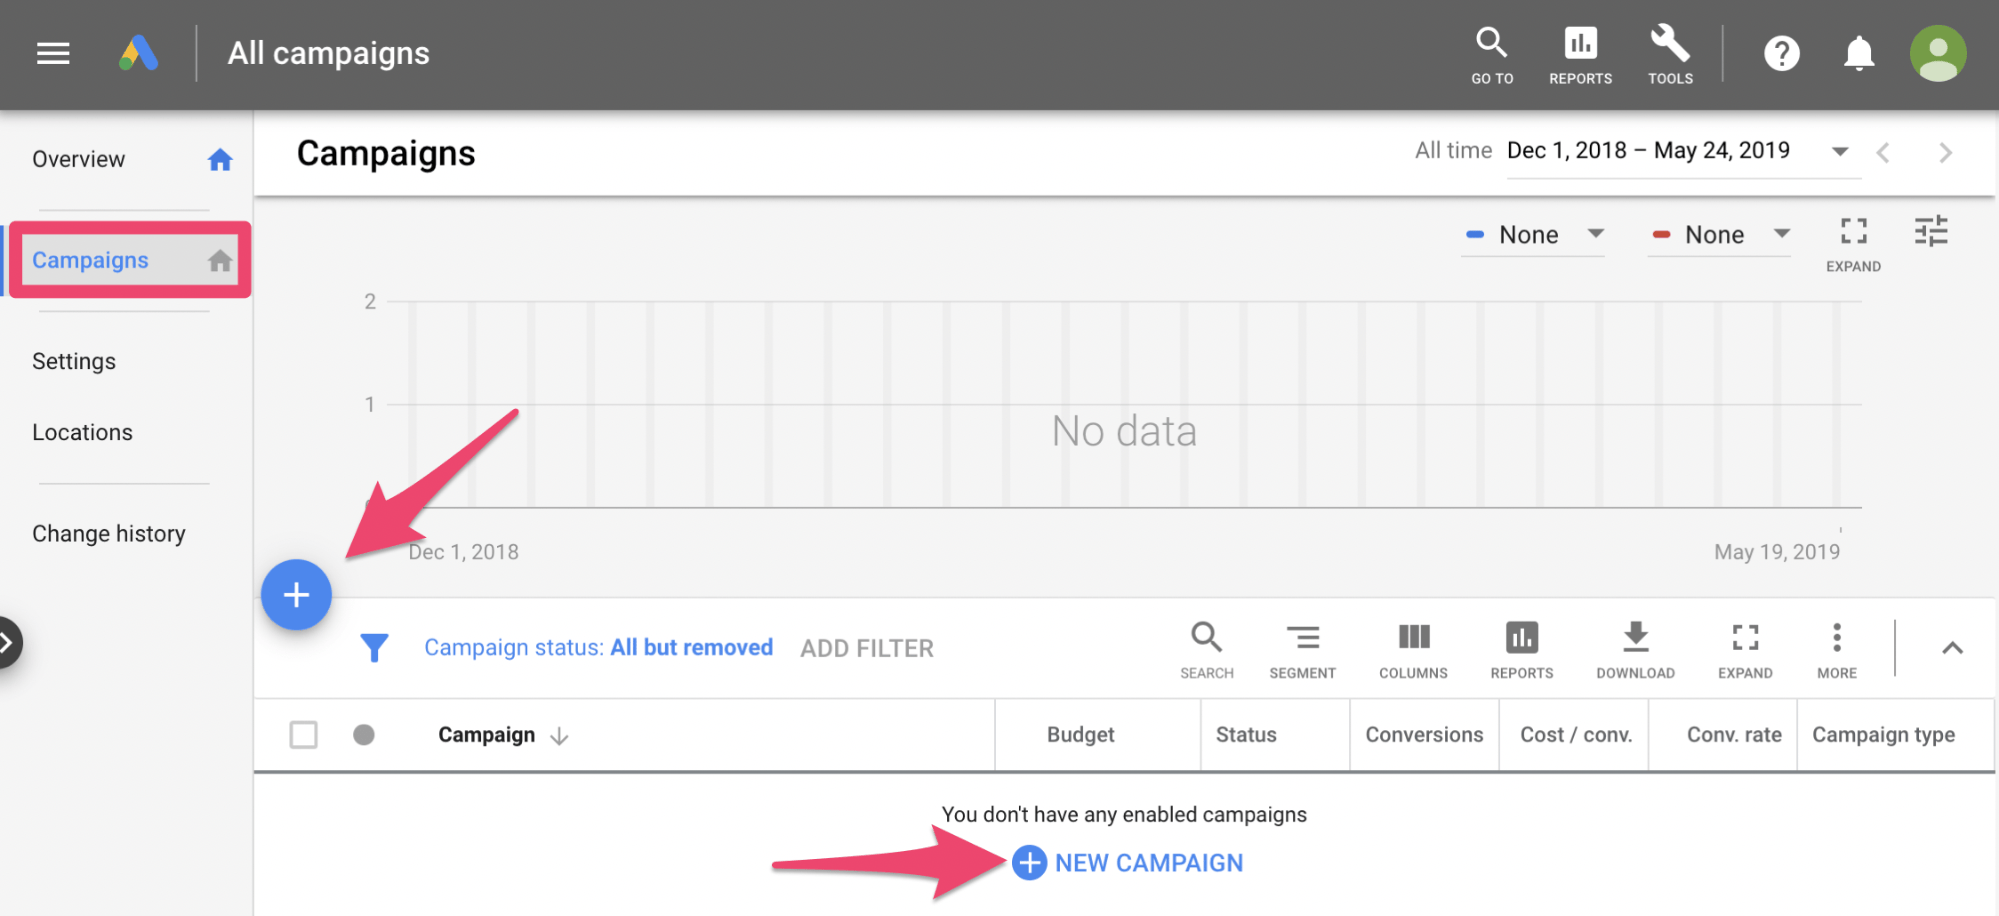
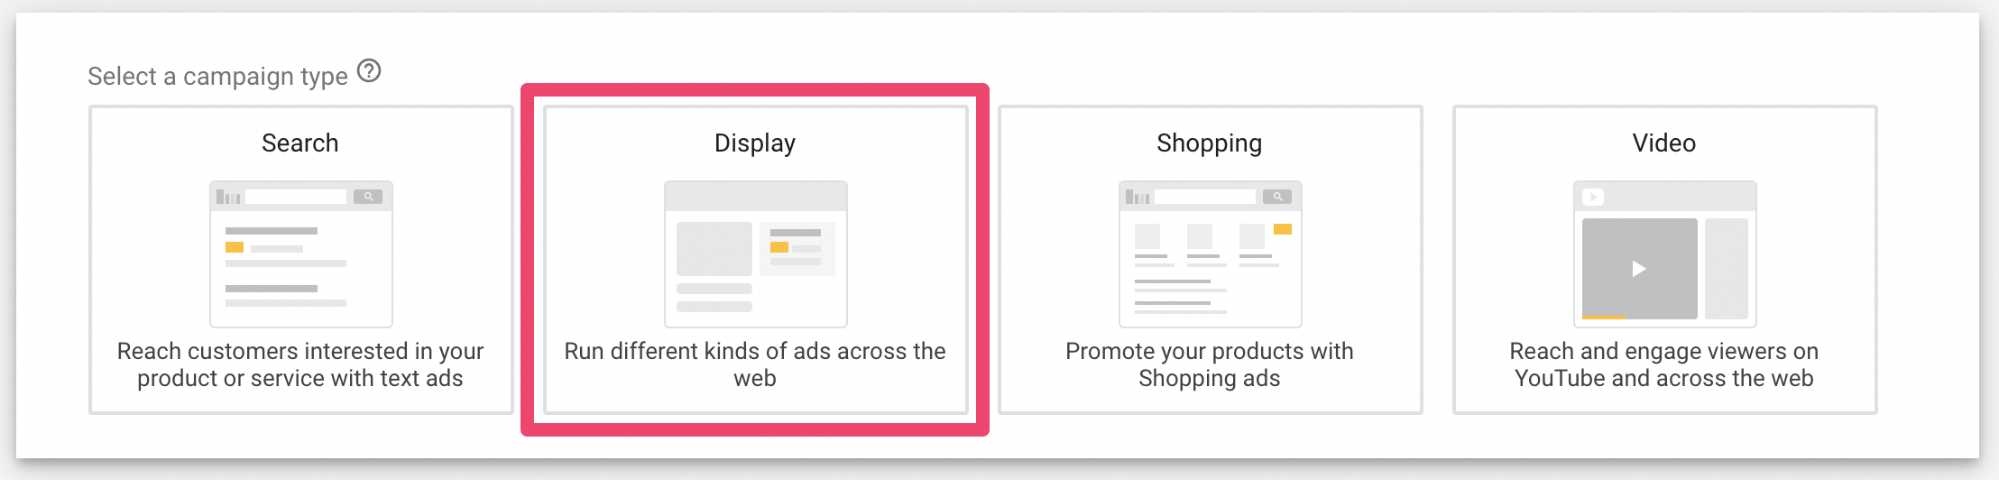
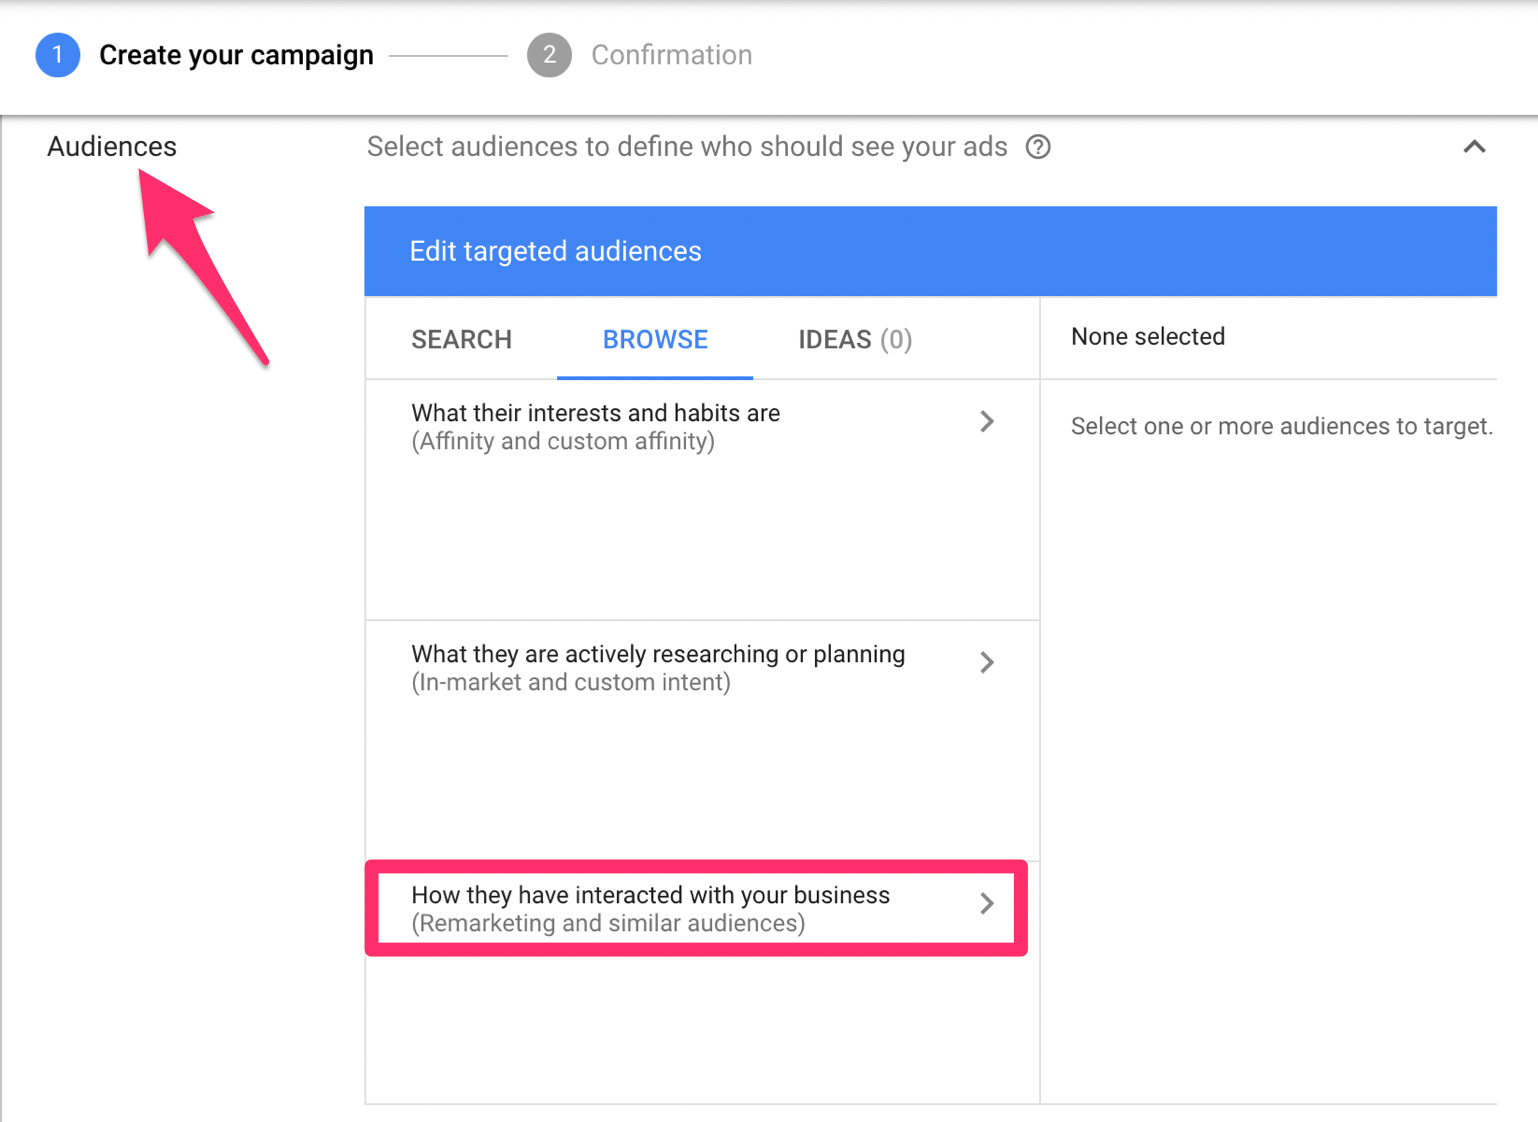
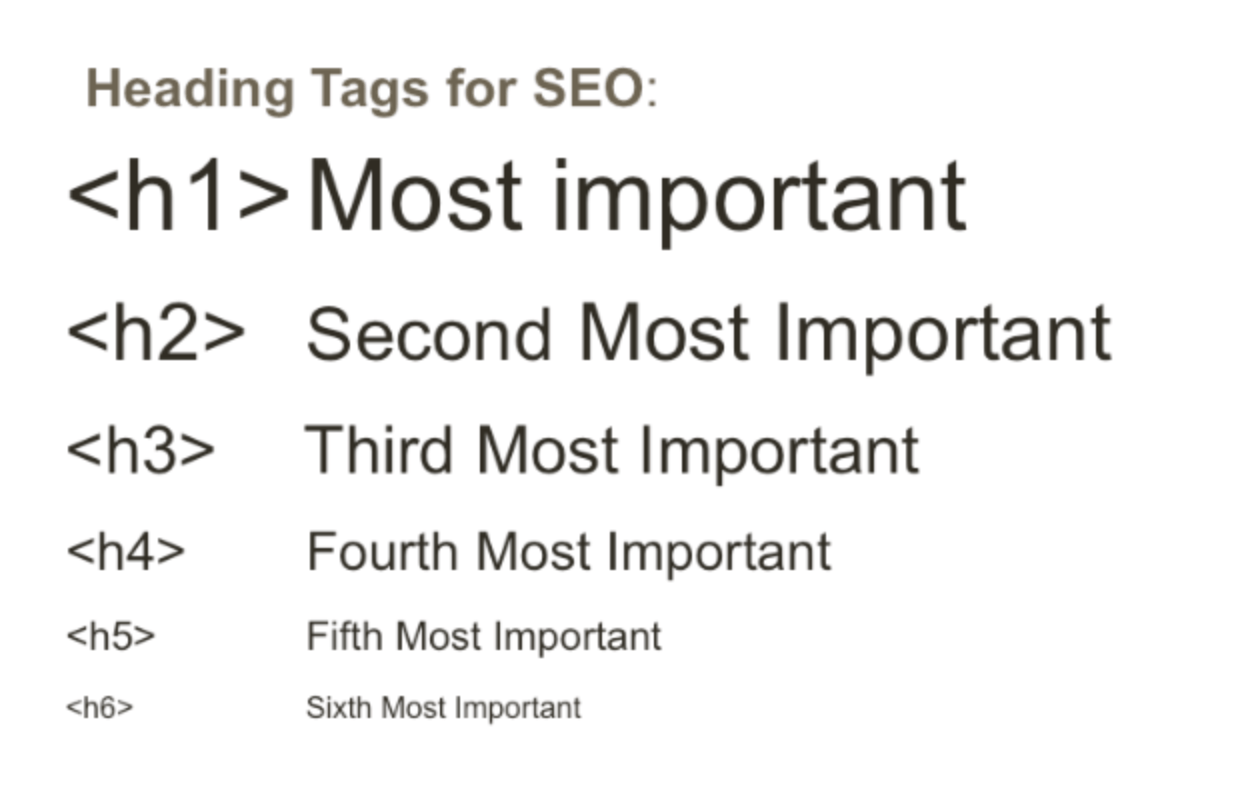
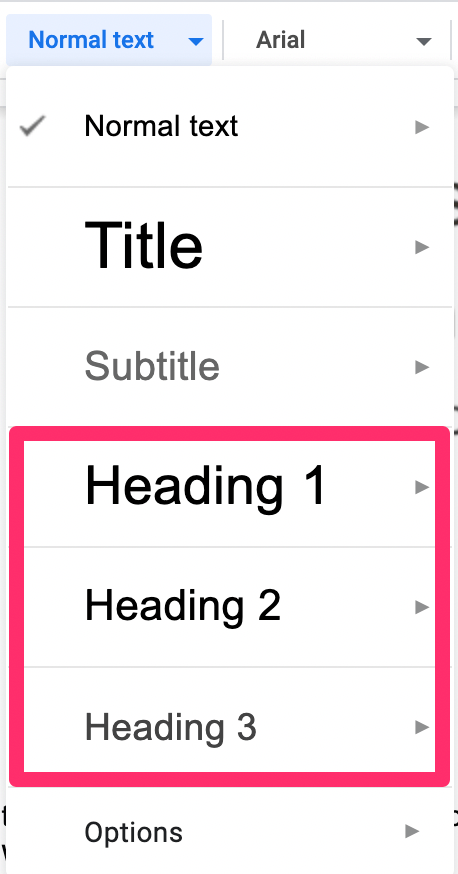
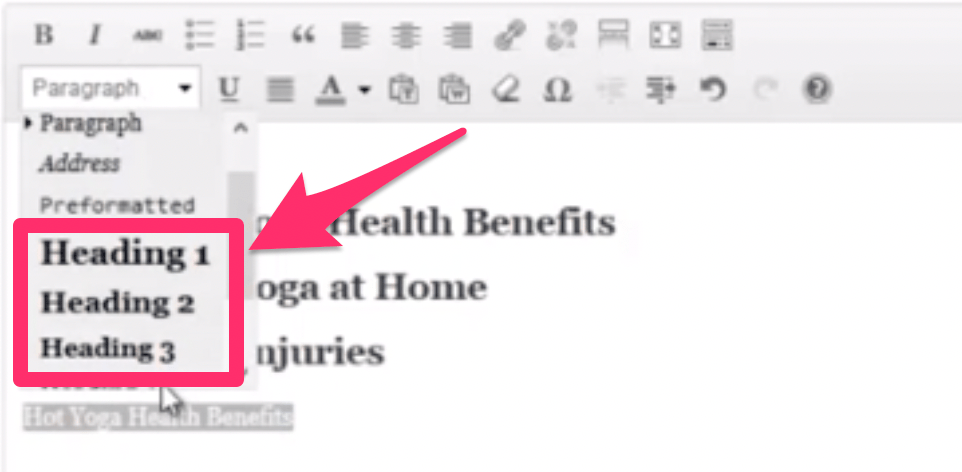
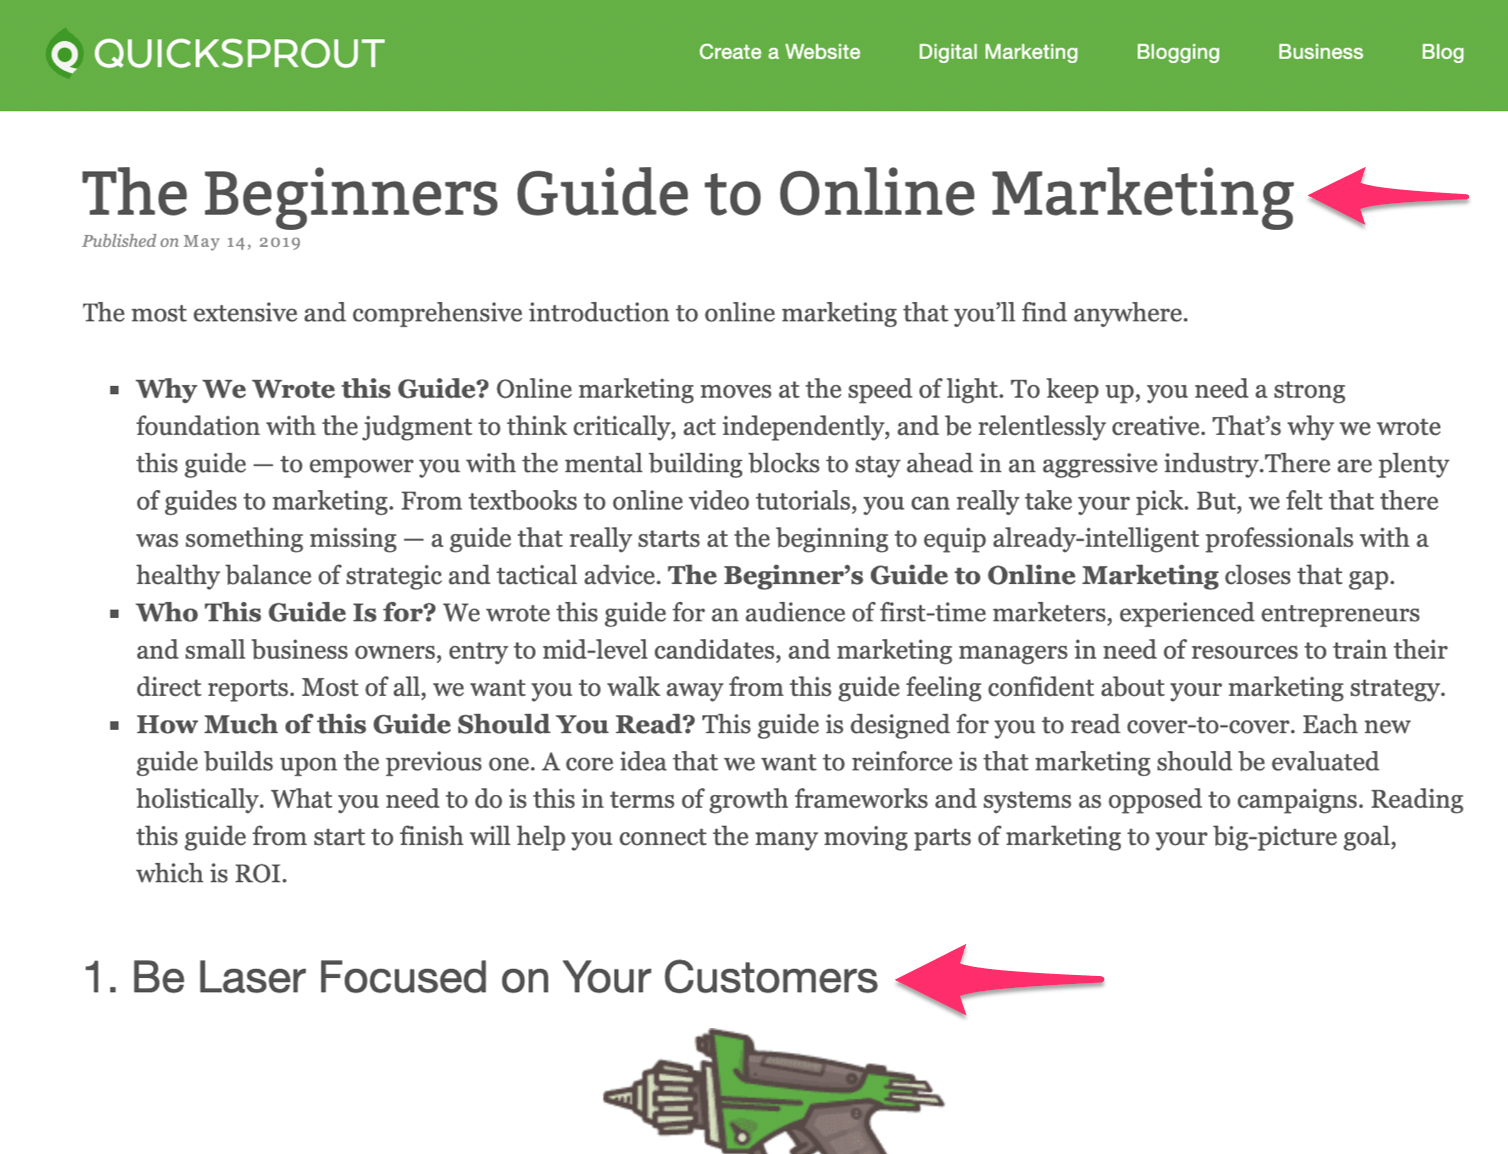

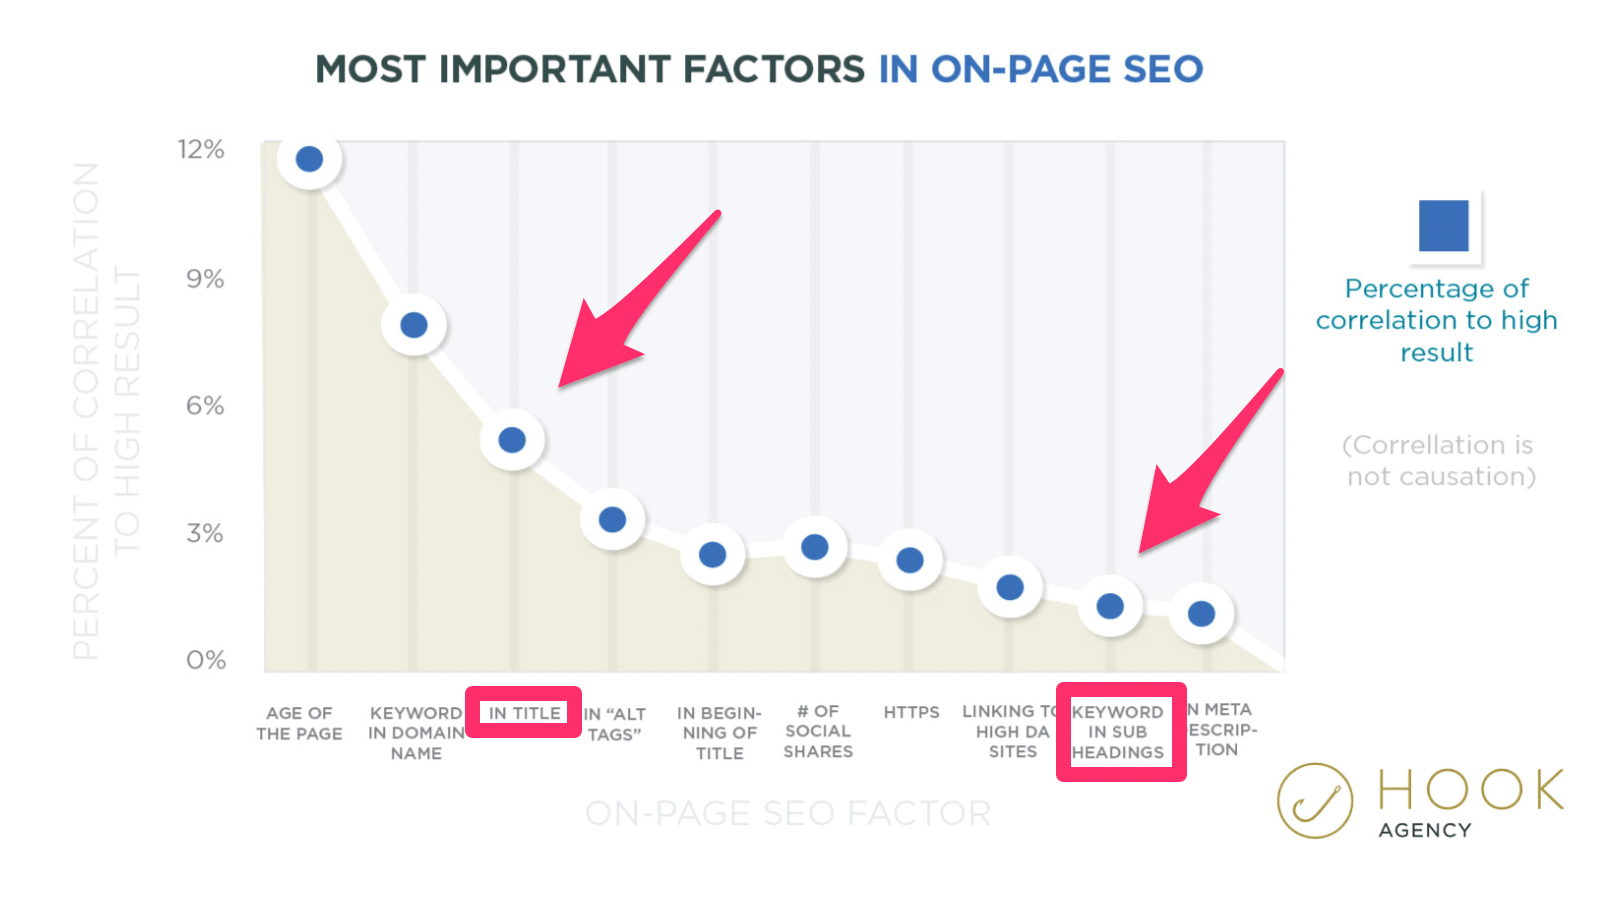
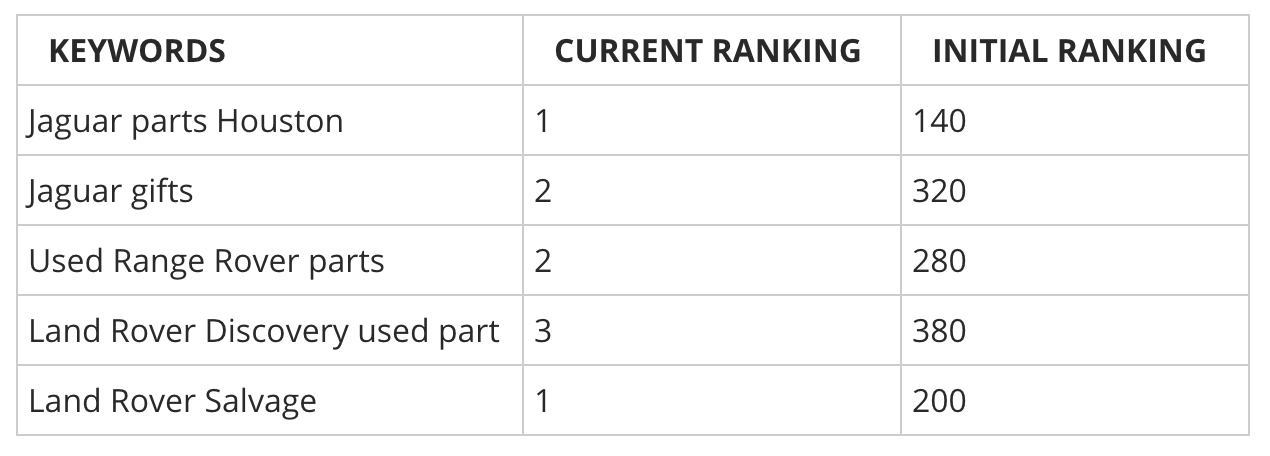
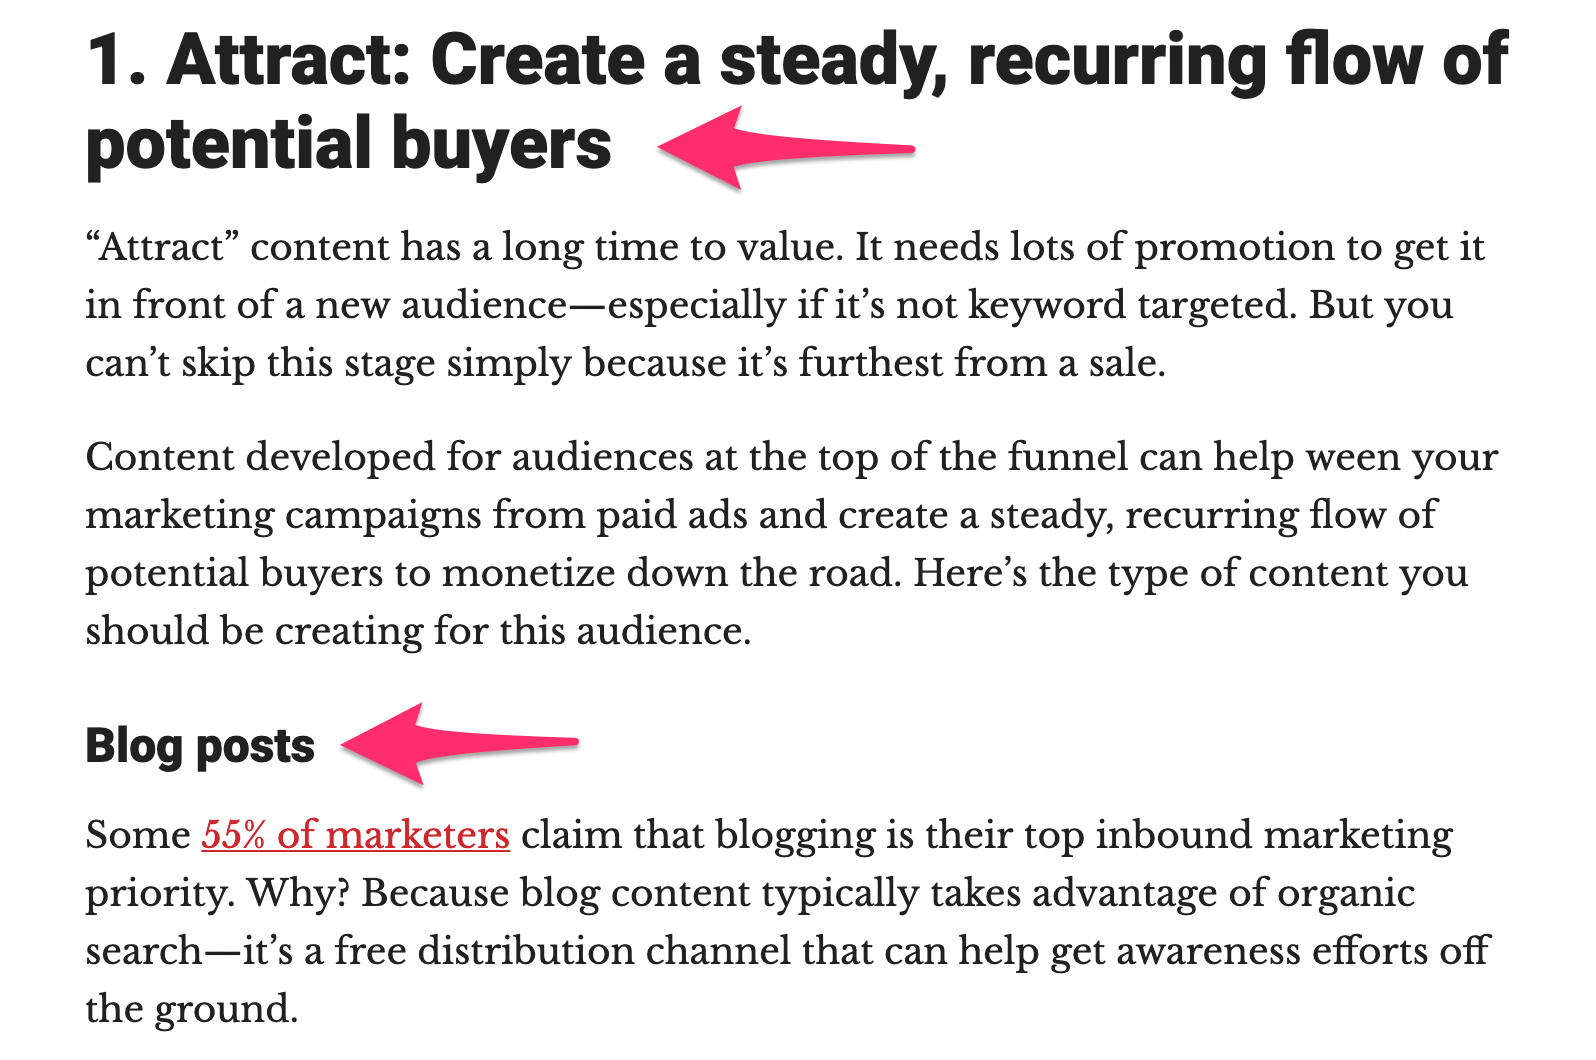

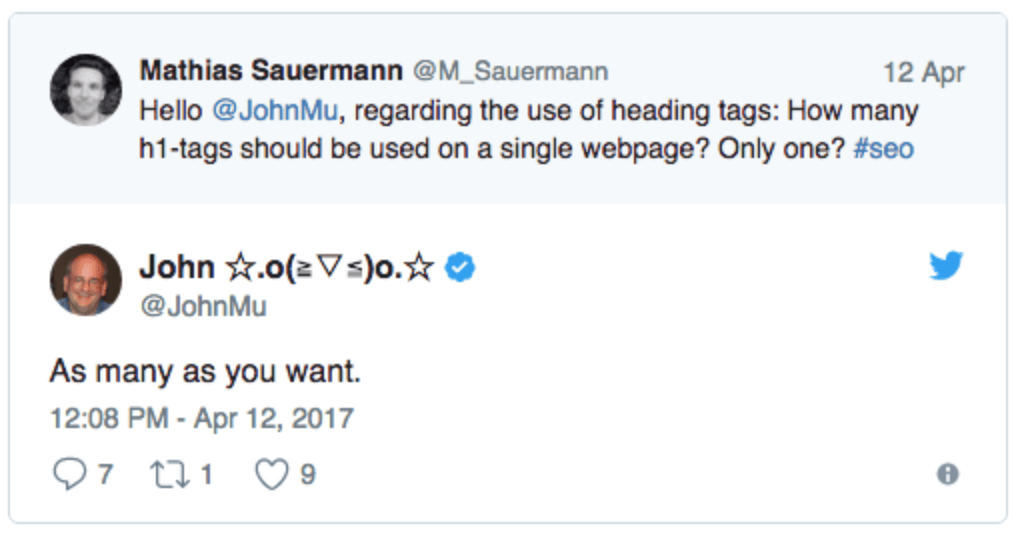
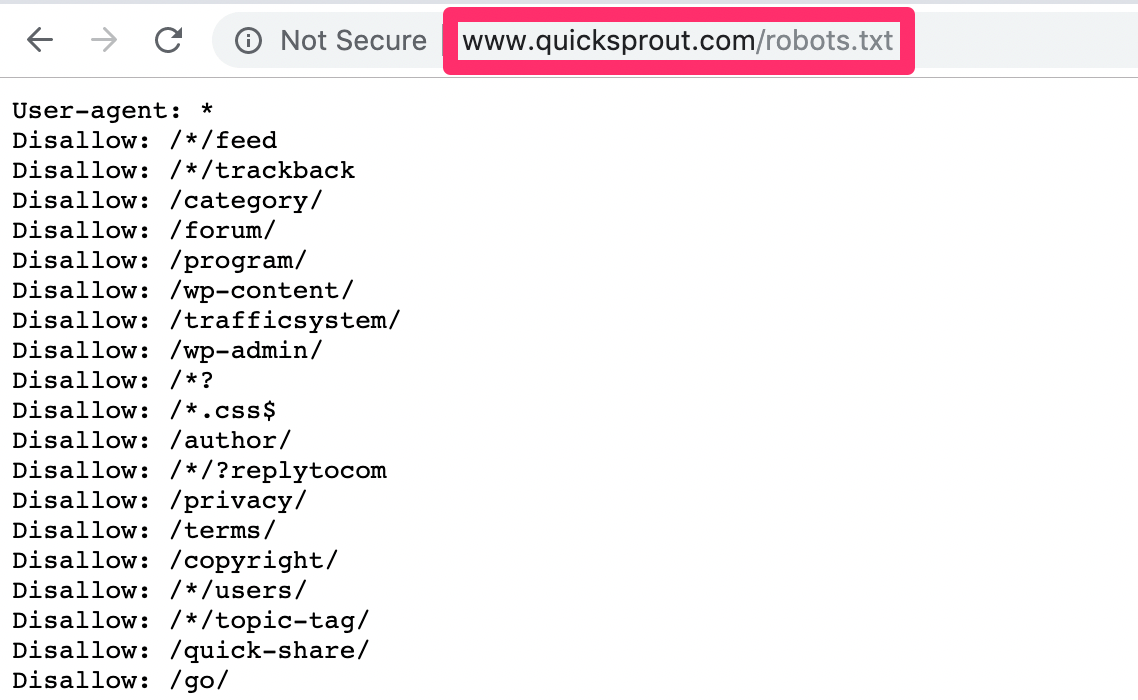
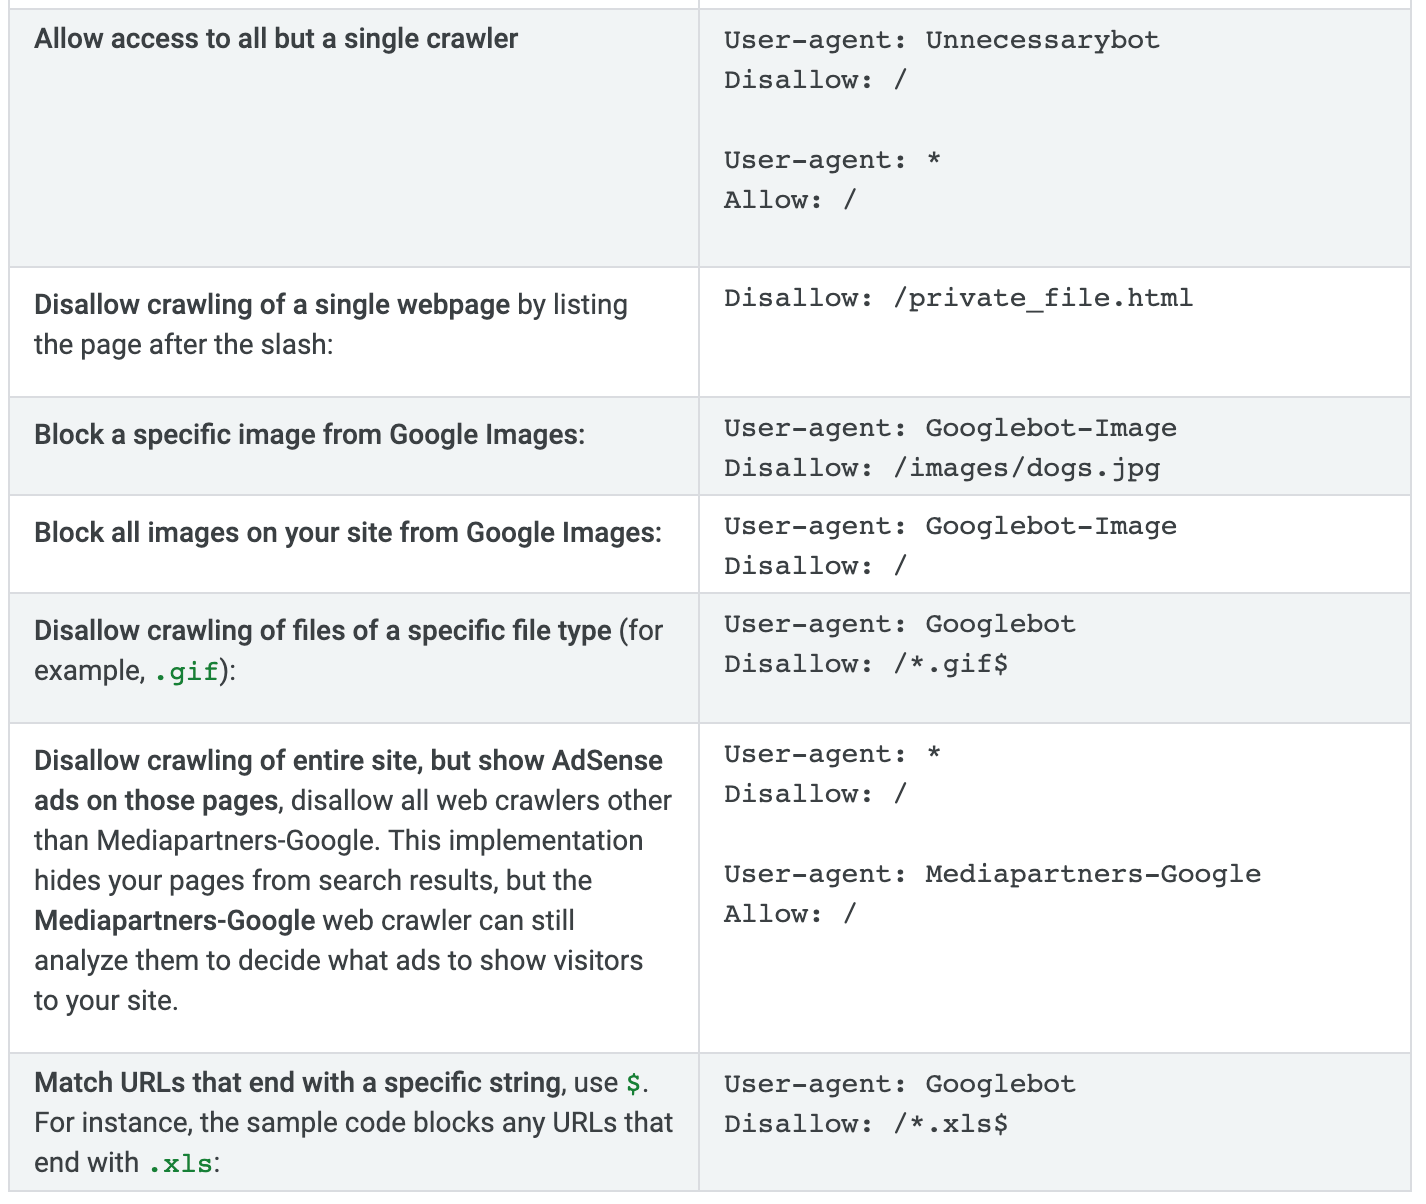
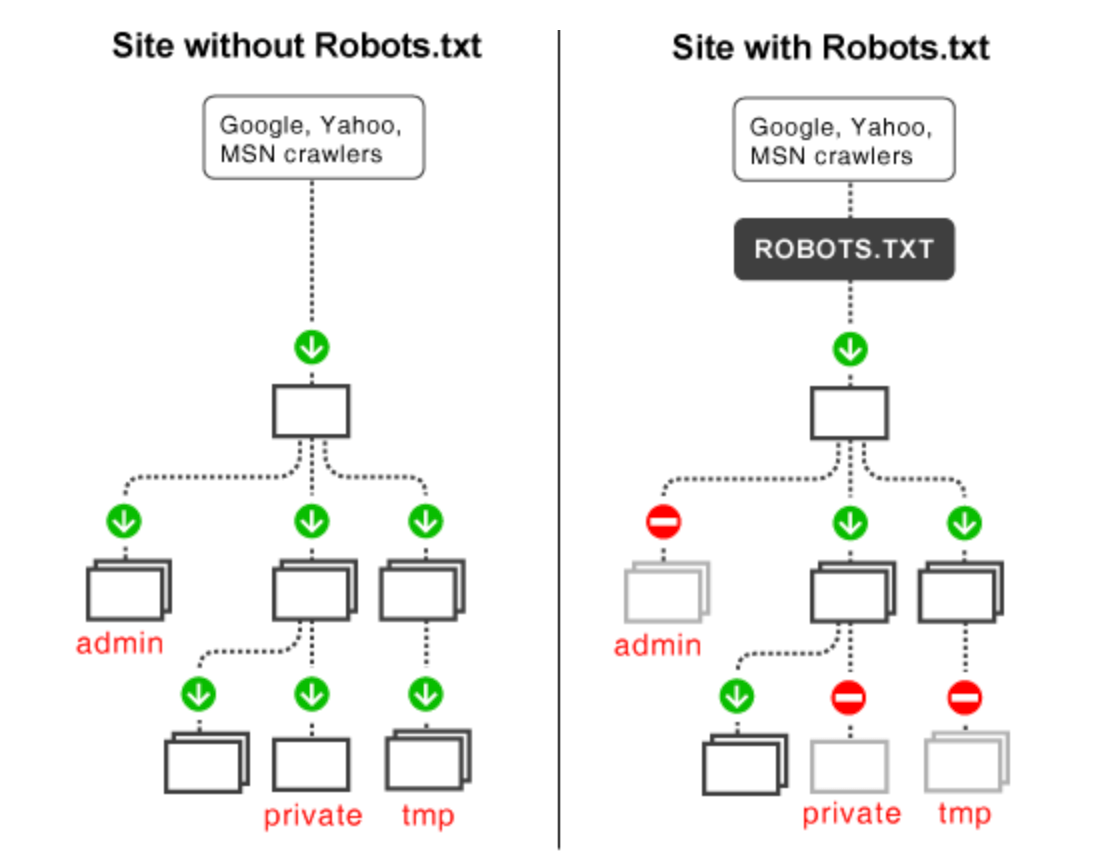
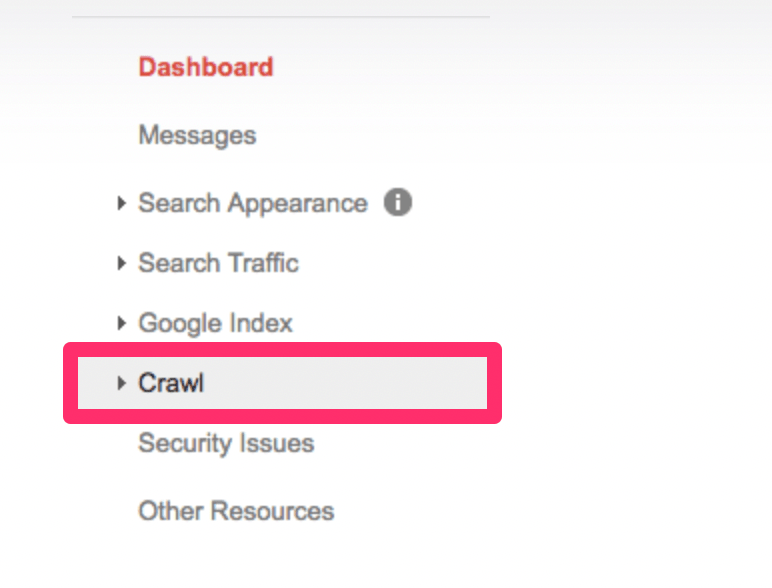
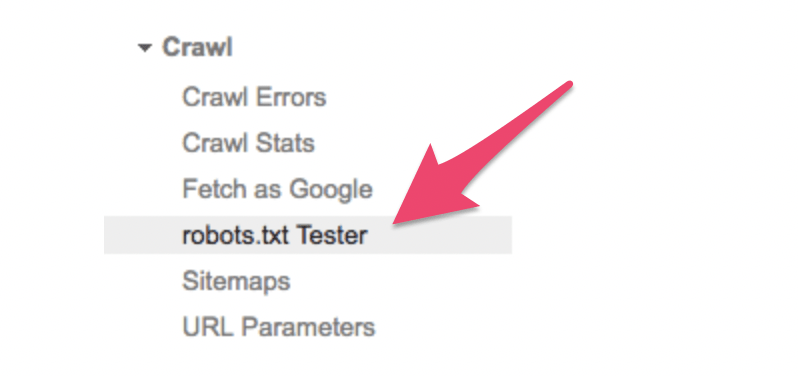
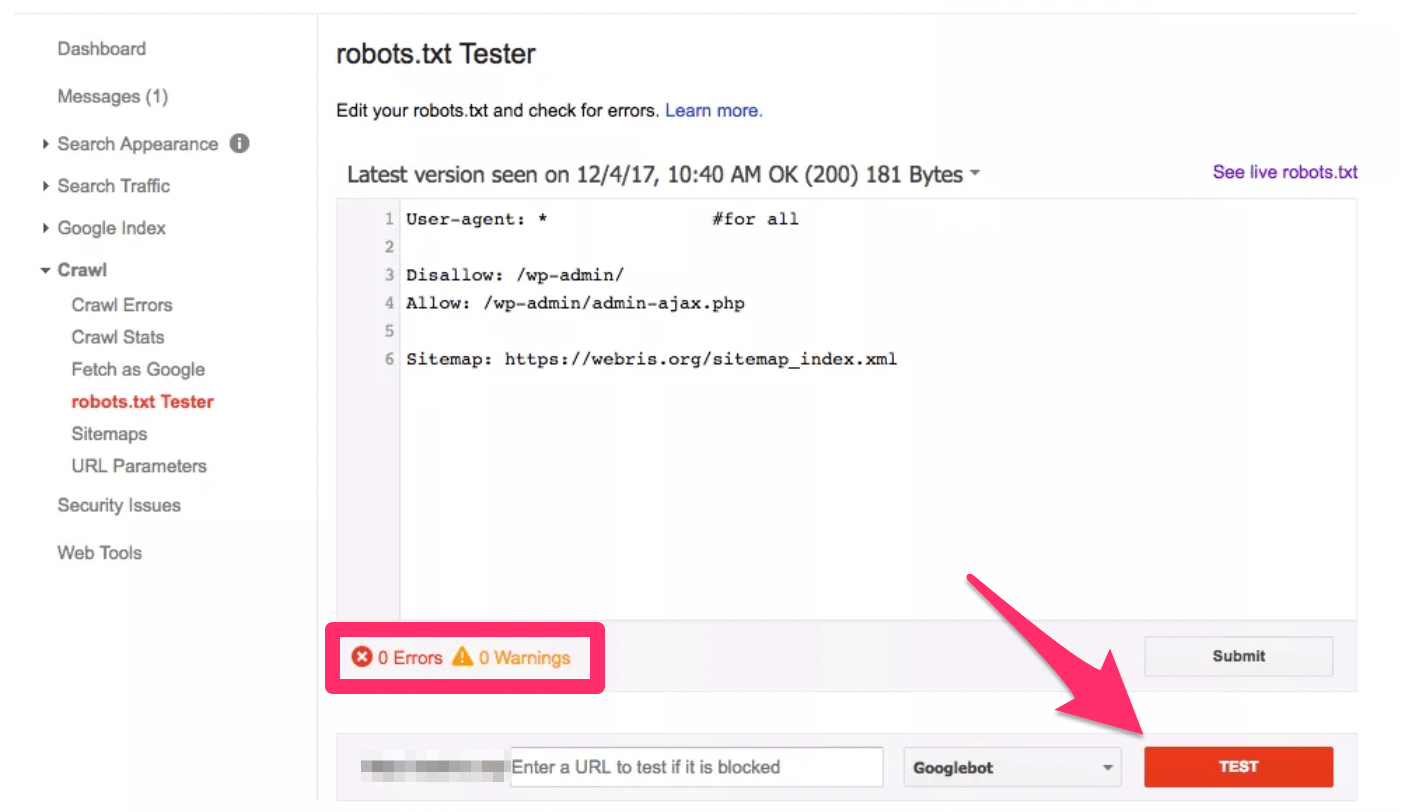
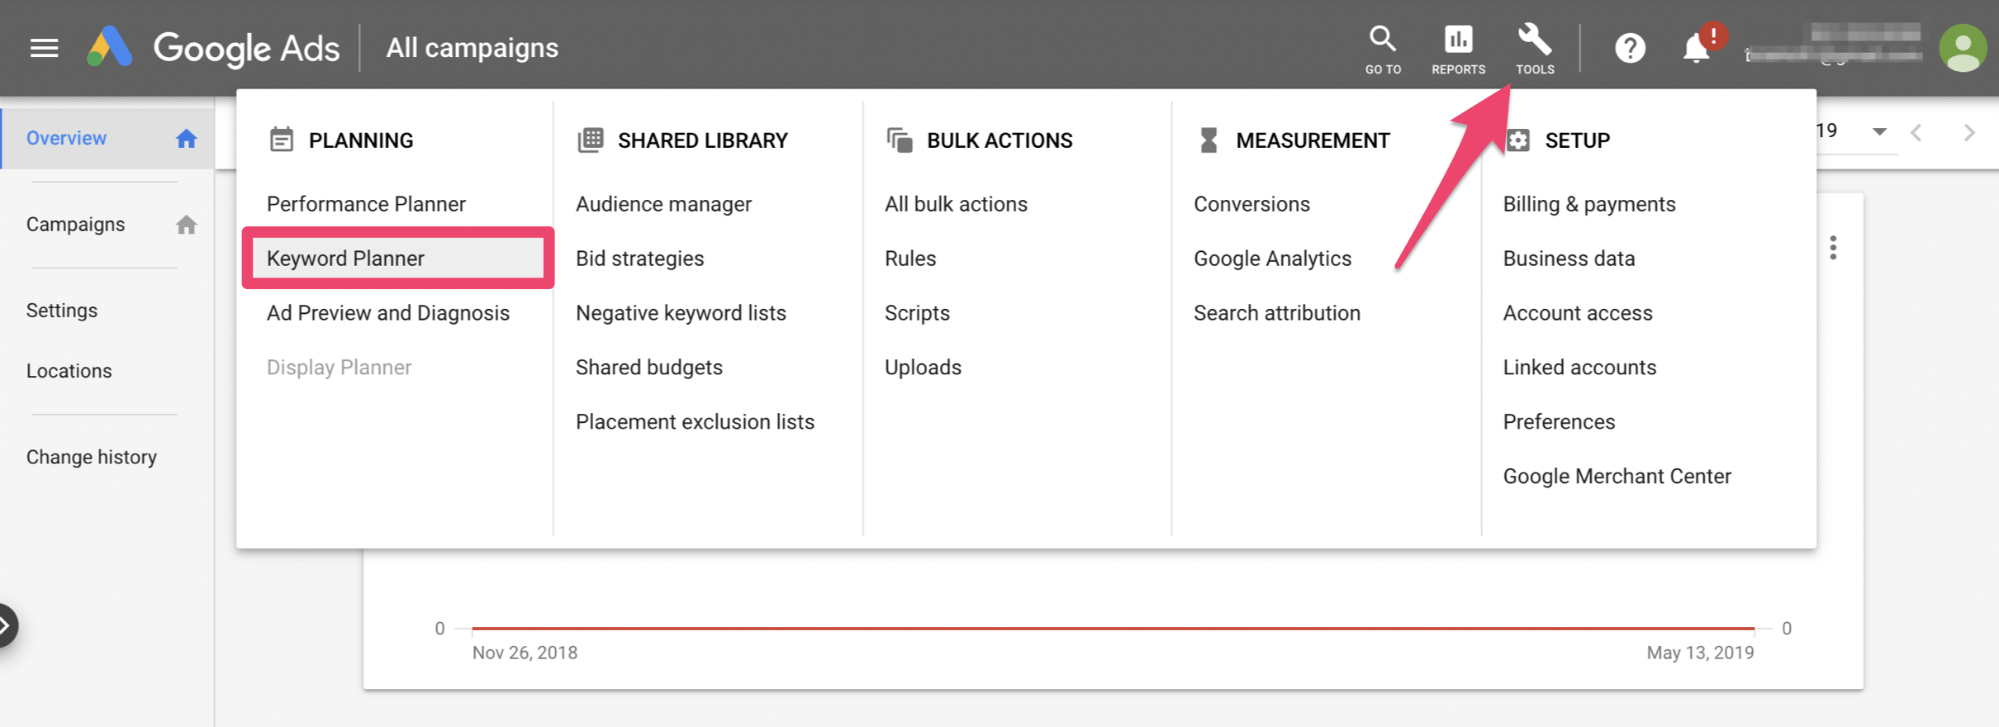
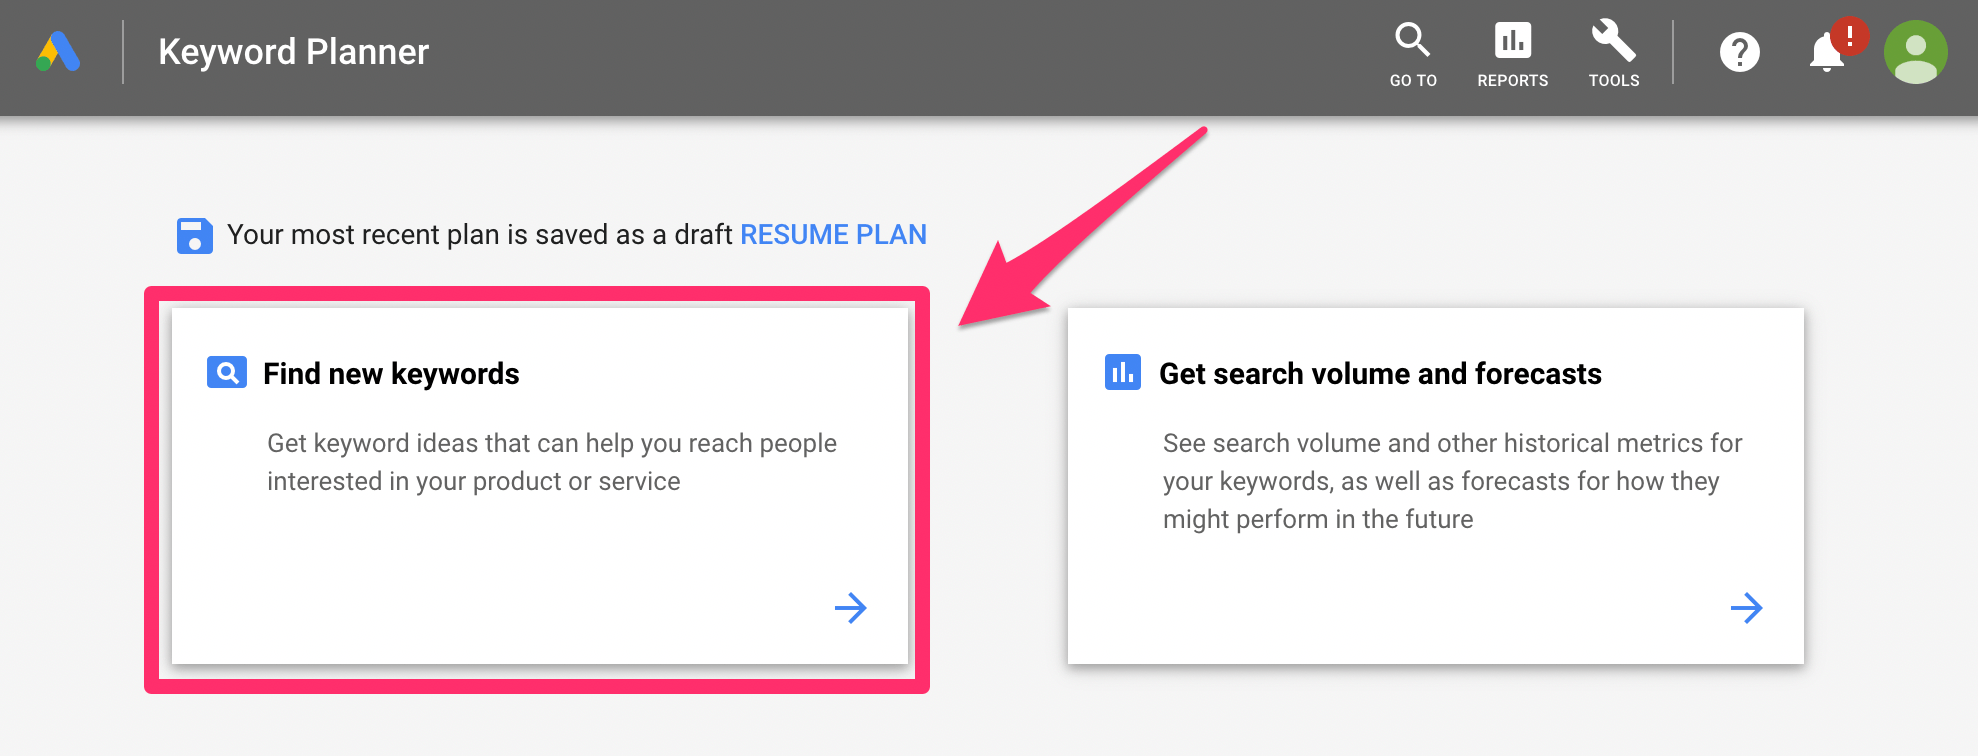
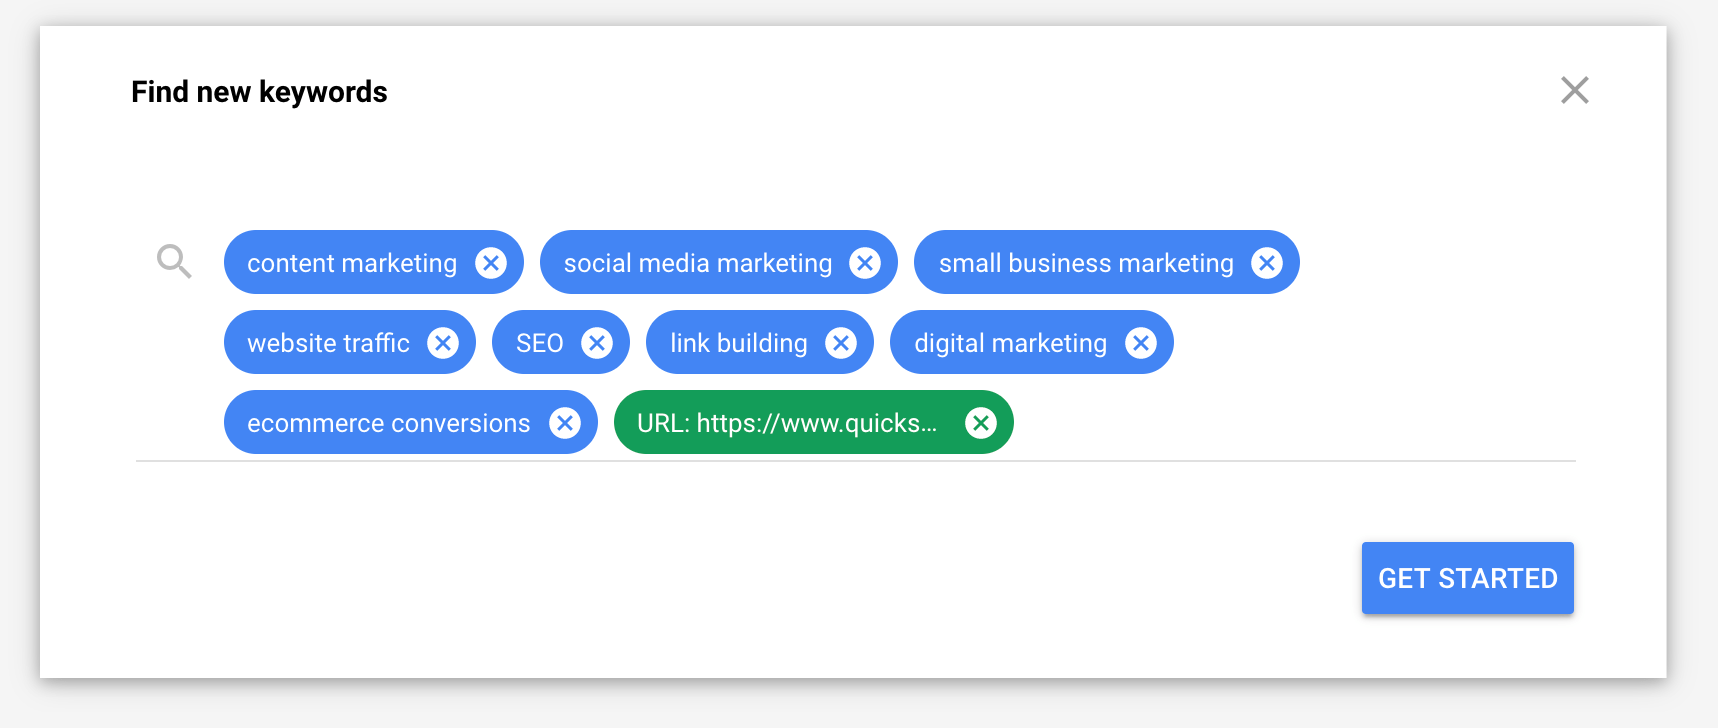
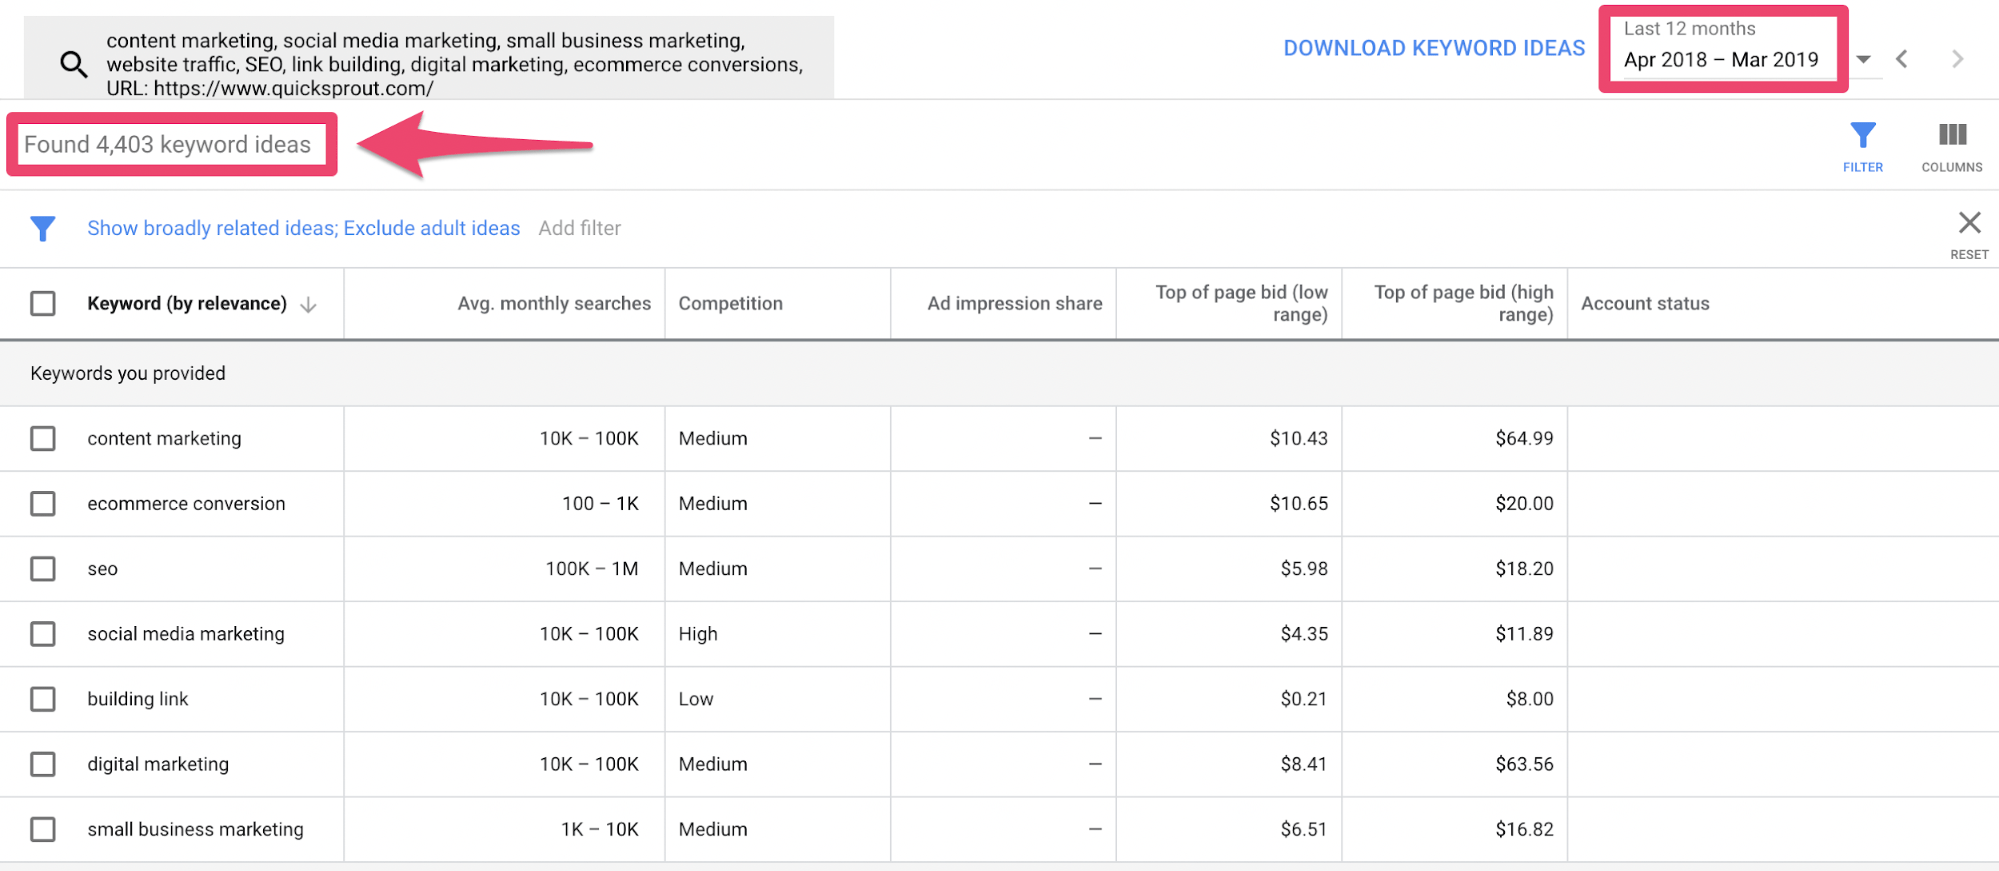
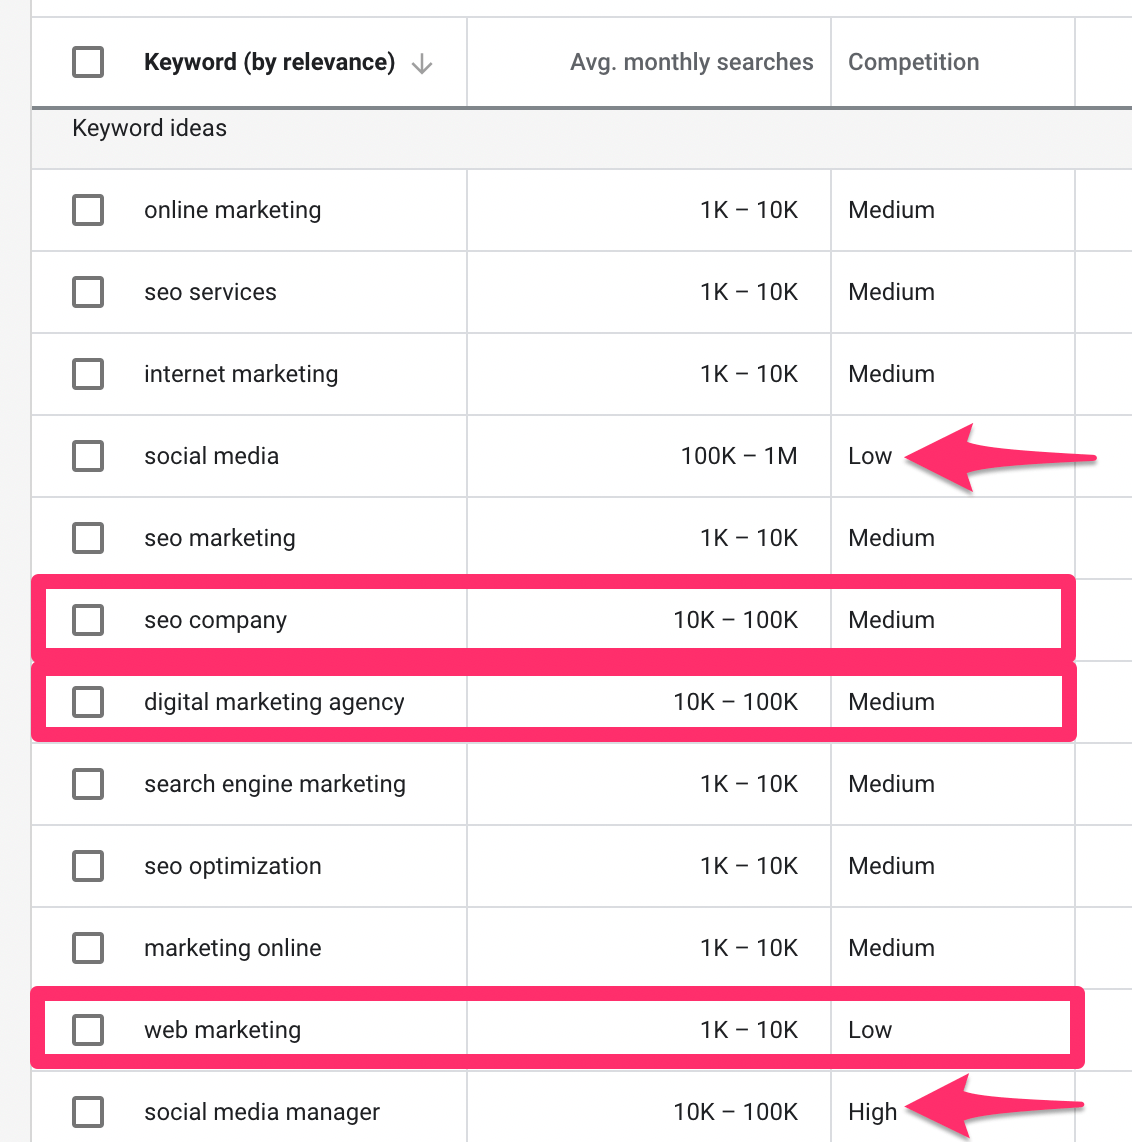
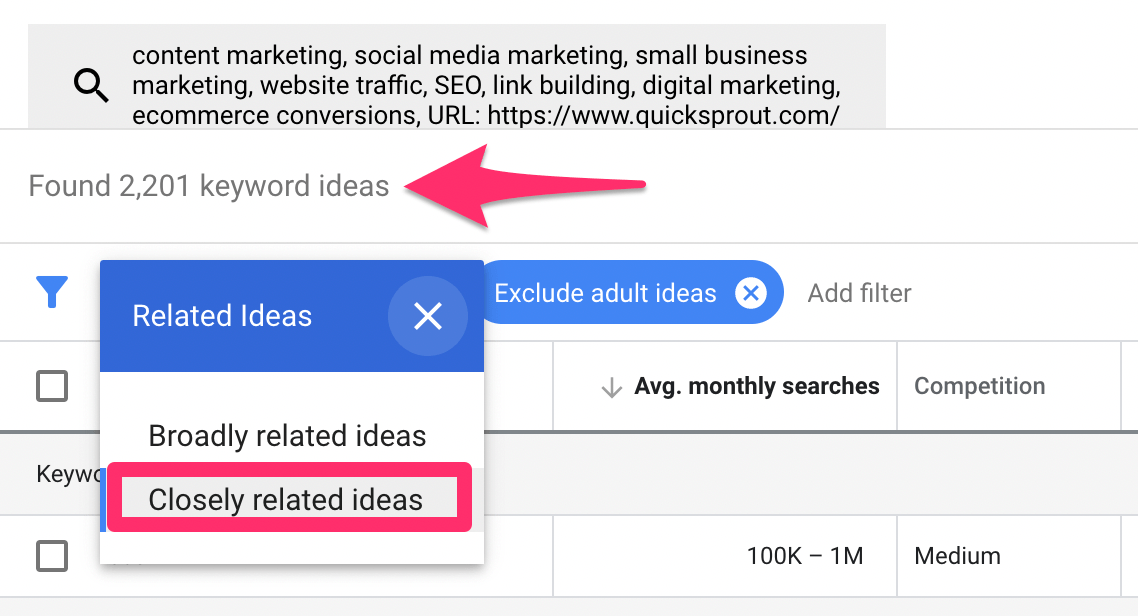
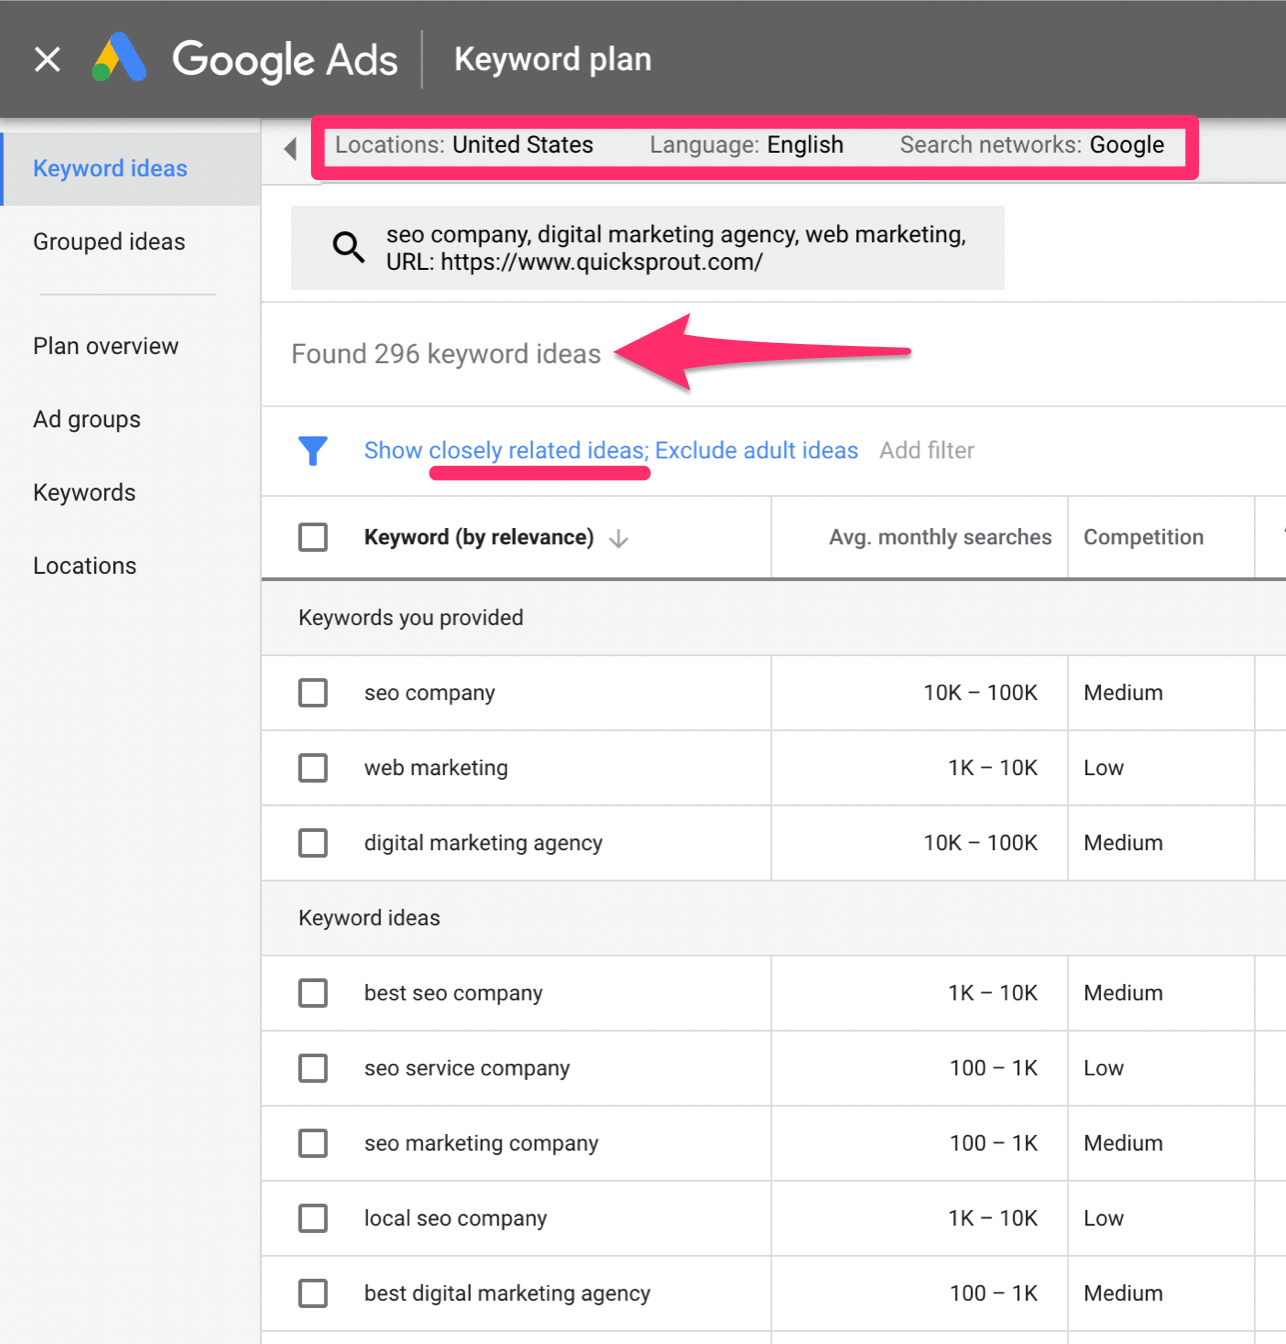
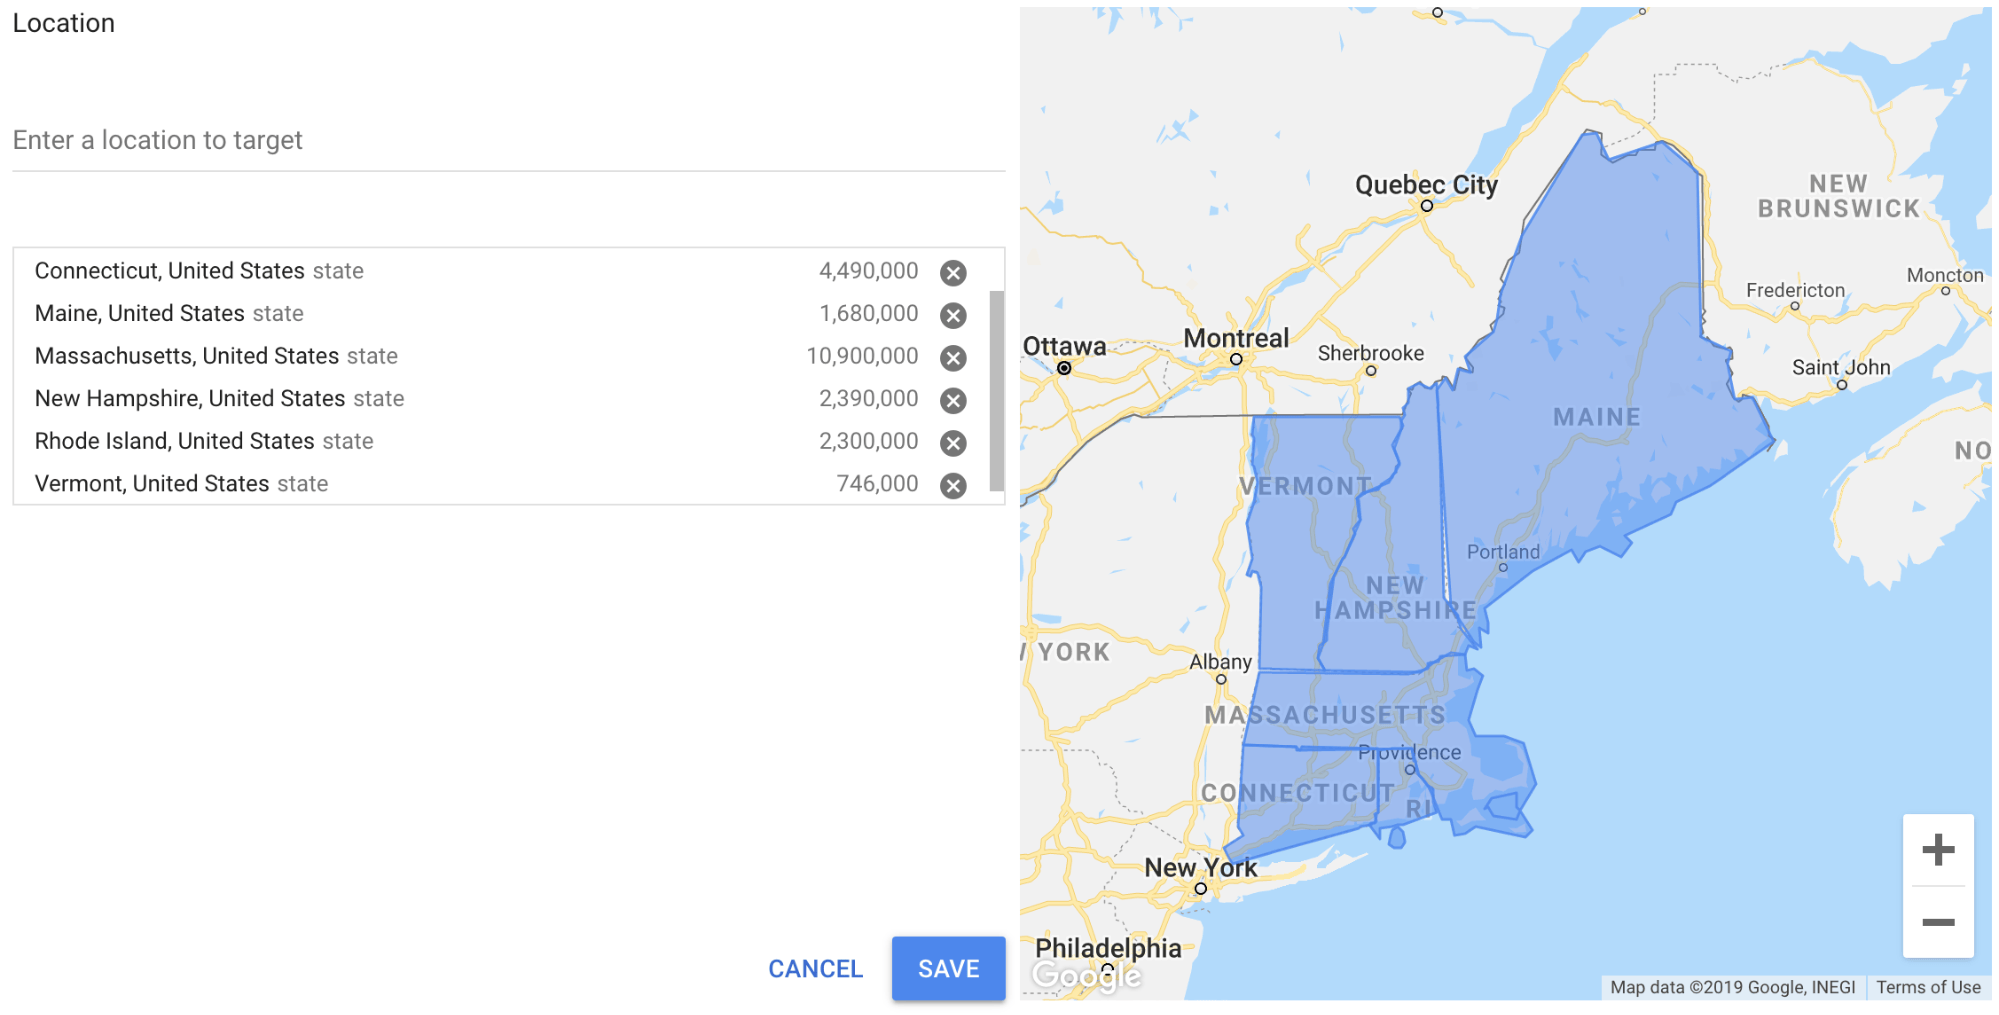

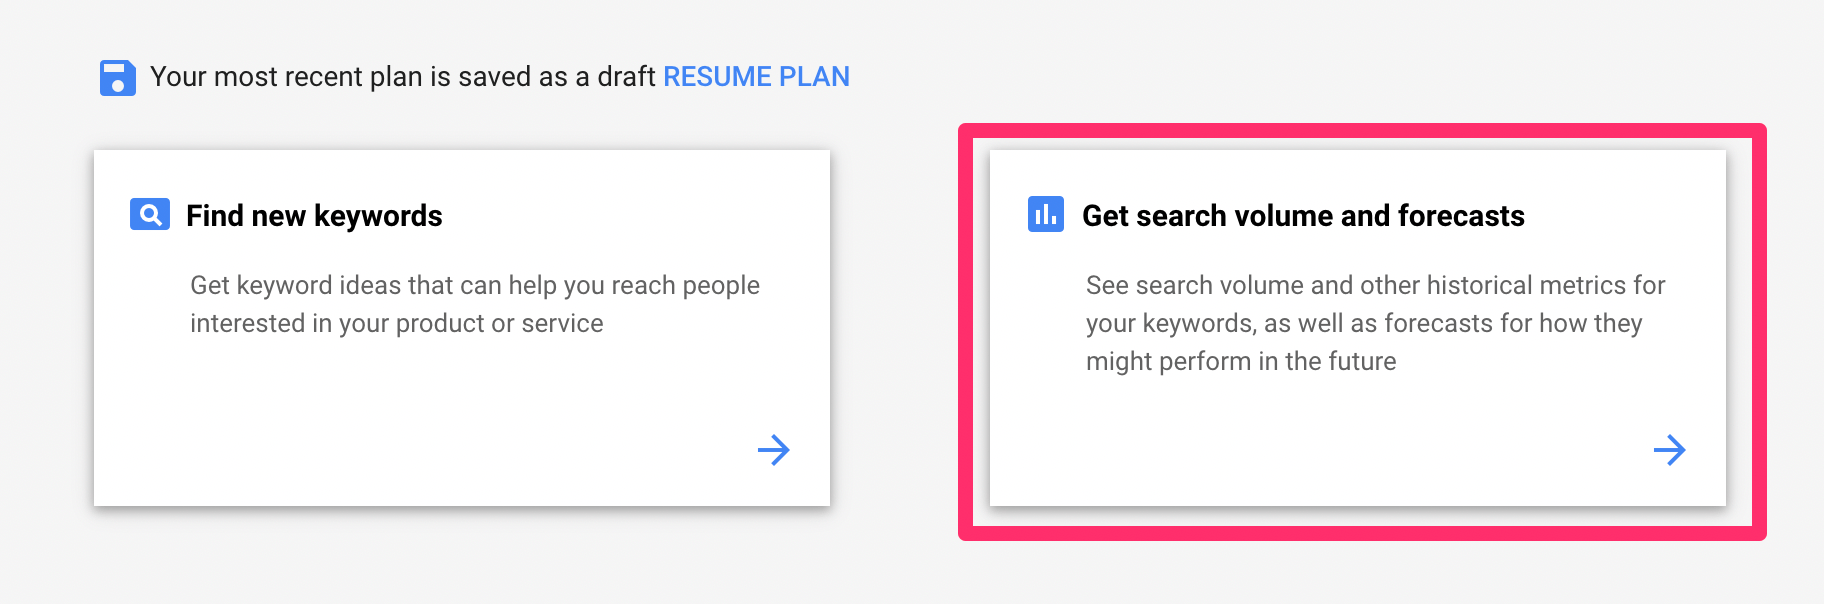
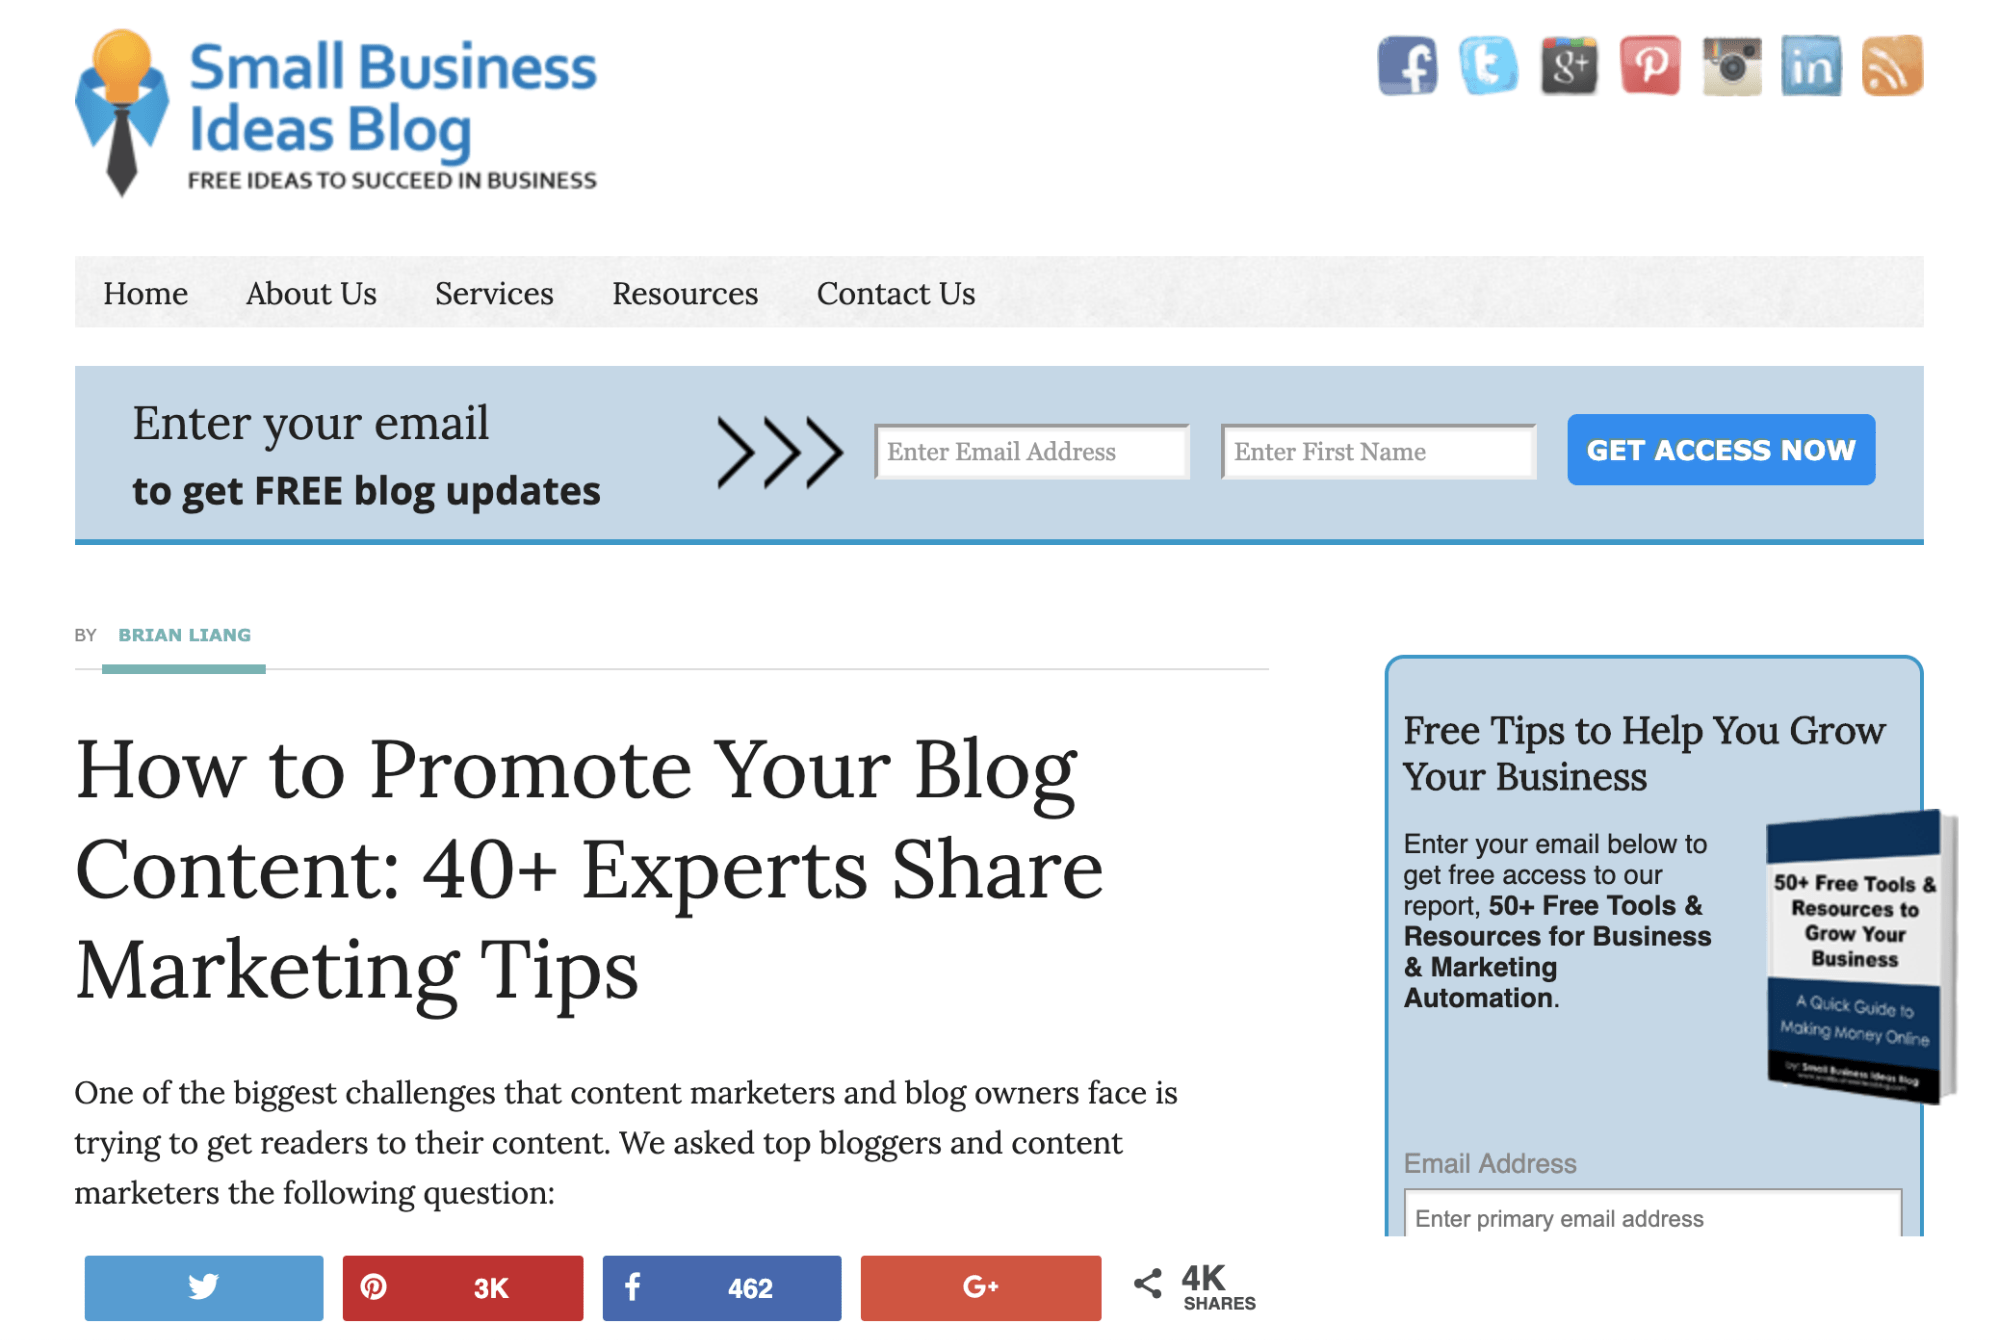
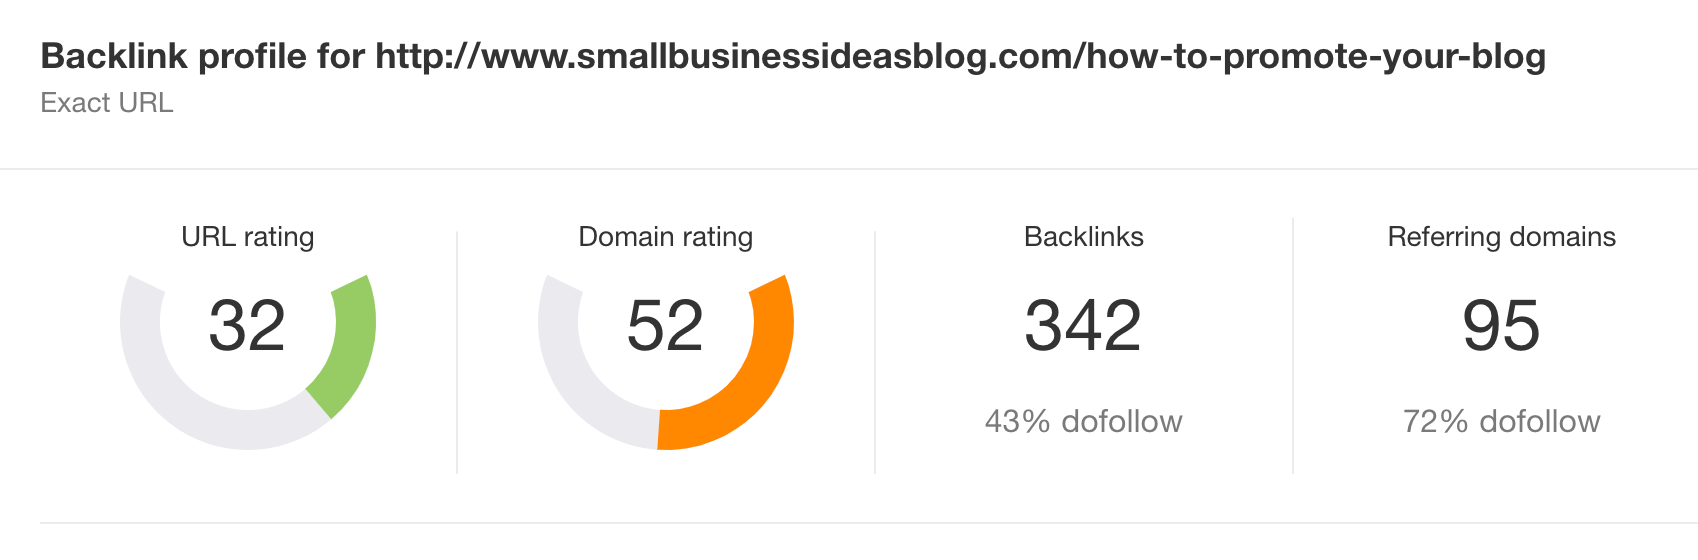
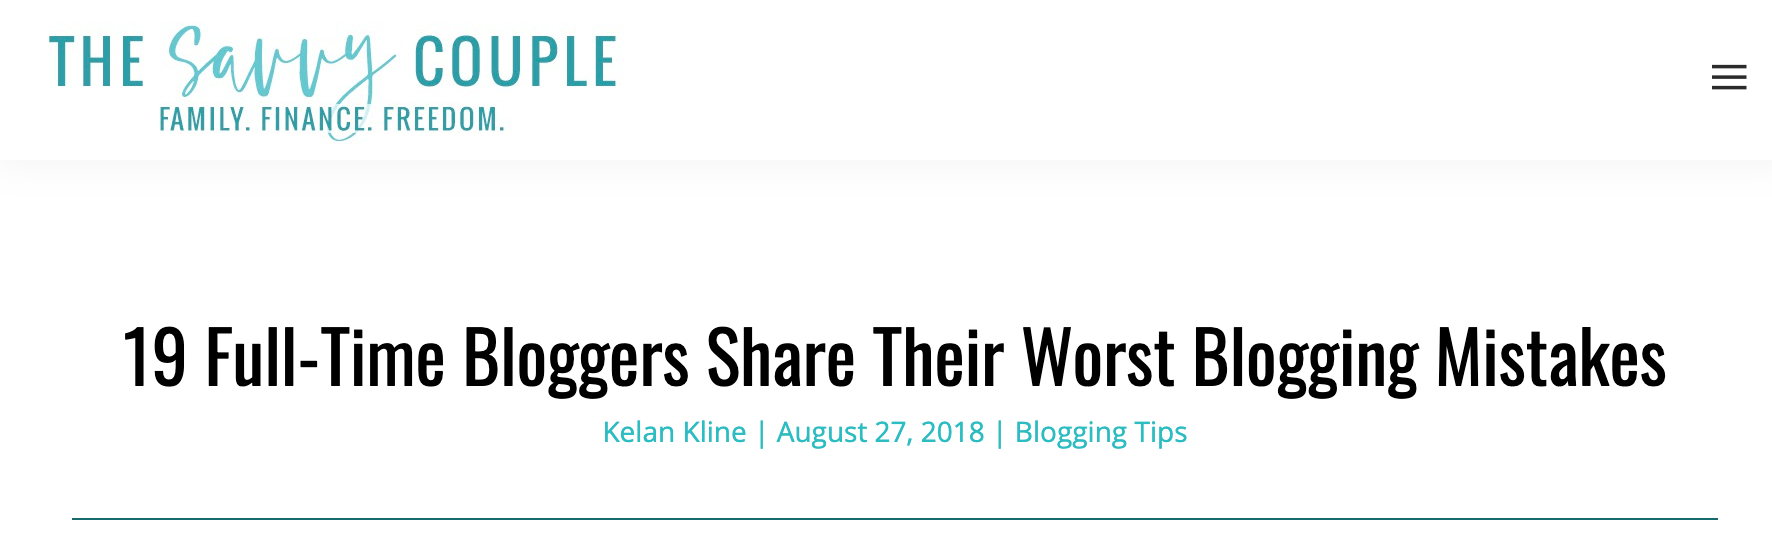
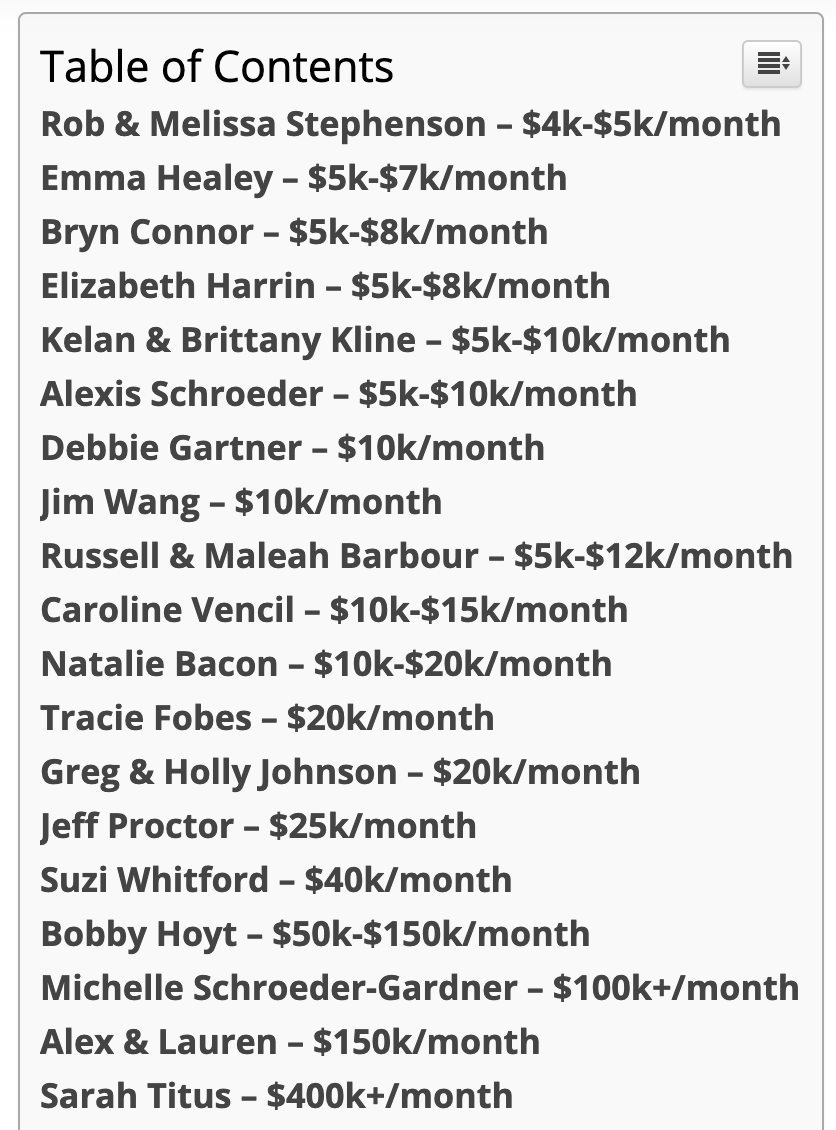
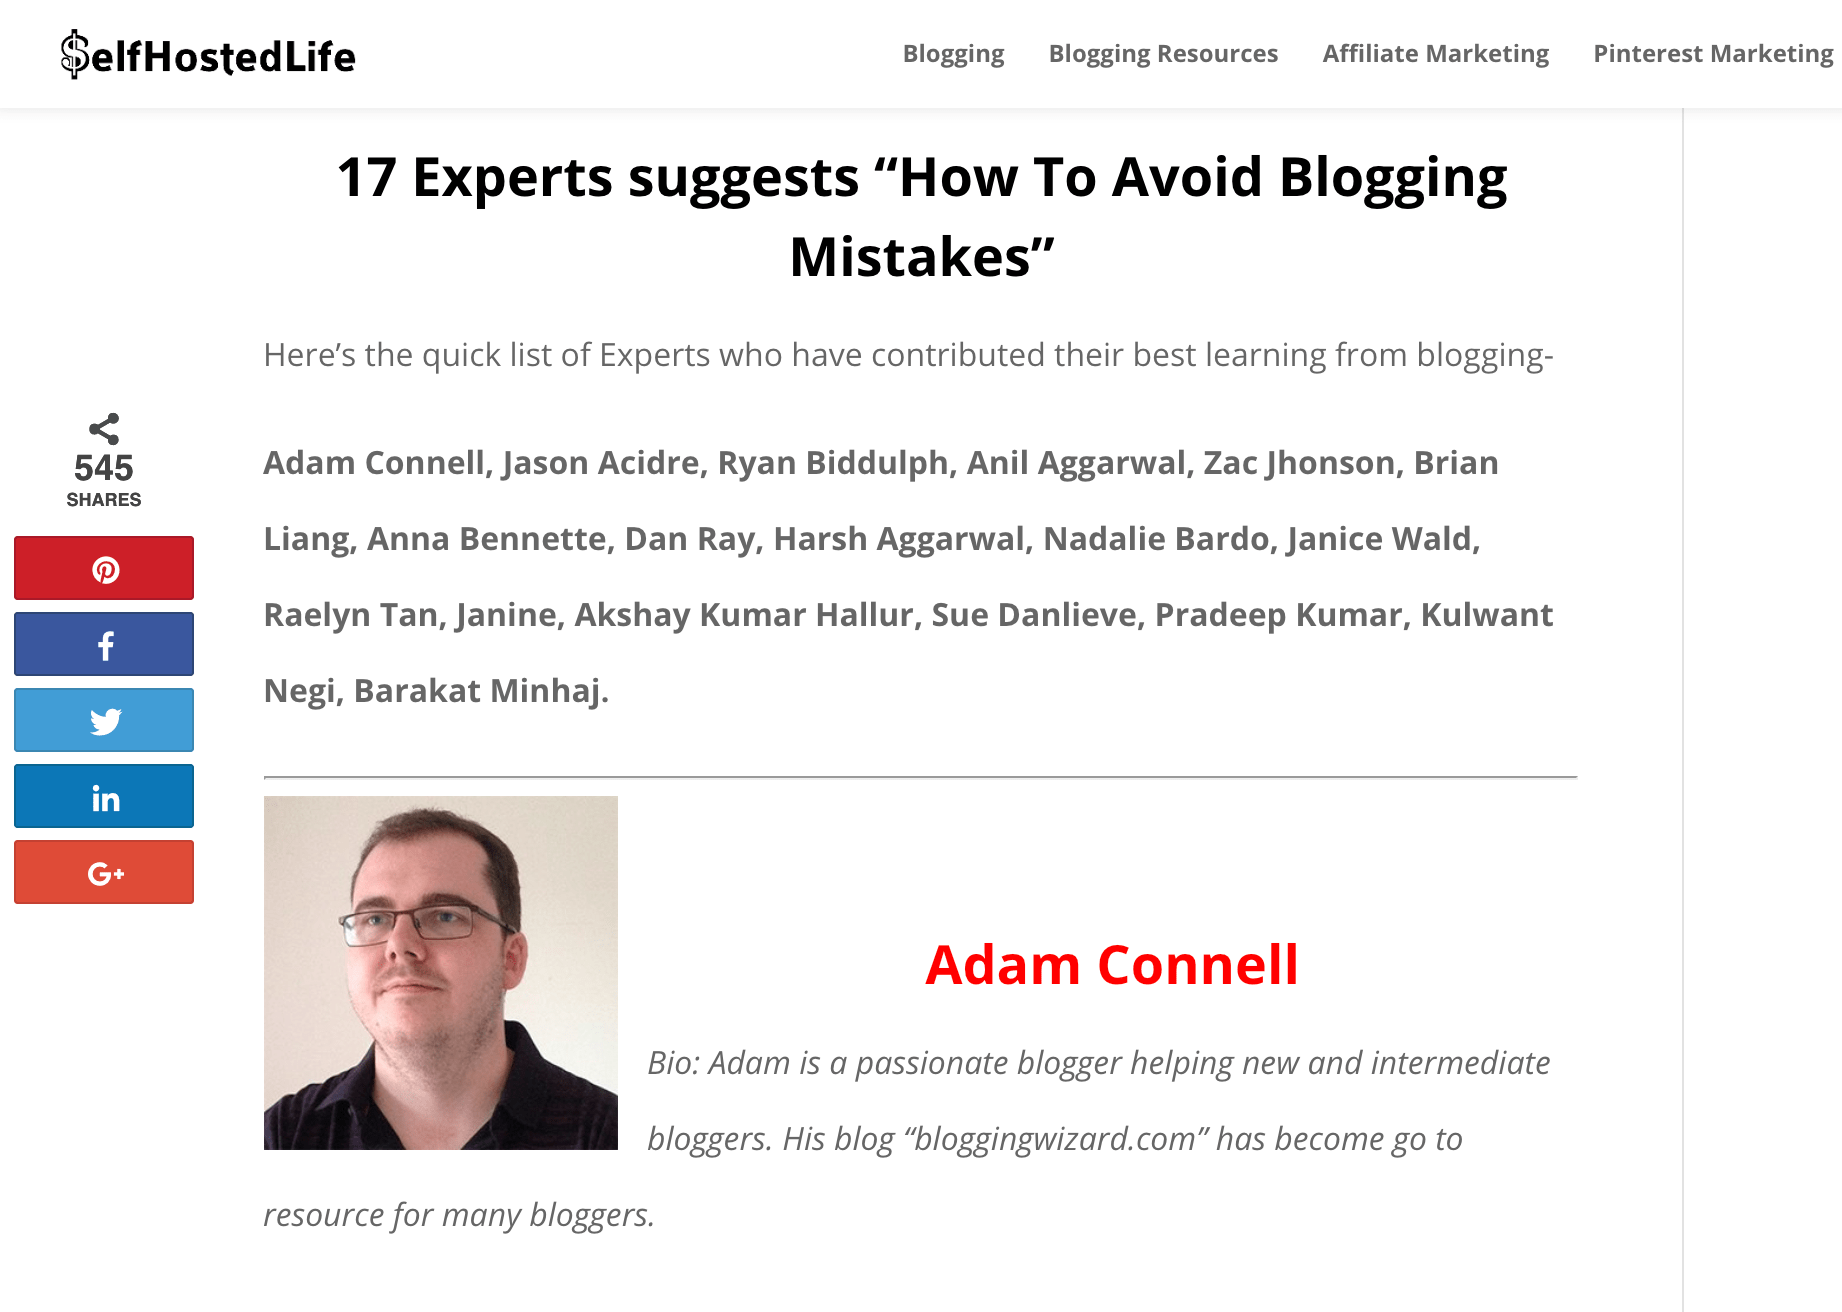
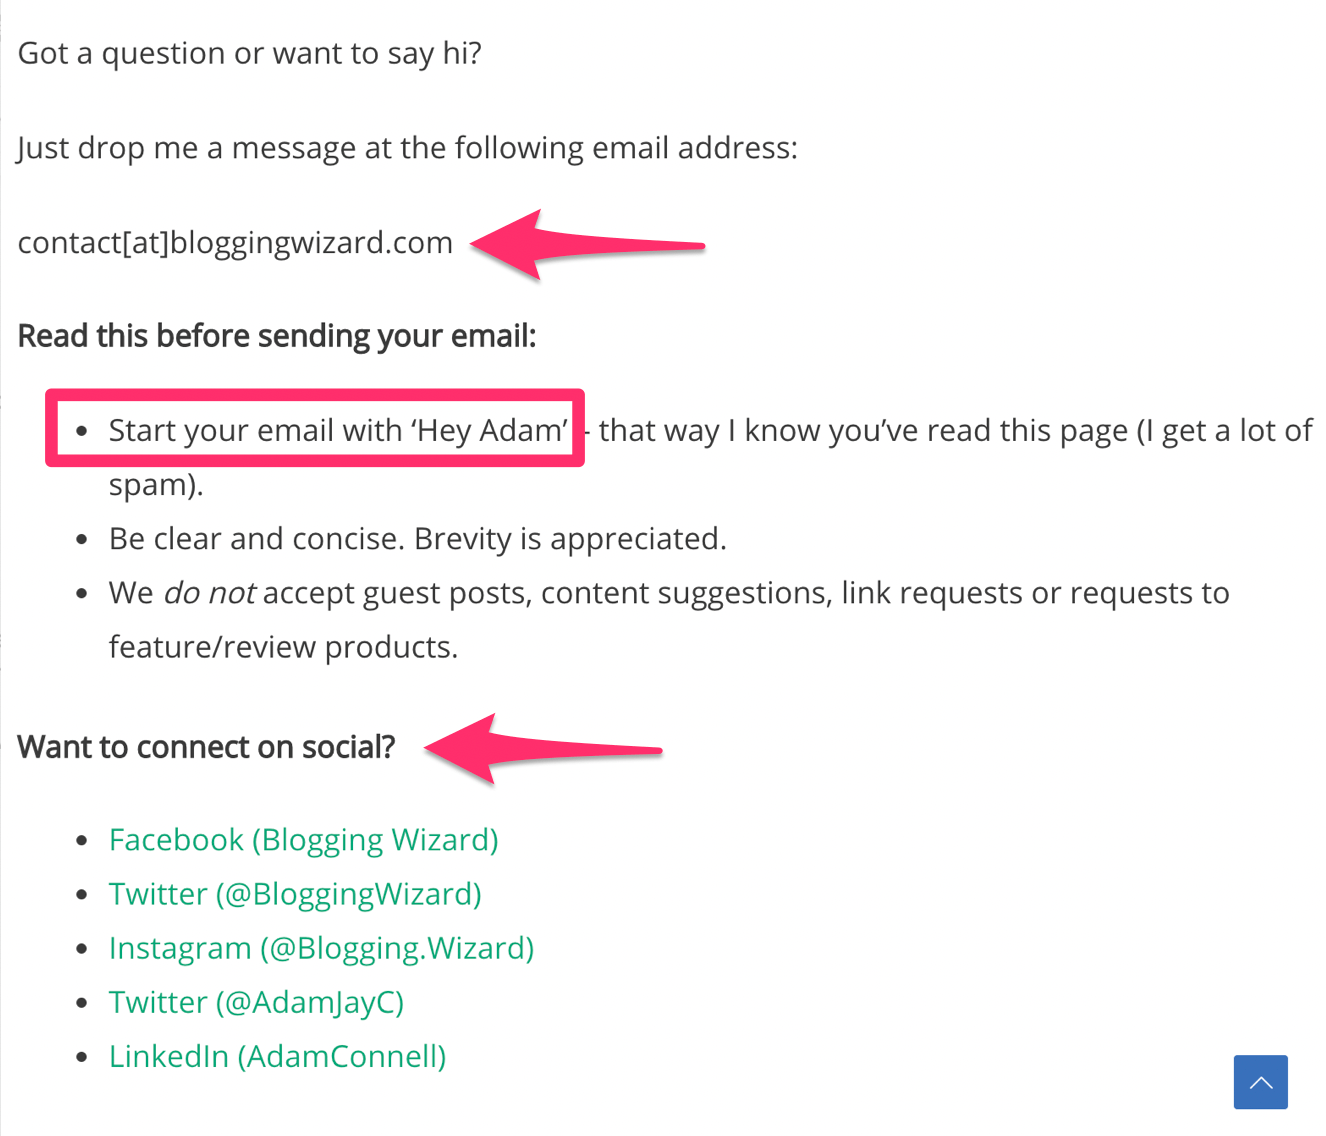
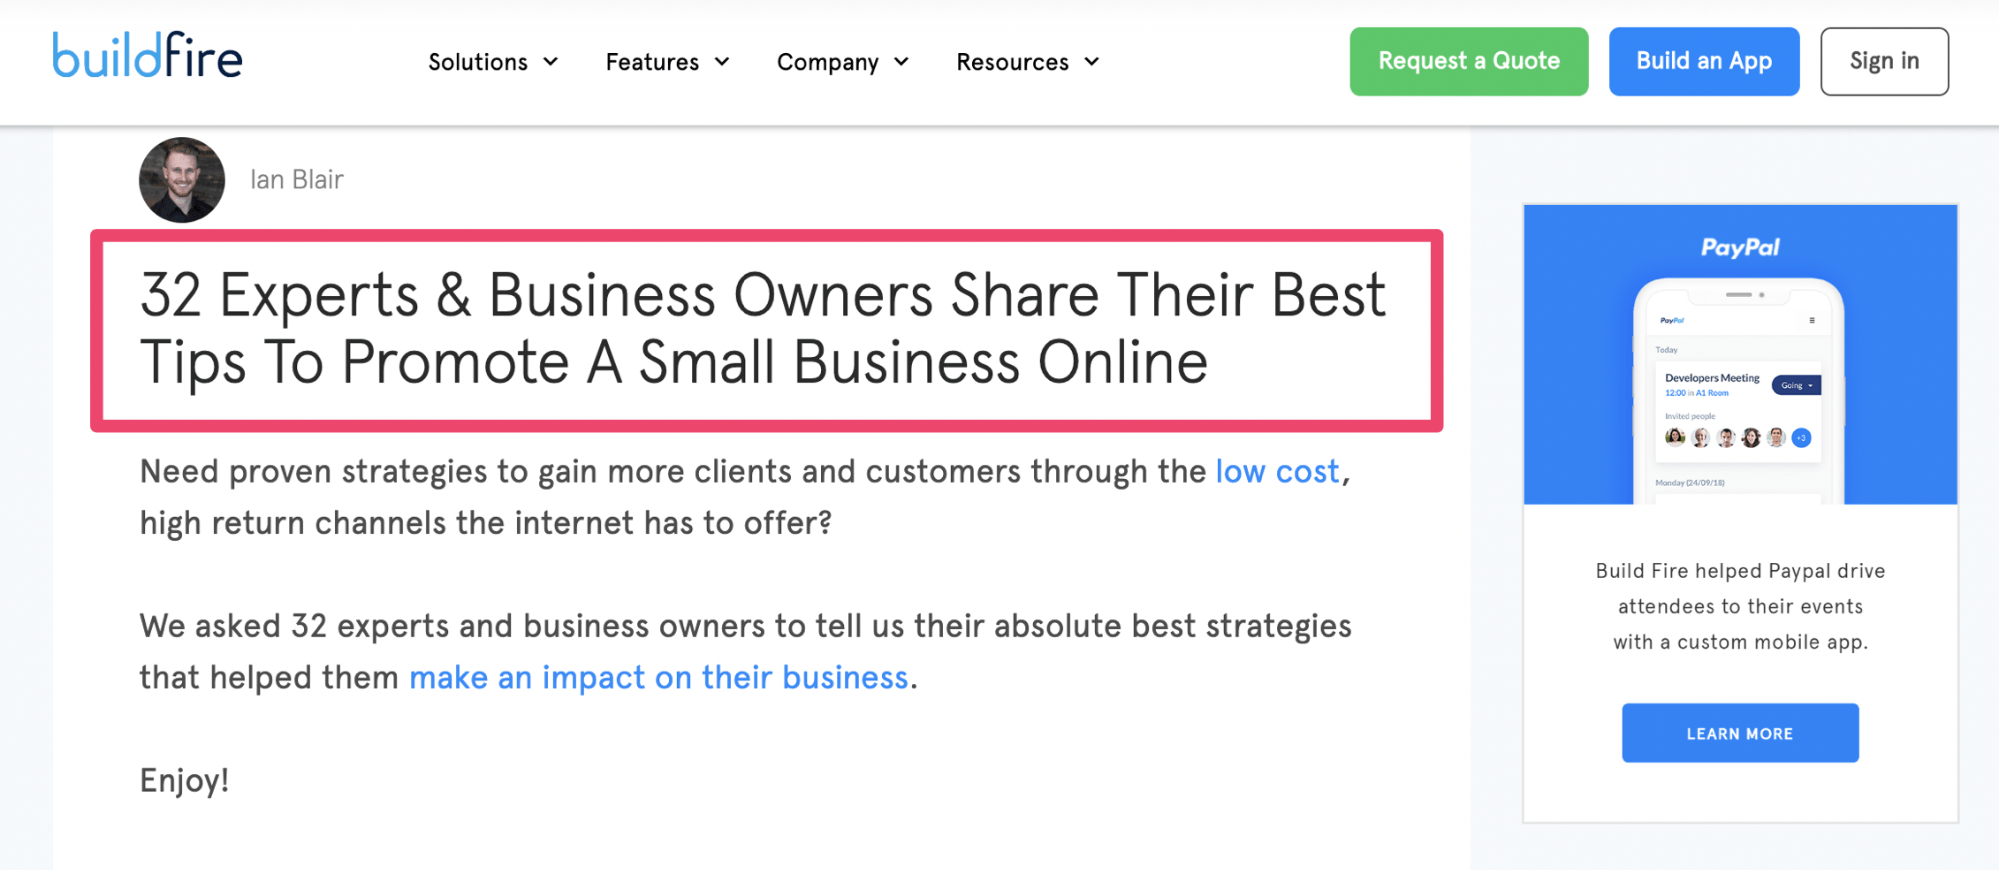


 RSS Feed
