Google Analytics can do just about whatever you want it to. It has a ton of depth. It can also feel a bit overwhelming once you get into it. After consulting on Google Analytics for years, both independently and as the head of marketing at an analytics startup, I have 10 customizations I consider vital for every site I run.
Once they’re in place, you’ll have:
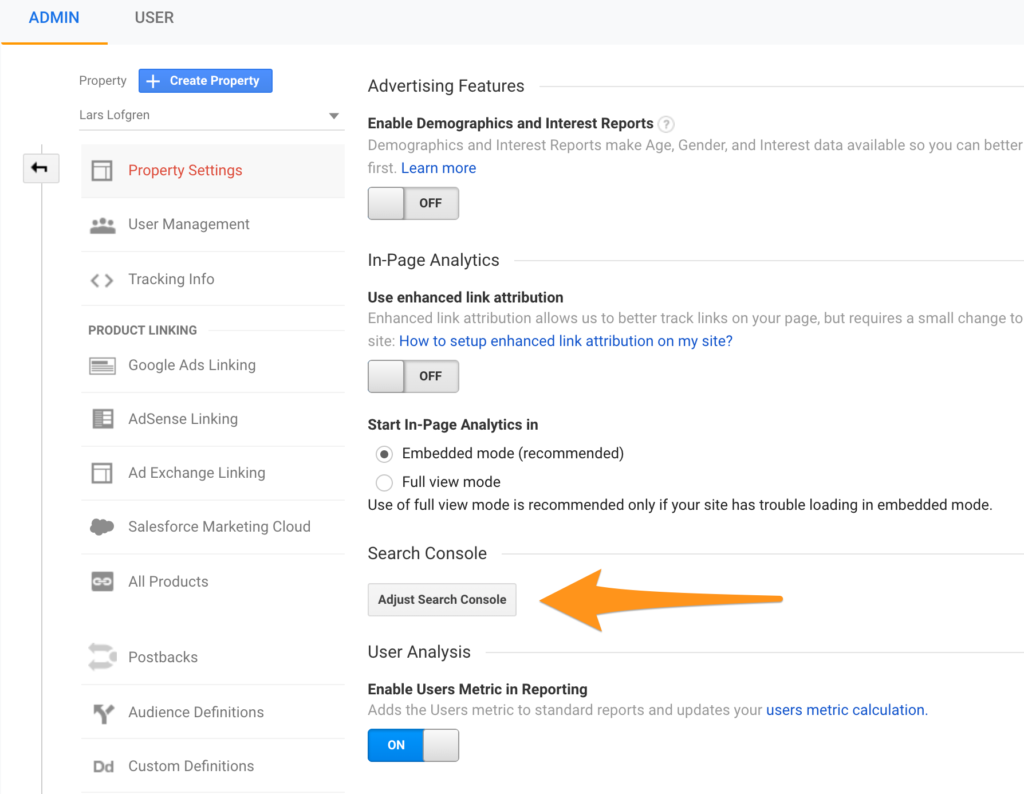
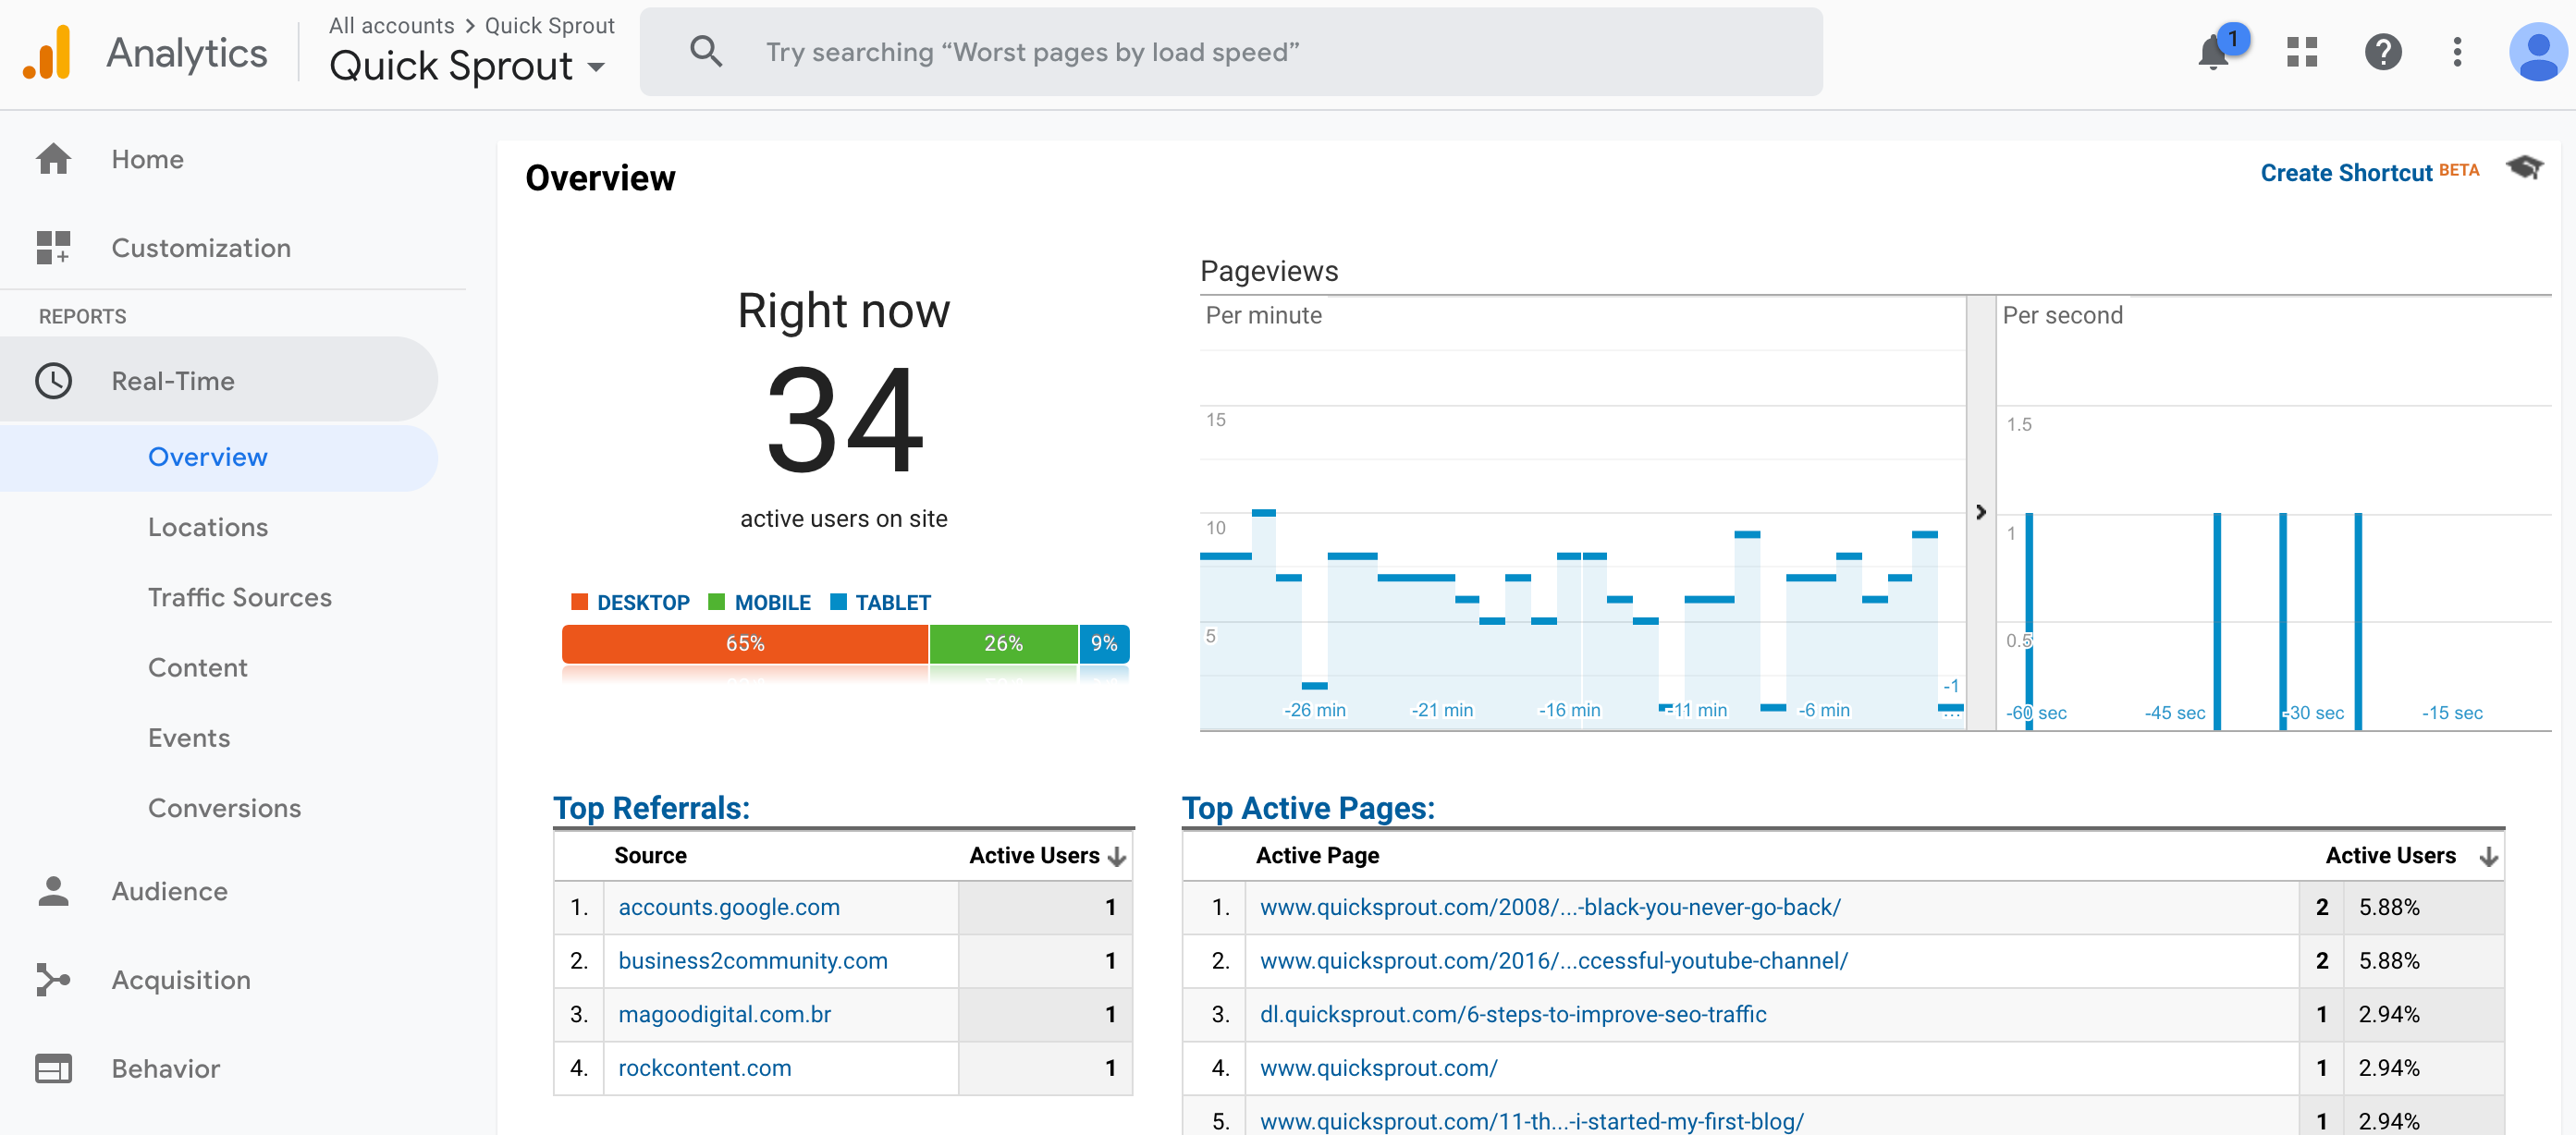
Let’s dive in. Connect Google Analytics to Google Search ConsoleWay back, Google Analytics used to have keyword data in all its standard reports. You were able to see which keywords sent traffic to which pages. And if you had ecommerce tracking or goals set up, you could see how much revenue each keyword produced for you. It was amazing. Then Google decided to remove the keyword data from Google Analytics. So, instead of amazing keyword data, everything got lumped into the dreaded “not provided” group. Google killed the keyword data in Google Analytics. I thought the keyword data was done forever — I never expected to see it again. I resigned my fate to needing tools like SEMrush or Ahrefs for keywords. Then a funny thing happened. Google started investing a lot of time into improving Google Search Console. In the last few years, it’s gotten incredibly good. The data is a goldmine. Google also improved the integration between Google Search Console and Google Analytics so it’s now possible to get a lot of that missing keyword data back. That’s right, keywords are back in Google Analytics. All you have to do is sign up for a free Google Search Console account and connect it to your Google Analytics account. It’s pretty easy. There are only two steps:
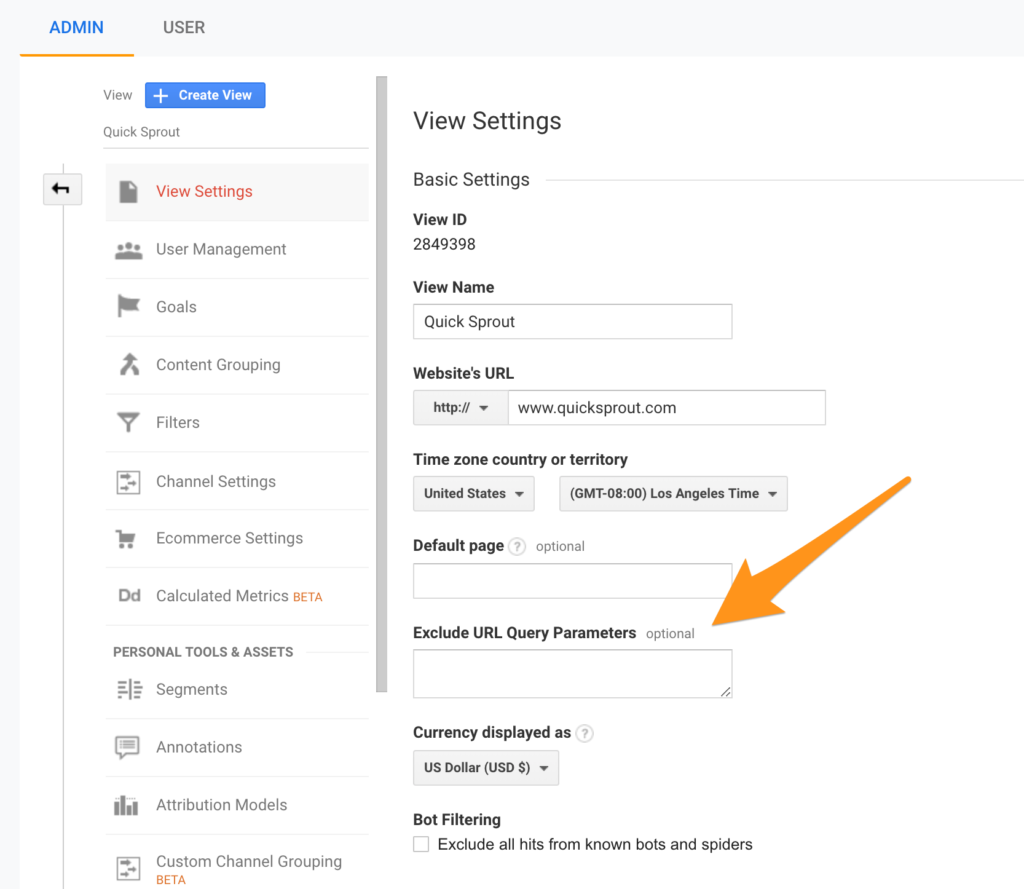
Here’s where to find the settings in Google Analytics to turn on Google Search Console: 
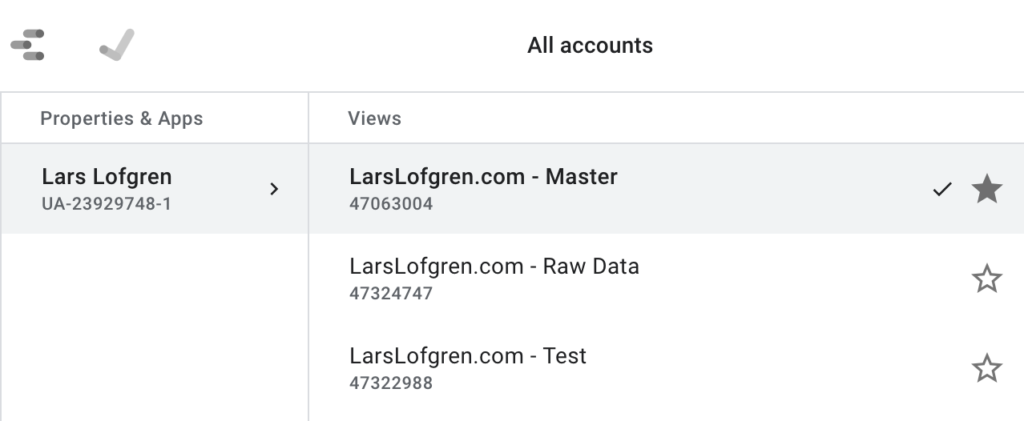
After the accounts are connected, all the reports under Acquisition – Search Console will start populating. Keep in mind that they have a 48 hour delay so give it a few extra days before checking for data. Create Multiple ViewsI consider this a mandatory customization for Google Analytics. Once data makes it into your Google Analytics reports, it’s permanent. Nothing can change it. Google has an entire processing pipeline for all the data it collects. Once data has been processed, there’s no going back. So what happens if you use one of these Google Analytics customizations and accidentally nuke your whole account? That data is permanently gone. When you fix the setting in your account, you won’t get any of your old data back. Only data from that moment onward will be clean. Even if you just make your reports a bit messier with the wrong setting, there’s no going back. In other words, the stakes are high. We all make mistakes. And it’s a good idea to create two extra views for your Google Analytics profile as a backup. On every one of my Google Analytics properties, I create three views:
Your Google Analytics views should look like this: 
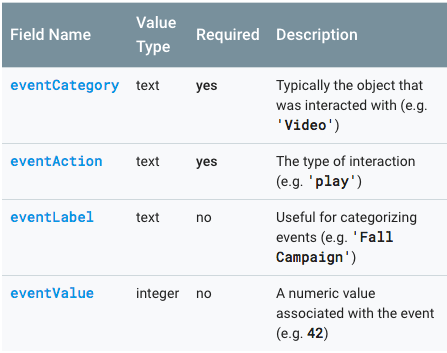
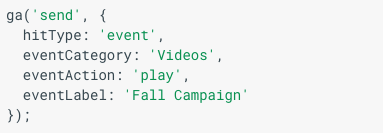
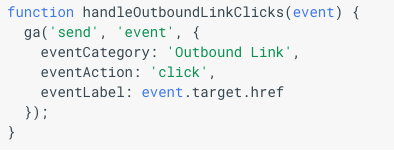
Set Up EventsGoogle Analytics tracks a ton of stuff without any customization which is why it’s so popular. There’s a ton of value right out of the box. Sometimes, there are other actions that are also worth tracking beyond the standard sessions, pageviews, bounce rates, and time on site. You might want to track:
Anything that’s important to your site can be turned into a Google Analytics event so you can track how often it’s happening. To trigger events, you will have to add some code to your site that sends the event data whenever the action occurs. Most likely, you’ll need a developer to help you set this up. All the event documentation is here. Define GoalsIn my experience, folks go overboard with goals. Hitting 10 pageviews per visit is a goal, signups are goals, PDF downloads get goals, random events are goals, goals goals goals everywhere. Usually when I start working on a new site, I end up having to delete a bunch of goals that don’t matter. My rule: only 1 or 2 goals per site. And they should be goals that closely track to revenue. So if the goal goes up, I expect revenue to also go up. If the correlation to revenue is weak, use an event instead of a goal. Some examples of good goals:
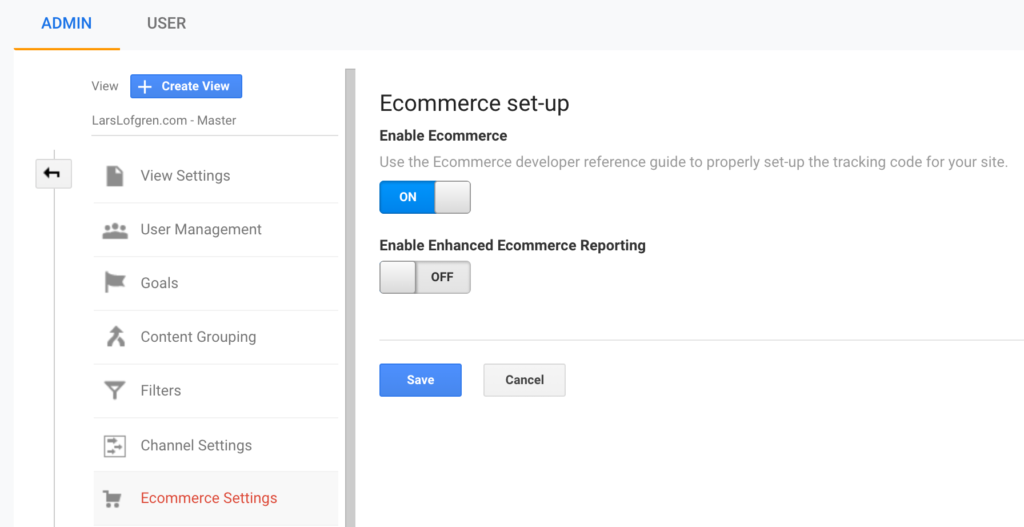
Any event that leads to a sales funnel is a good candidate for a goal. There are really two ways to set up goals like these. URL GoalIf your site is set up in a way that users always hit the same URL after completing one of these key actions, you can tell Google Analytics to trigger a goal every time someone lands on that URL. This works great for “thank you” pages. No code is needed for these, you can set it up right away. Event GoalsIt’s also possible to have Google Analytics trigger a goal any time an event fires. This gives you the flexibility to trigger a goal whenever you like since it’s possible to trigger events whenever you like. You most likely need a developer to help you set these up. Ask them to create a Google Analytics event for you. Once you see the event tracking correctly in the Google Analytics event reports, then go set up a Goal using the values of your event. Why go through the trouble of turning an event into a goal? Why not just look at the event reports? It makes getting conversions data in your reports a lot easier. Many of the reports are pre-configured to show conversions based on goals. It’s trickier to get the same reports based on just events. Implement Ecommerce TrackingIf you have an ecommerce store, Google Analytics ecommerce tracking gets all your revenue data into your reports. It’s amazing. You’ll be able to see:
Google Analytics doesn’t track any of your ecommerce purchases out of the box. You will need to set up some extra stuff. There are only two ways to get this set up:
First, go check your ecommerce tool and see if it has a built-in integration. Shopify has one. And if you’re not on Shopify, consider migrating. It’s worth the switch. If you need to set up ecommerce tracking by hand, all the developer documentation is here. One last thing, remember to turn on ecommerce tracking in your Google Analytics settings: 
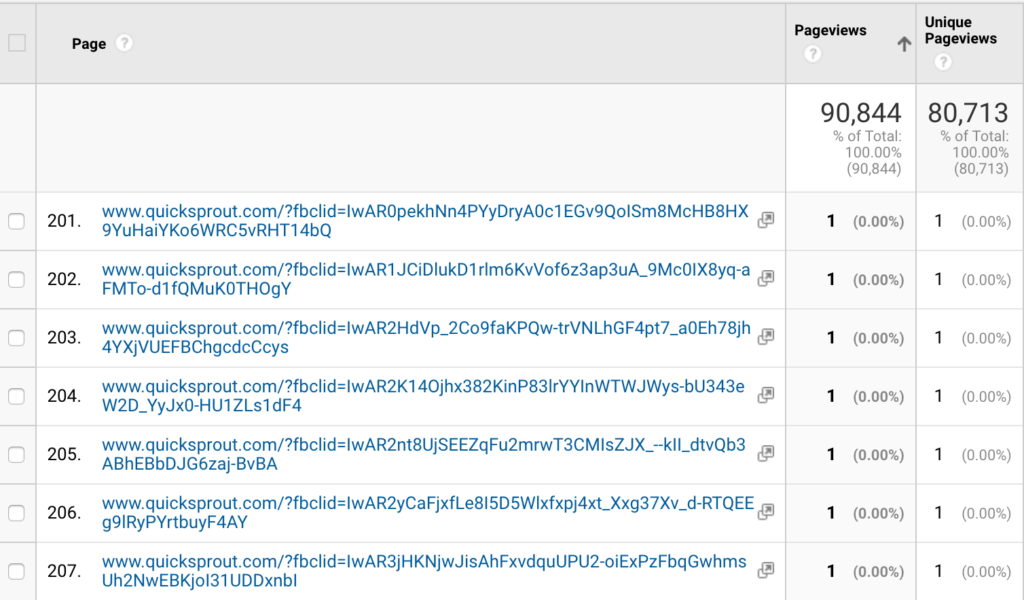
You need to flip the switch before data will start showing up. Content GroupsOut of everything on the list, Content Groups are the most situational customization. Most sites don’t need to set these up — they’ll amount to nothing more than busy work that’s quickly forgotten about. But for editorial and ecommerce sites, they make an enormous difference. Google Analytics considers all your URLs to be equal. It doesn’t lump them into subgroups at all. If you have a large site and manage the site by sections, this becomes a real problem. You might have Money, Heath and Fitness, and Political news sections that are all managed by different teams. Or, maybe you have different merchandize groups for your ecommerce store. How do you track the performance of those different sections of your site? You can’t do it with an internal spreadsheet; new posts and products go up too fast to keep one accurate. Even if you can make it work, it’s a real pain to keep updated. Setting up unique Google Analytics views is one option but only really works if every category has a clean subfolder in your URL. Plus, creating unique Google Analytics properties for each section creates all sorts of extra problems with referrals and tracking everything in aggregate. The solution? Google Analytics Content Groups. Using either the Google Analytics settings or by appending your Google Analytics JavaScript with a bit of extra code, you can categorize your site pages into whatever groupings you want. Once you’ve set up Content Groups, you can take any report in Google Analytics and organize all the data by any content group you’ve set up. For major editorial and ecommerce sites, it saves countless reporting hours. Clean Up ParametersIt’s pretty common to run into pages like this in your Google Analytics reports: Anything after a “?” in a URL is a parameter. It’s common for tools to add URL parameters to a URL. These parameters don’t change the destination of the URL, they add extra data that various tools can then use. The problem is that Google Analytics treats parameters as unique URLs. In other words, traffic to the same page will show up in Google Analytics as visiting different URLs simply because the parameters for each user were different. This splits our pageviews across a bunch of different URLs instead of giving us the real total for a single page on our site. That’s exactly what’s happening in the Quick Sprout example above. Instead of having 7 pageviews for our homepage, we have 7 pageviews split across unique pages because of a unique fbclid parameter that was added. There’s a bigger problem too. A lot of marketing automation and email tools will add ID parameters to the end of every URL in their emails. That allows them to track what email subscribers are doing. Even worse, it can populate reports with personal information like email addresses and names. It’s against the Google Analytics terms of service to have personal info in any report so you definitely don’t want this data to end up in your reports. Here’s how parameters work:
To clean up your reports and scrub personal data clean, go to the All Pages report. Then sort by least pageviews. This will give you a list of URLs that only had a single pageview. Scroll through about 100 pages and look for any parameters that don’t signify a real URL. Once you have a list of parameters that are junking up your reports, go to your View settings and add all the parameters that you want excluded here: Be careful though. Some sites use parameters for different pages. I personally think it’s a terrible way to structure a site but it does happen. If your site does this, don’t include the parameter for those real pages. Otherwise Google Analytics will stop tracking the pages entirely. Also don’t include any of the standard UTM parameters that are used to track marketing campaigns. Google Analytics already handles that data correctly. Install Google Analytics via Google Tag ManagerIn our post on setting up Google Analytics, I advocated for skipping Google Tag Manager when setting up Google Analytics for the first time. I still stand by that, especially for folks creating their site for the first time. When you skip Google Tag Manager as a new site owner, you skip a lot of emplexity without giving up much. If you’re at a stage with your site where you’re looking at deeper customizations for Google Analytics, it’s worth taking the time to get Google Tag Manager set up. Long term, using Google Tag Manager is a good habit to get into. It saves a bunch of headaches down the road that large sites run into. Keeping all of the JavaScript tags from all your marketing tools in a tag manager makes updates, maintenance, and audits super easy. Again, if you’re running your site by yourself and hate the thought of learning one more tool, feel free to skip this. For everyone else, it’s time to remove your Google Analytics Global Site Tag from your site, install Google Tag Manager, and then add Google Analytics to your tag manager. Once you’ve removed Google Analytics JavaScript from your site, follow these steps:
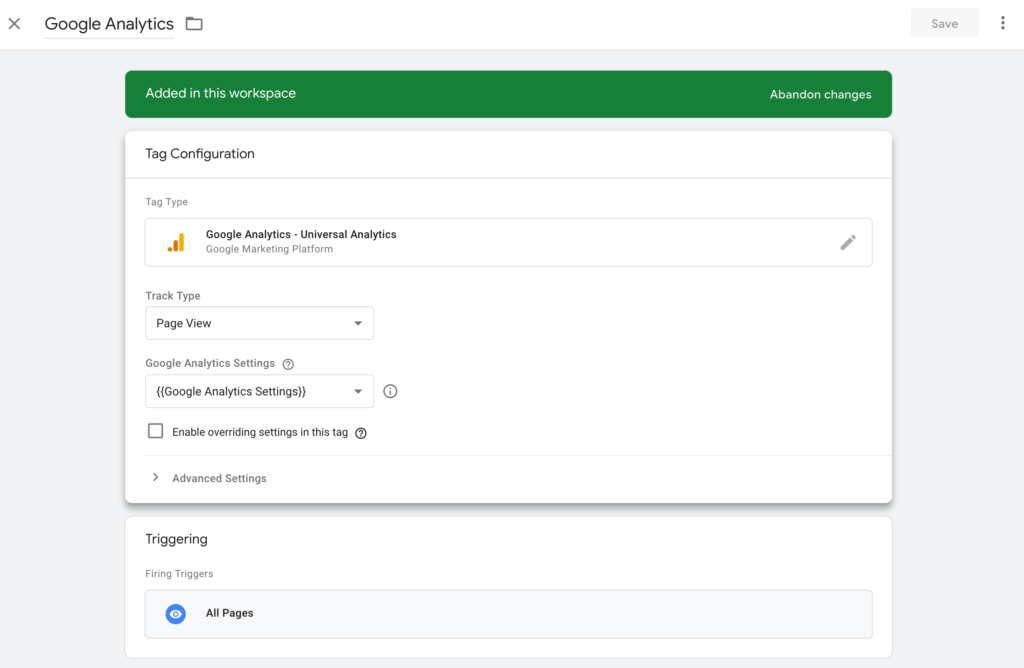
Your tag will look like this when you’re done: To make sure that Google Analytics is working through Google Tag Manager, check your real-time reports in Google Analytics to see if it’s successfully recording data. Create Custom AlertsSooner or later, you site will get hit. Here are a few scenarios that I’ve personally been through:
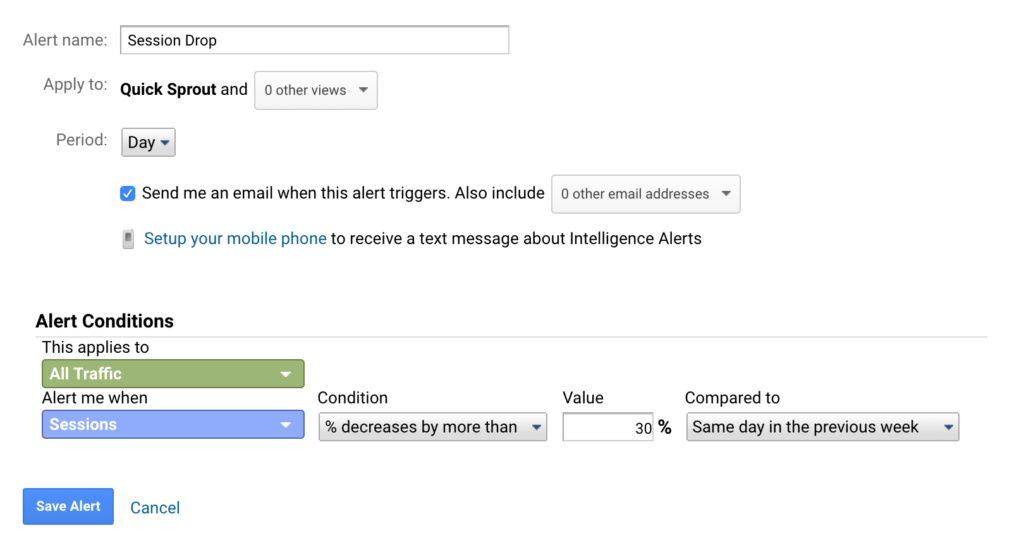
Most of these examples are pretty embarrassing. Sooner or later, they happen on every site. I find that I run into 1–2 per year. To help catch major problems like these, Google Analytics has Custom Alerts. You define a set of criteria and whenever that event happens, Google Analytics will send you an email. Even if your team isn’t checking Google Analytics daily, you’ll still catch major problems within 24 hours. Here’s the alert I like to set up: This alert sends me an email whenever sessions decrease by 30% or more compared to the same day the previous week. A few tricks that I’ve learned about custom alerts over the years:
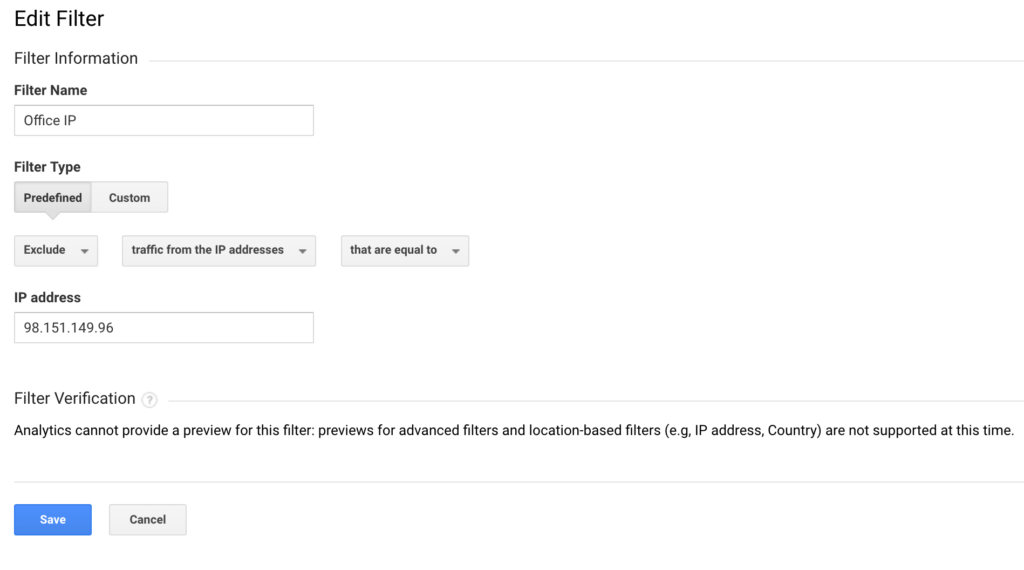
Add an Office IP FilterIn Google Analytics, filters give you complete and total power. You can remove and transform your data permanently. And when I say permanently, I do mean permanently. Be careful with these things. Once a filter is live, it’ll change all the data that’s collected. There’s no way to undo it. If a bad filter is applied, the only fix is to remove it and clean up data that’s collected after. There’s nothing that can be done to fix the old corrupted data. So proceed with caution on these things. There’s one filter that many websites should apply: a filter to remove internal traffic. If you’re running your own business out of your house or from a coffee shop, don’t worry about this at all. The data impact from a single person is so limited that it’s not worth the hassle of adding a filter and maintaining one more setting in Google Analytics. Whenever I start to see the impact of my own browsing habits on one of my websites, my first thought is: “I need to spend my time getting more traffic.” At that stage, I prefer to worry about big things like getting enough traffic and customers. However, there is a situation where an office IP filter becomes a requirement. When you’re working on a larger website with an entire team of people employed, skewing your traffic data becomes a real possibility. If a couple hundred people all work on the same website, Google Analytics data will become biased. If your company works out of an office (or several offices), it’s worth the effort to figure out the IP address of your office and apply a Google Analytics filter that excludes all data from that IP. That keeps your employees from skewing your Google Analytics reports during their day-to-day work. Here’s what your Office IP filter will look like: This filter tells Google Analytics to take all data from an IP address and completely ignore it. Remember to use the new views that you set up earlier. First apply the filter to your Test view, give it a few days to make sure it’s working properly, then apply the filter to your Master view. Filters are so powerful that you always want to test them first. All it takes is accidentally selecting “Include” when you meant “Exclude” to permanently nuke your entire Google Analytics account until your discover the mistake. via Quick Sprout http://www.quicksprout.com/google-analytics-customizations/
0 Comments
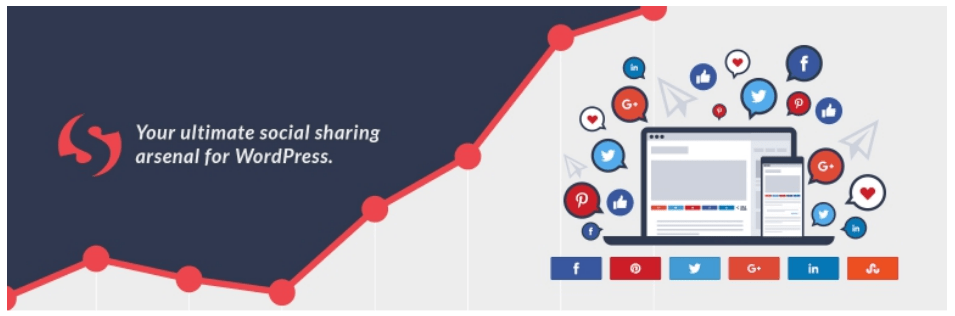
Social media has undoubtedly changed the way we live. It’s also changed the way we market ourselves, our businesses, and our websites. If you have a website in 2019, you definitely want some type of social media integration. You want your website visitors to engage with you on social media, and you want your social media followers to convert on your website. This won’t happen unless you make it as easy as possible. Let me give you an example: You wrote and published a killer blog post. A reader loves your post and wants to share it with their friends on social media. How do they do this?
Without the proper tools, the person would have to copy your blog link, navigate to the social platform, login, and manually paste the link before sharing it. This process involves too many steps, multiple browsing screens, and too much room for error. The person may ultimately decide that it’s just not worth going through all of those steps to share your post. That decision may not even be conscious — they may get distracted and move on to something else, leaving your post unshared. Social media WordPress plugins can make it easy for website visitors to share with just one click. As a result, you’ll benefit from higher engagement rates on your social media profiles and your website alike. That’s just one example of why you need to install a social media plugin to your WordPress site. As we continue through this guide and review the best social media WordPress plugins, you’ll learn about the additional benefits. Top features to look for in a social media WordPress pluginBefore we analyze specific plugins, I want to take a moment to identify some of the functionalities to keep your eye on when searching for a social media plugin: Social icons — This shows your website visitors that you have social media pages. If they click on an icon, they’ll automatically be directed to the corresponding profile. Social logins — Allow people to sign into customer profiles using their social media accounts. This makes it easier on your customers since they won’t have to create brand new usernames and passwords to access content on your website. Social sharing icons — Website visitors can share content from your site to their social media profiles with just one click. Social feeds — Showcase your social media feeds directly on your website. This feature gives your website visitors an idea of what to expect if they follow your profiles. Social locking — Restrict your best content with a social locking tool. Content can be unlocked if a website visitor makes a specified action, such as following you or sharing content on social media. Social comments — Enhance the conversation in your comments section by adding social media comments to your posts. This is a great way to drive engagement and get more blog comments. Automated posting — Instead of manually posting your website content on social media, you can take advantage of plugins that do this for you. Now that you know the top features of the best social media WordPress plugins, it’s time to check out the top options to consider. 1. Social WarfareSocial Warfare is considered among the best social media WordPress plugins because it’s so simple. Other plugins have a reputation for slowing down your website, but that shouldn’t happen with Social Warfare. This plugin is designed to increase shares by adding social sharing icons to your website. You can add buttons for the most popular social media networks, including: If you upgrade to Social Warfare Pro, you’ll gain access to share buttons for other platforms like Reddit, WhatsApp, Buffer, Tumblr, Pocket, and more. Social Warfare also lets you choose exactly where you want to place the sharing buttons. You can add them above your content, below your content, in both of these locations, or manually place them on your pages. This plugin offers floating share icons as well — as a user scrolls your site, the sharing buttons remain in view at all times. Social Warfare allows you to track your results with UTM parameters. You can view analytics to see how well your sharing icons are performing so you can tweak them, if necessary. 2. Instagram FeedAs the name implies, the Instagram Feed WordPress plugin lets you share your Instagram content directly on your website. By adding your Instagram posts to your website, visitors will have a better idea of what type of content you share on that platform. And, they won’t have to search for your profile on Instagram. This is a great way to increase your Instagram followers. It’s also a great way to keep your site updated with the fresh images you’re posting on Instagram. Setting up the plugin is easy. All you need to do is link your Instagram account and determine where you want the feed displayed on your website. There is a premium version of this plugin that comes with features like:
For one website, you can purchase the pro license for $39. But if you just want the basic feed on your website, you can stick with the free version and save a few bucks. 3. Social Locker
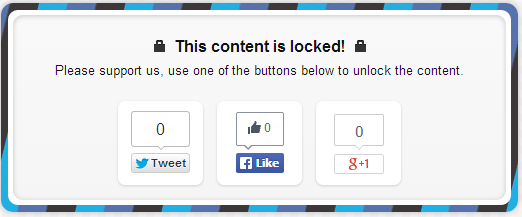
Social Locker is definitely one of my favorite social media WordPress plugins. Personally, I love the whole concept behind how this plugin works. Here’s the thing. Just adding social sharing icons to your website doesn’t necessarily give people a reason to follow you or share your content. You can increase those chances by installing this plugin. That’s because Social Locker restricts your premium content. For example, let’s say you have an ebook on your website. As opposed to charging for downloads, you use social media engagement as a currency. If someone follows, likes, or shares content on your website, the ebook is unlocked. Here’s an example of what this would look like from the perspective of a website visitor: For those of you who normally charge for various types of content on your website and don’t want to give it away for free, you can use these social engagements to generate discounts for that content. Maybe you have an online video tutorial that you normally charge to view. With Social Locker, you can choose to offer the video at a discount if a user shares your content. This plugin helps you drive social media traffic while simultaneously gaining quality followers. It’s a great way to generate new leads and drive conversions with social media integration on your website. 4. Super Socializer
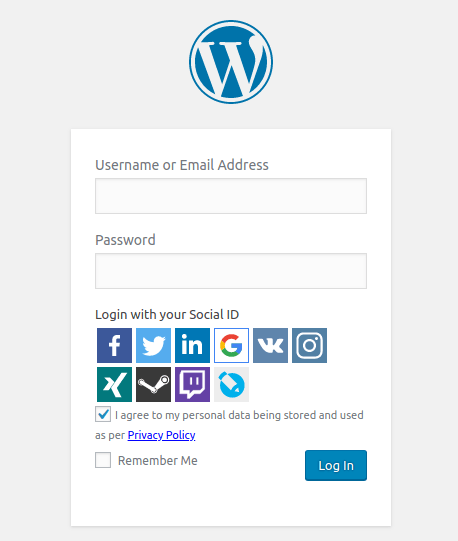
Allowing your website visitors to create a customer profile benefits everyone — the user will receive more personalized content, and you’ll be able to learn more information about your customers so you can target them accordingly. It’s a win-win situation. In order for this strategy to be effective, people need to create these profiles in the first place. That’s easier said than done. Think about it for a minute: What steps does someone need to take to create a profile? At a minimum, they need to provide you with some personal information and create a username and password. People have so many accounts to keep track of on various websites. Is your site important enough to them to go through this? You can increase your chances of getting more visitors to do this by integrating your sign up and login process with social media. Super Socializer is perfect for this. Now users can create an account and login with just one click since they’re likely already signed in to their social media profiles. Plus, they won’t have to remember a new username and password. Another benefit of this plugin is that you’ll get access to more information about your website visitors. You can target people accordingly based on their social media likes and habits. You can also enable social comments with Super Socializer. This is a great way to drive conversation and get more comments on your blog posts. Overall, this plugin definitely has more advanced features and functionality that goes far beyond simple social sharing icons, although it does have those options as well. If you want an all in one plugin for social logins, social comments, and social sharing, Super Socializer is worth checking out. 5. Revive Old Post
Here’s another question for you. How are you deciding what to share on your social platforms each day? It’s not always easy to come up with ideas for social media posts. The Revive Old Post WordPress plugin by Revive Social provides a solution to both of these questions. This plugin automatically shares your previously published content on your social media platforms like:
Revive Old Post can share more than just your blog posts. It can also share pages, custom posts, and media from your website. The plugin will automatically fetch images from your content and attach them to the social media post. You’ll have complete control over how each post is shared. Maybe you just want the title of your post or page. Some of you may want more, such as a hashtag or additional text. Revive Old Post can be integrated with your Google Analytics profile. This is ideal for campaign tracking to see how well these links are performing. Overall, it’s a great way to automate your social media posting while simultaneously driving traffic to your website. BONUS: Revive NetworkRevive Social has another plugin, called the Revive Network. This plugin is designed specifically for Facebook and Twitter. It’s made for sharing content from other websites in your industry on social media. This is a great way to expand your professional network, in addition to sharing relevant information on your website. It’s great for those of you who don’t have an active blog or lots of content of your own. 6. Kiwi Social ShareKiwi Social Share is designed for the average WordPress user. If you’re looking for a plugin that’s easy to install, setup, and won’t confuse you with too many complex features, you’ll definitely want to take a closer look at this option. With Kiwi Social Share, you’ll be able to create custom icons for social media sharing on your website. You can customize the position of the icons, as well as enable a floating bar that’s always in view. Kiwi Social Share also gives you the option to change the size and shape of the sharing buttons. It has a “click to tweet” function for specific phrases as well. So if you’re writing a blog and want to highlight one of your favorite quotes, users can share that quote via Twitter with a link back to your blog. Kiwi Social Share doesn’t slow down your website and lets you create social sharing icons that are visually appealing to your visitors. Installing this plugin puts you in a great position to increase engagement on your website and gain more exposure on social media. ConclusionIt’s obvious that your website and social media profiles need to be working together to generate optimal results. So what’s the best social media WordPress plugin? It depends on what you’re looking for. Some of you might just want to add something simple, like social sharing icons to your blog posts or Instagram feeds to your landing pages. While others might be looking for features that are a bit more advanced, like restricting content based on social media actions. Maybe you want an all-in-one plugin that also has features like social signups and logins. Do you want to automate your social media posts with your previously published content? There’s a plugin for that too. As you can see from this guide, there’s a social media WordPress plugin for everyone based on your specific needs. Now, share this post with a friend who needs it. Naturally, there are social buttons right here for you to do just that. via Quick Sprout http://www.quicksprout.com/best-social-media-wordpress-plugin/ Are you thinking about building a membership website? Great idea. Membership websites generate recurring revenue by offering premium content and features to members. It’s also a great way for you to establish your value within your niche. By offering memberships, you’re telling people that your content is so valuable you don’t have to offer it for free. In order for your membership business model to function properly, you need to install a membership plugin that adds this feature to your website to manage memberships, payments, and other user information. If you have a WordPress site, there are tons of membership plugins to choose from. I found 746 in my search. Luckily, you don’t have to do too much in-depth research — I’ve done all of the heavy lifting for you and narrowed down the top seven membership plugins. You can use this list as a reference, instead of to trying to find all of the pros and cons on your own.
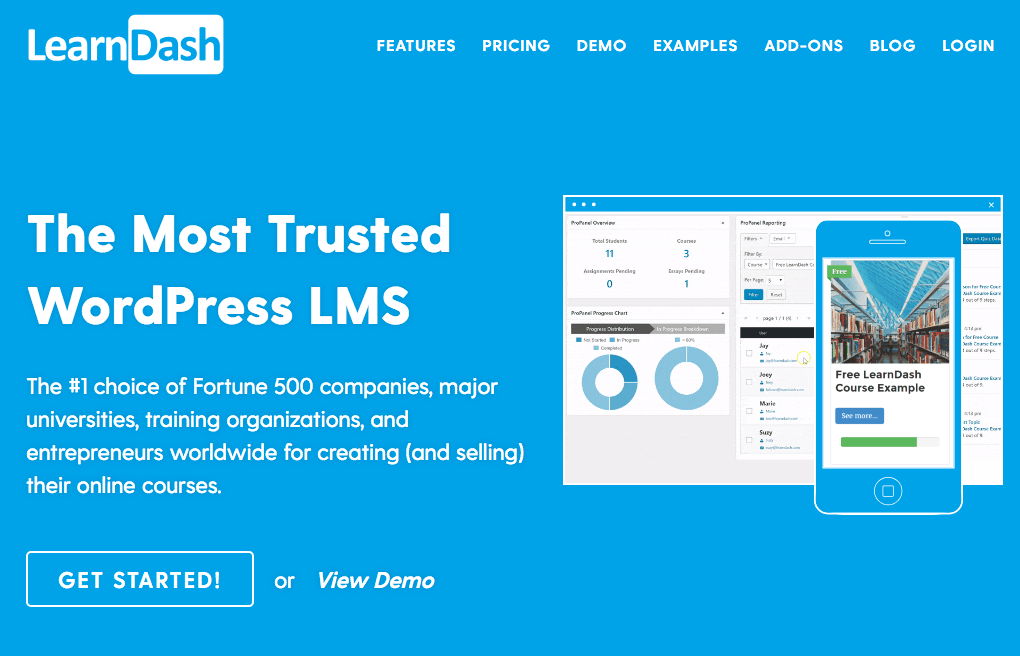
1. LearnDashLearnDash is for websites that create and sell online courses. It gives you the option to control the enrollment for all of your courses. You’ll set the pricing, and determine if the course is available to the public or exclusive to members. There are a few different ways to set this up. In addition to a membership that offers access to all of your content, you can add one-time pricing to give users the opportunity to buy individual courses. This plugin also lets you use automation to your advantage. You can schedule content delivery. That way you can create all of your courses at once, but distribute them at later dates automatically. This is more much efficient than approaching this manually. If a user doesn’t have automatic renewal enabled for their membership, you can set up automatic renewal notifications to encourage them to renew. With LearnDash, you can also create a system of points, badges, and certificates to reward users based on their progress. There are also engagement triggers that users can interact with as they are going through your courses. Support and resources are exceptional too. There are helpful video tutorials and an active community forum to discuss ideas or potential problems with other site owners. If you still need help, you can always contact the LearnDash customer support team. It’s tough to find another plugin that outperforms LearnDash when it comes to managing a membership site for online courses. 2. MemberPress
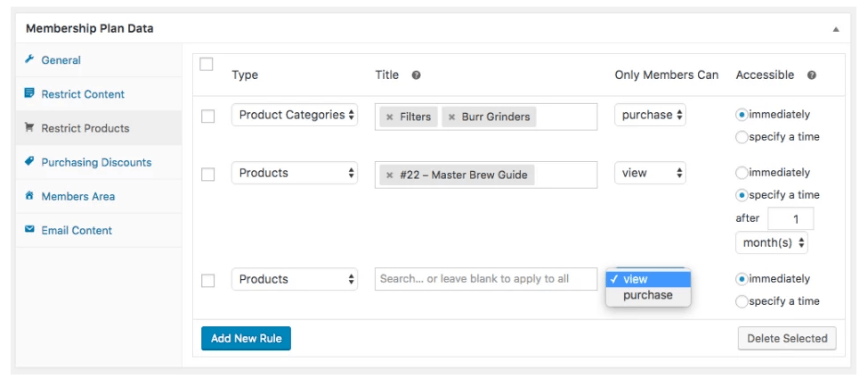
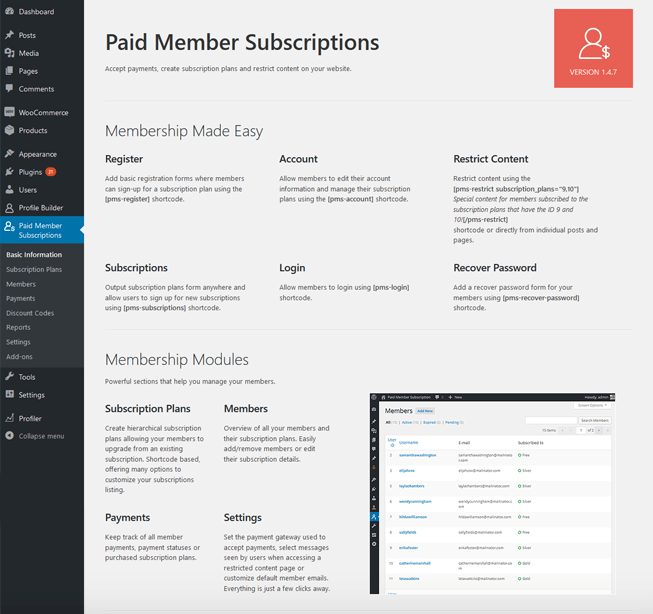
MemberPress allows you to switch your existing site into a fully-functioning membership website with ease. A seamless transformation isn’t necessarily the case with every other plugin out there, but it’s an important feature to consider for those of you who already have a website that’s up and running. With MemberPress, it’s as simple as installing the plugin, adding the details of your payment gateway, setting up your products, and inviting people to join. It’s very easy for you to manage your content with this plugin. You can restrict access to specific posts, pages, or files. You can do this for content that was already published before you installed the plugin. This plugin also comes with pricing page templates, which is another top feature. This will help you generate more profit by focusing on your pricing strategy. In addition to the pricing templates, MemberPress supports payment gateways like Stripe, PayPal, Authorize.net and more. MemberPress integrates with some of the most popular email marketing platforms as well. At the end of the day, your membership website will only be successful if people actually join and pay for content. So you need to treat this like any other product or service. Installing a plugin alone won’t necessarily generate sales for you. With that said, MemberPress makes your job much easier. 3. WooCommerce MembershipsWooCommerce Memberships is another plugin that’s ideal for integrating with your website’s existing content. Like we’ve seen before, this plugin allows you to drip content, so you can automatically schedule when members will have access to premium features. I’d recommend WooCommerce Memberships to those of you who want to add a membership site to your ecommerce platform. The plugin allows you to sell memberships along with product purchases. From the user end, memberships can be purchased as a standalone product, or as a bundle. For example, let’s say you have a fitness brand. If a customer purchases diet supplements, you could give them access to the training programs section of your website for free. So, if you want complete customization and fewer restrictions for your memberships and products, the WooCommerce Memberships plugin might be your best bet. Here is a look at some of the custom functionality offered from the plugin dashboard: WooCommerce Memberships makes it easy for you to import or export your members. So if you want to combine these memberships with existing services or subscriptions you offer, you’ll be able to do so without having to go through everything manually. With that said, there are times when you might want to go the extra mile to please one of your customers. For example, let’s say someone has a problem with one of their orders purchased from your site. This customer also pays for a membership to access exclusive content. To rectify the situation, you could easily change their membership to complementary for a specified time. You won’t get this type of flexibility and customization with some of the other membership plugins on the market. WooCommerce also has an option for selling memberships to groups, teams, or corporations. But that’s a different extension that would have to be purchased and installed separately. 4. aMember ProfessionalI should preface by letting you know that aMember Professional isn’t a native plugin for WordPress. It’s software that’s built with PHP, making it possible for you to integrate it with WordPress. However, since it’s not native and specifically designed for WordPress, there could potentially be some compatibility problems with other plugins you’re using. I like it because it’s another all-in-one option for membership websites. There are unlimited membership levels and items for you to add to your site. They also have more than 200 payment systems that you can use to manage memberships. From the administrative dashboard, aMember Professional lets you run customized reports about your members. You can also manage your email lists, set up autoresponders, and contact users who aren’t set up for auto renewals with reminder messages. I really like the access control features for aMember Professional. In addition to controlling who can access different types of content, this software has features to prevent access sharing between users. It tracks the number of IP addresses being used to access content, so if a limit is reached, that user will get locked out of the system and be reported to the admin. Unlike other membership plugin options, aMember Professional is just a one-time purchase, as opposed to a recurring subscription, making it one of the most cost-effective ways to set up your membership sit. 5. Restrict Content ProRestrict Content Pro also offers a cost-effective pricing option. Their plans range from $99 to $249 annually, but you can spend $499 one-time for lifetime access. It may seem like a lot initially, but this pays for itself in two to five years, depending on the plan you were considering. It’s definitely worth it if you’re planning to have a membership site for an extended period of time. Cost aside, Restricted Content Pro is extremely easy for to use if you’re going to manage basic content and membership levels on your website. You can create and share an unlimited number of discount codes to entice your website visitors to make purchases based on the best value. Restrict Content Pro also has built-in payment integrations so that you can accept credit cards, alternative payment options, or multiple payment methods at the same time. What really separates this plugin from the crowd is the way you can analyze performance by generating custom reports to view the latest month, or specified date ranges to see how well your memberships are doing. This information is extremely helpful when it comes to assessing your pricing, promotions, and things of that nature. 6. MemberMouseWith MemberMouse, you can easily sell memberships along with subscriptions and products on your website. This versatility definitely makes it a standout membership plugin. It’s great for websites that want to add memberships for content restriction, as well as for ecommerce sites that want to add membership features. The reason why I love this plugin is because it’s designed for website owners who aren’t too tech-savvy. It’s easy for anyone to use, regardless of your technical expertise. Simply restrict content on your website with password protection for members. When you create content, you can customize how it’s delivered based on things like membership levels, length of memberships, or the referring affiliate. MemberMouse lets you set up free memberships as well. This is a great opportunity for you to get users to join your site, without having to pay first. Once they join and see your free features, they may be more inclined to upgrade to a paid membership. The plugin is also designed to help you grow your email list. You’ll also be very pleased with the data provided with the MemberMouse analytics and reports. You can track and measure things like:
Some of these made my list of the top metrics every marketing manager needs to track. So the ability to get these reports directly from the plugin will make your life much easier. 7. Paid Member SubscriptionsPaid Member Subscriptions is another versatile plugin that I couldn’t leave off of my list. While it doesn’t necessarily offer anything different from the other plugins we’ve covered so far, it does have a free option. So for those of you who are new to this and don’t want to spend much money setting up your membership site, you won’t have to pay a dime to use Paid Membership Services. But, you won’t have access to premium features, such as content dripping, unless you upgrade to a paid plan. Another reason why Paid Member Subscriptions made my list is because the interface is user-friendly and extremely straightforward. If you get intimidated by new software or technology that’s out of your comfort zone, you shouldn’t have a problem using this plugin. ConclusionBuilding a membership website is an effective way to improve your content strategy, establish brand authority, and generate recurring revenue. In order to create a membership site with WordPress, you’ll need to install a plugin. So what’s the best membership plugin for WordPress? It depends on what you’re looking for. I created this list to give a wide range of options based on specific features. Some plugins are designed for managing memberships with online courses, while others are better for ecommerce websites that need to integrate memberships with product purchases. There are plugins on this list that are all-in-one solutions, and options that are cost-effective as well. Since there is so much variety in this guide, I’m sure you’ll be able to find what you’re looking for to meet the needs of your website. via Quick Sprout http://www.quicksprout.com/best-membership-plugins-for-wordpress/ I’ll get straight to the point. If your company takes reservations or appointments, you need an online booking system — period. Take a moment to analyze your current process. How does a customer schedule their appointment? Without an online booking system, I’m willing to bet that the process looks something like this:
That’s assuming you can clearly understand each other over the phone. We all know sometimes it’s difficult to hear based on things like reception, accents, and background noise. Oh yeah — that’s also assuming nobody else called you while you were on the phone. Then you’re forced to let the incoming call go to voicemail, or place your current caller on hold.
Each time someone calls, it takes you away from the task you’re working on. Sure, there are some alternative solutions. You could pay someone to sit by a phone and answer calls all day. But do you really want to incur that added cost? This still isn’t your most efficient option. Why you need a WordPress booking pluginAdding a booking plugin to your WordPress site will do more than just improve your operational efficiency. This new system will optimize the customer experience. Roughly 70% of consumers prefer booking appointments online. Furthermore, 36% of people said that waiting on hold too long when booking over the phone was their biggest pain point for scheduling appointments and 20% of people said the biggest inconvenience was having to wait to call during office hours to book. By adding a booking plugin to your WordPress site, you’ll eliminate more than half of the biggest pain points for consumers while simultaneously providing them with their most preferred booking option. When evaluating a new service provider, 94% of consumers say they are more likely to choose one that has online booking options compared to a provider that doesn’t. In short, adding online booking options to your website will:
I think I’ve made myself clear. Now that you know the importance of having a WordPress booking plugin, you need to install one to your site. How do you choose? What’s the best WordPress booking plugin? Use this guide as a reference to help you decide which one is the best for your business. 1. BooklyBookly is fully customizable and extremely responsive. Its sleek design on both the front and backend is modern and visually appealing. One of the features that makes Bookly one of the best WordPress booking plugins is the option for different employees to create custom pricing and availability. For example, let’s say you own a gym. Each personal trainer can set their own rates. Your customers would have the option to choose the trainer they want from a dropdown menu when booking a session. From the user end, Bookly takes them through a quick four-step process on your website.
That’s right. Bookly even processes payments or deposits. This is great for those of you who are getting lots of no-show appointments and missing out on those earnings. If you don’t want to force your customers to pay in advance, you can set an option for paying on-site at the appointment. You can also set up automatic text and email notifications with Bookly. Those notifications remind the customer as well as your staff members about upcoming appointments. Bookly also lets your customers translate the booking process into their native language. This solves the problem that I talked about earlier in terms of having trouble communicating with certain customers over the phone. Bookly lets you create promo codes to discount your services. The plugin tracks all of the data, so you can determine which deals are working the best. With Bookly, customers can set up recurring appointments, get added to a waiting list pending cancellations, attach files, and rate your services. This WordPress plugin even has a feature for group booking. Overall, Bookly is one of the most complete WordPress booking plugins you’ll find. 2. EDD BookingsEDD Bookings is definitely another top option to consider. In addition to booking standard services, this plugin is great for those of you who offer rentals. Maybe you have a business by the beach and rent out bikes, skateboards, surfboards, and paddleboards by the hour. All of this can be managed through your website with the EDD Bookings plugin. It’s one of the easiest plugins to integrate into your ecommerce platform. For those of you who are already using Easy Digital Downloads solutions for ecommerce, I highly recommend this plugin. Customers can book appointments or rentals in just seconds on your website with EDD Bookings. All they need to do is:
It’s as simple as that. The EDD Bookings plugin makes it easy for you to manage all of your appointments in one place with different calendar views. They provide you with extensive details for your day, week, and month. You can color code your appointments as well to keep track of different types of services. The plugin integrates with payment gateways, email lists, Zapier, and Slack as well. EDD will also provide you with reports and detailed analytics. EDD Bookings has a responsive design for desktops, smartphones, and tablets. Compared to other similar plugins, it’s very affordable. Pricing for the EDD Bookings plugin starts at $80 per year. 3. BookedThe Booked WordPress plugin makes it easy for customers to book appointments on your website. I like this plugin because it comes with great add-ons for things like integrating payment options with WooCommerce, calendar integrations with Google Calendars and iCal, as well as front-end appointment management. It’s a great option for beginners because it’s essentially ready to go right out of the box. You don’t need to worry about any custom coding. The interface is smooth and easy to navigate. Booked makes it easy for you to add custom time slots to your schedule. This is great for adding in holidays or vacation days. The plugin also comes with some great shortcodes, making it possible to embed your booking calendar nearly anywhere on your site. Booked is another option for managing calendars for multiple members of your staff. So let’s say you own a barbershop or hair salon. Customers can book with their preferred stylist online with ease. This plugin also offers guest booking, so website visitors don’t need to be registered or logged into their profile in order to schedule a service or appointment on your website. 4. Booking CalendarBooking Calendar has been around for ten years and is a top solution for those of you who are in the hospitality industry. In addition to appointments, this plugin is commonly used to book stays at hotels, resorts, or a bed and breakfast. That’s because the system is designed to accommodate days-long bookings, as opposed to just an hour time slot for an appointment. Not every WordPress booking plugin offers this feature. Booking Calendar is extremely responsive on both the frontend and backend. For those of you who aren’t too tech-savvy, you shouldn’t have any problems installing this plugin to your WordPress website. All you need to do is insert the booking shortcode into a page or post on your site. Your bookings are stored in the Booking Calendar dashboard, so you won’t need any third-party services or accounts to manage them. The plugin will automatically prevent double bookings based on this information. Again, this is ideal for those of you who are offering a service such as rooms in a hotel building. Booking Calendar supports multiple languages, so you can accommodate website traffic that’s coming from other countries. The plugin also syncs with third-party platforms such as Booking.com and TripAdvisor, to make sure your availability dates are updated in real-time all over the Internet. 5. Team BookingAs the name implies, the Team Booking plugin is designed to accommodate the booking schedules of multiple members on your staff. We’ve seen some other plugins on our list that have this feature, but none that have it has their primary point of emphasis. Team Booking integrates with Google Calendar, which makes it easy for managing appointments based on everyone’s unique availability. But don’t let that that dissuade you if you’re a solopreneur. While this plugin was designed with teams in mind, you can still use it on your own if you’re providing an individual service. This plugin allows you to set up multiple form fields to collect additional information about your customers. Team Booking also has a map feature, which is another differentiating element. When a customer books an appointment, the map can pop up with the location. All of the directions are displayed in real time from the customer’s address. You can collect payments or deposits with Team Booking as well. The plugin is supported by PayPal and Stripe. Team Booking is a top choice for those of you who don’t want to spend a ton of money on a booking plugin. Pricing for this license starts at $28. 6. AmeliaAmelia is an automated booking specialist. This plugin is great for those of you who offer multiple types of services. For example, let’s say you own a car repair center. Your customers can schedule things like tire rotations, oil changes, brake replacements, and other services that you offer. You can even set it up so they can choose a specific mechanic to service their vehicle, based on availability, of course. This plugin is also great for law consultants. Your clients can schedule meetings based on the type of help they need. You can collect deposits and payments through this booking plugin as well. As you can see, the applications for Amelia reach far and wide. Its versatility makes it one of the best WordPress booking plugins on the market. You can install Amelia to your WordPress site in just a few clicks. You don’t need to be a technology wizard or have experience with coding to get it up and running. I also like how this plugin has an administrative dashboard that lets you track and measure KPIs with graphs, tables, and charts. This provides you with deep insights into your performance. The design of the booking calendar is completely customizable, so you can choose the colors and other design elements that compliment your website color schemes. ConclusionYou need to have online booking options on your website. If you’re not allowing online booking, you’re leaving money on the table. Now that you’re aware of the importance of this feature, it’s time to find a plugin that fits your needs. What’s the best WordPress booking plugin? The answer will vary based on who you ask. I created this with all different types of businesses in mind. Depending on your needs, I’m confident you can find what you’re looking for.
Some plugins specialize in these features, so think these questions through and install a plugin that meets the needs of your business. via Quick Sprout http://www.quicksprout.com/best-wordpress-booking-plugin/ Are you about to build an ecommerce website? Build it on Shopify. I kind of wish the answer had more nuance to it, so I could write a more engaging review. But it really is that simple. Ecommerce site = Shopify. End of story. Out of all the decisions you need to make building your online store, the decision of which ecommerce tool to use is not a hard one.
If you want, you can stop reading this review and go sign up. You won’t miss out on much. In-Depth Shopify Review and MethodologyTo show you that I do know what I’m talking about, I have broken down all the core ecommerce site features and rated Shopify by each. I’ve used a simple 5-point scoring system on each ecommerce feature below: 5 for “amazing,” 1 for “it sucks.” I’m not a complete Shopify fanboy. There are a few areas where Shopify could do better. And one category Shopify completely fails. But these aren’t a big deal. The gaps are either minor or can be completely covered by other tools. If you’re building an enterprise ecommerce site and evaluating new tools, it’s worth having the Magento and Shopify Plus (Shopify’s enterprise version) teams do a bake-off for your business. Otherwise, go sign up for Shopify and build your site there. Big Brands Choose ShopifyBefore jumping into the Shopify review and feature-by-feature ratings, who else uses Shopify? Here are a few Shopify customers you might recognize: You’re in good company — world-class brands and massive ecommerce sites have been built on Shopify. Ease of Use: 5/5Ridiculously easy. Shopify is not only considered the easiest of the ecommerce tools, it’s also considered one of the easiest tools across all business apps. It’s true — lots of other business tools use Shopify as inspiration for how to build their apps. If you’re looking for an ecommerce tool to get all those annoying tasks out of your way, Shopify is your best option. Site Customization: 5/5Shopify managed to do something that’s exceptionally rare in software: build a tool that’s both extremely easy to use and has all the flexibility that you’d ever need. Most tools only achieve one of these. They’re either easy to use and limited, or they’re flexible and complicated. As you grow your business, you’ll have the ability to evolve your store however you like. While you’ll most likely start with one of the pre-built themes, you can build a theme from scratch. At some point, you’ll need a theme that embodies your brand and has a unique feel. When you’re ready, find a ecommerce site design agency that has experience with Shopify. They’ll be able to build the entire thing for you. When you’re ready for the big leagues and need a tool that has complete flexibility, Shopify has an enterprise version called Shopify Plus. So it’ll scale with you no matter how big you get. Pricing: 4/5Shopify charges you in four ways:
All of these prices are in sync with the rest of the industry. They’re exactly what you’d expect. Some ecommerce site builders advertise the fact that they charge 0% transaction fees. This isn’t entirely true. Yes, they don’t charge anything. But you also have to set up your own payment provider and that payment provider will charge you a payment fee. In other words, Shopify is your site builder and your payment provider. All payment providers charge a standard fee, including Shopify. That’s why Shopify charges you a monthly subscription and a payment processing fee. The one fee that’s a little annoying is the fee to use other payment processes. This is the fee that starts at 2.0% on the lowest plan and comes down to 0.5% on the advanced plan. This fee applies to payments accepted through Paypal and Amazon Payments, among others. I totally understand why Shopify charges a processing fee when they’re handling the payments. That’s completely normal for the industry. But the fee on top of other processing fees is a bit of an overreach in my opinion. The vast majority of your payments will come in through Shopify Payments anyway so it’s a minor annoyance. This mainly impacts transactions that will come in through Paypal. You’ll have the Paypal processing fees and Shopify’s fees on each transaction. That said, the extra cost is still worth all the extra value that you get from Shopify. Shipping: 5/5Shopify has removed all the friction from shipping. It’s as easy as it gets. Core integrations with all major shipping companies are built right into your store. You get discounted rates and you have multiple options for how to handle shipping during the checkout (flat rate shipping vs individual quotes). Simply print shipping labels at your home or office for each order. That’s it. Shopify Themes: 5/5Shopify has dozens of themes to choose from. Some of them are paid, ranging from $140–180. But there are a lot of amazing free themes, too. Even the free Shopify themes look like they were built by top-tier website designers. When you build your site on Shopify, you’ll look through the theme store to find one you like. If you choose a paid theme, you get a professional-looking site for a nominal fee that will easily support your business until you’re large enough to have the budget for a customer-built theme that conveys your brand perfectly. With the Shopify theme store and how easy it is to set up a site on Shopify, you can build your entire site on your own without needing a site designer and developer. Cutting those costs goes a long way for a new ecommerce site. App Store: 5/5The Shopify App Store is amazing. You’ll find an app for just about every extra feature you could ever want for your store: email abandonment, Facebook Messenger, recurring billing — it’s all there. This is what really sets Shopify apart from other ecommerce tools. I know several CEOs of Shopify app businesses that are doing extremely well. They’ve built businesses with hundreds of employees. What this means is that with a few clicks in the App Store, you can add an extremely advanced app on top of your Shopify store. It’s like buying an entirely new tool for your business that’s integrated perfectly with Shopify. No other ecommerce tool has an app store with as many apps or as high quality as Shopify. Expert Directory: 5/5Sooner or later, you’re going to want some help with your site. Maybe you want to tweak the layout of your product pages. Or maybe it’s time to do a complete brand revamp and you want your Shopify theme built from scratch. Whatever it is, you’re covered. Shopify has been the top ecommerce tool for long enough that there’s now an extensive network of professionals to help you with your site. Any ecommerce agency will have deep experience with Shopify at this point. Shopify also has an entire directory of experts for you to search. Designers, developers, photographers, marketers, all categorized by city. It’s super easy to find the help that you need. Marketplace Integrations: 5/5There are a few ways to build an online store. Quite a few ecommerce companies choose to focus exclusively on Amazon for example; they don’t have their own website at all. But what if you want both? Shopify has made this much easier than it used to be. Instead of having to build out all your product listings by hand multiple times — on your own website, Amazon, and eBay — Shopify will handle it for you. Build your products in Shopify first, then add integrations for Amazon and eBay: Once you’ve connected Shopify to your Amazon and eBay accounts, Shopify will automatically add your products to those platforms. It saves a ton of time. Product SEO: 5/5Out of the box, Shopify has great SEO for your product pages. Don’t get me wrong, you’ll still have to do a bunch of work to get your product pages to rank for any keyword that’s even somewhat competitive. But Shopify gives you everything that you could possibly expect from an ecommerce tool. You’ll be able to optimize your product pages, photos, and descriptions for keywords just like you’d expect. All the standard “on-page SEO” items are right where you’d expect them to be. In other words, Shopify’s on-page and technical SEO won’t slow you down at all. It’s everything that you need to rank. That doesn’t mean you’ll automatically rank for the keywords you want. You’ll still need to create a ton of great content to increase your site’s authority and do a bunch of link building. In my opinion, that’s outside the scope of an ecommerce tool. Content and Blog SEO: 1/5This is the one category where Shopify completely fails. Yes, Shopify technically has a blog feature. They built it out just enough so they can say that they have it. In reality, there’s no real reason that you’d ever want to use Shopify for your blog. Shopify lacks the management features and SEO that you’ll need. If I’m using a blog to grow my business and traffic, I get the blog on WordPress. End of story. If you’re going to get serious about blogging, you need to use WordPress. It is possible to have Shopify and WordPress on the same domain. So you’ll use Shopify for your online store and WordPress for your blog. I break all of this down in my guide on WordPress ecommerce. Point of Sale (POS): 3/5I don’t know anyone who uses Shopify as their POS system. Nor have I ever seen one in the wild as a customer. I consider that a… bad sign. Nearly every POS I run into is Square, tailed by Clover and Revel. I’ve even seen Shopkeep a few times. But I’ve never seen Shopify, not once. Following my rule of using business tools for the one thing that they’re best at, if I needed a POS, I’d go get the best POS tool. For a small business, the most popular choice is Square. I’d only use the Shopify POS if the majority of my business was an online store, I occasionally did some in-person retail like at a farmer’s market, and I wanted to keep everything as simple as possible by using a single tool. But if I had a brick-and-mortar location, I’d look into one of the dedicated POS tools instead of using the Shopify POS. I give Shopify a rating of 3/5 since I consider their POS to be a neutral benefit. It’s a nice to have but not a huge benefit. The Final Choice: Shopify vs BigCommerce vs MagentoFor small and medium-size ecommerce business, the choice really comes down to options: Shopify or BigCommerce. Shopify gives you the better tool and ecosystem. The tool itself is better, the apps are better, the agencies are better — all of it. What this costs you is an extra fee on payment providers on top of what the payment providers charge. Now if you use Shopify payments, you skip all that entirely. The extra fee also comes down from 2% to 0.5% as you upgrade plans. So as soon as you start to feel the impact of the extra fee, you’ll upgrade and the fee will be lowered. The extra payment fee is kind of annoying for folks who want to use another payment provider and give their customers as many options to pay as possible. But it’s a cost that’s worth enduring to get on the best ecommerce tool. At the end of the day, this is an extremely easy choice for me. For any ecommerce store, I automatically pick Shopify to build my site and don’t think twice about it. We put together an entire guide on how to create your store once you’re ready to build with Shopify. Our recommendation only changes for true enterprise ecommerce businesses. If that’s you, check out Shopify Enterprise and Magento. Contact both companies and have them fight for your business. via Quick Sprout http://www.quicksprout.com/shopify-review/ The Internet is full of directories. In fact, your website might already be listed on some directories right now. Depending on the scenario, directories have multiple applications and use cases. For example, Yelp is a popular option for consumers to find a restaurant or service in a specified area based on their search parameters, while a directory like Angie’s List connects people with contractors for things like electrical work, landscaping, and plumbing. Both of these websites are very different, yet, they are both directories. Essentially, directories are databases. They serve as an easy way for users to find more information about a particular subject or business.
Regardless of your business type or industry, there’s a good chance you can find a way to implement a directory on your website. Law firms use website directories to list their lawyers and employees. Real estate companies have directories for their listings as well as their agents. A retail chain probably has an online directory for its store locations. If you’re using WordPress, adding a directory to your website is simple. You just need to install a plugin. Key features of a WordPress directory pluginSince the word “directory” is so vague and has tons of potential applications, it can be a bit challenging at times to find the best WordPress directory plugin for your website. So before I go through my list of the top options for you to consider, I want to briefly explain what to look for in a directory plugin.
You won’t necessarily need every feature on this list. It really depends on your company, your website’s purpose, and the type of directory you’re trying to create. As we continue through this guide, you’ll see these features and many more offered by the directory plugins I’ve listed. So use this list as a reference to help you find the best WordPress directory plugin for your site. 1. GeoDirectoryGeoDirectory has one of my favorite search interfaces of all the directory plugins on the market. With GeoDirectory, you’re able to create a massive global directory on your website. This is a great option for those of you who are looking for a free WordPress directory plugin as well. They make it easy for website visitors to find exactly what they’re looking for without sacrificing the look and visual appeal of your website. This plugin offers a front-end form that allows other businesses and users to submit listings, so scaling your directory is limitless. When someone searches for a business on your website, the listings are displayed by proximity, so users can see the closest and most relevant options to them first. As the name implies, GeoDirectory is integrated with Google Maps. There is a large and clickable map next to every listing in the directory. Users can find directions to the location directly from that map without having to leave your website. While most of the features are free, you can buy add-ons for things like:
GeoDirectory is also multi-site compatible, so I recommend it to developers who will add it to their clients’ sites or to those of you who plan to build a network of directories. If you’re building your directory website from scratch, you could also consider purchasing the directory themes from GeoDirectory as well. But, this plugin will work with any theme, so you’re not obligated. Merchants with listings on your directory will have access to Google Analytics data. This feature will show them how much your site is helping their company. You can use that to potentially justify your pricing if you plan to charge for listings. Overall, GeoDirectory is a top option for anyone who wants to build a large and scalable business directory. 2. Advanced Classifieds & Directory ProAdvanced Classifieds & Directory Pro made my list is because its potential applications are seemingly endless. You can use it as a platform for classifieds, similar to Craigslist, or go a completely different direction and use this plugin for something like a directory of movie ratings. Maybe you want to add a travel guide directory, wedding directory, restaurant guide, or real estate portal to your website. All of these options are possible with the Advanced Classifieds & Directory Pro plugin for WordPress. Similar to other plugins on our list, Advanced Classifieds & Directory Pro is free to install. But it offers premium add-on features that you can purchase. One of my favorite add-on features is the listings slider. The plugin has a user-friendly interface for businesses to manage their listings on your website. This area also lets those businesses see their payment history and renew their listings directly from the platform. This plugin can integrate with Stripe, PayPal, and WooCommerce for payment processing, and even supports offline payments, meaning you can accept checks from local businesses that don’t want to pay online. This can be a way for you to save some money by avoiding a payment processing add-on. Merchants will automatically be notified via email when their listings expire. They will also receive a confirmation message when payments have been received. Advanced Classifieds & Directory Pro lets you organize listings by category, which is something you should take advantage of. An advanced search widget is also available from Advanced Classifieds and Directory Pro, so users can narrow their options by category, location, keywords, and more. All of these flexible features make this one of the best WordPress directory plugins you’ll come across. 3. Business Directory PluginThe Business Directory Plugin is an all-in-one option for WordPress directories. It offers some of the key features that I look for in a directory plugin:
You can also purchase add-ons to enhance your directory with the Business Directory Plugin. If you’re going to use these add-ons, I’d recommend buying the package. The combo pack is $199.99 for a single site and $399.99 for multiple sites. It may sound pricey initially, but considering the price for each add-on starts at $69.99 and $139.98 (for a single site and multiple sites, respectively), it’s actually a great deal. They have add-ons for premium features like:
Even though you’ll have the option for premium add-ons, you can install and use this plugin right out of the box for free. The plugin also comes with a built-in reCAPTCHA tool to avoid spam listings on your directory. The Business Directory Plugin also has a featured-levels module. This is perfect for those of you who are using this directory to generate recurring sales by implementing subscriptions. Here’s how it works: You can set up your site to offer specific features for paid listings. For example, a business that pays to be listed can have unlimited character counts, images, and maps, whereas a free listing wouldn’t get these features. Business Directory Plugin even lets you specify between payment tiers based on the features you offer. This plugin really gives you all of the tools that you need to compete with the giant names in the directory industry. I’m not saying that all of you should try to be the next Yelp or TripAdvisor, but if that’s your goal, you should definitely consider trying the Business Directory Plugin. I think it’d be super smart to create a directory in a very niche area that’s not well-represented or easily searched for in an existing directory. 4. LDD Directory LiteLDD Directory Lite is extremely easy to install, which means you can get a directory up and running on your site in just minutes. It’s another free WordPress directory plugin with add-on options available for purchase. Compared to some of the other plugins out there, these premium upgrades are fairly inexpensive, ranging around $10 to $20. The LDD Directory Lite shortcode makes it possible for you to add a directory to any page or post on your WordPress site. Once the shortcode is added, the directory gets generated automatically. This solution makes it one of the most lightweight (hence the name) directory plugins available. Once the plugin is installed, you have seemingly endless customization options. You completely control how the directory looks and feels on your site. Some of the top add-ons include social media and Google Maps integrations. By using this plugin, you’ll benefit from a modern design. It’s ideal for WordPress users who aren’t too tech-savvy and don’t want to play around with confusing features, but still want a good looking result. LDD Directory Lite is compatible for front-end submissions. It’s easy for website visitors to view your listings and navigate without any trouble as well. You can set up email notifications related to listings. Businesses that have listings on your site have the power to customize and make edits from the front end as well. I recommend it to anyone who wants a simple directory plugin that’s powerful and won’t weigh down your website. 5. Directories ProLast, but not least, is the Directories Pro WordPress plugin. It’s extremely responsive and uses caching to optimize the performance of the directories from both desktop and mobile devices. The plugin offers an advanced search and filter for your visitors. You can even enable an auto-suggest feature in the search forms. All of the fields are completely customizable. Each listing can have fields like tags, locations, reviews, and categories. One of the best features of Directories Pro is the content display editor. It’s easy for you to use the drag and drop editing options to customize the directory without having to use any code. Some of the other top features include:
With Directories Pro, customers can rate and review the listings on your directory without having to register, login, or create an account. So you’ll likely get more reviews that will improve your directory. It’s easy to build multiple directories with this plugin as well. You also have the option to clone or migrate your directories from one site to another. All of these features make Directories Pro one of the best WordPress directory plugins for developers and average users alike. ConclusionThere are so many different ways to add a directory to your website. Some of you might be trying to create giant business directories that will compete with the big players in this industry. Other websites will create local directories in niche categories. You might even just want a directory for something simple, like your staff. Regardless of your situation, you can add a directory to your WordPress site with ease by installing a plugin. So use this guide to narrow your search. Look for the option that has the specific features you need to help you find the best WordPress directory plugin for your website. via Quick Sprout http://www.quicksprout.com/best-wordpress-directory-plugin/ Popups are a controversial topic, to say the least. Are they effective? Are they annoying? Do they work? Truthfully, the answer depends on who you ask. According to a study from Sumo that analyzed nearly two billion popups, the average conversion rate for a website popup is 3.09%. The top 10% of high-performing popups convert at an average rate of 9.28%. Some websites saw conversion rates that topped 50%.
Let’s put these numbers into perspective. According to a recent study from Impact, the average conversion rate for any website landing page is 2.35%. The top 10% of websites have an average conversion rate of 11.45%. So popups on average outperform the average traditional landing page. And, the average conversion rate of the highest performing popups are still in the ballpark of the highest performing landing pages. On the flip side, HubSpot reported that 73% of consumers dislike online popups. Although this study focused on pop-up advertisements, as opposed to popups for something like email opt-ins. I could spend all day arguing both sides of the spectrum. But I’m not here to convince you to add popups to your website, or talk you out of implementing them either. Popups are like anything else. It’s all about context and application. To give you an analogy, think about social media marketing. Social media marketing works (in theory), but that doesn’t mean every company has success with it. I created this guide for those of you who’ve already decided you’re ready to add popups to your WordPress site. I’ve narrowed down the top seven options so you can find the best WordPress popup plugin for your website. Let’s dive right in. 1. Ninja PopupsNinja Popups is definitely one of the most popular WordPress popup plugins on the market. I’m not saying you should always follow the crowd, popularity is usually a telling sign when it comes to quality. Of the reason why Ninja Popups is one of my favorite plugins is because they offer an extensive list of features, the popups are extremely responsive and work well on mobile devices in addition to desktop browsers and it’s easy for anyone to configure this plugin, even if you don’t have any coding experience. With Ninja Popups, you can customize the design of your popups to match your trending website color schemes. Ninja Popups also lets you customize things like the size of your popups and colors of the buttons. This is important because this plugin also offers A/B testing. You can try different variations of your popups to see which is the most effective and yields the highest conversions. In addition to the A/B tests, Ninja Popups has a detailed analytics page. You can see other KPIs with charts to help you improve your popups. This plugin has page level targeting as well, so you can have different popups for each page on your site depending on your goals. The regular license for a single website starts at $26, making this plugin extremely affordable. It’s ideal for nearly any type of popup campaign you want to run. 2. Layered PopupsThe Layered Popups plugin lets you create popups that are, you guessed it — layered. Basically, these popups can have multiple layers, which can attract the attention of website visitors and let you get creative. I’d recommend this to anyone who wants to implement website popups that are far from boring and separate themselves from the crowd. This plugin has a visual editor, which makes it easy for anyone to create and make changes to the design of these popups. Layered Popups has several options for display modes as well. These are some of the options for triggering a popup:
These options make it easy for you to get more email subscribers without annoying your website visitors. Layered Popups is also compatible with some of the top email marketing platforms on the market. As a matter of fact, the plugin supports 56 of these email systems, but some of the biggest names include:
So it’s safe to assume that whatever software you’re using for email is on this list. When you install Layered Popups to your WordPress site, you’ll have access to more than 150 templates. You can also create an unlimited amount of A/B tests for different elements of your popups. With pricing starting at just $21, this is definitely one of the best WordPress popup plugins available. 3. Popups by OptinMonsterOptinMonster is a popular lead generation software. Some of you might even be using this platform to help you with other marketing strategies. More than 700,000 websites have used OptinMonster for something. In addition to its standard lead generation solutions, OptinMonster also has a WordPress plugin called Popups by OptinMonster. I like this plugin because the drag and drop builder is easy for anyone to use, regardless of their technical skill level. In addition to popups, this plugin allows you to create other campaigns like:
OptinMonster has advanced targeting based on personalized behavior for each unique website visitor. This technology is made to trigger popups at the most optimal time to drive conversions. They specialize in popups with exit intent technology. The software can determine when a website visitor is going to leave your page based on their browsing behavior. For example, if they open a new tab, there’s a good chance they are going to navigate to that tab. So that’s a time when an exit intent popup would be triggered. This is great because you don’t want popups to be intrusive to a user’s browsing experience, but you do want to catch visitors before they leave. OptinMonster claims that this plugin has helped some websites boost conversion rates by up to 785%. While I can’t guarantee you’ll get those same results, I’d definitely say it’s worth a try. All of the campaigns built with the Popups by OptinMonster plugin are mobile friendly and highly responsive. The plugin integrates with your email marketing software as well. You can run A/B tests with this plugin. And you’ll have access to Google Analytics data for all of your campaigns. 4. IcegramIcegram is another popular WordPress plugin with tons of features. It’s a top option if you want to implement more than just popups to your website, without having to install multiple plugins. In addition to popups, the Icegram WordPress plugin offers:
Icegram offers advanced targeting options for elements like:
Icegram will work with your email marketing service as well as your form and lead capture plugins that you’ve already installed. Icegram lets you run A/B tests to see which campaigns are performing the best as well and you’ll get detailed analytics and reports for everything you implement. As you can see, your options certainly won’t be limited here. 5. ConvertPlusThe ConvertPlus WordPress plugin is designed for driving conversions with popups. Here’s what the plugin offers
One of my favorite features of ConvertPlus is the template selection. You can take one of the 100+ templates and make slight tweaks to personalize it for your own website content. ConvertPlus has more than 700 fonts that will make your popups stand out. They offer custom CSS, animations, and background settings as well. You’ll also benefit from real-time analytics for your popups and other campaigns. This information will help you track KPIs like views, clicks, and conversions. This plugin integrates with email marketing software, as well as other CRM solutions such as:
6. BloomThe Bloom WordPress plugin is designed specifically for email opt-ins. There are six different ways to display these opt-in forms on your website.
The last option is something that’s unique, and makes this plugin stand apart from other available options. Here’s how it works: Depending on what your website is offering, you can restrict content to the average user. This is a great way to entice opt-ins or registrations. In order for a website visitor to gain access to premium content, they’ll need to opt-in first. Popups can be triggered based on a number of different actions.
Bloom also works with 16 different email marketing platforms, including:
Bloom has hundreds of templates for your popups. You can also customize things like the borders and edges of your popups. The color options are virtually unlimited, so you won’t have to worry about finding a color scheme to match your website design. 7. Elementor ProWith Elementor Pro, you can build any type of website popup from scratch. Like some of the other plugins we’ve seen, Elementor Pro has other features that will benefit your website. You can create popups for specific reasons like:
Elementor Pro offers advanced targeting options as well. For example, you can trigger a popup after a specified number of page views or a specified number of sessions. You can even control popups by the device a user is browsing from. Popups are triggered based on actions such as scrolling, clicks, page loading, inactivity, and exit intent. You can show certain popups on posts with specific tags, authors, or categories. This plugin also offers WooCommerce integration. I like this plugin because it allows you to hide popups for users who are logged in. That way you won’t be asking for an email address that’s already been added to your subscriber list. Subscriptions start at $49 per year for Elementor Pro, which is a bargain, in my opinion, considering all of the advanced features you’ll get for that price, plus design elements that are second to none. You can create beautiful popups that are visually appealing and attractive to your audience. ConclusionDo popups work? That’s a conversation for another day. For those of you who are ready to add popups to your website, you’ll need to install a WordPress plugin that will make this process much easier for you. So what’s the best WordPress popup plugin? It all depends on what you’re looking for. I’ve narrowed down the top seven options for you to consider. You’ll want to install a plugin that lets you create the type of popups you want, but also integrates smoothly with any other software you are using. Some plugins have more templates and custom design features than others. While other popup plugins offer better analytics, A/B tests, and advanced targeting options. You’ll even find some options with all in one features. via Quick Sprout http://www.quicksprout.com/best-wordpress-popup-plugin/
Business
The Use of Video in Internal Communications
Feb 20, 2019
// function popupCenter(pageURL, w,h) {var left = (screen.width/2)-(w/2);var top = (screen.height/2)-(h/2);var targetWin = window.open (pageURL, '_blank','toolbar=no, location=no, directories=no, status=no, menubar=no, scrollbars=no, resizable=no, copyhistory=no, width='+w+', height='+h+', top='+top+', left='+left);}function pinIt(){var e = document.createElement("script");e.setAttribute('type','text/javascript');e.setAttribute('charset','UTF-8');e.setAttribute('src','https://assets.pinterest.com/js/pinmarklet.js?r='+Math.random()*99999999); document.body.appendChild(e);} // When you think of videos, external communication immediately comes to mind. Most brands use videos for branding and to spread their message to the world. However, videos became quite a global communication method. This means they are also now used for internal communications and training. In this article, we explore some of the fundamental benefits that a user can have when it comes to video in internal communications. We look at how you can make a video yourself, and how it can improve productivity without you actually putting in too much effort, aside from actually quickly making the video itself. The Main Reason To Use Videos For Internal CommunicationsThere is a multitude of different reasons why you can use videos for internal communications. These stem from simple messages to updates about the business that everyone needs to know. It is also easier for people to follow video instructions (as you might have seen many people do when they are looking to do something and they use YouTube). Here are a couple of the main reasons why you should use video in internal communications: Easy to DistributeCompared to the standard email that might be a drag when it comes to typing, videos are much easier to distribute. Instead of spending hours, typing your email with limited character and making grammar mistakes that could give people the wrong idea, videos can allow you to directly communicate your message. No MiscommunicationAs it was mentioned, miscommunication can definitely hurt your organization, and it is really frustrating to constantly explain what you meant with your emails. Videos will give the recipient direct access to the explanation, creating a sense of personal communication. This can be much more influential than a simple email. Time ManagementWhilst typing one email is simple, it is not always the best way to go when you have multiple messages that need to be sent out. Most of the times people won’t be able to emphasize every point in the emails and this could lead to things being left out. When creating videos, you can create multiple detailed short snippets that will highlight every point that needs to be made. The Visual AspectAccording to studies, 65% of the world population are classified as visual learners, which means that they respond much better to visual cues. Explaining something over email does not stimulate the visual aspect of an individual. You might have also heard the expression that people actually learn much better when they can see what is expected of them. Save CostsLastly, the use of video in internal communications is one of the best ways that can actually help you save some costs in the company. Instead of hiring an expensive teacher or someone else that will convey messages, you can simply make use of new technology to make all of this possible. With video content, your employees will be up-to-date on everything new much quicker. It is just a simple matter of watching a video. How Videos Can Help You With New EmployeesOccasionally, we all add a new worker to the job force, and sometimes this means people with limited experience or no experience at all. It can be frustrating to teach a new employee everything that is expected from them when you don’t have a hands-on approach or if you might be out of town for a while. Let’s see how videos can help make it easier when it comes to communications: OnboardingOnce you bring someone on board, they might be left out a little, and if there is no one to actually guide them through the company processes, you might have a few mistakes on your hands. Videos can help you bring someone onboard and guide them every step of the way. If you are sending videos to the majority of the organization, they can simply fall in and also receive direct videos from you. Training On The GoWe all have mobile devices or tablets in the modern era, and with Wi-Fi access being rampant, there is no real excuse for anyone not to have an internet connection. If you create detailed training videos, you can send them out in bulk and even share them with a new worker in the organization structure. As it was mentioned, instead of typing email instructions, you can now stimulate the visual aspect of the individuals to help them gain a better understanding of the business and grasp the concept faster. If someone does forget the instructions, the videos are saved, and it is easy to refer back to them. Continuous Learning and DevelopmentNo matter which industry you are working in, times will change, and you need to move with them or be left behind. If you are in the tech industry, it can change rapidly and every day, leaving you a few steps behind before you know it. Much like the training, you can constantly have your Learning & Development department create videos that will help them develop. Explainer videos are generally the best for these types of tasks, and your employees can now easily find a way to access the videos, as well as continuously see what is the new plan of action. Since you can send them daily new videos of updates, they will constantly be flowing with the market and improving the quality of their production or work. Types of Videos to use in Internal CommunicationsHaving seen how beneficial videos can be for your organization, you might also be wondering which kind of videos you can make online. We have a complete list of excellent videos that you can easily make with Moovly, drag-and-drop online video editor and video maker, that could potentially change the way you run your organization, as well as improve the overall productivity. Plus, it’s convenient, easy, and cost-efficient. Animated VideosAnimated video content is one of the best ways to get your message across, especially when you have a lot of complex information that should be presented in a more engaging way. It is much easier to give someone a visual representation when you have a bucket load of information, especially when trying to convey some sort of a concept to your employee. Platforms like iMovie or Moovly will add great flair to your animated videos. Explainer VideosExplainer videos seem to be tougher to design, but not anymore. Now, it can be done in a couple of minutes through online video makers like Moovly. No longer do you need to deal with any potential miscommunications. You can also update the video if you feel the need to change any of the steps. Video PresentationsYou can use video presentations to help your team to be updated on any of the aspects of the business. You can set up presentations to help them understand a little more of what is going on. Presentations can also be used as an intricate briefing or tour of the organization. Whiteboard Animated VideosMuch like the presentation and the animation videos, the whiteboard animation is an excellent educational tool that is used for training. Instead of physically being present and setting up your very own whiteboard presentation, you do this with a video and have your message and training sent to everyone. Workshops and training seminars are extremely expensive, and you need to charge your clientele or employees a fee to make it viable. However, with a presentation, you can simply share it with your organization. Since they all have mobile devices, it can be viewed remotely without any issues. Final Take on Video for Internal CommunicationsWe hope that you have now seen the importance of video communication and how much of a difference it can make in your organization. It can definitely boost productivity, as well as boost confidence with employees having clear and concise instructions, especially when they need to learn something new. Moovly is one of the best ways to get all this done at an affordable price. It is easy and simple to get started with, making it possible for beginners to start building professional-looking videos for internal communications. Register now to see how much easier you can communicate internally. This article has been created in collaboration with TechiesPad.com The post The Use of Video in Internal Communications – Complete Guide appeared first on Moovly - Easily make videos online. from Moovly – Easily make videos online https://www.moovly.com/blog/the-use-of-video-in-internal-communications-complete-guide via IFTTT from https://seanbrian0.blogspot.com/2019/02/the-use-of-video-in-internal.html I remember the first site I ever worked on — a blog I built in college. After getting the site live, I heard I needed Google Analytics so I set it up. A few days went by. Nothing really happened. Then… all of sudden… I received my first visitor! Holy cow, someone actually looked at something I built! A complete stranger! Turns out, it was a false alarm. Google Analytics recorded one of the visits I made to my own site. I felt a little silly after I realized that. But a few days later, I did start receiving real traffic. I’ll never forget the feeling that came from having built something other people cared about. I quickly started a daily ritual of checking Google Analytics every morning during breakfast. Watching traffic come to your site is downright addicting.
Google Analytics tells you how many people are coming to your site, where they’re coming from, and what they look at while they’re on your site. All for free. That’s right, it’s completely free. Google built a ridiculously high-quality piece of software and makes it available to everyone. There aren’t any catches or downsides either. Well, maybe there is one downside. Google Analytics can get complicated. It has a ton of depth, countless reports, and a bunch of advanced features for expert marketers. But we can skip all that. Even if you never use the advanced stuff in Google Analytics, there’s a ton of value in a few basic reports. It’s also really easy to set up. Once you create your account and install Google Analytics on your site, you’ll get the majority of its value right out of the box without having to do any fancy customization. There are three basic steps: getting your tracking code, installing that code on your site, and confirming that it’s all working. Let’s go through each. Step 1: Get Your Google Analytics Tracking CodeAgain, Google Analytics is completely free and anyone can set up an account. I’m going to walk you through the process of creating your account, setting up a few basic things in Google Analytics, and show you where to find your Google Analytics tracking code (the Global Site Tag). First, go to this URL. Google will ask you to sign into a Google Account. If you have a Gmail or G Suite account, that’ll get you in. If not, you can create a Google Account easily. Once you’ve started the Google Analytics sign up process, Google will ask for some basic info about your site. Right after you finish creating your account, you’ll be taken to your Google Analytics tracking code: The Global Site Tag is what you’re looking for. That’s the code that will run all the tracking stuff on your site as soon as it’s installed. Also take note of the Tracking ID. Some website builders or WordPress plugins will send data to Google Analytics for you once they have your tracking ID. If you’re asked for the Tracking ID, you now know where to find it. There’s nothing else you need to configure in your account at this point, you’re ready to move on to the next step. Step 2: Install Your Google Analytics Tracking Code on Your SiteNow that you have your Google Analytics tracking code, it’s time to get it on your site. At a high level, the install is simple. Your Google Analytics Global Site Tag needs to fire on every page of your website when the page loads. As the page loads, it records data from that visitor and then sends it to your Google Analytics account and appears in your reports. There are a couple of ways to get installed on all your site pages. The way you’ll use depends on how your site is built. WordPress SitesFor WordPress, there are a couple of ways to install Google Analytics. The absolute easiest way is to install a Google Analytics plugin on your WordPress site. I’ve listed all of my favorite Google Analytics plugins here. After you install the plugin, go to the plugin settings and look for the place to add your Tracking ID. Another option is to check your WordPress theme settings. A lot of WordPress themes have the option to add header scripts. This is a place for you to copy and paste any code snippet into the header of your site. Those code snippet will load on every page. It’s in easy way to install marketing tools like Google Analytics on your site. If your WordPress theme has this option, copy and paste your Google Analytics Global Site Tag into that box. Then you’re done. This is the way that I usually prefer to install Google Analytics. It’s super easy and it allows me to keep the total number of WordPress plugins down. If you have trouble finding this setting or your theme doesn’t have it, the plugin option is still a great way to go. Ecommerce SitesIf you are using an ecommerce tool to run your site, dig around in your site settings. Most of the ecommerce site tools have integrations with Google Analytics. Usually, they just need to know your Tracking ID and you’ll start seeing data in your reports. Shopify does ask that you copy and paste your tracking code into its settings. This article also breaks down a few more steps to verify that your Shopify theme is using Google Analytics. Shopify is our recommended ecommerce platform and you should switch to Shopify if you’re not on it already. All Other SitesMost site builders like Squarespace and Wix have Google Analytics integrations. Search your site settings for a way to add your Tracking ID or copy your Global Site Tag into your site. If you’ve built your site by hand, you could install Google Analytics yourself. Your goal is to copy and paste your Global Site Tag into the <head> section on every page of your site. If you’re not sure how to do this, reach out to a developer to help you install it. What about that Google Tag Manager thing? Should I use it?Short answer: don’t worry about it. Install Google Analytics without it. Tag managers became popular to help teams manage their websites. For a growing business, managing all the scripts on different website becomes a real headache. There are dozens of marketing and engineering scripts along with countless sites and subdomains to manage. It’s pretty easy for scripts to get out of hand. Tag managers came around to manage… well… tags (scripts). Instead of installing scripts directly on your site, you install a single tag manager. Then you put all your scripts in your tag manager. Your tag manager loads the scripts every time someone comes to your site. There are several major advantages to this:
Google released its own Google Tag Manager a while back and it quickly became the industry standard. If you’re part of a larger company, you should install all your marketing tool scripts with Google Tag Manager, including Google Analytics. It’ll prevent a bunch of fires later. However, most site owners aren’t working at a large company. They’re building their own site or running a small business. If that’s you, I recommend you skip Google Tag Manager for several reasons:
So skip it and install Google Analytics directly on your site. Step 3: Confirm Google Analytics Is Set Up CorrectlyThe majority of data in Google Analytics only appears in your reports 24 hours after it happens. This means that if you’re looking at data for today, it’s not accurate. It takes time for Google to process all the data coming in and get it ready for your reports. So if you install Google Analytics, visit a bunch of pages on your site, then check your Google Analytics reports right away, you might not see anything in your reports. Give it 24 hours for the data to come in. Google Analytics does have some Real-Time reports that show you data as it’s coming in. These reports don’t have nearly as much depth as the normal reports but you don’t have to wait 24 hours to see what’s happening. The Real-Time reports are perfect for confirming that you’ve set up Google Analytics properly. They’re under “Real-Time” in the left sidebar. The Overview report looks like this: A great way to make sure your Google Analytics tracking code has been installed correctly is to open up the Real-Time Overview report in one browser tab and then click through a bunch of pages on your site in another tab. If the install was done correctly, you should be able to see the pages you’re visiting pop up in the report. Once all the data is coming in, you’re good to go. You’ve finished setting up Google Analytics and can start checking it during breakfast every morning like I do. via Quick Sprout http://www.quicksprout.com/setup-google-analytics/ How much do you know about your website? It may sound like a simple question, but you’d be surprised how many people aren’t able to answer it. Sure, you probably know everything about the layout, design, content, and navigation on your site. But I’m referring to your website’s performance. Here’s the thing: Unless you’re bombarded with sales, signups, or comments on a daily basis, it’s difficult to know what’s happening on your website. For those of you who have a new website, you’re probably wondering if your site is even working.
Now, let’s get back to the initial question about how much you know, though this time I’ll be more specific.
As you can see, these questions are a bit more in-depth. The knowledge required to answer these goes far beyond being able to regurgitate the titles of your last few blog posts. But this isn’t something you can track or measure by hand. You’ll need to take advantage of online tools and resources. That’s why you need to set up a Google Analytics account. If you’re using WordPress, you can integrate Google Analytics with your site to view all of these insights without having to leave your WordPress administrative dashboard. The solution? Plugins. It doesn’t matter if you’re website is new or old. It doesn’t matter if you have an ecommerce site or blog. Every website can benefit from Google Analytics plugins. So check out my list to determine which plugin is best for your situation. I took the time to research and identify the best Google Analytics plugins for WordPress. 1. Google Analytics Dashboard for WPFormally known as GADWP, the Google Analytics Dashboard for WP by ExactMetrics is definitely one of the most popular options. This plugin has more than one million active installations. With the Google Analytics Dashboard for WP, you’ll be able to use the latest Google Analytics tracking code to monitor your WordPress site. This is great for those of you who don’t want to manually insert the tracking code. Once installed, you’ll be able to view all of your Google Analytics statistics from the WordPress dashboard. This makes things much easier for you. You’ll be able to track key stats in real-time, such as:
The plugin also helps you track specific events on your site. Some of these include emails, downloads, page scrolling depth, and affiliate links. You can even create notated HTML elements that allow you to track custom events and actions. One of the key features of this plugin is the front-end viewing option. As an administrator, you can set up your reports on the front-end of any page on your site. You can also allow these front-end viewing permissions for other people who work on the website like editors, authors, and contributors. Some of the most popular reports you can view with the Google Analytics Dashboard for WP include:
Why is this information so important? The data allows you to learn more about the browsing behavior of people on your website. You can use these insights to create a customer persona that improves conversion rates. Just like Google Analytics, the Google Analytics Dashboard for WP plugin is also free. So it’s a great option for those of you are looking for a free Google Analytics plugin for WordPress. Overall, it’s a top option for any website. 2. MonsterInsightsMore than two million WordPress websites are using the MonsterInsights plugin. I love this plugin because it’s so easy to install and use. You can get the plugin configured in just minutes. This is much simpler than having to manually add your Google Analytics code, set up your event tracking, configure your ecommerce tracking (if applicable), and deal with the learning curve of Google Analytics. MonsterInsights simplifies everything for you, directly from your WordPress dashboard. You can enable specific Google Analytics features with just one click. There is no coding required. The plugin provides you with extensive reports about your website. I’ll go through each one briefly and list the benefits. Audience Report
You could learn that the majority of your traffic is coming from men in the United States between the ages of 25 and 34. These users are browsing from mobile devices. Behavior Report
If you identify specific outbound links on your website that are very popular, you can use that as a potential partnership opportunity. You’ll also be able to focus on referral channels that are driving the most traffic. Content Report The content report shows you the top performing landing pages. You’ll see the visits, average duration and bounce rate for each page. Based on these results, you can optimize those pages to drive conversions. Ecommerce Report
Obviously, this report is specifically for ecommerce websites. It’s useful information that will help you increase conversions and revenue. You can’t go wrong by installing the MonsterInsights plugin. The only catch is that it’s not free. Pricing starts at $99.50 per year. But if you have an ecommerce site, you’ll want to go with the pro version that’s $199.50 annually. MonsterInsights even has a plan for agencies and developers, which costs $499.50. That’s not bad considering you can use it on 25 sites. 3. AnalytifyLike the other plugins we’ve seen, Analytify also eliminates the need for you to manually add your Google Analytics tracking code to your site. All you need to do is install the plugin and authenticate it with one click to automatically add the code. This is a relief for those of you who are hesitant to add code to your WordPress site. Without any coding experience, even a simple copy and paste can be a bit intimidating. Analytify has all of the standard Google Analytics reports and statistics. You can view all of them from your WordPress dashboard. What makes this plugin stand apart from other options are the extras. They offer premium add-ons for things like WooCommerce and Easy Digital Downloads integrations. Depending on the type of website you have, you may want to show website visitors your statistics as well. For example, let’s say you have a business directory site. The companies that are listed on your site would want to know certain metrics. So you can enable front-end viewing reports. The Analytify WordPress plugin is great for ecommerce businesses. They have enhanced ecommerce tracking. You’ll know how many visitors added items to their shopping cart and also gain insights for when people are leaving the cart. This information will help you reduce shopping cart abandonment by optimizing your checkout process. You’ll also see things like:
Another reason why I recommend this plugin is because it provides you with automated email reports. You can gain deeper insights for specific campaigns, posts, and pages. The shortcodes offered by Analytify allow you to integrate your data into custom templates. Furthermore, you can manage your UTM campaigns with Analytify as well. For those of you who aren’t familiar with this or want to learn more, refer to my guide on how to track your leads with UTM parameters. It’s nice knowing that you can monitor those campaigns directly from this WordPress plugin. Pricing for Analytify starts at $39 for one site. Add-ons are purchased separately. Those all fall within the $19 to $49 range. Analytify also offers an all-in-one bundle for $129 per year that includes your Analytify install and every add-on. This is the most cost-effective deal if you’re planning to purchase add-ons. 4. WP Google Analytics EventsGoogle Analytics already offers insights for event tracking that allow you to monitor specific user interactions with content on your website. Think: clicks, downloads, flash element or AJAX embedded element interactions, video plays, and gadgets. Events are made to help you monitor custom metrics that aren’t based on something simple, like page views. Just because someone navigated to your homepage, it doesn’t tell you if they scrolled to view your pricing table. Neat, right? The only problem is these events can be tough to manually set up and configure with Google Analytics. Without a plugin, you’ll have to some extra work based on the type of event that you want to track: Then you’ll have to write commands. When it’s done, it will look something like this: Here’s another example: Again, it’s complicated. Even the Google Analytics developer page with these instructions says, “tracking outbound links and forms can be tricky.” The WP Google Analytics Events plugin simplifies this process. You can do all of this without having to worry about any coding. So if you want more detailed information with how users are interacting with specific pages on your website, you’ll want to install this plugin. It’s much easier and less complex than the standard coding process for event tracking. You can download and install the WP Google Analytics Events plugin to your WordPress site for free. 5. Enhanced Ecommerce Google Analytics Plugin for WooCommerceIn case the name didn’t give it away, the Enhanced Ecommerce Google Analytics Plugin for WooCommerce is designed specifically for ecommerce sites. Google Analytics recently launched a new feature for enhanced ecommerce statistics. That’s what this plugin focuses on. I like this plugin because it’s so fast and easy to install. Once you install it, you’ll be able to track the behavior of your website visitors across your entire ecommerce site. You’ll learn about everything they do from the home page to the product views, all the way to the thank you pages. These are some of the detailed reports you’ll get:
The plugin tracks product impresses, clicks, and add-to-cart rates on every page. If you don’t want to bounce back and forth between your WordPress dashboard and Google Analytics dashboard, this plugin will let you view everything from one place. ConclusionEvery website can benefit from Google Analytics. (You’ve already installed, right? If not, do it now. Right now. Go. Install it now.) But you can simplify your insights by getting all of your reports and information directly from your WordPress dashboard. All you need to do is install a plugin. So what’s the best Google Analytics plugin for WordPress? For those of you who want a free all in one plugin, you should consider Google Analytics Dashboard for WP. If you’re a developer, have an agency, or want added reports for an annual premium, you should look into MonsterInsights. Ecommerce websites would benefit from plugins like Analytify or the Enhanced Ecommerce Google Analytics Plugin for WooCommerce. Maybe you don’t want all of these features, and you’d rather focus on something specific, like event tracking. If that’s the case, WP Google Analytics Events will be your best bet. No matter what type of website you have, I know there’s a Google Analytics plugin for you on this list. via Quick Sprout http://www.quicksprout.com/best-google-analytics-plugins-for-wordpress/ |
Sean BrianWhile radishes deter certain insects naturally, they require similar growing conditions as carrots. Although the crops both have roots, radishes grow and germinate quicker, allowing carrots to continue growing in the soil space available when the radishes are harvested, Archives
April 2023
Categories |